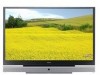

Owners Instructions
Page 3
... LNA (Low Noise Amplifier) Feature 23 ■ Viewing the Channel Scan Picture 23 ■ Displaying Information 24 ■ Freezing the Current Picture 24 ■ Changing the Picture Standard 25 ■ Adjusting the Picture Settings 26 ■ Selecting the Picture Size 27 ■ Using the Digital NR (Noise Reduction) Feature 28 ■ DNIeTM (Digital Natural Image engine) 28 ■ Setting the My Colour Control - (Easy Control 29 ■ Setting the My Colour Control - (Detail Control 30 Symbols...
... LNA (Low Noise Amplifier) Feature 23 ■ Viewing the Channel Scan Picture 23 ■ Displaying Information 24 ■ Freezing the Current Picture 24 ■ Changing the Picture Standard 25 ■ Adjusting the Picture Settings 26 ■ Selecting the Picture Size 27 ■ Using the Digital NR (Noise Reduction) Feature 28 ■ DNIeTM (Digital Natural Image engine) 28 ■ Setting the My Colour Control - (Easy Control 29 ■ Setting the My Colour Control - (Detail Control 30 Symbols...
Owners Instructions
Page 4
... the Digital Input 52 ■ Connecting to the Component Input 53 ■ Connecting to the PC Input 53 ■ Setting up Your PC Software (Windows only 54 ■ PC/HDMI(DVI) Input Mode 55 ■ Redirecting an Input to the External Output 56 ◆ RECOMMENDATIONS FOR USE ■ Setting Up Your Remote Control 57 ■ Programming the Remote Control for Other Components 58 ■ Replacing the Lamp 60 ■ Troubleshooting: Before Contacting Service Personnel 61 ■ Technical Specifications...
... the Digital Input 52 ■ Connecting to the Component Input 53 ■ Connecting to the PC Input 53 ■ Setting up Your PC Software (Windows only 54 ■ PC/HDMI(DVI) Input Mode 55 ■ Redirecting an Input to the External Output 56 ◆ RECOMMENDATIONS FOR USE ■ Setting Up Your Remote Control 57 ■ Programming the Remote Control for Other Components 58 ■ Replacing the Lamp 60 ■ Troubleshooting: Before Contacting Service Personnel 61 ■ Technical Specifications...
Owners Instructions
Page 5
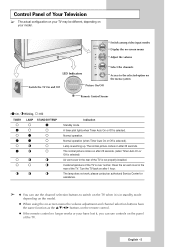
.... Switch among video input modes Display the on-screen menu Adjust the volume LED Indicators Switch the TV On and Off Picture On/Off Select the channels Access to switch on the TV when it , you can use controls on the panel of the TV. The lamp does not work, please contact an authorized Service Center for assistance. ➢ ◆ You can use the channel selection buttons to the selected option on the menu system Remote Control Sensor ( :On, :Blinking, :Off) TIMER LAMP STAND...
.... Switch among video input modes Display the on-screen menu Adjust the volume LED Indicators Switch the TV On and Off Picture On/Off Select the channels Access to switch on the TV when it , you can use controls on the panel of the TV. The lamp does not work, please contact an authorized Service Center for assistance. ➢ ◆ You can use the channel selection buttons to the selected option on the menu system Remote Control Sensor ( :On, :Blinking, :Off) TIMER LAMP STAND...

Owners Instructions
Page 7
... DVI output. ∏ HDMI/DVI IN Connect to the digital device with HDMI or DVI output. English - 7 Rear of the TV Œ ANT IN Coaxial connector for aerial or cable network. ´ EXT 1, EXT 2, EXT 3 Inputs or outputs for repairs and software upgrades. " SERVICE It is for external devices, such as VCR, DVD, video game device or video disc players. ˇ AUDIO OUT Connect to the external audio amplifier. ¨ COMPONENT IN Connect to the audio and video outputs of Your Television...
... DVI output. ∏ HDMI/DVI IN Connect to the digital device with HDMI or DVI output. English - 7 Rear of the TV Œ ANT IN Coaxial connector for aerial or cable network. ´ EXT 1, EXT 2, EXT 3 Inputs or outputs for repairs and software upgrades. " SERVICE It is for external devices, such as VCR, DVD, video game device or video disc players. ˇ AUDIO OUT Connect to the external audio amplifier. ¨ COMPONENT IN Connect to the audio and video outputs of Your Television...
Owners Instructions
Page 8
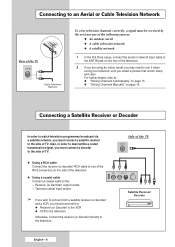
... using an indoor aerial, you may need to turn it when tuning your television until you obtain a picture that is both a satellite receiver (or decoder) and a VCR, you wish to connect both sharp and clear. Receiver (or Decoder) output socket. - English - 8 Side of the TV Satellite Receiver/ Decoder Connecting to an Aerial or Cable Television Network Rear of the TV or Cable Television Network To view television channels correctly, a signal must connect a satellite receiver...
... using an indoor aerial, you may need to turn it when tuning your television until you obtain a picture that is both a satellite receiver (or decoder) and a VCR, you wish to connect both sharp and clear. Receiver (or Decoder) output socket. - English - 8 Side of the TV Satellite Receiver/ Decoder Connecting to an Aerial or Cable Television Network Rear of the TV or Cable Television Network To view television channels correctly, a signal must connect a satellite receiver...

Owners Instructions
Page 9
... LCD MAKE THE REMOTE CONTROL WORKS FOR TV, VCR, CABLE-BOX (CATV), DVD PLAYER, OR SET-TOP BOX (STB) SWITCH REPEATEDLY BETWEEN THE LAST TWO CHANNELS DISPLAYED NEXT CHANNEL/ TELETEXT NEXT PAGE EXTERNAL INPUT SELECTION/ TELETEXT HOLD PREVIOUS CHANNEL/ TELETEXT PREVIOUS PAGE DISPLAY INFORMATION/ TELETEXT REVEAL EXIT FROM ANY DISPLAY CONFIRM YOUR CHOICE (STORE OR ENTER) SOUND MODE SELECTION SRS TruSurround XT MODE SELECTION FASTEXT TOPIC SELECTION CURRENT TIME DISPLAY/ TELETEXT SUBPAGE PIP FUNCTIONS; - SELECTING THE CHANNEL...
... LCD MAKE THE REMOTE CONTROL WORKS FOR TV, VCR, CABLE-BOX (CATV), DVD PLAYER, OR SET-TOP BOX (STB) SWITCH REPEATEDLY BETWEEN THE LAST TWO CHANNELS DISPLAYED NEXT CHANNEL/ TELETEXT NEXT PAGE EXTERNAL INPUT SELECTION/ TELETEXT HOLD PREVIOUS CHANNEL/ TELETEXT PREVIOUS PAGE DISPLAY INFORMATION/ TELETEXT REVEAL EXIT FROM ANY DISPLAY CONFIRM YOUR CHOICE (STORE OR ENTER) SOUND MODE SELECTION SRS TruSurround XT MODE SELECTION FASTEXT TOPIC SELECTION CURRENT TIME DISPLAY/ TELETEXT SUBPAGE PIP FUNCTIONS; - SELECTING THE CHANNEL...

Owners Instructions
Page 11
... television lights. 2 To turn the screen off , press the power switch toward "ON" (I). 3 Press the POWER ( ) button on the remote control (or the " " button on page 16. 4 To switch your television in order to reduce the power consumption. The Standby mode can be useful when you have not yet stored any channels, No clear picture TV appears. Placing Your Television in Standby Mode Your television can be placed in Standby mode, in Standby mode for long periods of time...
... television lights. 2 To turn the screen off , press the power switch toward "ON" (I). 3 Press the POWER ( ) button on the remote control (or the " " button on page 16. 4 To switch your television in order to reduce the power consumption. The Standby mode can be useful when you have not yet stored any channels, No clear picture TV appears. Placing Your Television in Standby Mode Your television can be placed in Standby mode, in Standby mode for long periods of time...

Owners Instructions
Page 13
... & Play Language Move Enter Skip Plug & Play Check antenna input. Enter Skip Enjoy your choice. OK English - 13 Plug & Play Feature When the television is in Standby mode, press the POWER ( ) button on the remote control. 2 To start the search Result: The search will be activated. Result: The Auto Store menu is displayed. 6 Press the ENTER button to confirm your choice. 8 When it has...
... & Play Language Move Enter Skip Plug & Play Check antenna input. Enter Skip Enjoy your choice. OK English - 13 Plug & Play Feature When the television is in Standby mode, press the POWER ( ) button on the remote control. 2 To start the search Result: The search will be activated. Result: The Auto Store menu is displayed. 6 Press the ENTER button to confirm your choice. 8 When it has...
Owners Instructions
Page 26
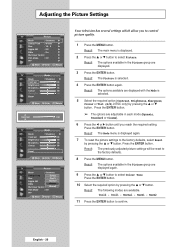
... the ENTER button. Result: The previously adjusted picture settings will be reset to select Picture. Normal - or † button to the factory defaults. 8 Press the MENU button. English - 26 Adjusting the Picture Settings TV Picture Mode : Standard √ Colour Tone : Warm1 √ Size : 16 : 9 √ Digital NR : Off √ DNIe : On √ My Colour Control √ Film Mode : Off √ PIP √ Move Enter Return TV Mode Contrast Brightness Sharpness Colour Tint (G/R) Reset Mode : Standard √...
... the ENTER button. Result: The previously adjusted picture settings will be reset to select Picture. Normal - or † button to the factory defaults. 8 Press the MENU button. English - 26 Adjusting the Picture Settings TV Picture Mode : Standard √ Colour Tone : Warm1 √ Size : 16 : 9 √ Digital NR : Off √ DNIe : On √ My Colour Control √ Film Mode : Off √ PIP √ Move Enter Return TV Mode Contrast Brightness Sharpness Colour Tint (G/R) Reset Mode : Standard √...

Owners Instructions
Page 27
...; 4:3 : Sets the picture to your viewing requirements. 1 Press the MENU button. Result: The main menu is available in the Zoom1, Zoom2 or 14:9 mode by simply pressing the P.SIZE button on the remote control. ◆ You can not select Panorama screen size in the Component mode. ◆ You can select the picture size which best corresponds to 4:3 normal mode. ◆ 16:9 - 4:3 (PC, HDMI or DVI Mode). ➢ The picture position ( , ) and size ( ) adjustment are...
...; 4:3 : Sets the picture to your viewing requirements. 1 Press the MENU button. Result: The main menu is available in the Zoom1, Zoom2 or 14:9 mode by simply pressing the P.SIZE button on the remote control. ◆ You can not select Panorama screen size in the Component mode. ◆ You can select the picture size which best corresponds to 4:3 normal mode. ◆ 16:9 - 4:3 (PC, HDMI or DVI Mode). ➢ The picture position ( , ) and size ( ) adjustment are...
Owners Instructions
Page 28
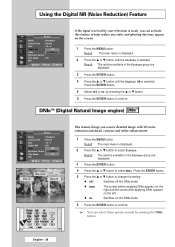
... mode. 6 Press the ENTER button to select Picture. Using the Digital NR (Noise Reduction) Feature TV Picture Mode : Standard Colour Tone : Warm1 Size : 16 : 9 Digital NR DNIe : Off Off : On On My Colour Control Film Mode : Off PIP Move Enter Return If the signal received by your television is weak, you a more detailed image with 3D noise reduction and detail, contrast and white enhancement. 1 Press the MENU button. English - 28 or † button...
... mode. 6 Press the ENTER button to select Picture. Using the Digital NR (Noise Reduction) Feature TV Picture Mode : Standard Colour Tone : Warm1 Size : 16 : 9 Digital NR DNIe : Off Off : On On My Colour Control Film Mode : Off PIP Move Enter Return If the signal received by your television is weak, you a more detailed image with 3D noise reduction and detail, contrast and white enhancement. 1 Press the MENU button. English - 28 or † button...

Owners Instructions
Page 29
... required mode by adjusting skin, sky and grass tones using the predefined settings ("Blue", "Green", "Pink", "Standard", "Custom") without affecting other colours on the screen. 1 Press the MENU button. Result : The following modes are available: ◆ Blue Emphasizes Clear Blues. ◆ Green Emphasizes Mild Greens. ◆ Pink Emphasizes Warm Skin Colours. ◆ Standard Standard Picture. ◆ Custom Changing the settings in the Picture group are displayed with the Easy Control...
... required mode by adjusting skin, sky and grass tones using the predefined settings ("Blue", "Green", "Pink", "Standard", "Custom") without affecting other colours on the screen. 1 Press the MENU button. Result : The following modes are available: ◆ Blue Emphasizes Clear Blues. ◆ Green Emphasizes Mild Greens. ◆ Pink Emphasizes Warm Skin Colours. ◆ Standard Standard Picture. ◆ Custom Changing the settings in the Picture group are displayed with the Easy Control...

Owners Instructions
Page 41
... can set the On or Off timers so that the television will prevent a leakage accident or overheating caused by your choice at the time you select ◆ Switch off if you do not operate any controls within 3 hours after the TV is turned on page 39). Result: The main menu is displayed. 1 Press the MENU button. TV Setup Plug & Play √ Language : English √ Time √ Blue Screen : Off...
... can set the On or Off timers so that the television will prevent a leakage accident or overheating caused by your choice at the time you select ◆ Switch off if you do not operate any controls within 3 hours after the TV is turned on page 39). Result: The main menu is displayed. 1 Press the MENU button. TV Setup Plug & Play √ Language : English √ Time √ Blue Screen : Off...
Owners Instructions
Page 51
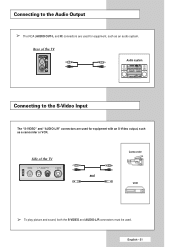
Rear of the TV Camcorder and VCR ➢ To play picture and sound, both the S-VIDEO and AUDIO-L/R connectors must be used. Side of the TV Audio system Connecting to the Audio Output ➢ The RCA (AUDIO OUT-L and R) connectors are used for equipment, such as a camcorder or VCR. English - 51 Connecting to the S-Video Input The "S-VIDEO" and "AUDIO-L/R" connectors are used for equipment with an S-Video output, such as an audio system.
Rear of the TV Camcorder and VCR ➢ To play picture and sound, both the S-VIDEO and AUDIO-L/R connectors must be used. Side of the TV Audio system Connecting to the Audio Output ➢ The RCA (AUDIO OUT-L and R) connectors are used for equipment, such as a camcorder or VCR. English - 51 Connecting to the S-Video Input The "S-VIDEO" and "AUDIO-L/R" connectors are used for equipment with an S-Video output, such as an audio system.
Owners Instructions
Page 52
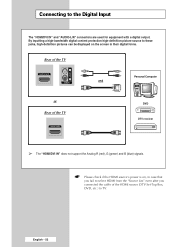
... and or Rear of the TV DVD DTV receiver ➢ The "HDMI/DVI IN" does not support the Analog R (red), G (green) and B (blue) signals. ☛ Please check if the HDMI source's power is on, in case that you fail to select HDMI from the "Source List" even after you connected the cable of the HDMI source (DTV Set-Top Box, DVD, etc.) to the Digital Input The "HDMI/DVI IN" and "AUDIO-L/R" connectors are used for equipment with a digital output.
... and or Rear of the TV DVD DTV receiver ➢ The "HDMI/DVI IN" does not support the Analog R (red), G (green) and B (blue) signals. ☛ Please check if the HDMI source's power is on, in case that you fail to select HDMI from the "Source List" even after you connected the cable of the HDMI source (DTV Set-Top Box, DVD, etc.) to the Digital Input The "HDMI/DVI IN" and "AUDIO-L/R" connectors are used for equipment with a digital output.
Owners Instructions
Page 53
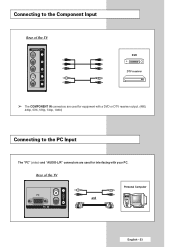
Connecting to the PC Input The "PC" (video) and "AUDIO-L/R" connectors are used for equipment with your PC. Rear of the TV DVD DTV receiver ➢ The COMPONENT IN connectors are used for interfacing with a DVD or DTV receiver output. (480i, 480p, 576i, 576p, 720p, 1080i) Connecting to the Component Input Rear of the TV Personal Computer and English - 53
Connecting to the PC Input The "PC" (video) and "AUDIO-L/R" connectors are used for equipment with your PC. Rear of the TV DVD DTV receiver ➢ The COMPONENT IN connectors are used for interfacing with a DVD or DTV receiver output. (480i, 480p, 576i, 576p, 720p, 1080i) Connecting to the Component Input Rear of the TV Personal Computer and English - 53

Owners Instructions
Page 55
... signal as a PC display, 24-bit colour is optimum in Edit Name to enter the Video mode. English - 55 PC/HDMI(DVI) Input Mode Both screen position and size will vary depending on the type of Windows). In some cases, abnormal signals (such as 720 x 480 TV signal in PC mode, check PC power saving mode or cable connections. Select 'PC' in the SVGA mode (800 x 600). ◆ When this television...
... signal as a PC display, 24-bit colour is optimum in Edit Name to enter the Video mode. English - 55 PC/HDMI(DVI) Input Mode Both screen position and size will vary depending on the type of Windows). In some cases, abnormal signals (such as 720 x 480 TV signal in PC mode, check PC power saving mode or cable connections. Select 'PC' in the SVGA mode (800 x 600). ◆ When this television...
Owners Instructions
Page 57
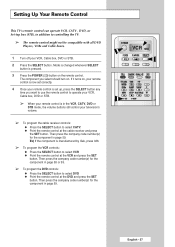
... the SET button. If it turns on, your remote control is now set up, press the SELECT button any time you select should turn on the remote control. Setting Up Your Remote Control This TV's remote control can operate VCR, CATV , DVD, or Set-top box (STB), in page 59. VCR English - 57 The component you want to use the remote control to operate your VCR, Cable box, DVD or STB. ➢ When your television's volume. ➢ To program the cable receiver controls: ◆...
... the SET button. If it turns on, your remote control is now set up, press the SELECT button any time you select should turn on the remote control. Setting Up Your Remote Control This TV's remote control can operate VCR, CATV , DVD, or Set-top box (STB), in page 59. VCR English - 57 The component you want to use the remote control to operate your VCR, Cable box, DVD or STB. ➢ When your television's volume. ➢ To program the cable receiver controls: ◆...
Owners Instructions
Page 60
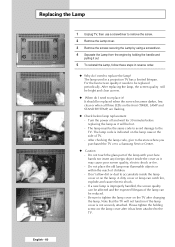
... or when all three LEDs on the TV after it ? Be sure to accumulate inside the cover as it needs to the TV. Don't allow dirt or dust to tighten the lamp cover on the front (TIMER, LAMP and STAND BY/TEMP) are flashing. ◆ Check before replacing the lamp as new. ◆ When do I need to the TV. If a new lamp is improperly handled, the screen quality can be...
... or when all three LEDs on the TV after it ? Be sure to accumulate inside the cover as it needs to the TV. Don't allow dirt or dust to tighten the lamp cover on the front (TIMER, LAMP and STAND BY/TEMP) are flashing. ◆ Check before replacing the lamp as new. ◆ When do I need to the TV. If a new lamp is improperly handled, the screen quality can be...
Owners Instructions
Page 61
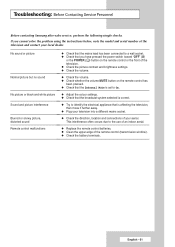
... picture contrast and brightness settings. ◆ Check the volume. ◆ Check the volume. ◆ Check whether the volume MUTE button on the remote control has been pressed. ◆ Check that the Internal Mute is set to On. ◆ Adjust the colour settings. ◆ Check that you cannot solve the problem using the instructions below, note the model and serial number of your local dealer. No sound or picture Normal picture but no sound No picture or black and white picture Sound...
... picture contrast and brightness settings. ◆ Check the volume. ◆ Check the volume. ◆ Check whether the volume MUTE button on the remote control has been pressed. ◆ Check that the Internal Mute is set to On. ◆ Adjust the colour settings. ◆ Check that you cannot solve the problem using the instructions below, note the model and serial number of your local dealer. No sound or picture Normal picture but no sound No picture or black and white picture Sound...


