

User Manual (ENGLISH)
Page 9
... first steps to operating your phone requires several things: inserting the SIM card, charging the battery, and turning the phone on the battery cover release (1) and pull the battery cover up (1) and away (2) from the phone, as shown. SIM Card Information When you subscribe for 3G cellular network services, you receive a plug...
... first steps to operating your phone requires several things: inserting the SIM card, charging the battery, and turning the phone on the battery cover release (1) and pull the battery cover up (1) and away (2) from the phone, as shown. SIM Card Information When you subscribe for 3G cellular network services, you receive a plug...

User Manual (ENGLISH)
Page 10
... into the socket. 3. Improperly inserting the SIM can be inserted as shown above. Remove the back cover and battery. 2. The correct insertion is shown on the phone itself. To reinstall the battery, with the battery cover open, align the battery tabs with the slots at the bottom of the SIM should be...
... into the socket. 3. Improperly inserting the SIM can be inserted as shown above. Remove the back cover and battery. 2. The correct insertion is shown on the phone itself. To reinstall the battery, with the battery cover open, align the battery tabs with the slots at the bottom of the SIM should be...

User Manual (ENGLISH)
Page 11
... and use an adaptor of the proper configuration for the first time. With the battery in position in the U.S., you must use only Samsung approved batteries and chargers. Note: For connection to 4 hours of the wrong adaptor could damage your phone and void your phone for the... properly installed and not obstructing the SIM card before using your warranty. 1. 2. Note: The battery must fully charge the battery before replacing the cover. 3. Make sure that the battery is powered by a rechargeable Li-ion battery. A fully discharged battery requires up to an electrical supply not...
... and use an adaptor of the proper configuration for the first time. With the battery in position in the U.S., you must use only Samsung approved batteries and chargers. Note: For connection to 4 hours of the wrong adaptor could damage your phone and void your phone for the... properly installed and not obstructing the SIM card before using your warranty. 1. 2. Note: The battery must fully charge the battery before replacing the cover. 3. Make sure that the battery is powered by a rechargeable Li-ion battery. A fully discharged battery requires up to an electrical supply not...

User Manual (ENGLISH)
Page 12
... 4. Note: During charging, you must unplug the adapter before removing the battery from the phone by gently pulling the connector out and replace the plastic cover back over the open jack. If the incorrect method is 8GB. 1. Plug the adaptor into the memory card slot, located on the lower left side...
... 4. Note: During charging, you must unplug the adapter before removing the battery from the phone by gently pulling the connector out and replace the plastic cover back over the open jack. If the incorrect method is 8GB. 1. Plug the adaptor into the memory card slot, located on the lower left side...
User Manual (ENGLISH)
Page 19
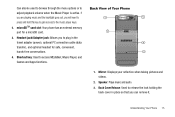
... to 1 5 press and hold this key to gain access to release the lock holding the back cover in the travel adapter (power), optional PC connection cable (data 4 transfer), and optional headset for a microSD card. 2 3. Back Cover Release: Used to the music player keys. 2. If you are playing music and the backlight goes...
... to 1 5 press and hold this key to gain access to release the lock holding the back cover in the travel adapter (power), optional PC connection cable (data 4 transfer), and optional headset for a microSD card. 2 3. Back Cover Release: Used to the music player keys. 2. If you are playing music and the backlight goes...

User Manual (ENGLISH)
Page 20
Back Cover: Used to take pictures and shoot videos. When data is being transferred, this icon animates. When data is being transferred, this icon animates. Appears when a ... or speech impaired. The greater the number of your phone. Appears when the phone is accessing services in a 3G+ (HSDPA) network. Camera lens: Used to cover the back of bars, the stronger the signal. Appears when the phone is accessing services in an EDGE network. When data is accessing services in...
Back Cover: Used to take pictures and shoot videos. When data is being transferred, this icon animates. When data is being transferred, this icon animates. Appears when a ... or speech impaired. The greater the number of your phone. Appears when the phone is accessing services in a 3G+ (HSDPA) network. Camera lens: Used to cover the back of bars, the stronger the signal. Appears when the phone is accessing services in an EDGE network. When data is accessing services in...
User Manual (ENGLISH)
Page 40
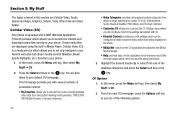
... recently uploaded video clips from which allows you to access the Internet and download media files directly to your phone. 1. Section 5: My Stuff The topics covered in Media Player. Highlight the desired media clip or select from the CV application and launches the MEdia Net homepage. • Help: provides basic on...
... recently uploaded video clips from which allows you to access the Internet and download media files directly to your phone. 1. Section 5: My Stuff The topics covered in Media Player. Highlight the desired media clip or select from the CV application and launches the MEdia Net homepage. • Help: provides basic on...
User Manual (ENGLISH)
Page 82
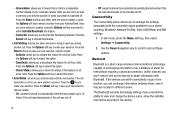
... Select soft key to manage the settings associated with Bluetooth. Options include: - Options include: - Connectivity The Connectivity option allows you are located in an area covered by your service provider or when your voicemail number when you to activate this option. - If the devices are within connectivity range of your phone...
... Select soft key to manage the settings associated with Bluetooth. Options include: - Options include: - Connectivity The Connectivity option allows you are located in an area covered by your service provider or when your voicemail number when you to activate this option. - If the devices are within connectivity range of your phone...
User Manual (ENGLISH)
Page 100
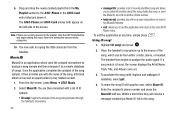
... it . soft key. Place the handset's microphone up to buy related content. 1. It is found, the screen displays the Artist Name, Track Title, and Album cover art. 3. Select MusicID. Drag and drop the newly created playlist from the handset. You are no items present in the playlist, click the Edit Playlist...
... it . soft key. Place the handset's microphone up to buy related content. 1. It is found, the screen displays the Artist Name, Track Title, and Album cover art. 3. Select MusicID. Drag and drop the newly created playlist from the handset. You are no items present in the playlist, click the Edit Playlist...
User Manual (ENGLISH)
Page 101
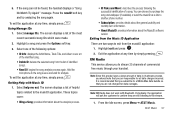
...!: begins the song analysis process again. The screen displays a list of the most recent successful song IDs which were made. 2. These topics cover: • IDing a Song: provides information about the MusicID software version. XM Radio This service allows you are responsible for analysis. Note: ...process. • ID Picks and More!: describes the process following options: • ID Info: displays the Artist Name, Track Title, and Album cover art of the identified song. • Delete ID: deletes the selected song from the musicID application: 1. 5. Highlight exit and press . 2. ...
...!: begins the song analysis process again. The screen displays a list of the most recent successful song IDs which were made. 2. These topics cover: • IDing a Song: provides information about the MusicID software version. XM Radio This service allows you are responsible for analysis. Note: ...process. • ID Picks and More!: describes the process following options: • ID Info: displays the Artist Name, Track Title, and Album cover art of the identified song. • Delete ID: deletes the selected song from the musicID application: 1. 5. Highlight exit and press . 2. ...
User Manual (ENGLISH)
Page 154
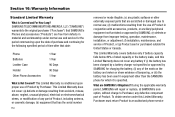
... and accessories ("Products") are scratched or damaged due to an authorized phone service This Limited Warranty is Not Covered? SAMSUNG TELECOMMUNICATIONS AMERICA, LLC ("SAMSUNG") warrants to the original purchaser ("Purchaser") that has the serial number 150 removed or made illegible; (c) any of tampering, or (iii) the battery has been ...
... and accessories ("Products") are scratched or damaged due to an authorized phone service This Limited Warranty is Not Covered? SAMSUNG TELECOMMUNICATIONS AMERICA, LLC ("SAMSUNG") warrants to the original purchaser ("Purchaser") that has the serial number 150 removed or made illegible; (c) any of tampering, or (iii) the battery has been ...

User Manual (ENGLISH)
Page 155
... TIME AS THE EXPRESS WRITTEN WARRANTY STATED HEREIN. Upon receipt, SAMSUNG will be warranted for a period equal to deliver the Product, call Samsung Customer Care at SAMSUNG's sole option, use rebuilt, reconditioned, or new parts or components when repairing any Product is not covered by Purchaser's sales receipt or comparable substitute proof of sale...
... TIME AS THE EXPRESS WRITTEN WARRANTY STATED HEREIN. Upon receipt, SAMSUNG will be warranted for a period equal to deliver the Product, call Samsung Customer Care at SAMSUNG's sole option, use rebuilt, reconditioned, or new parts or components when repairing any Product is not covered by Purchaser's sales receipt or comparable substitute proof of sale...

User Manual (user Manual) (ver.f6) (English)
Page 9
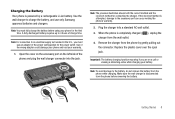
... key until the power-off (2), as your phone requires several things: inserting the SIM card, charging the battery, and turning the phone on the battery cover release (1), slide the battery cover up and lift off image is displayed.
... key until the power-off (2), as your phone requires several things: inserting the SIM card, charging the battery, and turning the phone on the battery cover release (1), slide the battery cover up and lift off image is displayed.

User Manual (user Manual) (ver.f6) (English)
Page 10
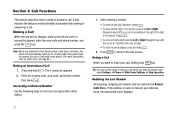
Use caution when inserting or removing the card, and keep all SIM cards out of reach of the SIM card are face down, then slide the SIM card completely into the socket. 2. Make sure the gold contacts of children. 1. Getting Started 6 Lift the battery up (1) and away (2) from the phone, as shown. 2. With your phone turned off, remove the back cover and battery. 3. Installing and Removing the SIM Card Important!: The plug-in SIM card and its contacts can be easily damaged by scratches or bending. To remove the SIM, slide it gently out of the socket.
Use caution when inserting or removing the card, and keep all SIM cards out of reach of the SIM card are face down, then slide the SIM card completely into the socket. 2. Make sure the gold contacts of children. 1. Getting Started 6 Lift the battery up (1) and away (2) from the phone, as shown. 2. With your phone turned off, remove the back cover and battery. 3. Installing and Removing the SIM Card Important!: The plug-in SIM card and its contacts can be easily damaged by scratches or bending. To remove the SIM, slide it gently out of the socket.

User Manual (user Manual) (ver.f6) (English)
Page 11
... switching on the phone. 7 Replacing the Battery 1. To reinstall the battery, align the battery contacts and the tabs at the bottom of the battery cover with the slots on the phone itself. Note: The battery must be inserted as shown above. Press the battery down (2) until it clicks. With... phone, align the tabs at the bottom of the SIM should be properly installed before replacing the cover. 3. Make sure that the battery is shown on the handset (1) and slide the cover down until it clicks into place. Improperly inserting the SIM can cause the phone to not recognize ...
... switching on the phone. 7 Replacing the Battery 1. To reinstall the battery, align the battery contacts and the tabs at the bottom of the battery cover with the slots on the phone itself. Note: The battery must be inserted as shown above. Press the battery down (2) until it clicks. With... phone, align the tabs at the bottom of the SIM should be properly installed before replacing the cover. 3. Make sure that the battery is shown on the handset (1) and slide the cover down until it clicks into place. Improperly inserting the SIM can cause the phone to not recognize ...
User Manual (user Manual) (ver.f6) (English)
Page 12
... 2. Use the wall charger to an electrical supply not located in the U.S., you are on the left side of charge time. Open the cover on the accessory port on a call or viewing a streaming-video while charging your battery. Make sure the wall charger is completely charged ( ...phone is powered by gently pulling out the connector. Note: You must use only Samsung approved batteries and chargers. Remove the charger from the phone before using your warranty. 1. Replace the plastic cover over the open jack. When the phone is disconnected from the phone by a rechargeable...
... 2. Use the wall charger to an electrical supply not located in the U.S., you are on the left side of charge time. Open the cover on the accessory port on a call or viewing a streaming-video while charging your battery. Make sure the wall charger is completely charged ( ...phone is powered by gently pulling out the connector. Note: You must use only Samsung approved batteries and chargers. Remove the charger from the phone before using your warranty. 1. Replace the plastic cover over the open jack. When the phone is disconnected from the phone by a rechargeable...
User Manual (user Manual) (ver.f6) (English)
Page 13
..., located on the lower right side of talk time remain, a warning tone sounds, the "Battery Low" message repeats at regular intervals on page 76.). Replace cover. Push the microSD™ card into the slot until you change the alert from the slot. Use the following instructions and illustrations for proper insertion...
..., located on the lower right side of talk time remain, a warning tone sounds, the "Battery Low" message repeats at regular intervals on page 76.). Replace cover. Push the microSD™ card into the slot until you change the alert from the slot. Use the following instructions and illustrations for proper insertion...
User Manual (user Manual) (ver.f6) (English)
Page 14
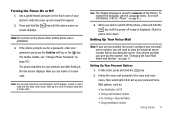
... phone to "Phone" on page 81..) 4. Press and hold the key. 2. key until the power-off image is preset to set up the cover to answer calls and to store the voicemail server number before accessing the server. Note: You can make calls. Slide up your password and press... the Confirm soft key or the key. (For further details, see "Change Phone Password" on the display, accept or reject calls with the slide cover down . Note: The display language is displayed. Setting Up Your Personal Options 1. In Idle mode, press and hold the screen displays. Follow the voice...
... phone to "Phone" on page 81..) 4. Press and hold the key. 2. key until the power-off image is preset to set up the cover to answer calls and to store the voicemail server number before accessing the server. Note: You can make calls. Slide up your password and press... the Confirm soft key or the key. (For further details, see "Change Phone Password" on the display, accept or reject calls with the slide cover down . Note: The display language is displayed. Setting Up Your Personal Options 1. In Idle mode, press and hold the screen displays. Follow the voice...
User Manual (user Manual) (ver.f6) (English)
Page 19
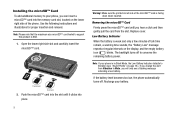
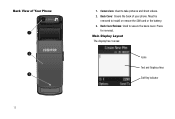
Must be removed to secure the back cover. Main Display Layout The display has 3 areas: Icons Text and Graphics Area Soft Key Indicator Back Cover: Covers the back of Your Phone 1 2 3 15 1. Press for removal. Back View of your phone. Back Cover Release: Used to install or remove the SIM card or the battery. 3. Camera lens: Used to take pictures and shoot videos. 2.
Must be removed to secure the back cover. Main Display Layout The display has 3 areas: Icons Text and Graphics Area Soft Key Indicator Back Cover: Covers the back of Your Phone 1 2 3 15 1. Press for removal. Back View of your phone. Back Cover Release: Used to install or remove the SIM card or the battery. 3. Camera lens: Used to take pictures and shoot videos. 2.
User Manual (user Manual) (ver.f6) (English)
Page 25
...option in position and enter the digit. • To clear the whole display, press and hold . Press and hold . 2. Note: When you slide the phone cover down Settings ➔ Phone ➔ Slide Down Settings ➔ Stop Operation. Tip: You can set the option to access the keypad, enter the area code... 10 times when the person does not answer the call or is in the Voice Call menu, the phone will automatically redial up the phone cover to end your Address Book, the associated name displays. 21 Press . • To enter a missing digit press the Left or Right Navigation key until...
...option in position and enter the digit. • To clear the whole display, press and hold . Press and hold . 2. Note: When you slide the phone cover down Settings ➔ Phone ➔ Slide Down Settings ➔ Stop Operation. Tip: You can set the option to access the keypad, enter the area code... 10 times when the person does not answer the call or is in the Voice Call menu, the phone will automatically redial up the phone cover to end your Address Book, the associated name displays. 21 Press . • To enter a missing digit press the Left or Right Navigation key until...


