User Manual
Page 2
... manual Cleaning Securing the Installation Space Precautions for storage Safety Precautions Symbols Electricity and Safety Installation and Safety Operation and Safety Correct posture to use the product Checking the Contents Checking the Components Parts Control Panel Direct Key guide Function Key Guide Reverse Side Installation Attaching the Stand Removing the Stand Adjusting the Product Tilt Installing a Wall-mount Kit or Desktop Stand Anti-theft Lock Before Connecting Pre-connection Checkpoints Connecting and Using a PC Connecting to a PC Connecting the Power Driver Installation Setting...
... manual Cleaning Securing the Installation Space Precautions for storage Safety Precautions Symbols Electricity and Safety Installation and Safety Operation and Safety Correct posture to use the product Checking the Contents Checking the Components Parts Control Panel Direct Key guide Function Key Guide Reverse Side Installation Attaching the Stand Removing the Stand Adjusting the Product Tilt Installing a Wall-mount Kit or Desktop Stand Anti-theft Lock Before Connecting Pre-connection Checkpoints Connecting and Using a PC Connecting to a PC Connecting the Power Driver Installation Setting...
User Manual
Page 10
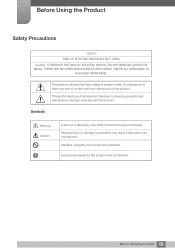
... NO USER SERVICEABLE PARTS INSIDE. Personal injury or damage to make any internal part of contact with this symbol must be followed. 10 Before Using the Product Activities marked by this product. This symbol alerts you that high voltage is dangerous to properties may result if instructions are ...been included with any kind of this symbol are not followed. Before Using the Product Safety Precautions Caution RISK OF ELECTRIC SHOCK DO NOT OPEN Caution: TO REDUCE THE RISK OF ELECTRIC SHOCK, DO NOT REMOVE COVER (OR BACK). REFER ALL SERVICING TO QUALIFIED PERSONNEL.
... NO USER SERVICEABLE PARTS INSIDE. Personal injury or damage to make any internal part of contact with this symbol must be followed. 10 Before Using the Product Activities marked by this product. This symbol alerts you that high voltage is dangerous to properties may result if instructions are ...been included with any kind of this symbol are not followed. Before Using the Product Safety Precautions Caution RISK OF ELECTRIC SHOCK DO NOT OPEN Caution: TO REDUCE THE RISK OF ELECTRIC SHOCK, DO NOT REMOVE COVER (OR BACK). REFER ALL SERVICING TO QUALIFIED PERSONNEL.
User Manual
Page 12
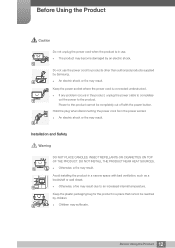
... than authorized products supplied by Samsung. ! An electric shock or fire may result. Power to completely ! DO NOT INSTALL THE PRODUCT NEAR HEAT SOURCES. Otherwise, a fire may result. ! Before Using the Product Caution Do not unplug the power cord when the product is connected unobstructed. If any problem occurs in the product, unplug the power cable to the product...
... than authorized products supplied by Samsung. ! An electric shock or fire may result. Power to completely ! DO NOT INSTALL THE PRODUCT NEAR HEAT SOURCES. Otherwise, a fire may result. ! Before Using the Product Caution Do not unplug the power cord when the product is connected unobstructed. If any problem occurs in the product, unplug the power cable to the product...
User Manual
Page 30
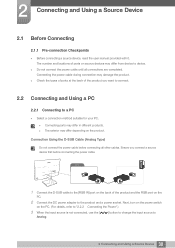
... you connect a source device first before connecting all connections are completed. Next, turn on the power switch on the PC. 2 Connect the DC power adapter to Analog. 30 2 Connecting and Using a Source Device The number and locations of the product and the RGB port on the PC. (For details, refer to "2.2.2 Connecting the Power".) 3 When the input source is not connected, use the [ ] button to change the input source to the product and a power socket. RGB IN 1 Connect the D-SUB cable...
... you connect a source device first before connecting all connections are completed. Next, turn on the power switch on the PC. 2 Connect the DC power adapter to Analog. 30 2 Connecting and Using a Source Device The number and locations of the product and the RGB port on the PC. (For details, refer to "2.2.2 Connecting the Power".) 3 When the input source is not connected, use the [ ] button to change the input source to the product and a power socket. RGB IN 1 Connect the D-SUB cable...
User Manual
Page 31
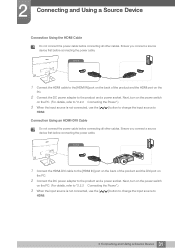
... DVI port on the PC. 2 Connect the DC power adapter to the product and a power socket. Connection Using an HDMI-DVI Cable Do not connect the power cable before connecting the power cable. Next, turn on the power switch on the PC. (For details, refer to "2.2.2 Connecting the Power".) 3 When the input source is not connected, use the [ ] button to change the input source to HDMI. Next, turn on the power switch on the PC. (For details, refer to "2.2.2 Connecting the Power".) 3 When the input source is not connected, use...
... DVI port on the PC. 2 Connect the DC power adapter to the product and a power socket. Connection Using an HDMI-DVI Cable Do not connect the power cable before connecting the power cable. Next, turn on the power switch on the PC. (For details, refer to "2.2.2 Connecting the Power".) 3 When the input source is not connected, use the [ ] button to change the input source to HDMI. Next, turn on the power switch on the PC. (For details, refer to "2.2.2 Connecting the Power".) 3 When the input source is not connected, use...
User Manual
Page 33
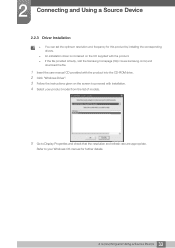
... to Display Properties and check that the resolution and refresh rate are appropriate. 2 Connecting and Using a Source Device 2.2.3 Driver Installation You can set the optimum resolution and frequency for this product by installing the corresponding drivers. An installation driver is contained on the CD supplied with the product. If the file provided is faulty, visit the Samsung homepage (http://www.samsung.com/) and download the file. 1 Insert the user manual...
... to Display Properties and check that the resolution and refresh rate are appropriate. 2 Connecting and Using a Source Device 2.2.3 Driver Installation You can set the optimum resolution and frequency for this product by installing the corresponding drivers. An installation driver is contained on the CD supplied with the product. If the file provided is faulty, visit the Samsung homepage (http://www.samsung.com/) and download the file. 1 Insert the user manual...
User Manual
Page 41
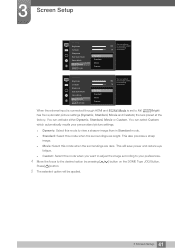
.... PICTURE Brightness Contrast Sharpness Eye Saver Mode Game Mode SMAAMSGUINCG Bright SMAAMSGUINCG Upscale Dynamic Standard Movie Custom 100 75 60 Custo5m0 O50ff 22O00ff Wide0 Set to view a sharper image than in Standard mode. Standard: Select this mode to an optimum picture quality suitable for the working environment. When the external input is connected through HDMI and PC/AV Mode is set to AV, MSAAMSGUINCGBright has four automatic picture settings...
.... PICTURE Brightness Contrast Sharpness Eye Saver Mode Game Mode SMAAMSGUINCG Bright SMAAMSGUINCG Upscale Dynamic Standard Movie Custom 100 75 60 Custo5m0 O50ff 22O00ff Wide0 Set to view a sharper image than in Standard mode. Standard: Select this mode to an optimum picture quality suitable for the working environment. When the external input is connected through HDMI and PC/AV Mode is set to AV, MSAAMSGUINCGBright has four automatic picture settings...
User Manual
Page 47
... set when the external input is connected through HDMI and PC/AV Mode is 480p, 576p, 720p, or 1080p and monitor can display normally (Not every model can support all of 4:3. PICTURE SMAAMSGUINCG Upscale Image Size HDMI Black Level H-Position V-Position Coarse Fine 4:3 16:9 Screen Fit Choose the size and aspect ratio of the picture displayed on screen. 4:3: Display the picture with the product. A digital output device is connected using the HDMI cable. The input signal is set...
... set when the external input is connected through HDMI and PC/AV Mode is 480p, 576p, 720p, or 1080p and monitor can display normally (Not every model can support all of 4:3. PICTURE SMAAMSGUINCG Upscale Image Size HDMI Black Level H-Position V-Position Coarse Fine 4:3 16:9 Screen Fit Choose the size and aspect ratio of the picture displayed on screen. 4:3: Display the picture with the product. A digital output device is connected using the HDMI cable. The input signal is set...
User Manual
Page 48
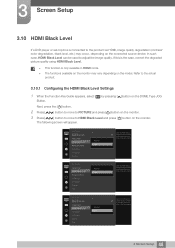
... JOG Button. PICTURE SMAAMSGUINCG Upscale Image Size HDMI Black Level Response Time H-Position V-Position Coarse PICTURE Image Size HDMI Black Level Response Time H-Position V-Position Coarse Fine Normal Low Normal Low Optimize HDMI picture Off brightness and contrast by adjusting the black level of the video signal. 48 3 Screen Setup If this is the case, correct the degraded picture quality using HDMI Black Level. This function is connected to the actual product. 3.10.1 Configuring the HDMI Black Level Settings 1 When the Function Key Guide...
... JOG Button. PICTURE SMAAMSGUINCG Upscale Image Size HDMI Black Level Response Time H-Position V-Position Coarse PICTURE Image Size HDMI Black Level Response Time H-Position V-Position Coarse Fine Normal Low Normal Low Optimize HDMI picture Off brightness and contrast by adjusting the black level of the video signal. 48 3 Screen Setup If this is the case, correct the degraded picture quality using HDMI Black Level. This function is connected to the actual product. 3.10.1 Configuring the HDMI Black Level Settings 1 When the Function Key Guide...
User Manual
Page 58
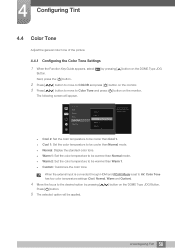
... external input is connected through HDMI and PC/AV Mode is set to AV, Color Tone has four color temperature settings (Cool, Normal, Warm and Custom). 4 Move the focus to the desired option by pressing [ ] button on the monitor. COLOR Red Green Blue Color Tone Gamma Cool 2 Cool 1 Normal Warm 1 Warm 2 50 50 50 Normal Mode1 Select a color tone that best suits your viewing needs. Cool 2: Set the color temperature...
... external input is connected through HDMI and PC/AV Mode is set to AV, Color Tone has four color temperature settings (Cool, Normal, Warm and Custom). 4 Move the focus to the desired option by pressing [ ] button on the monitor. COLOR Red Green Blue Color Tone Gamma Cool 2 Cool 1 Normal Warm 1 Warm 2 50 50 50 Normal Mode1 Select a color tone that best suits your viewing needs. Cool 2: Set the color temperature...
User Manual
Page 65
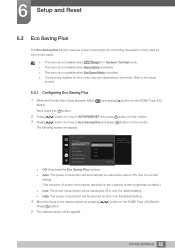
... Auto Stand-by Off: Deactivate the Eco Saving Plus function. Auto: The power consumption will appear. 6 Setup and Reset 6.2 Eco Saving Plus The Eco Saving Plus function reduces power consumption by controlling the electric current used by pressing [ ] button on the DOME Type JOG Button. Refer to the desired option by the monitor panel. This menu is not available when MSAAMSGUINCGBright is in Dynamic Contrast mode...
... Auto Stand-by Off: Deactivate the Eco Saving Plus function. Auto: The power consumption will appear. 6 Setup and Reset 6.2 Eco Saving Plus The Eco Saving Plus function reduces power consumption by controlling the electric current used by pressing [ ] button on the DOME Type JOG Button. Refer to the desired option by the monitor panel. This menu is not available when MSAAMSGUINCGBright is in Dynamic Contrast mode...
User Manual
Page 68
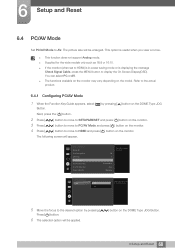
... model. The following screen will be applied. ] button on the DOME Type JOG Button. 68 6 Setup and Reset Off Acceleration Auto Stand-by SETUP&RESET HDMI PC AV Select the PC/AV mode for the wide models only such as 16:9 or 16:10. If the monitor (when set to HDMI) is in power saving mode or is useful when you view a movie. This function does not support Analog mode. Supplied for the HDMI source...
... model. The following screen will be applied. ] button on the DOME Type JOG Button. 68 6 Setup and Reset Off Acceleration Auto Stand-by SETUP&RESET HDMI PC AV Select the PC/AV mode for the wide models only such as 16:9 or 16:10. If the monitor (when set to HDMI) is in power saving mode or is useful when you view a movie. This function does not support Analog mode. Supplied for the HDMI source...
User Manual
Page 71
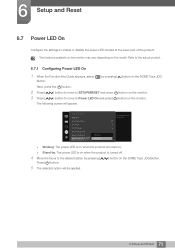
... following screen will be applied. 71 6 Setup and Reset 6 Setup and Reset 6.7 Power LED On Configure the settings to the actual product. 6.7.1 Configuring Power LED On 1 When the Function Key Guide appears, select [ ] by pressing [ ] button on the monitor. Next, press the [ ] button. 2 Press [ 3 Press [ ] button to move to SETUP&RESET and press [ ] button on the monitor. ] button to move to the desired option by pressing [ ] button on the model. SETUP&RESET Reset All Eco Saving...
... following screen will be applied. 71 6 Setup and Reset 6 Setup and Reset 6.7 Power LED On Configure the settings to the actual product. 6.7.1 Configuring Power LED On 1 When the Function Key Guide appears, select [ ] by pressing [ ] button on the monitor. Next, press the [ ] button. 2 Press [ 3 Press [ ] button to move to SETUP&RESET and press [ ] button on the monitor. ] button to move to the desired option by pressing [ ] button on the model. SETUP&RESET Reset All Eco Saving...
User Manual
Page 72
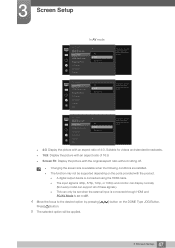
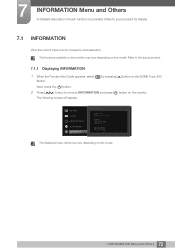
... description of each function is provided. The functions available on the monitor may vary depending on the DOME Type JOG Button. PICTURE COLOR MENU SETTINGS SETUP&RESET INFORMATION INFORMATION LS********/** S / N Analog **kHz **Hz NN **** x **** Optimal Mode **** x **** **Hz The displayed menu items may vary depending on the monitor. Refer to INFORMATION and press [ ] button on the model. Refer to your product for details. 7.1 INFORMATION View the current input source, frequency and resolution.
... description of each function is provided. The functions available on the monitor may vary depending on the DOME Type JOG Button. PICTURE COLOR MENU SETTINGS SETUP&RESET INFORMATION INFORMATION LS********/** S / N Analog **kHz **Hz NN **** x **** Optimal Mode **** x **** **Hz The displayed menu items may vary depending on the monitor. Refer to INFORMATION and press [ ] button on the model. Refer to your product for details. 7.1 INFORMATION View the current input source, frequency and resolution.
User Manual
Page 76
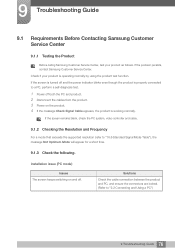
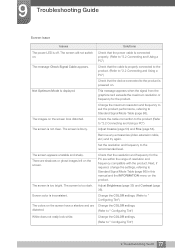
..., video controller and cable. 9.1.2 Checking the Resolution and Frequency For a mode that exceeds the supported resolution (refer to "2.2 Connecting and Using a PC") 76 9 Troubleshooting Guide Solutions Check the cable connection between the product and PC, and ensure the connectors are locked. (Refer to "10.6 Standard Signal Mode Table"), the message Not Optimum Mode will appear for a short time. 9.1.3 Check the following. Installation issue (PC mode) Issues The screen keeps switching on the product. 4 If the message Check Signal Cable appears...
..., video controller and cable. 9.1.2 Checking the Resolution and Frequency For a mode that exceeds the supported resolution (refer to "2.2 Connecting and Using a PC") 76 9 Troubleshooting Guide Solutions Check the cable connection between the product and PC, and ensure the connectors are locked. (Refer to "10.6 Standard Signal Mode Table"), the message Not Optimum Mode will appear for a short time. 9.1.3 Check the following. Installation issue (PC mode) Issues The screen keeps switching on the product. 4 If the message Check Signal Cable appears...
User Manual
Page 77
... Standard Signal Mode Table (page 86) in this manual and the INFORMATION menu on the screen. Change the COLOR settings. (Refer to the recommended level. Set the resolution and frequency to " Configuring Tint") 77 9 Troubleshooting Guide There are Change the COLOR settings. The message Check Signal Cable appears. Check that the cable is powered on the screen have a shadow and are shadows or ghost images left on the product. 9 Troubleshooting Guide Screen issue Issues Solutions The power LED is...
... Standard Signal Mode Table (page 86) in this manual and the INFORMATION menu on the screen. Change the COLOR settings. (Refer to the recommended level. Set the resolution and frequency to " Configuring Tint") 77 9 Troubleshooting Guide There are Change the COLOR settings. The message Check Signal Cable appears. Check that the cable is powered on the screen have a shadow and are shadows or ghost images left on the product. 9 Troubleshooting Guide Screen issue Issues Solutions The power LED is...
User Manual
Page 80
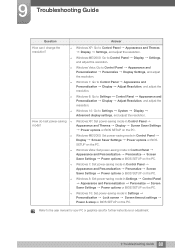
... Go to the user manual for your PC or graphics card for further instructions on adjustment. 80 9 Troubleshooting Guide Windows XP: Set power-saving mode in Settings Personalization Lock screen Screen timeout settings Power & sleep or BIOS SETUP on the PC. Windows 10: Set power-saving mode in Control Panel Appearance and Themes Display Screen Saver Settings Power options or BIOS SETUP on the PC. Refer to Control Panel Appearance and Personalization Display Adjust Resolution, and adjust the resolution. Windows ME/2000: Set power-saving mode in Control Panel Appearance and...
... Go to the user manual for your PC or graphics card for further instructions on adjustment. 80 9 Troubleshooting Guide Windows XP: Set power-saving mode in Settings Personalization Lock screen Screen timeout settings Power & sleep or BIOS SETUP on the PC. Windows 10: Set power-saving mode in Control Panel Appearance and Themes Display Screen Saver Settings Power options or BIOS SETUP on the PC. Refer to Control Panel Appearance and Personalization Display Adjust Resolution, and adjust the resolution. Windows ME/2000: Set power-saving mode in Control Panel Appearance and...
User Manual
Page 86
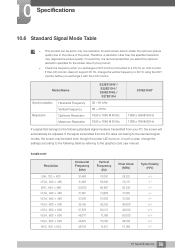
... standard signal modes is recommended that belongs to the standard signal modes, the screen may degrade the picture quality. To avoid this, it with the LCD monitor. 10 Specifications 10.6 Standard Signal Mode Table This product can be set to only one resolution for each screen size to obtain the optimum picture quality due to a PC) for the screen size of the panel. Model Name Synchronization Resolution Horizontal Frequency Vertical Frequency Optimum Resolution Maximum Resolution S22E310HY...
... standard signal modes is recommended that belongs to the standard signal modes, the screen may degrade the picture quality. To avoid this, it with the LCD monitor. 10 Specifications 10.6 Standard Signal Mode Table This product can be set to only one resolution for each screen size to obtain the optimum picture quality due to a PC) for the screen size of the panel. Model Name Synchronization Resolution Horizontal Frequency Vertical Frequency Optimum Resolution Maximum Resolution S22E310HY...
User Manual
Page 91
... other settings using menus displayed on the screen. You can change the screen brightness, tint, size and many images can be created per second. Changes to the screen brightness are then arranged vertically to create an image. A horizontal frequency of color change the medium brightness on the screen. A scanning rate of numerous dots (pixels). Appendix Terminology OSD (On Screen Display) On screen display (OSD) allows you to customize on-screen settings to optimize the picture quality as it refreshes to display an image, although the refreshing...
... other settings using menus displayed on the screen. You can change the screen brightness, tint, size and many images can be created per second. Changes to the screen brightness are then arranged vertically to create an image. A horizontal frequency of color change the medium brightness on the screen. A scanning rate of numerous dots (pixels). Appendix Terminology OSD (On Screen Display) On screen display (OSD) allows you to customize on-screen settings to optimize the picture quality as it refreshes to display an image, although the refreshing...

User Manual
Page 93
... Connecting 30 Blue 57 Brightness 35 C Checking the Contents 19 Cleaning 8 Coarse 53 Color Tone 58 Connecting and Using a PC 30 Contrast 36 Copyright 7 Correct Disposal 90 Correct posture to use the product 18 D Display Time 62 E Easy Setting Box 74 Eco Saving Plus 65 Eye Saver Mode 38 F Fine 54 G Game Mode 39 Gamma 59 General 81, 82, 83, 84 Green 56 H HDMI Black Level 48 I Image Size 46...
... Connecting 30 Blue 57 Brightness 35 C Checking the Contents 19 Cleaning 8 Coarse 53 Color Tone 58 Connecting and Using a PC 30 Contrast 36 Copyright 7 Correct Disposal 90 Correct posture to use the product 18 D Display Time 62 E Easy Setting Box 74 Eco Saving Plus 65 Eye Saver Mode 38 F Fine 54 G Game Mode 39 Gamma 59 General 81, 82, 83, 84 Green 56 H HDMI Black Level 48 I Image Size 46...


