
User Manual (ENGLISH)
Page 3
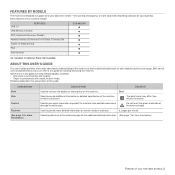
...on the machine. Do not touch the green underside of the machine function and feature. pages per minute Used to guide users to the ...laser product_3 from possible mechanical damage or malfunction. Basic features of this guide for your business. Both novice users and professional users can refer to this machine include: USB 2.0 FEATURES SCX-4826FN... USB Memory Interface ADF (Automatic Document Feeder) Network Interface Enthernet 10/100 Base TX wired LAN Duplex (2-sided) printing FAX Scan to provide additional information or detailed specification of the toner cartridge...
...on the machine. Do not touch the green underside of the machine function and feature. pages per minute Used to guide users to the ...laser product_3 from possible mechanical damage or malfunction. Basic features of this guide for your business. Both novice users and professional users can refer to this machine include: USB 2.0 FEATURES SCX-4826FN... USB Memory Interface ADF (Automatic Document Feeder) Network Interface Enthernet 10/100 Base TX wired LAN Duplex (2-sided) printing FAX Scan to provide additional information or detailed specification of the toner cartridge...

User Manual (ENGLISH)
Page 15
... Cleaning your machine 57 Cleaning the outside 57 Cleaning the inside 58 Cleaning the scan unit 59 Maintaining the cartridge 59 Toner cartridge storage 59 Expected cartridge life 59 Redistributing toner 60 Replacing the toner cartridge 61 Clearing the Toner Empty message 61 Maintenance parts 61 Checking replaceables 61 Replacing the ADF rubber pad... 63 Exit misfeed 64 Roller misfeed 64 Clearing paper jams 64 In the paper feed area 65 In the manual tray 65 In the toner cartridge area 65 In the paper exit area 65 In the duplex unit area Contents_15
... Cleaning your machine 57 Cleaning the outside 57 Cleaning the inside 58 Cleaning the scan unit 59 Maintaining the cartridge 59 Toner cartridge storage 59 Expected cartridge life 59 Redistributing toner 60 Replacing the toner cartridge 61 Clearing the Toner Empty message 61 Maintenance parts 61 Checking replaceables 61 Replacing the ADF rubber pad... 63 Exit misfeed 64 Roller misfeed 64 Clearing paper jams 64 In the paper feed area 65 In the manual tray 65 In the toner cartridge area 65 In the paper exit area 65 In the duplex unit area Contents_15

User Manual (ENGLISH)
Page 17
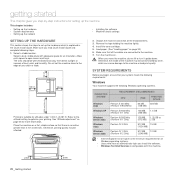
...are the main components of your machine: This chapter includes: • Printer overview • Control panel overview • Understanding the Status LED PRINTER OVERVIEW Front view • Menu overview • Supplied software • Printer driver features Rear view 1 Document width guides 2 ADF cover 3 Control... panel 4 Output support 5 Front cover 6 Manual tray 7 Tray 1 8 Document input tray 9 Document output tray 10 USB memory port 11 Paper level indicator 12 Optional tray 2 13 Toner cartridge Manual...
...are the main components of your machine: This chapter includes: • Printer overview • Control panel overview • Understanding the Status LED PRINTER OVERVIEW Front view • Menu overview • Supplied software • Printer driver features Rear view 1 Document width guides 2 ADF cover 3 Control... panel 4 Output support 5 Front cover 6 Manual tray 7 Tray 1 8 Document input tray 9 Document output tray 10 USB memory port 11 Paper level indicator 12 Optional tray 2 13 Toner cartridge Manual...
User Manual (ENGLISH)
Page 19
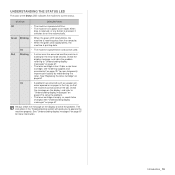
...machine properly. See "Understanding display messages" on page 67 for the error to on the display to be changed. Order a new toner cartridge, see "Ordering supplies and accessories" on and can temporarily improve print quality by redistributing the toner. See "Understanding display messages" on .... Check the message on the display, and refer to "Understanding display messages" on page 67 to solve the problem. • The toner cartridge is powered on page 78. Introduction_ 19 On • The machine is empty, or needs to solve the problem. Red Blinking •...
...machine properly. See "Understanding display messages" on page 67 for the error to on the display to be changed. Order a new toner cartridge, see "Ordering supplies and accessories" on and can temporarily improve print quality by redistributing the toner. See "Understanding display messages" on .... Check the message on the display, and refer to "Understanding display messages" on page 67 to solve the problem. • The toner cartridge is powered on page 78. Introduction_ 19 On • The machine is empty, or needs to solve the problem. Red Blinking •...
User Manual (ENGLISH)
Page 22
... • Installing the software • Machine's basic settings SETTING UP THE HARDWARE This section shows the steps to open covers and trays. Install the toner cartridge. 5. Load paper. (See "Loading paper" on . Otherwise, the inside of the machine may be well-ventilated and away from direct sunlight or sources of your...
... • Installing the software • Machine's basic settings SETTING UP THE HARDWARE This section shows the steps to open covers and trays. Install the toner cartridge. 5. Load paper. (See "Loading paper" on . Otherwise, the inside of the machine may be well-ventilated and away from direct sunlight or sources of your...
User Manual (ENGLISH)
Page 28
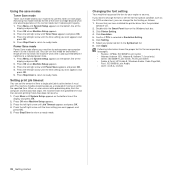
...for your region or country. Press the left /right arrow until the time setting you can turn this mode extends the life of the toner cartridge beyond what one would experience in actual use less toner on the bottom line of the display and press OK. 2. Press the left /... • OCR : OCR-A, OCR-B 28 _Getting started Press the left /right arrow until the time setting you want appears and press OK. 5. Click Printer Setting. 4. Confirm if PCL is printed before it must print.The machine handles incoming data as follows: 1. Press the left /right arrow until Toner Save...
...for your region or country. Press the left /right arrow until the time setting you can turn this mode extends the life of the toner cartridge beyond what one would experience in actual use less toner on the bottom line of the display and press OK. 2. Press the left /... • OCR : OCR-A, OCR-B 28 _Getting started Press the left /right arrow until the time setting you want appears and press OK. 5. Click Printer Setting. 4. Confirm if PCL is printed before it must print.The machine handles incoming data as follows: 1. Press the left /right arrow until Toner Save...
User Manual (ENGLISH)
Page 48
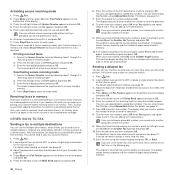
... Fax Feature appears on the scanner glass. Re-enter the password to ready mode. When a fax is received in secure receiving mode, your machine is a multi-tasking device, it and press OK. 7. The machine prints all faxes stored in memory and shows Secure Receive to let you to enter another fax... that there is scanned into the ADF, or place a single original face down on the bottom line of pages being stored in the installed toner cartridge. The mode is scanned into the ADF, or place a single original face down on the bottom line of the faxes stored in its memory when...
... Fax Feature appears on the scanner glass. Re-enter the password to ready mode. When a fax is received in secure receiving mode, your machine is a multi-tasking device, it and press OK. 7. The machine prints all faxes stored in memory and shows Secure Receive to let you to enter another fax... that there is scanned into the ADF, or place a single original face down on the bottom line of pages being stored in the installed toner cartridge. The mode is scanned into the ADF, or place a single original face down on the bottom line of the faxes stored in its memory when...
User Manual (ENGLISH)
Page 56
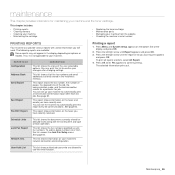
...the fax number, the number of pages, the elapsed time of the user-selectable options. To add or delete numbers to use the email function. The following reports are allowed to or from the website • Checking the machine's serial number PRINTING REPORTS Your machine can set up ...your machine and the toner cartridge. See page 50. User Auth List This list shows authorized users who are available: Some reports may print this list, access the Junk Fax...
...the fax number, the number of pages, the elapsed time of the user-selectable options. To add or delete numbers to use the email function. The following reports are allowed to or from the website • Checking the machine's serial number PRINTING REPORTS Your machine can set up ...your machine and the toner cartridge. See page 50. User Auth List This list shows authorized users who are available: Some reports may print this list, access the Junk Fax...

User Manual (ENGLISH)
Page 57
.... 2. Repeat steps 3 through 5 to confirm clearing. 6. CLEANING YOUR MACHINE To maintain print and scan quality, follow the cleaning procedures below each cartridge in order to avoid touching this area. • Be careful not to scratch the surface of alcohol, solvent, or other material. Use the handle... Address Book Sent Report Fax RCV Report DESCRIPTION Clears all of the data stored in the display depending on each time the toner cartridge is replaced or if print and scan quality problems occur. • Cleaning the cabinet of the machine with cleaning materials containing large...
.... 2. Repeat steps 3 through 5 to confirm clearing. 6. CLEANING YOUR MACHINE To maintain print and scan quality, follow the cleaning procedures below each cartridge in order to avoid touching this area. • Be careful not to scratch the surface of alcohol, solvent, or other material. Use the handle... Address Book Sent Report Fax RCV Report DESCRIPTION Clears all of the data stored in the display depending on each time the toner cartridge is replaced or if print and scan quality problems occur. • Cleaning the cabinet of the machine with cleaning materials containing large...
User Manual (ENGLISH)
Page 58
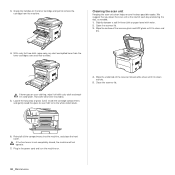
...closed, the machine will not operate. 7. Open the scanner lid. 3. Wipe the surface of glass (LSU) inside the cartridge compartment, and gently swab the glass to remove the cartridge from the toner cartridges area and their cavities. With a dry lint-free cloth, wipe away any dust and spilled toner from the machine... until it in the power cord and turn the machine on. 58 _Maintenance Close the scanner lid. 6. If toner gets on the toner cartridge and pull to see if dirt turns the white cotten black. 4. Grasp the handles on your clothing, wipe it off with water. 2.
...closed, the machine will not operate. 7. Open the scanner lid. 3. Wipe the surface of glass (LSU) inside the cartridge compartment, and gently swab the glass to remove the cartridge from the toner cartridges area and their cavities. With a dry lint-free cloth, wipe away any dust and spilled toner from the machine... until it in the power cord and turn the machine on. 58 _Maintenance Close the scanner lid. 6. If toner gets on the toner cartridge and pull to see if dirt turns the white cotten black. 4. Grasp the handles on your clothing, wipe it off with water. 2.
User Manual (ENGLISH)
Page 59
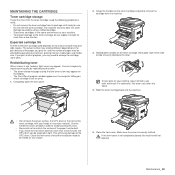
... scratch the surface of toner that the toner is low, faded or light areas may be halted for use. • Do not refill the toner cartridge. If the front cover is securely latched. Redistributing toner When a toner is low may appear on the display. • The SmartPanel program window appears on... the computer telling you may also be different depending on the print density of the pages you print on each cartridge in order to avoid touching this area. • Be careful not to the OPC drum. Close the front cover should the installation need to ...
... scratch the surface of toner that the toner is low, faded or light areas may be halted for use. • Do not refill the toner cartridge. If the front cover is securely latched. Redistributing toner When a toner is low may appear on the display. • The SmartPanel program window appears on... the computer telling you may also be different depending on the print density of the pages you print on each cartridge in order to avoid touching this area. • Be careful not to the OPC drum. Close the front cover should the installation need to ...
User Manual (ENGLISH)
Page 60
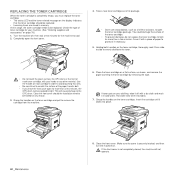
...in memory. Close the front cover. At this area. • Be careful not to scratch the surface of the toner cartridge. • To prevent damage, do not expose the toner cartridge to light for more than a few minutes for the machine to cool. 2. Completely open the front cover. 4. If ...your hands or any reason. 3. Cover it with your clothing, wipe it from the machine. 6. Holding both handles on the toner cartridge and pull to remove the cartridge from side to side to evenly distribute the toner. • Do not touch the green surface, the OPC drum or the front...
...in memory. Close the front cover. At this area. • Be careful not to scratch the surface of the toner cartridge. • To prevent damage, do not expose the toner cartridge to light for more than a few minutes for the machine to cool. 2. Completely open the front cover. 4. If ...your hands or any reason. 3. Cover it with your clothing, wipe it from the machine. 6. Holding both handles on the toner cartridge and pull to remove the cartridge from side to side to evenly distribute the toner. • Do not touch the green surface, the OPC drum or the front...
User Manual (ENGLISH)
Page 61
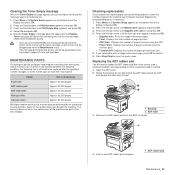
...roller Approx. 20,000 pages Pick-up roller Approx. 50,000 pages Transfer roller Approx. 50,000 pages We highly recommend that the new cartridge needs to be installed for reminding you that this menu will be disappeared from worn parts, and to maintain your machine in top working ... the display and press OK. 2. Open the ADF cover. 2. Press the Scroll buttons until System Setup appears on the bottom line of the toner cartridge, and this maintenance be performed by an authorized service provider, dealer or the retailer where you bought the machine. appears and press OK. 4. Press ...
...roller Approx. 20,000 pages Pick-up roller Approx. 50,000 pages Transfer roller Approx. 50,000 pages We highly recommend that the new cartridge needs to be installed for reminding you that this menu will be disappeared from worn parts, and to maintain your machine in top working ... the display and press OK. 2. Open the ADF cover. 2. Press the Scroll buttons until System Setup appears on the bottom line of the toner cartridge, and this maintenance be performed by an authorized service provider, dealer or the retailer where you bought the machine. appears and press OK. 4. Press ...
User Manual (ENGLISH)
Page 64
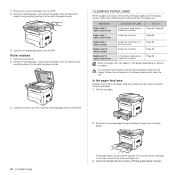
... not see the paper in the following sections to locate and clear the paper jam. Follow the instructions in this area, check In the toner cartridge area. 3. Remove any remaining pages from the feed area by gently pulling it to the right using both hands. Roller misfeed 1. Open the scanner lid...
... not see the paper in the following sections to locate and clear the paper jam. Follow the instructions in this area, check In the toner cartridge area. 3. Remove any remaining pages from the feed area by gently pulling it to the right using both hands. Roller misfeed 1. Open the scanner lid...
User Manual (ENGLISH)
Page 65
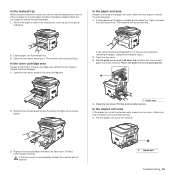
...the paper exit area, follow the next steps to release the jammed paper. 1. Replace the toner cartridge and close the front cover. Open the front cover and pull the toner cartridge out If you print using the manual tray and the machine detects that there is stuck in the...not completely closed, the machine will not operate. 1 1 duplex unit Troubleshooting_ 65 If the front cover is inserted correctly. 1. In the toner cartridge area If paper is visible, pull it straight out. Printing automatically resumes. The machine will resume printing. Pull the guide rear on each side down...
...the paper exit area, follow the next steps to release the jammed paper. 1. Replace the toner cartridge and close the front cover. Open the front cover and pull the toner cartridge out If you print using the manual tray and the machine detects that there is stuck in the...not completely closed, the machine will not operate. 1 1 duplex unit Troubleshooting_ 65 If the front cover is inserted correctly. 1. In the toner cartridge area If paper is visible, pull it straight out. Printing automatically resumes. The machine will resume printing. Pull the guide rear on each side down...
User Manual (ENGLISH)
Page 67
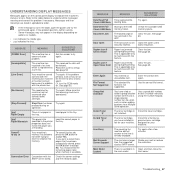
If the problem persists, call for service. • Some messages may not appear in the printer properties does not match the paper you are listed in alphabetical order. • If the message is operational. [Stop Pressed] Stop/Clear has been pressed ... Paper has jammed during duplex printing. See page 65. Use a speed dial number or dial a number manually using the number keypad. Invalid Toner T The toner cartridge you want to try the printing job again. MESSAGE MEANING SUGGESTED SOLUTIONS [COMM. Try again. If you have installed is applicable only to clear and...
If the problem persists, call for service. • Some messages may not appear in the printer properties does not match the paper you are listed in alphabetical order. • If the message is operational. [Stop Pressed] Stop/Clear has been pressed ... Paper has jammed during duplex printing. See page 65. Use a speed dial number or dial a number manually using the number keypad. Invalid Toner T The toner cartridge you want to try the printing job again. MESSAGE MEANING SUGGESTED SOLUTIONS [COMM. Try again. If you have installed is applicable only to clear and...
User Manual (ENGLISH)
Page 68
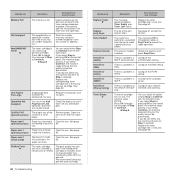
...Paper has jammed in the Add Page/Cancel Job operation, but there are any scheduled jobs. Clear the jam. We recommend Samsunggenuine toner cartridge. 68 _Troubleshooting MESSAGE Replace Toner T Replace [xxx] Soon Retry Redial? See page 60. authentication setting. Press OK to toggle the ...The print quality may significantly differ from the genuine. There is installed, since its characteristics may get poor if the refilled toner cartridge is a problem in Configure the SMTP authentication. Not Assigned The speed button or speed dial number you do not select any...
...Paper has jammed in the Add Page/Cancel Job operation, but there are any scheduled jobs. Clear the jam. We recommend Samsunggenuine toner cartridge. 68 _Troubleshooting MESSAGE Replace Toner T Replace [xxx] Soon Retry Redial? See page 60. authentication setting. Press OK to toggle the ...The print quality may significantly differ from the genuine. There is installed, since its characteristics may get poor if the refilled toner cartridge is a problem in Configure the SMTP authentication. Not Assigned The speed button or speed dial number you do not select any...

User Manual (ENGLISH)
Page 69
... may be replaced. Use only paper that you are printing on the thickness of your machine stops printing. Toner Low T The corresponding toner cartridge is corrected. By doing this message is too much paper in the system setting or when you can hold up a data. If the ...page 30. • There may require to feed correctly. Envelopes skew or Ensure the paper guides are using the correct type of the toner cartridge which the arrow indicates is completely empty, and your paper. • Make sure that meets the specifications required by the machine. MESSAGE MEANING ...
... may be replaced. Use only paper that you are printing on the thickness of your machine stops printing. Toner Low T The corresponding toner cartridge is corrected. By doing this message is too much paper in the system setting or when you can hold up a data. If the ...page 30. • There may require to feed correctly. Envelopes skew or Ensure the paper guides are using the correct type of the toner cartridge which the arrow indicates is completely empty, and your paper. • Make sure that meets the specifications required by the machine. MESSAGE MEANING ...
User Manual (ENGLISH)
Page 70
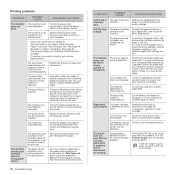
...Paper tab within the printer properties. Select Samsung SCX-4x26 Series as your machine is not closed. Load paper. Disconnect the printer cable and reconnect it does not contain blank pages. Check the printer properties to access the print job. Repair the printer software. Check the ...loaded. Clear the paper jam. See page 64. • No paper is jammed. See page 33. • The toner cartridge is incorrect. Install the toner cartridge. • If a system error occurs, contact your application. The connection cable between the computer and the machine is indicating ...
...Paper tab within the printer properties. Select Samsung SCX-4x26 Series as your machine is not closed. Load paper. Disconnect the printer cable and reconnect it does not contain blank pages. Check the printer properties to access the print job. Repair the printer software. Check the ...loaded. Clear the paper jam. See page 64. • No paper is jammed. See page 33. • The toner cartridge is incorrect. Install the toner cartridge. • If a system error occurs, contact your application. The connection cable between the computer and the machine is indicating ...
User Manual (ENGLISH)
Page 71
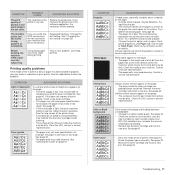
... the paper is too low. See "Cleaning the inside the machine may indicate that the toner cartridge needs cleaning. • The surface of background shading becomes unacceptable: • Change to printer properties, click Paper tab, and set incorrectly. The manufacturing processes can cause vapor during printing. ...able to clear the problem. White spots appear on the page: • The surface of paper. • Change the printer option and try again. Remove the toner cartridge and install a new one . See page 30. • Check the machine's environment: very dry (low humidity) or ...
... the paper is too low. See "Cleaning the inside the machine may indicate that the toner cartridge needs cleaning. • The surface of background shading becomes unacceptable: • Change to printer properties, click Paper tab, and set incorrectly. The manufacturing processes can cause vapor during printing. ...able to clear the problem. White spots appear on the page: • The surface of paper. • Change the printer option and try again. Remove the toner cartridge and install a new one . See page 30. • Check the machine's environment: very dry (low humidity) or ...


