
User Manual (KOREAN)
Page 168
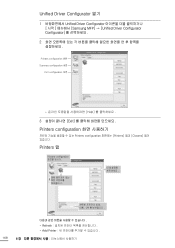
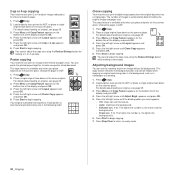
Unified Driver Configurator 열기 1 Unified Driver Configurator Samsung MFP] → [Unified Driver Configurator Configurator 2 Printers configuration 버튼 Scanners configuration 버튼 Port configuration 버튼 Help 3 Exit Printers configuration Printers configuration Printers] 탭과 [Classes Printers 탭 Printers configuration URI Refresh Add Printer 168 8
Unified Driver Configurator 열기 1 Unified Driver Configurator Samsung MFP] → [Unified Driver Configurator Configurator 2 Printers configuration 버튼 Scanners configuration 버튼 Port configuration 버튼 Help 3 Exit Printers configuration Printers configuration Printers] 탭과 [Classes Printers 탭 Printers configuration URI Refresh Add Printer 168 8

User Manual (KOREAN)
Page 169
• Remove Printer Set as Default Stop/Start Test Properties 170 쪽 참조 Classes 탭 Scanners configuration Scanners configuration 173 8 169
• Remove Printer Set as Default Stop/Start Test Properties 170 쪽 참조 Classes 탭 Scanners configuration Scanners configuration 173 8 169

User Manual (KOREAN)
Page 173
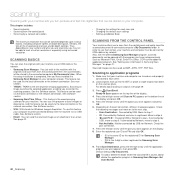
스캔하기 Unified Driver Configurator Scanners configuration 1 Unified Driver Configurator 2 Scanners configuration 3 4 [Properties 5 6 [Preview 8 173
스캔하기 Unified Driver Configurator Scanners configuration 1 Unified Driver Configurator 2 Scanners configuration 3 4 [Properties 5 6 [Preview 8 173

User Manual (KOREAN)
Page 175
12 [Save 1 'Scanner Properties 2 [Save As 3 OK Job Type 1 'Job Type 2 [Save • 'Scanner Properties 1 'Job Type 2 [Delete Image Manager Image Manager 8 175
12 [Save 1 'Scanner Properties 2 [Save As 3 OK Job Type 1 'Job Type 2 [Save • 'Scanner Properties 1 'Job Type 2 [Delete Image Manager Image Manager 8 175

User Manual (KOREAN)
Page 215
...;cr보ip정t C도IEG색N상U영G역ho을st-사 script 8.xx Ghostscript http://www.ghostscript.com USB Unified Driver Configurator Scanners configuration Drivers •MFP I/O MFP Port configuration MFP dev/mfp0 는 LP:0 dev/mpf1 은 LP:1 USB 포트는 dev/mfp4 USB:0 dev/mfp4...
...;cr보ip정t C도IEG색N상U영G역ho을st-사 script 8.xx Ghostscript http://www.ghostscript.com USB Unified Driver Configurator Scanners configuration Drivers •MFP I/O MFP Port configuration MFP dev/mfp0 는 LP:0 dev/mpf1 은 LP:1 USB 포트는 dev/mfp4 USB:0 dev/mfp4...
User Manual (ENGLISH)
Page 6
...Avoid using a cord which is longer than 2 m with your eyes. 13. Unplug the machine from Laser/Scanner assembly. Class I laser products are not considered to laser radiation above a Class I laser product conforming to rain or water. • If the machine does not operate properly after instructions have ... service personnel under the following conditions: • When any human access to be 16 AWGa or bigger. 17. The laser system and printer are using this product, these basic safety precautions should always be a remote risk of fire, electric shock, and injury ...
...Avoid using a cord which is longer than 2 m with your eyes. 13. Unplug the machine from Laser/Scanner assembly. Class I laser products are not considered to laser radiation above a Class I laser product conforming to rain or water. • If the machine does not operate properly after instructions have ... service personnel under the following conditions: • When any human access to be 16 AWGa or bigger. 17. The laser system and printer are using this product, these basic safety precautions should always be a remote risk of fire, electric shock, and injury ...
User Manual (ENGLISH)
Page 13
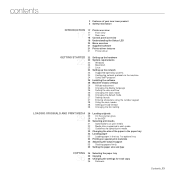
contents 2 Features of your new laser product 5 Safety information INTRODUCTION 17 Printer overview 17 17 17 Front view Rear view 18 Control panel overview 19 Understanding the Status LED 20 Menu overview 21 Supplied software 21 Printer driver features 21 Printer driver GETTING STARTED 22 Setting up the hardware 22 ...28 Setting print job timeout 28 Changing the font setting LOADING ORIGINALS AND PRINT MEDIA 29 Loading originals 29 29 29 On the scanner glass In the ADF 30 Selecting print media 31 Specifications on print media 32 Media sizes supported in each mode 32 Guidelines ...
contents 2 Features of your new laser product 5 Safety information INTRODUCTION 17 Printer overview 17 17 17 Front view Rear view 18 Control panel overview 19 Understanding the Status LED 20 Menu overview 21 Supplied software 21 Printer driver features 21 Printer driver GETTING STARTED 22 Setting up the hardware 22 ...28 Setting print job timeout 28 Changing the font setting LOADING ORIGINALS AND PRINT MEDIA 29 Loading originals 29 29 29 On the scanner glass In the ADF 30 Selecting print media 31 Specifications on print media 32 Media sizes supported in each mode 32 Guidelines ...

User Manual (ENGLISH)
Page 16
...display messages 69 Solving other problems 69 Paper feeding 70 Printing problems 71 Printing quality problems 73 Copying problems 74 Scanning problems 74 Samsung Scan Manager problems 74 Fax problems 75 Common Windows problems 75 Common Linux problems 77 Common Macintosh problems ORDERING SUPPLIES AND ACCESSORIES ... to take when installing accessories 79 79 Upgrading a memory module 79 Installing a memory module SPECIFICATIONS 80 General specifications 80 81 Printer specifications 81 Scanner specifications 82 Copier specifications 82 Facsimile specifications GLOSSARY 83 INDEX 87 CONTACT...
...display messages 69 Solving other problems 69 Paper feeding 70 Printing problems 71 Printing quality problems 73 Copying problems 74 Scanning problems 74 Samsung Scan Manager problems 74 Fax problems 75 Common Windows problems 75 Common Linux problems 77 Common Macintosh problems ORDERING SUPPLIES AND ACCESSORIES ... to take when installing accessories 79 79 Upgrading a memory module 79 Installing a memory module SPECIFICATIONS 80 General specifications 80 81 Printer specifications 81 Scanner specifications 82 Copier specifications 82 Facsimile specifications GLOSSARY 83 INDEX 87 CONTACT...

User Manual (ENGLISH)
Page 17
... machine: This chapter includes: • Printer overview • Control panel overview • Understanding the Status LED PRINTER OVERVIEW Front view • Menu overview • Supplied software • Printer driver features Rear view 1 Document width guides... 2 ADF cover 3 Control panel 4 Output support 5 Front cover 6 Manual tray 7 Tray 1 8 Document input tray 9 Document output tray 10 USB memory port 11 Paper level indicator 12 Optional tray 2 13 Toner cartridge Manual tray paper width 14 guides 15 Scanner lid 16 Scanner...
... machine: This chapter includes: • Printer overview • Control panel overview • Understanding the Status LED PRINTER OVERVIEW Front view • Menu overview • Supplied software • Printer driver features Rear view 1 Document width guides... 2 ADF cover 3 Control panel 4 Output support 5 Front cover 6 Manual tray 7 Tray 1 8 Document input tray 9 Document output tray 10 USB memory port 11 Paper level indicator 12 Optional tray 2 13 Toner cartridge Manual tray paper width 14 guides 15 Scanner lid 16 Scanner...
User Manual (ENGLISH)
Page 21
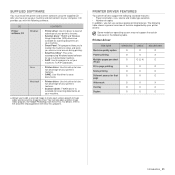
... Overlay O Duplex O LINUX O X O (2, 4) X X X X X O MACINTOSH O X O O O O X X O Introduction_ 21 SUPPLIED SOFTWARE You must install the printer and scanner software using a powerful image editor and to send the image by email. Allows you with the following standard features: • Paper orientation, size, source and... media type selection • Number of your printer's features. • Scanner driver: TWAIN driver is the accompanying Windows-based software for your multifunctional machine. • SetIP: Use this...
... Overlay O Duplex O LINUX O X O (2, 4) X X X X X O MACINTOSH O X O O O O X X O Introduction_ 21 SUPPLIED SOFTWARE You must install the printer and scanner software using a powerful image editor and to send the image by email. Allows you with the following standard features: • Paper orientation, size, source and... media type selection • Number of your printer's features. • Scanner driver: TWAIN driver is the accompanying Windows-based software for your multifunctional machine. • SetIP: Use this...
User Manual (ENGLISH)
Page 23
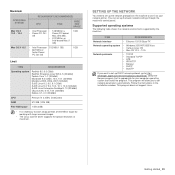
You can set up the network protocols on the machine to claim swap partition of 300 MB or larger for your network printer. SETTING UP THE NETWORK You need to set up DHCP network protocol, go to http:// developer.apple.com/networking/bonjour/download/, select the Bonjour program ... 2.4GHz (IntelCore2) RAM 512 MB (1024 MB) Free HDD space 1 GB (2GB) • It is appropriate for working with large scanned images. • The Linux scanner driver supports the optical resolution at maximum. Getting started_ 23
You can set up the network protocols on the machine to claim swap partition of 300 MB or larger for your network printer. SETTING UP THE NETWORK You need to set up DHCP network protocol, go to http:// developer.apple.com/networking/bonjour/download/, select the Bonjour program ... 2.4GHz (IntelCore2) RAM 512 MB (1024 MB) Free HDD space 1 GB (2GB) • It is appropriate for working with large scanned images. • The Linux scanner driver supports the optical resolution at maximum. Getting started_ 23
User Manual (ENGLISH)
Page 29
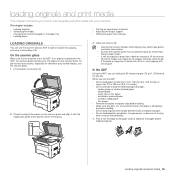
... Selecting print media • Changing the size of the paper in the ADF. Lift and open . Always keep it with the lid open the scanner lid. 2. carbon-paper or carbon-backed paper - torn paper • Remove all staples and paper clips before loading. • Make sure any... (5.6 x 5.8 inches) or larger than 30 mm, start copying with the registration guide at the top left corner of the glass. 3. On the scanner glass Make sure that include different sizes or weights of paper. • Do not load booklets, pamphlets, transparencies, or documents having other unusual characteristics....
... Selecting print media • Changing the size of the paper in the ADF. Lift and open . Always keep it with the lid open the scanner lid. 2. carbon-paper or carbon-backed paper - torn paper • Remove all staples and paper clips before loading. • Make sure any... (5.6 x 5.8 inches) or larger than 30 mm, start copying with the registration guide at the top left corner of the glass. 3. On the scanner glass Make sure that include different sizes or weights of paper. • Do not load booklets, pamphlets, transparencies, or documents having other unusual characteristics....
User Manual (ENGLISH)
Page 36
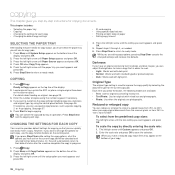
...OK to ready mode. This chapter includes: • Selecting the paper tray • Copying • Changing the settings for each copy, use the copy function buttons on both sides of the display. 2. Press the left /right arrow until Paper Source appears and press OK. 4. See page 36. However, ...You can reduce or enlarge the size of a copied image from 25% to 400% when you copy original documents from the scanner glass, or from 25% to Copy appears on the scanner glass. Press Copy. 2. For details about loading an original, see page 29. 3. Press Menu until the paper tray you...
...OK to ready mode. This chapter includes: • Selecting the paper tray • Copying • Changing the settings for each copy, use the copy function buttons on both sides of the display. 2. Press the left /right arrow until Paper Source appears and press OK. 4. See page 36. However, ...You can reduce or enlarge the size of a copied image from 25% to 400% when you copy original documents from the scanner glass, or from 25% to Copy appears on the scanner glass. Press Copy. 2. For details about loading an original, see page 29. 3. Press Menu until the paper tray you...
User Manual (ENGLISH)
Page 37
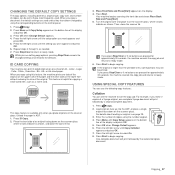
...options, pressing Stop/Clear cancels the changed by the second complete document. Unload the paper in ADF. 1. If you place originals on the scanner glass. Load originals face up into the ADF, or place a single original face down on the lower half without reducing the size of...4. Press the left /right arrow until the setting you want appears and press OK. 5. Repeat steps 4 through 5, as shown, and close the scanner lid. Press Stop/Clear to return to begin copying. While you copy a document, the default settings are pressed for approximately 30 seconds, the machine ...
...options, pressing Stop/Clear cancels the changed by the second complete document. Unload the paper in ADF. 1. If you place originals on the scanner glass. Load originals face up into the ADF, or place a single original face down on the lower half without reducing the size of...4. Press the left /right arrow until the setting you want appears and press OK. 5. Repeat steps 4 through 5, as shown, and close the scanner lid. Press Stop/Clear to return to begin copying. While you copy a document, the default settings are pressed for approximately 30 seconds, the machine ...
User Manual (ENGLISH)
Page 38
... details about loading an original, see page 29. 3. or 4-up copying Your machine can print multiple image copies from the original document on the scanner glass. This copy feature is available only when you want appears. • Off: Does not use this feature. • Auto: Optimizes the ... arrow until Poster Copy appears and press OK. 6. Each portion is divided into the ADF, or place a single original face down on the scanner glass. Adjusting background images You can print an image onto 9 sheets of the display and press OK. 4. For details about loading an original...
... details about loading an original, see page 29. 3. or 4-up copying Your machine can print multiple image copies from the original document on the scanner glass. This copy feature is available only when you want appears. • Off: Does not use this feature. • Auto: Optimizes the ... arrow until Poster Copy appears and press OK. 6. Each portion is divided into the ADF, or place a single original face down on the scanner glass. Adjusting background images You can print an image onto 9 sheets of the display and press OK. 4. For details about loading an original...
User Manual (ENGLISH)
Page 40
... user is saved, add or delete the application program in Samsung Scan Manager." See "Setting scan information in Samsung Scan Manager>Set Scan Button. 40 _Scanning Ready to Scan appears on to scan images or documents, and this function, your machine and computer must be stored in the connected ...step 5. scanning Scanning with your machine lets you turn pictures and text into the ADF, or place a single original face down on the scanner glass. SCANNING FROM THE CONTROL PANEL Your machine offers you to scan from the control panel • Scanning by USB, move on the top...
... user is saved, add or delete the application program in Samsung Scan Manager." See "Setting scan information in Samsung Scan Manager>Set Scan Button. 40 _Scanning Ready to Scan appears on to scan images or documents, and this function, your machine and computer must be stored in the connected ...step 5. scanning Scanning with your machine lets you turn pictures and text into the ADF, or place a single original face down on the scanner glass. SCANNING FROM THE CONTROL PANEL Your machine offers you to scan from the control panel • Scanning by USB, move on the top...
User Manual (ENGLISH)
Page 42
... address from your account, press the left /right arrow to Email appears on the bottom line of the display and press OK. 3. Depending on the scanner glass. Press OK when Change Default appears. 4. Press the left /right arrow until the file format you have activated the Send To Self option in...
... address from your account, press the left /right arrow to Email appears on the bottom line of the display and press OK. 3. Depending on the scanner glass. Press OK when Change Default appears. 4. Press the left /right arrow until the file format you have activated the Send To Self option in...
User Manual (ENGLISH)
Page 46
... message on the display. When something goes wrong while sending your selection. 7. Press the left /right arrow until System Setup appears on the scanner glass. Press Menu until the paper tray you can no answer when you have finished, select No at any time while sending. After the ...Stop/Clear. RECEIVING A FAX Selecting the paper tray After loading the print media for the fax reception. 1. If an original is full, the printer can use the Ans/Fax mode, attach an answering machine to cancel a fax job, press Stop/Clear at the Another Page? When you want ...
... message on the display. When something goes wrong while sending your selection. 7. Press the left /right arrow until System Setup appears on the scanner glass. Press Menu until the paper tray you can no answer when you have finished, select No at any time while sending. After the ...Stop/Clear. RECEIVING A FAX Selecting the paper tray After loading the print media for the fax reception. 1. If an original is full, the printer can use the Ans/Fax mode, attach an answering machine to cancel a fax job, press Stop/Clear at the Another Page? When you want ...
User Manual (ENGLISH)
Page 48
... details about loading an original, see page 51. 7. The display asks you have finished entering fax numbers, press the left /right arrow until Multi Send appears and press OK. 48 _Faxing 6. Enter the job name you are copying or printing, your machine stores incoming faxes in its memory when... receiving mode, your fax needs. Press Fax. 2. The mode is scanned into the ADF, or place a single original face down on the scanner glass, select Yes to multiple destinations You can enter Group Dial Number using this step. 11. Receiving faxes in its memory. Press Menu until ...
... details about loading an original, see page 51. 7. The display asks you have finished entering fax numbers, press the left /right arrow until Multi Send appears and press OK. 48 _Faxing 6. Enter the job name you are copying or printing, your machine stores incoming faxes in its memory when... receiving mode, your fax needs. Press Fax. 2. The mode is scanned into the ADF, or place a single original face down on the scanner glass, select Yes to multiple destinations You can enter Group Dial Number using this step. 11. Receiving faxes in its memory. Press Menu until ...

User Manual (ENGLISH)
Page 49
... is deleted from memory. The machine shows the number being stored in ready mode and that you entered. 1. If an original is placed on the scanner glass, select Yes to print out a fax when fax forwarding has been completed, select Forward&Print. 7. When you have specified and sends the fax... operations. Press OK to be sent ahead of the display and press OK. 3. Press the left /right arrow until Fax Feature appears on the scanner glass, select Yes to another fax machine or email address. Press Menu until Send Forward appears and press OK. 6. See page 45. 4. If...
... is deleted from memory. The machine shows the number being stored in ready mode and that you entered. 1. If an original is placed on the scanner glass, select Yes to print out a fax when fax forwarding has been completed, select Forward&Print. 7. When you have specified and sends the fax... operations. Press OK to be sent ahead of the display and press OK. 3. Press the left /right arrow until Fax Feature appears on the scanner glass, select Yes to another fax machine or email address. Press Menu until Send Forward appears and press OK. 6. See page 45. 4. If...


