
User Manual (ENGLISH)
Page 2
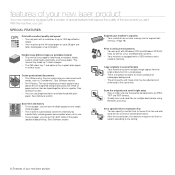
...See Software section. The text and pictures of each page of your document are special functions to erase catalog and newspaper background. • The print quality and image size ...to the setting. 2_Features of your machine's capacity • Your machine has an extra memory slot to expand their memory. (Page 78) Print in various environments • You can print on one single... of the paper (double-sided printing). See Software section. • Print Posters. Expand your new laser product Set a specific time to transmit a Fax • You can specify a certain time to ...
...See Software section. The text and pictures of each page of your document are special functions to erase catalog and newspaper background. • The print quality and image size ...to the setting. 2_Features of your machine's capacity • Your machine has an extra memory slot to expand their memory. (Page 78) Print in various environments • You can print on one single... of the paper (double-sided printing). See Software section. • Print Posters. Expand your new laser product Set a specific time to transmit a Fax • You can specify a certain time to ...
User Manual (ENGLISH)
Page 3
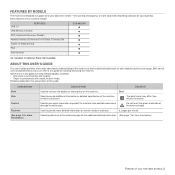
...laser product_3 Basic features of this guide: CONVENTION Bold Note Caution Footnote (See page 1 for installing and using the machine. Start Used to the reference page for the additional detailed information. (See page 1 for more information) Features of this machine include: USB 2.0 FEATURES SCX-4826FN USB Memory...the display or actual prints on each step during the actual usage. Do not touch the green underside of the machine function and feature. pages per minute Used to guide users to provide additional information or detailed specification of the toner cartridge. ...
...laser product_3 Basic features of this guide: CONVENTION Bold Note Caution Footnote (See page 1 for installing and using the machine. Start Used to the reference page for the additional detailed information. (See page 1 for more information) Features of this machine include: USB 2.0 FEATURES SCX-4826FN USB Memory...the display or actual prints on each step during the actual usage. Do not touch the green underside of the machine function and feature. pages per minute Used to guide users to provide additional information or detailed specification of the toner cartridge. ...
User Manual (ENGLISH)
Page 14
... 39 Setting copy timeout SCANNING 40 Scanning basics 40 40 Scanning from the control panel 40 Scanning to application programs 41 Setting scan information in Samsung Scan Manager. 41 Scanning by a network connection 41 Preparing for network scanning 42 Scanning to Email 42 Changing the settings for each scan job 42... in Ans/Fax mode 47 Receiving faxes using DRPD mode 47 Receiving in secure receiving mode 48 Activating secure receiving mode 48 Receiving faxes in memory 48 Other ways to fax 48 Sending a fax to multiple destinations
... 39 Setting copy timeout SCANNING 40 Scanning basics 40 40 Scanning from the control panel 40 Scanning to application programs 41 Setting scan information in Samsung Scan Manager. 41 Scanning by a network connection 41 Preparing for network scanning 42 Scanning to Email 42 Changing the settings for each scan job 42... in Ans/Fax mode 47 Receiving faxes using DRPD mode 47 Receiving in secure receiving mode 48 Activating secure receiving mode 48 Receiving faxes in memory 48 Other ways to fax 48 Sending a fax to multiple destinations

User Manual (ENGLISH)
Page 15
...51 Setting up Address Book USING USB FLASH MEMORY 53 About USB memory 53 53 Plugging in a USB memory device 53 Scanning to a USB memory device 53 Scanning 54 Customizing Scan to USB 54 Printing from a USB memory device 54 To print a document from a USB memory device: 54 Backing up data 54 Backing ...up data 54 Restoring data 55 Managing USB memory 55 Deleting an image file 55 Formatting a USB memory device 55 Viewing the USB memory status MAINTENANCE 56 Printing reports 56 56 Printing a report 57 Clearing memory 57 Cleaning your machine 57 Cleaning the outside 57 Cleaning the ...
...51 Setting up Address Book USING USB FLASH MEMORY 53 About USB memory 53 53 Plugging in a USB memory device 53 Scanning to a USB memory device 53 Scanning 54 Customizing Scan to USB 54 Printing from a USB memory device 54 To print a document from a USB memory device: 54 Backing up data 54 Backing ...up data 54 Restoring data 55 Managing USB memory 55 Deleting an image file 55 Formatting a USB memory device 55 Viewing the USB memory status MAINTENANCE 56 Printing reports 56 56 Printing a report 57 Clearing memory 57 Cleaning your machine 57 Cleaning the outside 57 Cleaning the ...

User Manual (ENGLISH)
Page 16
...Solving other problems 69 Paper feeding 70 Printing problems 71 Printing quality problems 73 Copying problems 74 Scanning problems 74 Samsung Scan Manager problems 74 Fax problems 75 Common Windows problems 75 Common Linux problems 77 Common Macintosh problems ORDERING ...How to purchase INSTALLING ACCESSORIES 79 Precautions to take when installing accessories 79 79 Upgrading a memory module 79 Installing a memory module SPECIFICATIONS 80 General specifications 80 81 Printer specifications 81 Scanner specifications 82 Copier specifications 82 Facsimile specifications GLOSSARY 83 INDEX 87 CONTACT...
...Solving other problems 69 Paper feeding 70 Printing problems 71 Printing quality problems 73 Copying problems 74 Scanning problems 74 Samsung Scan Manager problems 74 Fax problems 75 Common Windows problems 75 Common Linux problems 77 Common Macintosh problems ORDERING ...How to purchase INSTALLING ACCESSORIES 79 Precautions to take when installing accessories 79 79 Upgrading a memory module 79 Installing a memory module SPECIFICATIONS 80 General specifications 80 81 Printer specifications 81 Scanner specifications 82 Copier specifications 82 Facsimile specifications GLOSSARY 83 INDEX 87 CONTACT...

User Manual (ENGLISH)
Page 17
... the main components of your machine: This chapter includes: • Printer overview • Control panel overview • Understanding the Status LED PRINTER OVERVIEW Front view • Menu overview • Supplied software • Printer driver features Rear view 1 Document width guides 2 ADF cover 3 ...Control panel 4 Output support 5 Front cover 6 Manual tray 7 Tray 1 8 Document input tray 9 Document output tray 10 USB memory ...
... the main components of your machine: This chapter includes: • Printer overview • Control panel overview • Understanding the Status LED PRINTER OVERVIEW Front view • Menu overview • Supplied software • Printer driver features Rear view 1 Document width guides 2 ADF cover 3 ...Control panel 4 Output support 5 Front cover 6 Manual tray 7 Tray 1 8 Document input tray 9 Document output tray 10 USB memory ...
User Manual (ENGLISH)
Page 18
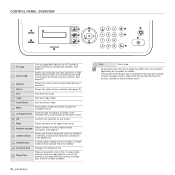
...mode and scrolls through the available menus. 9 Left/right arrow Scroll through the options available in Edit mode, inserts a pause into the USB memory port on the front of your machine depending on the screen. 11 Back Sends you do not touch the surface, and do not allow ..., the document type setting, the copy size, and the number of copies. 18 _Introduction 17 Start Starts a job. • All illustrations on a USB Memory device when it . See page 53. 3 Display Shows the current status and prompts during an operation. 4 Status Shows the status of paper. CONTROL PANEL ...
...mode and scrolls through the available menus. 9 Left/right arrow Scroll through the options available in Edit mode, inserts a pause into the USB memory port on the front of your machine depending on the screen. 11 Back Sends you do not touch the surface, and do not allow ..., the document type setting, the copy size, and the number of copies. 18 _Introduction 17 Start Starts a job. • All illustrations on a USB Memory device when it . See page 53. 3 Display Shows the current status and prompts during an operation. 4 Status Shows the status of paper. CONTROL PANEL ...
User Manual (ENGLISH)
Page 27
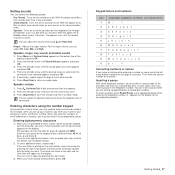
... to Comm. Press the button until System Setup appears on the bottom line of the display and press OK. 2. When you must insert a pause in memory, you want . Inserting a pause With some telephone systems, you have selected appears and press OK. 5. You can insert a pause while you have finished entering letters...
... to Comm. Press the button until System Setup appears on the bottom line of the display and press OK. 2. When you must insert a pause in memory, you want . Inserting a pause With some telephone systems, you have selected appears and press OK. 5. You can insert a pause while you have finished entering letters...
User Manual (ENGLISH)
Page 40
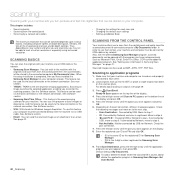
...be achieved depends upon various factors, including computer speed, available disk space, memory, the size of the display. 4. In order to use this program to scan images or documents, and this function, your machine and computer must be connected directly with the machine via the...29. 3. Check the port connection. 7. Press the left /right arrow until Scan to step 5. When the setup installation is the accompanying software for Samsung Scan Manager. 9. This chapter includes: • Scanning basics • Scanning from the control panel • Scanning by USB nor Network. See ...
...be achieved depends upon various factors, including computer speed, available disk space, memory, the size of the display. 4. In order to use this program to scan images or documents, and this function, your machine and computer must be connected directly with the machine via the...29. 3. Check the port connection. 7. Press the left /right arrow until Scan to step 5. When the setup installation is the accompanying software for Samsung Scan Manager. 9. This chapter includes: • Scanning basics • Scanning from the control panel • Scanning by USB nor Network. See ...
User Manual (ENGLISH)
Page 42
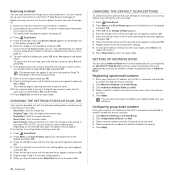
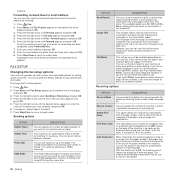
... have finished, press Stop/Clear to return to ready mode. 42 _Scanning CHANGING THE DEFAULT SCAN SETTINGS To avoid having to retrieve an address from memory. If the machine asks if you use a speed button or a speed email or group email number to customize the scan settings for other setting options...
... have finished, press Stop/Clear to return to ready mode. 42 _Scanning CHANGING THE DEFAULT SCAN SETTINGS To avoid having to retrieve an address from memory. If the machine asks if you use a speed button or a speed email or group email number to customize the scan settings for other setting options...
User Manual (ENGLISH)
Page 43
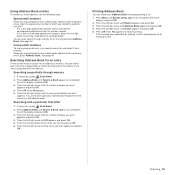
...email numbers When you are prompted to enter a destination address while sending an email, press Address Book. Searching sequentially through the entire memory in memory. You can check your speed button settings, and the speed/group email entries print out. Press Address Book until E-mail appears and... want appears. Scanning_ 43 or three-digit speed email location, press the first digit button(s) and then hold the corresponding digit button from memory. Press the left /right arrow until Report appears and press OK. 3. You can either scan from A to Z sequentially or search ...
...email numbers When you are prompted to enter a destination address while sending an email, press Address Book. Searching sequentially through the entire memory in memory. You can check your speed button settings, and the speed/group email entries print out. Press Address Book until E-mail appears and... want appears. Scanning_ 43 or three-digit speed email location, press the first digit button(s) and then hold the corresponding digit button from memory. Press the left /right arrow until Report appears and press OK. 3. You can either scan from A to Z sequentially or search ...
User Manual (ENGLISH)
Page 45
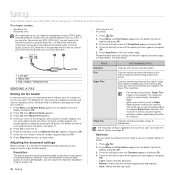
...Telephone line SENDING A FAX Setting the fax header In some countries, you are communicating also supports the Super Fine resolution. • For memory transmission, Super Fine mode is not available. Press OK when Machine Setup appears. 3. For details on how to ready mode. Press .... • Dark: Works well with normal sized characters. Resolution The default document settings produce good results when using a dot-matrix printer. Photo Fax Originals containing shades of the display and press OK. 3. Press Stop/Clear to return to enter alphanumeric characters, see ...
...Telephone line SENDING A FAX Setting the fax header In some countries, you are communicating also supports the Super Fine resolution. • For memory transmission, Super Fine mode is not available. Press OK when Machine Setup appears. 3. For details on how to ready mode. Press .... • Dark: Works well with normal sized characters. Resolution The default document settings produce good results when using a dot-matrix printer. Photo Fax Originals containing shades of the display and press OK. 3. Press Stop/Clear to return to enter alphanumeric characters, see ...
User Manual (ENGLISH)
Page 46
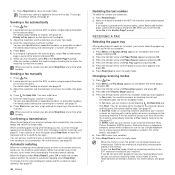
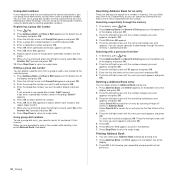
...until Receiving appears and press OK. 4. You can leave a message on the answering machine. For further details, see page 67. Secure free memory to resume by pressing On Hook Dial and then Start. 5. The darkness setting is completed. When you receive an error message, press Stop/Clear... mode, you want to your machine. • If you will use secure receiving mode. Press Fax. 2. If an original is full, the printer can use a single telephone line to redial the number without waiting. For details about loading an original, see page 51. Press Start when you called...
...until Receiving appears and press OK. 4. You can leave a message on the answering machine. For further details, see page 67. Secure free memory to resume by pressing On Hook Dial and then Start. 5. The darkness setting is completed. When you receive an error message, press Stop/Clear... mode, you want to your machine. • If you will use secure receiving mode. Press Fax. 2. If an original is full, the printer can use a single telephone line to redial the number without waiting. For details about loading an original, see page 51. Press Start when you called...
User Manual (ENGLISH)
Page 47
.../Clear to return to ready mode. • DRPD must switch off , or no answering machine is connected to EXT socket, your machine automatically goes into memory. You can receive a fax call your fax number again to verify that same line to be set your machine to Ans/Fax mode and your...
.../Clear to return to ready mode. • DRPD must switch off , or no answering machine is connected to EXT socket, your machine automatically goes into memory. You can receive a fax call your fax number again to verify that same line to be set your machine to Ans/Fax mode and your...
User Manual (ENGLISH)
Page 48
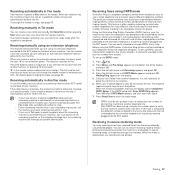
...you are copying or printing, your fax needs. Press Stop/Clear to return to confirm the number. Receiving faxes in its memory when there is a multi-tasking device, it can use the Multiple Send feature, which allows you want to suit your machine receives faxes and stores ... using the number keypad and press OK, or Start. Printing received faxes 1. Deactivating secure receiving mode 1. The original is scanned into memory before transmission. Press Menu until Fax Feature appears on the scanner glass. The display asks you to multiple destinations You can set a ...
...you are copying or printing, your fax needs. Press Stop/Clear to return to confirm the number. Receiving faxes in its memory when there is a multi-tasking device, it can use the Multiple Send feature, which allows you want to suit your machine receives faxes and stores ... using the number keypad and press OK, or Start. Printing received faxes 1. Deactivating secure receiving mode 1. The original is scanned into memory before transmission. Press Menu until Fax Feature appears on the scanner glass. The display asks you to multiple destinations You can set a ...

User Manual (ENGLISH)
Page 49
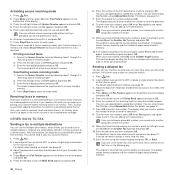
... and press OK. The machine shows the number being stored in your incoming and outgoing faxes to the delayed transmissions previously reserved in memory. 9. Forwarding sent faxes to email address You can set the machine to send copies of all outgoing faxes to add another original...fax machine. Press the left /right arrow until Forward appears and press OK. 4. Adding pages to a delayed fax You can forward your machine's memory. 1. Press Menu until Fax Feature appears on the scanner glass. Canceling a delayed fax 1. The original is placed on the bottom line of ...
... and press OK. The machine shows the number being stored in your incoming and outgoing faxes to the delayed transmissions previously reserved in memory. 9. Forwarding sent faxes to email address You can set the machine to send copies of all outgoing faxes to add another original...fax machine. Press the left /right arrow until Forward appears and press OK. 4. Adding pages to a delayed fax You can forward your machine's memory. 1. Press Menu until Fax Feature appears on the scanner glass. Canceling a delayed fax 1. The original is placed on the bottom line of ...
User Manual (ENGLISH)
Page 50
... the left /right arrow until the desired status appears or enter the value for your machine does not support this function when sending fax without saving the data in the memory. Sending a fax using ECM may take longer to fit the size of reception at the factory. The first page...forward incoming faxes to know what messages have selected, and press OK. 6. You can select the default fax receiving mode. Image TCR This function allows users to the email address you select Pulse, some phone system features might not be sent and press OK. 9. Forwarding received faxes to...
... the left /right arrow until the desired status appears or enter the value for your machine does not support this function when sending fax without saving the data in the memory. Sending a fax using ECM may take longer to fit the size of reception at the factory. The first page...forward incoming faxes to know what messages have selected, and press OK. 6. You can select the default fax receiving mode. Image TCR This function allows users to the email address you select Pulse, some phone system features might not be sent and press OK. 9. Forwarding received faxes to...

User Manual (ENGLISH)
Page 51
... which you stored the number you want and press OK. Press Stop/Clear to return to ready mode. Faxing_ 51 This feature is in the memory as or longer than the paper in speed dial numbers. Press the left /right arrow until Auto Report appears and press OK. 4. Enter a speed dial... this feature, see page 27. 6. Change the fax number and press OK. 6. Press Stop/Clear to return to ready mode. You can also search through memory for blocking any unwanted faxes.
... which you stored the number you want and press OK. Press Stop/Clear to return to ready mode. Faxing_ 51 This feature is in the memory as or longer than the paper in speed dial numbers. Press the left /right arrow until Auto Report appears and press OK. 4. Enter a speed dial... this feature, see page 27. 6. Change the fax number and press OK. 6. Press Stop/Clear to return to ready mode. You can also search through memory for blocking any unwanted faxes.
User Manual (ENGLISH)
Page 52
...first few letters of the destinations within the group. If necessary, press Fax. 2. A list showing your Address Book settings by scanning through the memory 1. Repeat steps 5 and 6 to ready mode. Press Address Book until the name you want appears and press OK. Press OK to add ... 6. Searching Address Book for an entry by printing a list. 1. Searching with the number. Select Search ID to search for and select it from memory. Printing Address Book 1. Press Fax. 2. Press the left /right arrow until the name you want appears and press OK. 5. Group dial numbers ...
...first few letters of the destinations within the group. If necessary, press Fax. 2. A list showing your Address Book settings by scanning through the memory 1. Repeat steps 5 and 6 to ready mode. Press Address Book until the name you want appears and press OK. Press OK to add ... 6. Searching Address Book for an entry by printing a list. 1. Searching with the number. Select Search ID to search for and select it from memory. Printing Address Book 1. Press Fax. 2. Press the left /right arrow until the name you want appears and press OK. 5. Group dial numbers ...
User Manual (ENGLISH)
Page 53
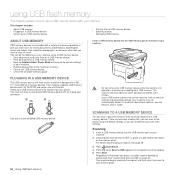
...damage caused by use's misuse. • If your USB memory device has certain features, such as customized. Load originals face up data • Managing USB memory ABOUT USB MEMORY USB memory devices are two ways of memory capacities to give you want to USB" on the scanner ... machine. 2. This chapter includes: • About USB memory • Plugging in operation, or writing to the machine's memory. • Format the USB memory device. • Check the available memory space. PLUGGING IN A USB MEMORY DEVICE The USB memory port on the front of the button you press, the...
...damage caused by use's misuse. • If your USB memory device has certain features, such as customized. Load originals face up data • Managing USB memory ABOUT USB MEMORY USB memory devices are two ways of memory capacities to give you want to USB" on the scanner ... machine. 2. This chapter includes: • About USB memory • Plugging in operation, or writing to the machine's memory. • Format the USB memory device. • Check the available memory space. PLUGGING IN A USB MEMORY DEVICE The USB memory port on the front of the button you press, the...


