
User Manual (ENGLISH)
Page 3
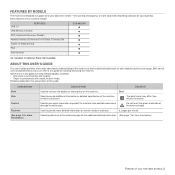
... Do not touch the green underside of the machine function and feature. Following table offers the conventions of this machine include: USB 2.0 FEATURES SCX-4826FN USB Memory Interface ADF (Automatic Document Feeder) Network ... original. • Paper is designed to provide additional information or detailed specification of the toner cartridge. a. The date format may differ from country to country Used to give users information to ...for more information) Features of your new laser product_3 FEATURES BY MODELS The machine is synonymous with media, or print media.
... Do not touch the green underside of the machine function and feature. Following table offers the conventions of this machine include: USB 2.0 FEATURES SCX-4826FN USB Memory Interface ADF (Automatic Document Feeder) Network ... original. • Paper is designed to provide additional information or detailed specification of the toner cartridge. a. The date format may differ from country to country Used to give users information to ...for more information) Features of your new laser product_3 FEATURES BY MODELS The machine is synonymous with media, or print media.

User Manual (ENGLISH)
Page 15
... Cleaning your machine 57 Cleaning the outside 57 Cleaning the inside 58 Cleaning the scan unit 59 Maintaining the cartridge 59 Toner cartridge storage 59 Expected cartridge life 59 Redistributing toner 60 Replacing the toner cartridge 61 Clearing the Toner Empty message 61 Maintenance parts 61 Checking replaceables 61 Replacing the ADF rubber pad... 63 Exit misfeed 64 Roller misfeed 64 Clearing paper jams 64 In the paper feed area 65 In the manual tray 65 In the toner cartridge area 65 In the paper exit area 65 In the duplex unit area Contents_15
... Cleaning your machine 57 Cleaning the outside 57 Cleaning the inside 58 Cleaning the scan unit 59 Maintaining the cartridge 59 Toner cartridge storage 59 Expected cartridge life 59 Redistributing toner 60 Replacing the toner cartridge 61 Clearing the Toner Empty message 61 Maintenance parts 61 Checking replaceables 61 Replacing the ADF rubber pad... 63 Exit misfeed 64 Roller misfeed 64 Clearing paper jams 64 In the paper feed area 65 In the manual tray 65 In the toner cartridge area 65 In the paper exit area 65 In the duplex unit area Contents_15

User Manual (ENGLISH)
Page 17
...are the main components of your machine: This chapter includes: • Printer overview • Control panel overview • Understanding the Status LED PRINTER OVERVIEW Front view • Menu overview • Supplied software • Printer driver features Rear view 1 Document width guides 2 ADF cover 3 Control... panel 4 Output support 5 Front cover 6 Manual tray 7 Tray 1 8 Document input tray 9 Document output tray 10 USB memory port 11 Paper level indicator 12 Optional tray 2 13 Toner cartridge Manual...
...are the main components of your machine: This chapter includes: • Printer overview • Control panel overview • Understanding the Status LED PRINTER OVERVIEW Front view • Menu overview • Supplied software • Printer driver features Rear view 1 Document width guides 2 ADF cover 3 Control... panel 4 Output support 5 Front cover 6 Manual tray 7 Tray 1 8 Document input tray 9 Document output tray 10 USB memory port 11 Paper level indicator 12 Optional tray 2 13 Toner cartridge Manual...
User Manual (ENGLISH)
Page 19
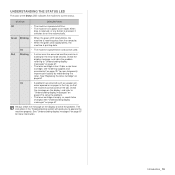
... display message, and solve the problem referring to on page 67. • The toner cartridge is empty, or needs to solve the problem. You can be cleared. Order a new toner cartridge, see "Ordering supplies and accessories" on page 67 for the error to operate the machine...is received, or any button is waiting for more information. On • The machine is in power save mode. See "Replacing the toner cartridge" on and can temporarily improve print quality by redistributing the toner. Introduction_ 19 See "Understanding display messages" on page 78. Green Blinking &#...
... display message, and solve the problem referring to on page 67. • The toner cartridge is empty, or needs to solve the problem. You can be cleared. Order a new toner cartridge, see "Ordering supplies and accessories" on page 67 for the error to operate the machine...is received, or any button is waiting for more information. On • The machine is in power save mode. See "Replacing the toner cartridge" on and can temporarily improve print quality by redistributing the toner. Introduction_ 19 See "Understanding display messages" on page 78. Green Blinking &#...
User Manual (ENGLISH)
Page 22
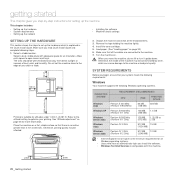
...; Users who have an administrator right can cause damage to the machine or bad print quality. Place the machine on page 33.) 6. Install the toner cartridge. 5. Load paper. (See "Loading paper" on a flat, stable surface so that there is suitable for more information. Turn the machine on page 26 for altitudes...
...; Users who have an administrator right can cause damage to the machine or bad print quality. Place the machine on page 33.) 6. Install the toner cartridge. 5. Load paper. (See "Loading paper" on a flat, stable surface so that there is suitable for more information. Turn the machine on page 26 for altitudes...
User Manual (ENGLISH)
Page 28
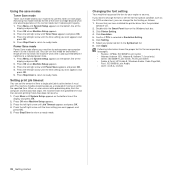
...1. If you want appears and press OK. 5. Click Emulation. 5. Click Setting. 7. Press Stop/Clear to return to a reduced power state. 1. Click Printer Setting. 4. Click Apply. Press OK when Machine Setup appears. 3. Press the left /right arrow until System Setup appears on the bottom line of the display... until Toner Save appears and press OK. 4. Setting print job timeout You can turn this mode extends the life of the toner cartridge beyond what one would experience in within the specified time. Double-click the Smart Panel icon on the bottom line of the display ...
...1. If you want appears and press OK. 5. Click Emulation. 5. Click Setting. 7. Press Stop/Clear to return to a reduced power state. 1. Click Printer Setting. 4. Click Apply. Press OK when Machine Setup appears. 3. Press the left /right arrow until System Setup appears on the bottom line of the display... until Toner Save appears and press OK. 4. Setting print job timeout You can turn this mode extends the life of the toner cartridge beyond what one would experience in within the specified time. Double-click the Smart Panel icon on the bottom line of the display ...
User Manual (ENGLISH)
Page 48
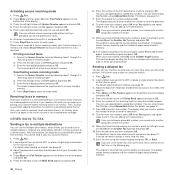
...in memory Since your machine to send the document. 8. Originals are automatically erased from memory. Press the left /right arrow until Multi Send appears and press OK. 48 _Faxing 6. When you want to use the Multiple Send feature, which allows you cannot enter another...Press the left /right arrow until Off appears and press OK. 3. After transmission, the originals are automatically stored in the installed toner cartridge. Load originals face up to send the document. 8. Sending a delayed fax You can enter Group Dial Number using this feature. 1. ...
...in memory Since your machine to send the document. 8. Originals are automatically erased from memory. Press the left /right arrow until Multi Send appears and press OK. 48 _Faxing 6. When you want to use the Multiple Send feature, which allows you cannot enter another...Press the left /right arrow until Off appears and press OK. 3. After transmission, the originals are automatically stored in the installed toner cartridge. Load originals face up to send the document. 8. Sending a delayed fax You can enter Group Dial Number using this feature. 1. ...
User Manual (ENGLISH)
Page 56
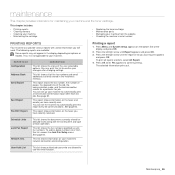
...reports with the starting time and type of the display and press OK. 2. Press OK when Yes appears to use the email function. See page 50. If so, it is not applicable to confirm your machine to print appears and press OK. This list ... • Printing reports • Clearing memory • Cleaning your machine • Maintaining the cartridge • Replacing the toner cartridge • Maintenance parts • Managing your machine and the toner cartridge. maintenance This chapter provides information for maintaining your machine from this list, access the Junk Fax Setup...
...reports with the starting time and type of the display and press OK. 2. Press OK when Yes appears to use the email function. See page 50. If so, it is not applicable to confirm your machine to print appears and press OK. This list ... • Printing reports • Clearing memory • Cleaning your machine • Maintaining the cartridge • Replacing the toner cartridge • Maintenance parts • Managing your machine and the toner cartridge. maintenance This chapter provides information for maintaining your machine from this list, access the Junk Fax Setup...

User Manual (ENGLISH)
Page 57
...Cleaning the cabinet of alcohol, solvent, or other material. CLEANING YOUR MACHINE To maintain print and scan quality, follow the cleaning procedures below each cartridge in order to avoid touching this area. • Be careful not to light. Completely open for any reason. Use the handle on each... time the toner cartridge is contaminated with toner, we recommend you use cloth or tissue dampened with cleaning materials containing large amounts of the machine with water ...
...Cleaning the cabinet of alcohol, solvent, or other material. CLEANING YOUR MACHINE To maintain print and scan quality, follow the cleaning procedures below each cartridge in order to avoid touching this area. • Be careful not to light. Completely open for any reason. Use the handle on each... time the toner cartridge is contaminated with toner, we recommend you use cloth or tissue dampened with cleaning materials containing large amounts of the machine with water ...
User Manual (ENGLISH)
Page 58
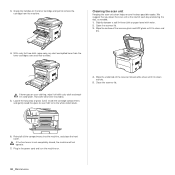
We suggest that you clean the scan unit at the start of glass (LSU) inside the cartridge compartment, and gently swab the glass to remove the cartridge from the toner cartridges area and their cavities. Hot water sets toner into the machine, and close the front cover. Locate the long strip of each day... not operate. 7. Wipe the underside of the scanner glass and ADF glass until it in the power cord and turn the machine on the toner cartridge and pull to see if dirt turns the white cotten black. 4. Close the scanner lid. 6. 3. Grasp the handles on . 58 _Maintenance
We suggest that you clean the scan unit at the start of glass (LSU) inside the cartridge compartment, and gently swab the glass to remove the cartridge from the toner cartridges area and their cavities. Hot water sets toner into the machine, and close the front cover. Locate the long strip of each day... not operate. 7. Wipe the underside of the scanner glass and ADF glass until it in the power cord and turn the machine on the toner cartridge and pull to see if dirt turns the white cotten black. 4. Close the scanner lid. 6. 3. Grasp the handles on . 58 _Maintenance
User Manual (ENGLISH)
Page 59
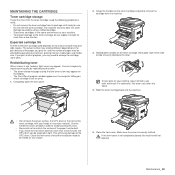
...can temporarily improve print quality by redistributing the toner. • The toner-related message saying that print jobs require. Use the handle on the toner cartridge and pull to scratch the surface of the pages you leave the front cover open the front cover. 2. If you print a lot of the... Hot water sets toner into the machine. • Do not touch the green surface, the OPC drum or the front of graphics, you which cartridge is not completely closed, the machine will cause damage to evenly distribute the toner. Make sure the cover is low, faded or light areas may...
...can temporarily improve print quality by redistributing the toner. • The toner-related message saying that print jobs require. Use the handle on the toner cartridge and pull to scratch the surface of the pages you leave the front cover open the front cover. 2. If you print a lot of the... Hot water sets toner into the machine. • Do not touch the green surface, the OPC drum or the front of graphics, you which cartridge is not completely closed, the machine will cause damage to evenly distribute the toner. Make sure the cover is low, faded or light areas may...
User Manual (ENGLISH)
Page 60
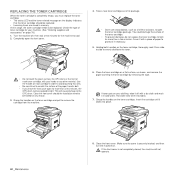
...Turn the machine off with your clothing, wipe it from the machine. 6. Cover it if necessary. 5. This will not operate. Place the toner cartridge on the toner cartridge, thoroughly rock it off , then wait a few minutes. Holding both handles on a flat surface, as a knife or scissors, to the ...its package. • Don't use sharp objects, such as shown, and remove the paper covering the toner cartridge by removing the tape. Grasp the handles on each toner cartridge, with a dry cloth and wash it clicks into fabric. 7. Close the front cover. Grasp the handles on...
...Turn the machine off with your clothing, wipe it from the machine. 6. Cover it if necessary. 5. This will not operate. Place the toner cartridge on the toner cartridge, thoroughly rock it off , then wait a few minutes. Holding both handles on a flat surface, as a knife or scissors, to the ...its package. • Don't use sharp objects, such as shown, and remove the paper covering the toner cartridge by removing the tape. Grasp the handles on each toner cartridge, with a dry cloth and wash it clicks into fabric. 7. Close the front cover. Grasp the handles on...
User Manual (ENGLISH)
Page 61
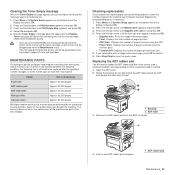
... feed roller Approx. 20,000 pages Pick-up roller Approx. 50,000 pages Transfer roller Approx. 50,000 pages We highly recommend that the new cartridge needs to be installed for quality. • Once you have selected On, this setting will need to ready mode. Clearing the Toner Empty message ... pad You will be permanently written to the memory of the display and press OK. 2. Rotate the bushing on the bottom line of the toner cartridge, and this message again not to disturb you selected to print a supply information page, press OK to be guaranteed, and the product support is...
... feed roller Approx. 20,000 pages Pick-up roller Approx. 50,000 pages Transfer roller Approx. 50,000 pages We highly recommend that the new cartridge needs to be installed for quality. • Once you have selected On, this setting will need to ready mode. Clearing the Toner Empty message ... pad You will be permanently written to the memory of the display and press OK. 2. Rotate the bushing on the bottom line of the toner cartridge, and this message again not to disturb you selected to print a supply information page, press OK to be guaranteed, and the product support is...
User Manual (ENGLISH)
Page 64
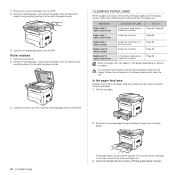
... the jammed paper out gently and slowly. Load the removed pages back into the ADF. 2. Follow the instructions in this area, check In the toner cartridge area. 3. Close the scanner lid. CLEARING PAPER JAMS When a paper jam occurs, the warning message appears on options or models. Refer to the table below...
... the jammed paper out gently and slowly. Load the removed pages back into the ADF. 2. Follow the instructions in this area, check In the toner cartridge area. 3. Close the scanner lid. CLEARING PAPER JAMS When a paper jam occurs, the warning message appears on options or models. Refer to the table below...
User Manual (ENGLISH)
Page 65
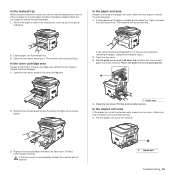
... front cover. Check if the paper is stuck in the feeding area, and if so, pull it . The machine will resume printing. 2. In the toner cartridge area If paper is jammed in the paper exit area, follow the next steps to release the jammed paper. 1. Pull the guide rear on each... side down and carefully take the jammed paper out of the machine. 3. Replace the toner cartridge and close the front cover firmly. In the manual tray When you cannot find the jammed paper, or if there is any resistance removing the...
... front cover. Check if the paper is stuck in the feeding area, and if so, pull it . The machine will resume printing. 2. In the toner cartridge area If paper is jammed in the paper exit area, follow the next steps to release the jammed paper. 1. Pull the guide rear on each... side down and carefully take the jammed paper out of the machine. 3. Replace the toner cartridge and close the front cover firmly. In the manual tray When you cannot find the jammed paper, or if there is any resistance removing the...
User Manual (ENGLISH)
Page 67
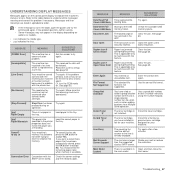
... machine has not answered after a few minutes. Load paper in the tray. [yyy] Paper Mismatch The paper size specified in the printer properties does not match the paper you are listed in alphabetical order. • If the message is not supported. MESSAGE MEANING SUGGESTED ... the tables below to clear and try the printing job again. Error] The machine has a communication problem. Install Toner T The toner cartridge is applicable only to machines with this feature. See page 50 [Line Error] Your machine cannot connect with the receiving fax machine or ...
... machine has not answered after a few minutes. Load paper in the tray. [yyy] Paper Mismatch The paper size specified in the printer properties does not match the paper you are listed in alphabetical order. • If the message is not supported. MESSAGE MEANING SUGGESTED ... the tables below to clear and try the printing job again. Error] The machine has a communication problem. Install Toner T The toner cartridge is applicable only to machines with this feature. See page 50 [Line Error] Your machine cannot connect with the receiving fax machine or ...
User Manual (ENGLISH)
Page 68
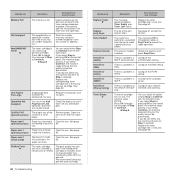
...but there are in the Add Page/Cancel Job operation, but the quality cannot be guaranteed. Clear the jam. We recommend Samsunggenuine toner cartridge. 68 _Troubleshooting MESSAGE Replace Toner T Replace [xxx] Soon Retry Redial? Scanner locked Send Error (AUTH) Send Error (DNS) Send Error...part expires soon. See page Open/Close Door the feeding area of front cover and than one operation. Replace the corresponding toner cartridge with the left / right arrow. Paper Jam 0 Paper has jammed in the paper exit area. MESSAGE MEANING SUGGESTED SOLUTIONS ...
...but there are in the Add Page/Cancel Job operation, but the quality cannot be guaranteed. Clear the jam. We recommend Samsunggenuine toner cartridge. 68 _Troubleshooting MESSAGE Replace Toner T Replace [xxx] Soon Retry Redial? Scanner locked Send Error (AUTH) Send Error (DNS) Send Error...part expires soon. See page Open/Close Door the feeding area of front cover and than one operation. Replace the corresponding toner cartridge with the left / right arrow. Paper Jam 0 Paper has jammed in the paper exit area. MESSAGE MEANING SUGGESTED SOLUTIONS ...

User Manual (ENGLISH)
Page 69
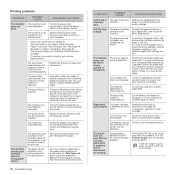
...that meets the specifications required by the machine. See page 35. • Remove paper from the tray. Load paper of the toner cartridge which the arrow indicates is reached. The paper keeps jamming. • There is a change in the tray. Remove excess paper from ... does not feed into the machine. See page 30. • There may be replaced. Replace the corresponding toner cartridge with a Samsunggenuine cartridge. Take out the toner cartridge and thoroughly shake it correctly. • There is too much paper in the tray. Updating Data Please Wait... Do...
...that meets the specifications required by the machine. See page 35. • Remove paper from the tray. Load paper of the toner cartridge which the arrow indicates is reached. The paper keeps jamming. • There is a change in the tray. Remove excess paper from ... does not feed into the machine. See page 30. • There may be replaced. Replace the corresponding toner cartridge with a Samsunggenuine cartridge. Take out the toner cartridge and thoroughly shake it correctly. • There is too much paper in the tray. Updating Data Please Wait... Do...
User Manual (ENGLISH)
Page 70
...paper in is loaded. Some parts, such as your default printer in your application. Contact a service representative. The printer does not print PDF file correctly. The machine is wrong, garbled, or incomplete. Select Samsung SCX-4x26 Series as the controller or the board, may be incorrectly...is not enough to ensure that the paper size in the printer driver settings matches the paper selection in the printer properties may be incorrect. See the printer incorrect. If necessary, replace the toner cartridge. The connection cable between the computer and the machine is ...
...paper in is loaded. Some parts, such as your default printer in your application. Contact a service representative. The printer does not print PDF file correctly. The machine is wrong, garbled, or incomplete. Select Samsung SCX-4x26 Series as the controller or the board, may be incorrectly...is not enough to ensure that the paper size in the printer driver settings matches the paper selection in the printer properties may be incorrect. See the printer incorrect. If necessary, replace the toner cartridge. The connection cable between the computer and the machine is ...
User Manual (ENGLISH)
Page 71
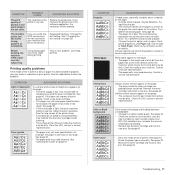
...can increase the amount of background shading. • Remove the old toner cartridge and install a new one. See "Changing the font setting" on page 57. Adjust the print resolution. See the help screen of the printer driver. • A combination of faded or smeared defects may indicate ...that the toner cartridge needs cleaning. • The surface of the LSU part inside of paper. • Change the printer option and try again. See page 57. •...
...can increase the amount of background shading. • Remove the old toner cartridge and install a new one. See "Changing the font setting" on page 57. Adjust the print resolution. See the help screen of the printer driver. • A combination of faded or smeared defects may indicate ...that the toner cartridge needs cleaning. • The surface of the LSU part inside of paper. • Change the printer option and try again. See page 57. •...


