
Universal Print Driver Guide (ENGLISH)
Page 9
... - Shows status of recently used printer is at the top of the model you print. Changing Samsung Universal Print Driver settings Setting the pop-up : 1. Using the Samsung Universal Print Driver_ 9 Search Now: Searches printers that are connected either by the printer's IP address. • My Printer - You need to install the Smart Panel of the list. - The most recently used printers. You can set the Samsung Universal Print Driver window to see the troubleshooting guide. • Printer Settings: Opens SyncThur Web Service, which provides options for...
... - Shows status of recently used printer is at the top of the model you print. Changing Samsung Universal Print Driver settings Setting the pop-up : 1. Using the Samsung Universal Print Driver_ 9 Search Now: Searches printers that are connected either by the printer's IP address. • My Printer - You need to install the Smart Panel of the list. - The most recently used printers. You can set the Samsung Universal Print Driver window to see the troubleshooting guide. • Printer Settings: Opens SyncThur Web Service, which provides options for...
User Manual (ENGLISH)
Page 5
... Panel Functions ...1.3 2. Getting Started Unpacking ...2.1 Selecting a Location ...2.2 Installing the Toner Cartridge 2.2 Loading Paper ...2.3 Making Connections ...2.4 Turning the Machine On ...2.6 Installing Printer Software ...2.7 System requirements ...2.7 Printer Driver Features ...2.8 Changing the Display Language and Country 2.9 Setting Language ...2.9 Setting Country ...2.9 Setting the Machine ID (Only for SCX-4521F 2.9 Entering Characters Using the Number Keypad ...2.9 Setting the Date and Time (Only for SCX-4521F 2.10 Changing the Clock Mode 2.10 Setting the Paper Size and Type...
... Panel Functions ...1.3 2. Getting Started Unpacking ...2.1 Selecting a Location ...2.2 Installing the Toner Cartridge 2.2 Loading Paper ...2.3 Making Connections ...2.4 Turning the Machine On ...2.6 Installing Printer Software ...2.7 System requirements ...2.7 Printer Driver Features ...2.8 Changing the Display Language and Country 2.9 Setting Language ...2.9 Setting Country ...2.9 Setting the Machine ID (Only for SCX-4521F 2.9 Entering Characters Using the Number Keypad ...2.9 Setting the Date and Time (Only for SCX-4521F 2.10 Changing the Clock Mode 2.10 Setting the Paper Size and Type...
User Manual (ENGLISH)
Page 7
... Tray ...9.2 In the Manual Tray ...9.2 In the Fuser Area or Around the Toner Cartridge 9.3 In the Paper Exit Area ...9.3 Tips for Avoiding Paper Jams 9.4 Clearing LCD Error Messages 9.4 Solving Other Problems ...9.6 Paper Feeding Problems ...9.6 Printing Problems ...9.7 Printing Quality Problems 9.8 Copying Problems ...9.10 Scanning Problems ...9.11 Fax Problems (Only for Using Paper 10.4 Paper Specifications ...10.5 Paper Output Capacity ...10.5 Paper Storage Environment 10.5 6 Specifications General Specifications ...10.1 Scanner and Copier Specifications 10.2 Printer Specifications...
... Tray ...9.2 In the Manual Tray ...9.2 In the Fuser Area or Around the Toner Cartridge 9.3 In the Paper Exit Area ...9.3 Tips for Avoiding Paper Jams 9.4 Clearing LCD Error Messages 9.4 Solving Other Problems ...9.6 Paper Feeding Problems ...9.6 Printing Problems ...9.7 Printing Quality Problems 9.8 Copying Problems ...9.10 Scanning Problems ...9.11 Fax Problems (Only for Using Paper 10.4 Paper Specifications ...10.5 Paper Output Capacity ...10.5 Paper Storage Environment 10.5 6 Specifications General Specifications ...10.1 Scanner and Copier Specifications 10.2 Printer Specifications...
User Manual (ENGLISH)
Page 12
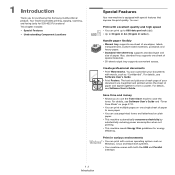
...-sheet tray supports standard type and size of paper. Handle paper flexibly • Manual tray supports one single sheet of your documents with excellent quality and high speed • You can customize your document are magnified and printed across the sheet of special materials. • 50-sheet output tray supports convenient access. The text and pictures of each page of paper to save the toner. For details, see Software User's Guide. • Print Posters. For details, see Software User's Guide. Your machine provides printing, copying, scanning, and faxing...
...-sheet tray supports standard type and size of paper. Handle paper flexibly • Manual tray supports one single sheet of your documents with excellent quality and high speed • You can customize your document are magnified and printed across the sheet of special materials. • 50-sheet output tray supports convenient access. The text and pictures of each page of paper to save the toner. For details, see Software User's Guide. • Print Posters. For details, see Software User's Guide. Your machine provides printing, copying, scanning, and faxing...

User Manual (ENGLISH)
Page 14
Displays the current status and prompts during an 2 operation. Enter Confirms the selection on the display. In Standby mode, clears/cancels the copy options, such as the darkness, the document type setting, the copy size, and the number of copies. of Copies Selects the number of copies. 1 Reduce/Enlarge Makes a copy smaller or larger than the original. Start Starts a job. For details, see Software User's Guide. 7 Toner Save Allows you back to the upper menu level. Favorite Copy Allows you to use one of the special...
Displays the current status and prompts during an 2 operation. Enter Confirms the selection on the display. In Standby mode, clears/cancels the copy options, such as the darkness, the document type setting, the copy size, and the number of copies. of Copies Selects the number of copies. 1 Reduce/Enlarge Makes a copy smaller or larger than the original. Start Starts a job. For details, see Software User's Guide. 7 Toner Save Allows you back to the upper menu level. Favorite Copy Allows you to use one of the special...
User Manual (ENGLISH)
Page 15
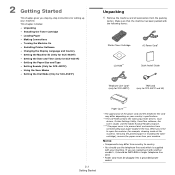
... tray. If you are replacing it should use the telephone line cord which is to open the machine (for example, cleaning inside of the machine, removing the jammed paper or installing the toner cartridge), remove the paper cover from contaminating your machine. This chapter includes: • Unpacking • Installing the Toner Cartridge • Loading Paper • Making Connections • Turning the Machine On • Installing Printer Software • Changing the Display Language and Country • Setting the Machine ID (Only for SCX-4521F) • Setting the Date...
... tray. If you are replacing it should use the telephone line cord which is to open the machine (for example, cleaning inside of the machine, removing the jammed paper or installing the toner cartridge), remove the paper cover from contaminating your machine. This chapter includes: • Unpacking • Installing the Toner Cartridge • Loading Paper • Making Connections • Turning the Machine On • Installing Printer Software • Changing the Display Language and Country • Setting the Machine ID (Only for SCX-4521F) • Setting the Date...
User Manual (ENGLISH)
Page 21
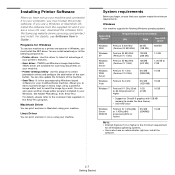
... update the firmware of your machine. For details, please refer to send the image by e-mail. Linux Driver You can print and scan in Linux using a powerful image editor and to the onscreen help supplied on your machine. Windows Your machine supports the following components: • Printer driver- Macintosh Driver You can print and scan in Macintosh using your machine. • Printer Settings Utility- For details, see Software User's Guide.: Programs for scanning documents on the SmarThru program. You can install the software. 2.7 Getting Started...
... update the firmware of your machine. For details, please refer to send the image by e-mail. Linux Driver You can print and scan in Linux using a powerful image editor and to the onscreen help supplied on your machine. Windows Your machine supports the following components: • Printer driver- Macintosh Driver You can print and scan in Macintosh using your machine. • Printer Settings Utility- For details, see Software User's Guide.: Programs for scanning documents on the SmarThru program. You can install the software. 2.7 Getting Started...
User Manual (ENGLISH)
Page 32
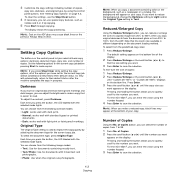
... make a reduced copy, black lines may cause black lines on the bottom line of the display. 2 Press Reduce/Enlarge or the scroll button ( or ) to find the size setting you can select the number of Copies Using the No. For the SCX-4521F, you want to reduce the background, change the Darkness setting to Light and/or the Original Type setting to save the selection. Always keep it clean. Setting Copy Options The buttons on the ADF...
... make a reduced copy, black lines may cause black lines on the bottom line of the display. 2 Press Reduce/Enlarge or the scroll button ( or ) to find the size setting you can select the number of Copies Using the No. For the SCX-4521F, you want to reduce the background, change the Darkness setting to Light and/or the Original Type setting to save the selection. Always keep it clean. Setting Copy Options The buttons on the ADF...
User Manual (ENGLISH)
Page 33
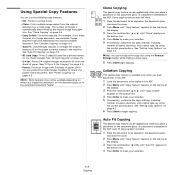
... normal mode. • Clone: Prints multiple image copies from the original document on the bottom line. 4 Press Enter to make your selection. 5 If necessary, customize the copy settings, including number of copies, darkness, and original type, by using the control panel buttons. NOTE: You cannot adjust the copy size using the Reduce/ Enlarge button while making a clone copy. 6 Press Start begin copying. If a document is automatically determined by the original image and paper size. The number of images is detected in the ADF, Auto Fit copying...
... normal mode. • Clone: Prints multiple image copies from the original document on the bottom line. 4 Press Enter to make your selection. 5 If necessary, customize the copy settings, including number of copies, darkness, and original type, by using the control panel buttons. NOTE: You cannot adjust the copy size using the Reduce/ Enlarge button while making a clone copy. 6 Press Start begin copying. If a document is automatically determined by the original image and paper size. The number of images is detected in the ADF, Auto Fit copying...
User Manual (ENGLISH)
Page 38
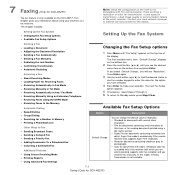
... you send the fax manually. The first available menu item, "Default-Change", displays on the bottom line. 2 Press the scroll button ( or ) until you have selected. 4 Press Enter to Fax • Sending Broadcast Faxes • Sending a Delayed Fax • Sending a Priority Fax • Adding Documents To a Scheduled Fax • Canceling a Scheduled Fax Additional Features • Using Secure Receiving Mode • Printing Reports • Using Advanced Fax Settings Changing the Fax Setup options 1 Press Menu until "Fax Setup" appears on color fax transmission, a slow speed in Memory...
... you send the fax manually. The first available menu item, "Default-Change", displays on the bottom line. 2 Press the scroll button ( or ) until you have selected. 4 Press Enter to Fax • Sending Broadcast Faxes • Sending a Delayed Fax • Sending a Priority Fax • Adding Documents To a Scheduled Fax • Canceling a Scheduled Fax Additional Features • Using Secure Receiving Mode • Printing Reports • Using Advanced Fax Settings Changing the Fax Setup options 1 Press Menu until "Fax Setup" appears on color fax transmission, a slow speed in Memory...

User Manual (ENGLISH)
Page 39
... turned off or fails, data outside the margin and the Auto Reduction feature is available only when you set your documents lighter or darker. • Light works well with dark print. • Normal works well with standard typed or printed documents. • Dark works well with detailed information about the previous 50 communications operations, including time and dates. You can receive a call , and the caller can leave a message on page...
... turned off or fails, data outside the margin and the Auto Reduction feature is available only when you set your documents lighter or darker. • Light works well with dark print. • Normal works well with standard typed or printed documents. • Dark works well with detailed information about the previous 50 communications operations, including time and dates. You can receive a call , and the caller can leave a message on page...
User Manual (ENGLISH)
Page 50
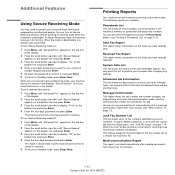
... Enter. 3 Press the scroll button ( or ) to display "Print" on Secure Receiving mode to restrict printing of the user-selectable options. To add or delete numbers to or from more than one location. 7.13 Faxing (Only for SCX-4521F) To turn on the bottom line and press Enter. 4 Enter the four-digit password and press Enter. Received Fax Report This report shows information on the faxes you want to use, using the Phone Book button: see "Junk Fax Setup" on the bottom line and press Enter. 4 Enter...
... Enter. 3 Press the scroll button ( or ) to display "Print" on Secure Receiving mode to restrict printing of the user-selectable options. To add or delete numbers to or from more than one location. 7.13 Faxing (Only for SCX-4521F) To turn on the bottom line and press Enter. 4 Enter the four-digit password and press Enter. Received Fax Report This report shows information on the faxes you want to use, using the Phone Book button: see "Junk Fax Setup" on the bottom line and press Enter. 4 Enter...

User Manual (ENGLISH)
Page 51
... from being accessed by pressing Stop/Clear. ECM Mode (Error Correction Mode) Error Correction Mode helps with poor line quality and makes sure any error. Printing a Report 1 Press Menu until "Reports" appears on the top line of the display. 2 Press the scroll button ( or ) until "Advanced Fax" appears on the display, choose a status by pressing the scroll button ( or ) or enter a value using the number keypad. 4 Press Enter to save the selection. 5 You can keep your received faxes from Setup mode at...
... from being accessed by pressing Stop/Clear. ECM Mode (Error Correction Mode) Error Correction Mode helps with poor line quality and makes sure any error. Printing a Report 1 Press Menu until "Reports" appears on the top line of the display. 2 Press the scroll button ( or ) until "Advanced Fax" appears on the display, choose a status by pressing the scroll button ( or ) or enter a value using the number keypad. 4 Press Enter to save the selection. 5 You can keep your received faxes from Setup mode at...
User Manual (ENGLISH)
Page 64
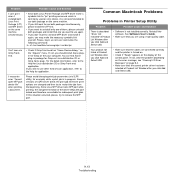
... the printer properties. Select your Windows. See "Clearing Paper Jams" on page 2.2. The connection cable between the computer and the machine is indicating a system error. If possible, attach the cable to see Software User's Guide. Check the Windows printer setting to make sure that your service representative. The printer driver may be incorrectly installed. Change the page orientation in the software application settings you have already printed successfully. Turn the machine off and then back on page 2.3. • Install the toner cartridge. The machine is...
... the printer properties. Select your Windows. See "Clearing Paper Jams" on page 2.2. The connection cable between the computer and the machine is indicating a system error. If possible, attach the cable to see Software User's Guide. Check the Windows printer setting to make sure that your service representative. The printer driver may be incorrectly installed. Change the page orientation in the software application settings you have already printed successfully. Turn the machine off and then back on page 2.3. • Install the toner cartridge. The machine is...
User Manual (ENGLISH)
Page 67
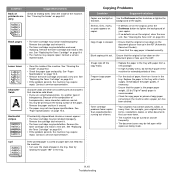
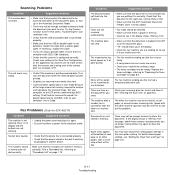
..., or heavy lines. background of toner. • Your originals may require repair. If horizontally aligned black streaks or smears appear: • The toner cartridge may require repair. Remove the toner cartridge and install a new one . See "Replacing the Toner Cartridge" on page 10.3. • Remove the toner cartridge and install a new one. Remove the toner cartridge and install a new one . Contact a service representative. Also try another type of printouts are too light or Use the Darkness button to lighten the background of time. Check/adjust the paper guides, if...
..., or heavy lines. background of toner. • Your originals may require repair. If horizontally aligned black streaks or smears appear: • The toner cartridge may require repair. Remove the toner cartridge and install a new one . See "Replacing the Toner Cartridge" on page 10.3. • Remove the toner cartridge and install a new one. Remove the toner cartridge and install a new one . Contact a service representative. Also try another type of printouts are too light or Use the Darkness button to lighten the background of time. Check/adjust the paper guides, if...
User Manual (ENGLISH)
Page 68
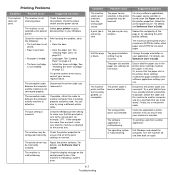
... paper settings, see if that works. The machine does not send. • Make sure that the document is loaded in the ADF or on the document glass. • "TX" should be empty. See "Cleaning the Scan Unit" on the documents you send. The machine dials a number, but a connection with a known good cable. There may not be turned off, out of paper, or cannot answer incoming calls. If the display shows a "Memory Full" message, delete from memory any documents...
... paper settings, see if that works. The machine does not send. • Make sure that the document is loaded in the ADF or on the document glass. • "TX" should be empty. See "Cleaning the Scan Unit" on the documents you send. The machine dials a number, but a connection with a known good cable. There may not be turned off, out of paper, or cannot answer incoming calls. If the display shows a "Memory Full" message, delete from memory any documents...
User Manual (ENGLISH)
Page 70
... uninstall MFP driver and install it is turned on. • Check if "Ready" appears on the display of CUPS server break the print job whenever print options are using a high-quality cable. See Software User's Guide. • Make sure that the correct printer driver has been selected at Product List Window after you click Add and Select USB. 9.13 Troubleshooting Common Macintosh Problems Problems in Printer Setup Utility Problem Possible Cause and Solution There is described "driver not installed" at Product List Window...
... uninstall MFP driver and install it is turned on. • Check if "Ready" appears on the display of CUPS server break the print job whenever print options are using a high-quality cable. See Software User's Guide. • Make sure that the correct printer driver has been selected at Product List Window after you click Add and Select USB. 9.13 Troubleshooting Common Macintosh Problems Problems in Printer Setup Utility Problem Possible Cause and Solution There is described "driver not installed" at Product List Window...

User Manual (ENGLISH)
Page 78
... sheet) copying 4.5 P paper guidelines 3.2 paper jam, clear 9.2 paper load manual tray 3.3 tray 2.3 paper load capacity 3.1 paper size, set paper tray 2.11 paper type, set paper tray 2.11 parallel,connect 2.6 poster copying 4.5 power save mode, use 2.12 print quality problems, solve 9.8 printing document 5.1 Phonebook list 7.10 reports 7.13 priority fax 7.11 problem, solve copying 9.10 error messages 9.4 faxing 9.11 Linux 9.12 Macintosh 9.13 paper feeding 9.6 printing 9.7 printing quality 9.8 scanning 9.11 R receive mode, set 7.2 receiving a fax in Ans/Fax mode 7.6 in DRPD mode 7.7 in Fax mode...
... sheet) copying 4.5 P paper guidelines 3.2 paper jam, clear 9.2 paper load manual tray 3.3 tray 2.3 paper load capacity 3.1 paper size, set paper tray 2.11 paper type, set paper tray 2.11 parallel,connect 2.6 poster copying 4.5 power save mode, use 2.12 print quality problems, solve 9.8 printing document 5.1 Phonebook list 7.10 reports 7.13 priority fax 7.11 problem, solve copying 9.10 error messages 9.4 faxing 9.11 Linux 9.12 Macintosh 9.13 paper feeding 9.6 printing 9.7 printing quality 9.8 scanning 9.11 R receive mode, set 7.2 receiving a fax in Ans/Fax mode 7.6 in DRPD mode 7.7 in Fax mode...
User Manual (ENGLISH)
Page 102
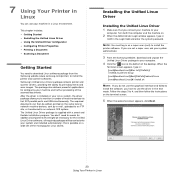
... not use your machine in a Linux environment. Follow the steps 3 to install the printer and scanner softwares. This chapter includes: • Getting Started • Installing the Unified Linux Driver • Using the Unified Driver Configurator • Configuring Printer Properties • Printing a Document • Scanning a Document Getting Started You need to install the printer software. this is possible on . 2 When the Administrator Login window appears, type in root in the Login field and enter the system password. The acquired documents can use...
... not use your machine in a Linux environment. Follow the steps 3 to install the printer and scanner softwares. This chapter includes: • Getting Started • Installing the Unified Linux Driver • Using the Unified Driver Configurator • Configuring Printer Properties • Printing a Document • Scanning a Document Getting Started You need to install the printer software. this is possible on . 2 When the Administrator Login window appears, type in root in the Login field and enter the system password. The acquired documents can use...
User Manual (ENGLISH)
Page 110
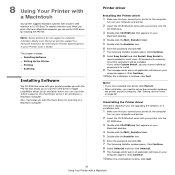
... driver for printer operations will close on your computer. Easy Install is required if you are upgrading the software, or if installation fails. 1 Make sure that allows you to use the CUPS driver or Apple LaserWriter driver (only available when you connect your printer to Printer Specifications in USB interface or 10/100 Base-TX network interface card. Also, it provides you with the PPD file that you use the CUPS driver...
... driver for printer operations will close on your computer. Easy Install is required if you are upgrading the software, or if installation fails. 1 Make sure that allows you to use the CUPS driver or Apple LaserWriter driver (only available when you connect your printer to Printer Specifications in USB interface or 10/100 Base-TX network interface card. Also, it provides you with the PPD file that you use the CUPS driver...


