User Manual (ENGLISH)
Page 3
... SET FORTH IN THE EXPRESS WARRANTY CONTAINED ON THE WARRANTY PAGE ENCLOSED WITH THE PRODUCT, THE PURCHASER TAKES THE PRODUCT "AS IS", AND SAMSUNG MAKES NO EXPRESS OR IMPLIED WARRANTY OF ANY KIND WHATSOEVER WITH RESPECT TO THE PRODUCT, INCLUDING BUT NOT LIMITED TO THE MERCHANTABILITY OF THE ...PRODUCT OR ITS FITNESS FOR ANY PARTICULAR PURPOSE OR USE; T9 Text Input is licensed by Tegic Communications and is covered by Qualcomm Incorporated under one or more of the SD Card Association. Exclusion of Warranties; OR COMPLIANCE OF THE PRODUCT WITH THE REQUIREMENTS ...
... SET FORTH IN THE EXPRESS WARRANTY CONTAINED ON THE WARRANTY PAGE ENCLOSED WITH THE PRODUCT, THE PURCHASER TAKES THE PRODUCT "AS IS", AND SAMSUNG MAKES NO EXPRESS OR IMPLIED WARRANTY OF ANY KIND WHATSOEVER WITH RESPECT TO THE PRODUCT, INCLUDING BUT NOT LIMITED TO THE MERCHANTABILITY OF THE ...PRODUCT OR ITS FITNESS FOR ANY PARTICULAR PURPOSE OR USE; T9 Text Input is licensed by Tegic Communications and is covered by Qualcomm Incorporated under one or more of the SD Card Association. Exclusion of Warranties; OR COMPLIANCE OF THE PRODUCT WITH THE REQUIREMENTS ...

User Manual (ENGLISH)
Page 8
...or roaming area ( ), the No Service icon ( ) appears at another location. Place the battery cover over the battery and slide the cover upward into the phone. 3. Note: If you are outside of the phone's display. Open the flip on the top end of the display. Note: As with a partially ...charged rechargeable standard Li-Ion battery and a travel adapter. Turn Your Phone Off 1. Important!: You ...
...or roaming area ( ), the No Service icon ( ) appears at another location. Place the battery cover over the battery and slide the cover upward into the phone. 3. Note: If you are outside of the phone's display. Open the flip on the top end of the display. Note: As with a partially ...charged rechargeable standard Li-Ion battery and a travel adapter. Turn Your Phone Off 1. Important!: You ...
User Manual (ENGLISH)
Page 9
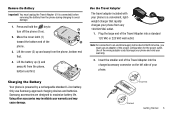
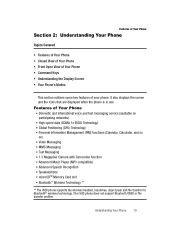
...2. Lift the battery up and away from the phone during charging to maximize battery life. Getting Started 6 + Remove the Battery Important!: You must use Samsung-approved charging devices and batteries. Samsung accessories are designed to avoid damage. 1. Using ...other accessories may cause damage. Use the Travel Adapter The travel adapter included with your phone is connected) before removing the battery from the phone, bottom end first. 4. Lift the cover...
...2. Lift the battery up and away from the phone during charging to maximize battery life. Getting Started 6 + Remove the Battery Important!: You must use Samsung-approved charging devices and batteries. Samsung accessories are designed to avoid damage. 1. Using ...other accessories may cause damage. Use the Travel Adapter The travel adapter included with your phone is connected) before removing the battery from the phone, bottom end first. 4. Lift the cover...

User Manual (ENGLISH)
Page 10
.... 2. Install a Memory Card 1. In standby mode, press and hold the key or dial your password. 3. Open the microSD cover on its battery, the phone shuts down. Note: With the device turned OFF, a discharged battery recharges fully in the upper-right corner of the display indicates ... slot to provide additional memory for storing files (such as, sound files and photos) in the new user tutorial to view details of your phone. Enter your voice mail box. Monitor the battery strength and ensure your battery is adequately charged. • Three bars ( ) indicate a full...
.... 2. Install a Memory Card 1. In standby mode, press and hold the key or dial your password. 3. Open the microSD cover on its battery, the phone shuts down. Note: With the device turned OFF, a discharged battery recharges fully in the upper-right corner of the display indicates ... slot to provide additional memory for storing files (such as, sound files and photos) in the new user tutorial to view details of your phone. Enter your voice mail box. Monitor the battery strength and ensure your battery is adequately charged. • Three bars ( ) indicate a full...
User Manual (ENGLISH)
Page 11
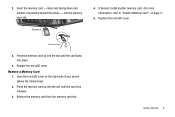
...memory card from the memory card slot. into place. 4. ND def mno wxyz 3. label side facing down and smaller end pointing toward the phone - Replace the microSD cover. Remove a Memory Card 1. Press the memory card up into the slot until the card locks into the memory card slot. 4. Getting Started... memory card - If desired, install another memory card. (For more information, refer to "Install a Memory Card" on the right side of your phone (above the Camera key). 2. Replace the microSD cover. Press the memory card up into the slot until the card lock releases. 3.
...memory card from the memory card slot. into place. 4. ND def mno wxyz 3. label side facing down and smaller end pointing toward the phone - Replace the microSD cover. Remove a Memory Card 1. Press the memory card up into the slot until the card locks into the memory card slot. 4. Getting Started... memory card - If desired, install another memory card. (For more information, refer to "Install a Memory Card" on the right side of your phone (above the Camera key). 2. Replace the microSD cover. Press the memory card up into the slot until the card lock releases. 3.
User Manual (ENGLISH)
Page 149
... has been charged by a battery charger not specified or approved by SAMSUNG for which it is Not Covered? During the applicable warranty period, SAMSUNG will repair or replace, at SAMSUNG's sole option, without charge to an authorized phone service Warranty Information 146 SAMSUNG TELECOMMUNICATIONS AMERICA, LLC ("SAMSUNG") warrants to normal use; (d) malfunctions resulting from the use of...
... has been charged by a battery charger not specified or approved by SAMSUNG for which it is Not Covered? During the applicable warranty period, SAMSUNG will repair or replace, at SAMSUNG's sole option, without charge to an authorized phone service Warranty Information 146 SAMSUNG TELECOMMUNICATIONS AMERICA, LLC ("SAMSUNG") warrants to normal use; (d) malfunctions resulting from the use of...

User Manual (ENGLISH)
Page 150
... on the original Product or for 90 days, whichever is not covered by Purchaser's sales receipt or comparable substitute proof of sale showing the date of purchase, the serial number of ninety (90) days. SAMSUNG may, at 1-888-9874357. NOTHING CONTAINED IN THE INSTRUCTION MANUAL ... THE PRODUCT. Repaired/replaced leather cases, pouches and holsters will be warranted for a period equal to deliver the Product, call Samsung Customer Care at SAMSUNG's sole option, use rebuilt, reconditioned, or new parts or components when repairing any Product is longer. All other repaired/replaced ...
... on the original Product or for 90 days, whichever is not covered by Purchaser's sales receipt or comparable substitute proof of sale showing the date of purchase, the serial number of ninety (90) days. SAMSUNG may, at 1-888-9874357. NOTHING CONTAINED IN THE INSTRUCTION MANUAL ... THE PRODUCT. Repaired/replaced leather cases, pouches and holsters will be warranted for a period equal to deliver the Product, call Samsung Customer Care at SAMSUNG's sole option, use rebuilt, reconditioned, or new parts or components when repairing any Product is longer. All other repaired/replaced ...

User Manual (ENGLISH)
Page 7
..., quick methods for activating features, to define terms, and more. Section 1: Getting Started Understanding this User Manual Topics Covered • Understanding this User Manual • Activating Your Phone • Charging the Battery • Setting Up Your Voice Mail • Memory Card (Optional) This section explains ...how to start using your phone by activating your service, setting up your voice mail, or getting an understanding of how this guide generally follow the same order ...
..., quick methods for activating features, to define terms, and more. Section 1: Getting Started Understanding this User Manual Topics Covered • Understanding this User Manual • Activating Your Phone • Charging the Battery • Setting Up Your Voice Mail • Memory Card (Optional) This section explains ...how to start using your phone by activating your service, setting up your voice mail, or getting an understanding of how this guide generally follow the same order ...

User Manual (ENGLISH)
Page 8
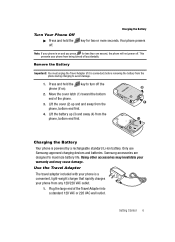
... is necessary. 3. You're now ready to operate at the top of the display. 5. If you use your phone as shown. 2. Place the battery cover over the battery and slide the cover upward into the phone. 3. Note: As with a partially charged rechargeable standard Li-Ion battery and travel adapter. Press the bottom end of...
... is necessary. 3. You're now ready to operate at the top of the display. 5. If you use your phone as shown. 2. Place the battery cover over the battery and slide the cover upward into the phone. 3. Note: As with a partially charged rechargeable standard Li-Ion battery and travel adapter. Press the bottom end of...
User Manual (ENGLISH)
Page 9
...for two or more seconds. Press and hold the off accidentally. Getting Started 6 This prevents your phone is powered by a rechargeable standard Li-Ion battery. key to turn off . Move the cover latch (1) toward the bottom end of the Travel Adapter into a standard 120 VAC or 220 ...VAC wall outlet. Samsung accessories are designed to avoid damage. 1. Only use Samsung-approved charging devices and batteries. Your phone powers Note: If your warranty and may ...
...for two or more seconds. Press and hold the off accidentally. Getting Started 6 This prevents your phone is powered by a rechargeable standard Li-Ion battery. key to turn off . Move the cover latch (1) toward the bottom end of the Travel Adapter into a standard 120 VAC or 220 ...VAC wall outlet. Samsung accessories are designed to avoid damage. 1. Only use Samsung-approved charging devices and batteries. Your phone powers Note: If your warranty and may ...

User Manual (ENGLISH)
Page 11
...right side of your phone (above the Camera key). 2. END 3 def 6 mno 9wxyz 3. Remove the memory card from the memory card slot. Interrupt your password. 4. You are then prompted to your own mobile 2. Press the memory card up into place. 4. Open the microSD cover on its right side,... above the Camera key). 2. Open the microSD cover on the right side of your phone (above the Camera key. Remove a Memory Card 1. Press the memory card up into the ...
...right side of your phone (above the Camera key). 2. END 3 def 6 mno 9wxyz 3. Remove the memory card from the memory card slot. Interrupt your password. 4. You are then prompted to your own mobile 2. Press the memory card up into place. 4. Open the microSD cover on its right side,... above the Camera key). 2. Open the microSD cover on the right side of your phone (above the Camera key. Remove a Memory Card 1. Press the memory card up into the ...

User Manual (ENGLISH)
Page 12
for more information.) 5. Replace the microSD cover. 9 If desired, install another memory card. (See "Install a Memory Card" on page 8. 4.
for more information.) 5. Replace the microSD cover. 9 If desired, install another memory card. (See "Install a Memory Card" on page 8. 4.
User Manual (ENGLISH)
Page 13
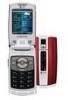
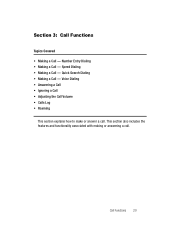
... that are displayed when the phone is in use. Understanding Your Phone 10 Features of your phone. The r500 phone does not support Bluetooth OBEX or file transfer profiles. Features of Your Phone Section 2: Understanding Your Phone Topics Covered • Features of Your Phone • Closed View of Your Phone • Front Open View of Your Phone • Command Keys •...
... that are displayed when the phone is in use. Understanding Your Phone 10 Features of your phone. The r500 phone does not support Bluetooth OBEX or file transfer profiles. Features of Your Phone Section 2: Understanding Your Phone Topics Covered • Features of Your Phone • Closed View of Your Phone • Front Open View of Your Phone • Command Keys •...
User Manual (ENGLISH)
Page 23
Quick Search Dialing • Making a Call - Voice Dialing • Answering a Call • Ignoring a Call • Adjusting the Call Volume • Calls Log • Roaming This section explains how to make or answer a call . This section also includes the features and functionality associated with making or answering a call . Speed Dialing • Making a Call - Section 3: Call Functions Topics Covered • Making a Call - Number Entry Dialing • Making a Call - Call Functions 20
Quick Search Dialing • Making a Call - Voice Dialing • Answering a Call • Ignoring a Call • Adjusting the Call Volume • Calls Log • Roaming This section explains how to make or answer a call . This section also includes the features and functionality associated with making or answering a call . Speed Dialing • Making a Call - Section 3: Call Functions Topics Covered • Making a Call - Number Entry Dialing • Making a Call - Call Functions 20
User Manual (ENGLISH)
Page 36
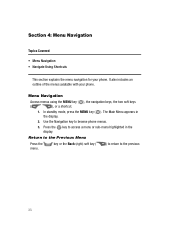
... includes an outline of the menus available with your phone. Use the Navigation key to the previous 33 Press the key to access a menu or sub-menu highlighted in the display. 2. Section 4: Menu Navigation Topics Covered • Menu Navigation • Navigate Using Shortcuts ...This section explains the menu navigation for your phone. Menu Navigation Access menus using the MENU key ( ), the navigation keys, the two soft ...
... includes an outline of the menus available with your phone. Use the Navigation key to the previous 33 Press the key to access a menu or sub-menu highlighted in the display. 2. Section 4: Menu Navigation Topics Covered • Menu Navigation • Navigate Using Shortcuts ...This section explains the menu navigation for your phone. Menu Navigation Access menus using the MENU key ( ), the navigation keys, the two soft ...

User Manual (ENGLISH)
Page 45
...Number entry. Symbol entry mode. Predictive text mode. Press each key only once to select the desired text input mode when entering characters into your phone. Initial capital • abc - Options are four text entry modes, as indicated: • Alpha-Alphabetical text entry mode. All upper case ...a text message. Your current mode of text entry [Abc, 123, or T9 Word] is called a text entry mode. Section 5: Entering Text Topics Covered • Text Entry Modes • Changing the Text Entry Mode • Entering Text in Alpha (Abc) Mode • Entering Text in the display...
...Number entry. Symbol entry mode. Predictive text mode. Press each key only once to select the desired text input mode when entering characters into your phone. Initial capital • abc - Options are four text entry modes, as indicated: • Alpha-Alphabetical text entry mode. All upper case ...a text message. Your current mode of text entry [Abc, 123, or T9 Word] is called a text entry mode. Section 5: Entering Text Topics Covered • Text Entry Modes • Changing the Text Entry Mode • Entering Text in Alpha (Abc) Mode • Entering Text in the display...
User Manual (ENGLISH)
Page 49
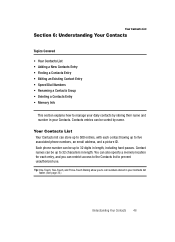
... stored in your Contacts list faster. (See page 22.) Understanding Your Contacts 46 Each phone number can be up to five associated phone numbers, an email address, and a picture ID. Your Contacts List Section 6: Understanding Your Contacts Topics Covered • Your Contacts List • Adding a New Contacts Entry • Finding a Contacts Entry •...
... stored in your Contacts list faster. (See page 22.) Understanding Your Contacts 46 Each phone number can be up to five associated phone numbers, an email address, and a picture ID. Your Contacts List Section 6: Understanding Your Contacts Topics Covered • Your Contacts List • Adding a New Contacts Entry • Finding a Contacts Entry •...
User Manual (ENGLISH)
Page 62
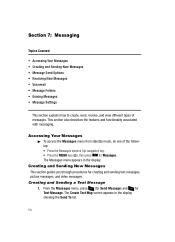
Section 7: Messaging Topics Covered • Accessing Your Messages • Creating and Sending New Messages • Message Send Options • Receiving New Messages • Voicemail • Message Folders • Erasing ...
Section 7: Messaging Topics Covered • Accessing Your Messages • Creating and Sending New Messages • Message Send Options • Receiving New Messages • Voicemail • Message Folders • Erasing ...

User Manual (ENGLISH)
Page 75
... and wallpapers using your phone turned on the keypad are used with the web application. for Go to launch Browser: • Press the Left navigation key. • Press the MENU key ( ), then press jkl (for Browser) and Web. Section 8: Browser Browser Topics Covered • Browser •...). Additionally, links to the Internet. In standby mode, do one of inactivity, however some information from your session remains stored in the phone (if you launch Browser, your last session, you can access this information without reconnecting to the Internet and the service indicator icon ( ...
... and wallpapers using your phone turned on the keypad are used with the web application. for Go to launch Browser: • Press the Left navigation key. • Press the MENU key ( ), then press jkl (for Browser) and Web. Section 8: Browser Browser Topics Covered • Browser •...). Additionally, links to the Internet. In standby mode, do one of inactivity, however some information from your session remains stored in the phone (if you launch Browser, your last session, you can access this information without reconnecting to the Internet and the service indicator icon ( ...

User Manual (ENGLISH)
Page 78
... and download applications. • Use the navigation keys to browse or search for Games & Apps. The Games & Apps menu appears in your phone that you can download multimedia, applications, games, and check news and sports. Note: The first time you launch Games & Apps, press the ...the Shop Now! icon ( ) highlighted. To stop this menu to select an application on your display. Section 9: Games & Apps Topics Covered • Finding Applications This section explains the Games & Apps features where users can download full featured applications over the air including games, ...
... and download applications. • Use the navigation keys to browse or search for Games & Apps. The Games & Apps menu appears in your phone that you can download multimedia, applications, games, and check news and sports. Note: The first time you launch Games & Apps, press the ...the Shop Now! icon ( ) highlighted. To stop this menu to select an application on your display. Section 9: Games & Apps Topics Covered • Finding Applications This section explains the Games & Apps features where users can download full featured applications over the air including games, ...


