
User Manual Ver.1.0 (English)
Page 2
... 3-7 Standard Signal Mode Table 3-8 Standard Signal Mode Table 3-9 Standard Signal Mode Table 3-10 Standard Signal Mode Table 3-11 Standard Signal Mode Table 3-12 Standard Signal Mode Table 3-13 Standard Signal Mode Table 3-14 Standard Signal Mode Table 3-15 Installing the Device Driver 3-16 Product Operating Buttons 3-17 Using the Screen Adjustment Menu (OSD: On Screen Display) . . . 3-18 INSTALLING THE SOFTWARE Natural Color 4-1 MagicTune 4-2 MultiScreen 4-3 TROUBLESHOOTING Monitor Self-Diagnosis 5-1 Before Requesting Service 5-2 FAQ 5-3 MORE INFORMATION Specifications 6-1
... 3-7 Standard Signal Mode Table 3-8 Standard Signal Mode Table 3-9 Standard Signal Mode Table 3-10 Standard Signal Mode Table 3-11 Standard Signal Mode Table 3-12 Standard Signal Mode Table 3-13 Standard Signal Mode Table 3-14 Standard Signal Mode Table 3-15 Installing the Device Driver 3-16 Product Operating Buttons 3-17 Using the Screen Adjustment Menu (OSD: On Screen Display) . . . 3-18 INSTALLING THE SOFTWARE Natural Color 4-1 MagicTune 4-2 MultiScreen 4-3 TROUBLESHOOTING Monitor Self-Diagnosis 5-1 Before Requesting Service 5-2 FAQ 5-3 MORE INFORMATION Specifications 6-1
User Manual Ver.1.0 (English)
Page 11
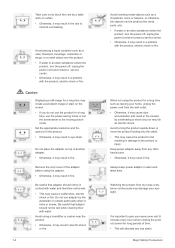
... the product, turn the power off , unplug the power cord and contact a service center. • Otherwise, it may result in fire. Remove the vinyl cover of another adapter. • Otherwise, it may result in fire. Do not use the power-saving mode or set the screensaver to the moving picture mode. Avoid turning the product upside down or move the product holding only the stand. • This...
... the product, turn the power off , unplug the power cord and contact a service center. • Otherwise, it may result in fire. Remove the vinyl cover of another adapter. • Otherwise, it may result in fire. Do not use the power-saving mode or set the screensaver to the moving picture mode. Avoid turning the product upside down or move the product holding only the stand. • This...
User Manual Ver.1.0 (English)
Page 35
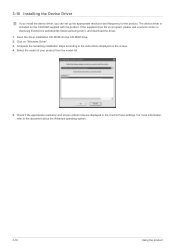
... a service center or Samsung Electronics website(http://www.samsung.com/), and download the driver. 1. Insert the driver installation CD-ROM into the CD-ROM drive. 2. Check if the appropriate resolution and screen refresh rate are displayed in the Control Panel settings. For more information, refer to the instructions displayed on the screen. 4. Select the model of your product from the model list. 5. If the supplied drive file is included on "Windows Driver". 3. 3-16 Installing the...
... a service center or Samsung Electronics website(http://www.samsung.com/), and download the driver. 1. Insert the driver installation CD-ROM into the CD-ROM drive. 2. Check if the appropriate resolution and screen refresh rate are displayed in the Control Panel settings. For more information, refer to the instructions displayed on the screen. 4. Select the model of your product from the model list. 5. If the supplied drive file is included on "Windows Driver". 3. 3-16 Installing the...
User Manual Ver.1.0 (English)
Page 36
...> - < Bright> - - Even if the OSD Adjustment Lock function is activated, users can adjust the brightness and contrast and can set the to one of the monitor again. • OSD Guide may vary according to functions and models. 3-17 Product Operating Buttons Product Operating Buttons • Press one of the Customized Key by selecting -> in order to maintain the current settings or to prevent the settings from being changed...
...> - < Bright> - - Even if the OSD Adjustment Lock function is activated, users can adjust the brightness and contrast and can set the to one of the monitor again. • OSD Guide may vary according to functions and models. 3-17 Product Operating Buttons Product Operating Buttons • Press one of the Customized Key by selecting -> in order to maintain the current settings or to prevent the settings from being changed...

User Manual Ver.1.0 (English)
Page 37
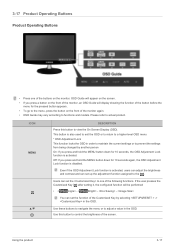
... input signal appears at the top left of the product are changed in the Display Properties, the AUTO adjustment function is not available for a long time, unplugging the power cord is turned on when the product works normally. When not using the product for products with your finger. If the resolution settings are touch-type buttons. • Touch the buttons lightly with an Analog interface only. ICON AUTO DESCRIPTION Use this button...
... input signal appears at the top left of the product are changed in the Display Properties, the AUTO adjustment function is not available for a long time, unplugging the power cord is turned on when the product works normally. When not using the product for products with your finger. If the resolution settings are touch-type buttons. • Touch the buttons lightly with an Analog interface only. ICON AUTO DESCRIPTION Use this button...

User Manual Ver.1.0 (English)
Page 39
... external input is connected through HDMI and is set . 3-18 Using the product You can configure the and directly using this mode when the surroundings are balanced overall. This menu is unavailable when < Angle> or is set to , < Bright> has four automatic picture settings (, , and ) that bright and dark pictures are dark. Provides preset picture settings optimized for the best entertainment environment (movie, DVD, etc.). • Controls the picture contrast automatically...
... external input is connected through HDMI and is set . 3-18 Using the product You can configure the and directly using this mode when the surroundings are balanced overall. This menu is unavailable when < Angle> or is set to , < Bright> has four automatic picture settings (, , and ) that bright and dark pictures are dark. Provides preset picture settings optimized for the best entertainment environment (movie, DVD, etc.). • Controls the picture contrast automatically...
User Manual Ver.1.0 (English)
Page 43
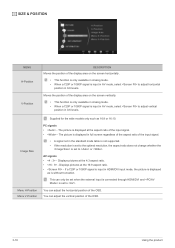
Image Size Menu H-Position Menu V-Position Supplied for the wide models only such as is without truncation. The picture is displayed at the 4:3 aspect ratio. • - Displays pictures at the aspect ratio of the input signal. • - If a 720P or 1080P signal is input in HDMI/DVI input mode, the picture is displayed as 16:9 or 16:10. PC signals • - AV signals • - Displays pictures at the 16:9 aspect ratio. • - You can adjust the horizontal position of the OSD. 3-18...
Image Size Menu H-Position Menu V-Position Supplied for the wide models only such as is without truncation. The picture is displayed at the 4:3 aspect ratio. • - Displays pictures at the aspect ratio of the input signal. • - If a 720P or 1080P signal is input in HDMI/DVI input mode, the picture is displayed as 16:9 or 16:10. PC signals • - AV signals • - Displays pictures at the 16:9 aspect ratio. • - You can adjust the horizontal position of the OSD. 3-18...
User Manual Ver.1.0 (English)
Page 47
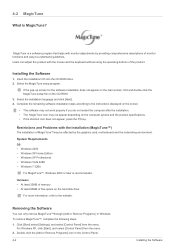
... setup program. Restrictions and Problems with the Installation (MagicTune™) The installation of the product. Click [Start] select [Settings], and select [Control Panel] from the menu. 2. For Windows XP, click [Start], and select [Control Panel] from the menu. MagicTune is a software program that helps with the mouse and the keyboard without using the operating buttons of MagicTune™may not appear depending on the screen. • The software may not work...
... setup program. Restrictions and Problems with the Installation (MagicTune™) The installation of the product. Click [Start] select [Settings], and select [Control Panel] from the menu. 2. For Windows XP, click [Start], and select [Control Panel] from the menu. MagicTune is a software program that helps with the mouse and the keyboard without using the operating buttons of MagicTune™may not appear depending on the screen. • The software may not work...
User Manual Ver.1.0 (English)
Page 51
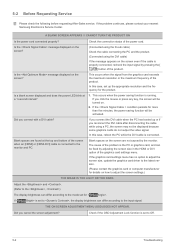
... the power LED blink at the top and bottom of the screen when an [HDMI] or [HDMI-DVI] cable is the PC or graphics card, and can be displayed because some graphics cards do not output the video signal. Check if the OSD Adjustment Lock function is set to , the display brightness can differ according to the mode set to the input signal. Is the message displayed on . 2. Blank spaces are not caused by adjusting the screen size...
... the power LED blink at the top and bottom of the screen when an [HDMI] or [HDMI-DVI] cable is the PC or graphics card, and can be displayed because some graphics cards do not output the video signal. Check if the OSD Adjustment Lock function is set to , the display brightness can differ according to the mode set to the input signal. Is the message displayed on . 2. Blank spaces are not caused by adjusting the screen size...
User Manual Ver.1.0 (English)
Page 52
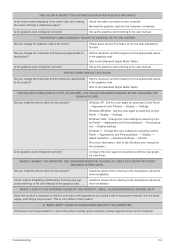
... change the resolution and frequency appropriate to the user manual. THE PICTURES ARE OUT-OF-FOCUS. Did you install the device driver for the computer.) Configure the color again in the graphics card refer to the (Standard Signal Mode Table) Set up the computer, please request service for the product? Windows Vista : Change the color settings by selecting Control Panel → Appearance and Themes → Display → Settings. Check if all the Plug&Play (VESA...
... change the resolution and frequency appropriate to the user manual. THE PICTURES ARE OUT-OF-FOCUS. Did you install the device driver for the computer.) Configure the color again in the graphics card refer to the (Standard Signal Mode Table) Set up the computer, please request service for the product? Windows Vista : Change the color settings by selecting Control Panel → Appearance and Themes → Display → Settings. Check if all the Plug&Play (VESA...

User Manual Ver.1.0 (English)
Page 3
... Using an DVI-HDMI Cable (S22C350B / S23C350B / S23C350BL) Connection Using an HDMI Cable (S22C350H / S23C340H / S23C350H /S24C340HL / S24C350H / S24C350HL / S27C350H) Connection Using an HDMI-DVI Cable (S22C350H / S23C340H / S23C350H / S24C340HL / S24C350H / S24C350HL / S27C350H) Connecting to Headphones or Speakers (S22C350H / S23C340H / S23C350H / S24C340HL / S24C350H / S24C350HL / S27C350H) Tidying Up the Connected Cables Changing the sound settings on Windows Driver Installation Setting Optimum Resolution Changing the Resolution Using a PC Brightness Configuring Brightness Contrast...
... Using an DVI-HDMI Cable (S22C350B / S23C350B / S23C350BL) Connection Using an HDMI Cable (S22C350H / S23C340H / S23C350H /S24C340HL / S24C350H / S24C350HL / S27C350H) Connection Using an HDMI-DVI Cable (S22C350H / S23C340H / S23C350H / S24C340HL / S24C350H / S24C350HL / S27C350H) Connecting to Headphones or Speakers (S22C350H / S23C340H / S23C350H / S24C340HL / S24C350H / S24C350HL / S27C350H) Tidying Up the Connected Cables Changing the sound settings on Windows Driver Installation Setting Optimum Resolution Changing the Resolution Using a PC Brightness Configuring Brightness Contrast...
User Manual Ver.1.0 (English)
Page 23
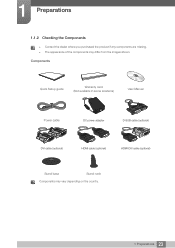
z The appearance of the components may vary depending on the country. 23 1 Preparations Components Quick Setup guide Warranty card (Not available In some locations) User Manual Power cable DC power adapter D-SUB cable (optional) DVI cable (optional) HDMI cable (optional) HDMI-DVI cable (optional) Stand base Stand neck Components may differ from the images shown. 1 Preparations 1.1.2 Checking the Components z Contact the dealer where you purchased the product if any components are missing.
z The appearance of the components may vary depending on the country. 23 1 Preparations Components Quick Setup guide Warranty card (Not available In some locations) User Manual Power cable DC power adapter D-SUB cable (optional) DVI cable (optional) HDMI cable (optional) HDMI-DVI cable (optional) Stand base Stand neck Components may differ from the images shown. 1 Preparations 1.1.2 Checking the Components z Contact the dealer where you purchased the product if any components are missing.
User Manual Ver.1.0 (English)
Page 27
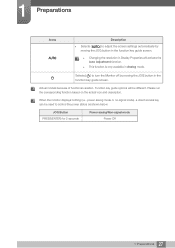
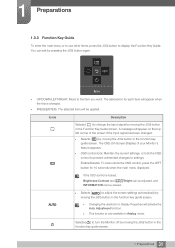
... description. z Changing the resolution in Analog mode. z This function is only available in Display Properties will be used to adjust the screen settings automatically by moving the JOG button in the function key guide screen. Actual models because of functional variation, Function key guide options will activate the Auto Adjustment function. JOG Button PRESS(ENTER) for 2 seconds Power saving/Non-signal mode Power Off 27 1 Preparations When the monitor displays nothing (i.e., power saving mode or no-signal mode), a direct...
... description. z Changing the resolution in Analog mode. z This function is only available in Display Properties will be used to adjust the screen settings automatically by moving the JOG button in the function key guide screen. Actual models because of functional variation, Function key guide options will activate the Auto Adjustment function. JOG Button PRESS(ENTER) for 2 seconds Power saving/Non-signal mode Power Off 27 1 Preparations When the monitor displays nothing (i.e., power saving mode or no-signal mode), a direct...
User Manual Ver.1.0 (English)
Page 31
... the input signal has been changed. z OSD control lock: Maintain the current settings, or lock the OSD control to prevent unintended changes to the item you want. z Selects [ ] to change the input signal by moving the JOG button in the function key guide screen. z Changing the resolution in Display Properties will appear on the top left corner of your Monitor's feature appears. You can be applied. z This function is locked, Brightness/Contrast and SAMSUNG MAGIC Bright...
... the input signal has been changed. z OSD control lock: Maintain the current settings, or lock the OSD control to prevent unintended changes to the item you want. z Selects [ ] to change the input signal by moving the JOG button in the function key guide screen. z Changing the resolution in Display Properties will appear on the top left corner of your Monitor's feature appears. You can be applied. z This function is locked, Brightness/Contrast and SAMSUNG MAGIC Bright...
User Manual Ver.1.0 (English)
Page 46
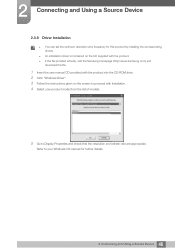
... drive. 2 Click "Windows Driver". 3 Follow the instructions given on the CD supplied with installation. 4 Select your product model from the list of models. 5 Go to your Windows OS manual for this product by installing the corresponding drivers. Refer to Display Properties and check that the resolution and refresh rate are appropriate. 2 Connecting and Using a Source Device 2.3.9 Driver Installation z You can set the optimum resolution and frequency for further details. 46 2 Connecting and Using a Source Device z If the...
... drive. 2 Click "Windows Driver". 3 Follow the instructions given on the CD supplied with installation. 4 Select your product model from the list of models. 5 Go to your Windows OS manual for this product by installing the corresponding drivers. Refer to Display Properties and check that the resolution and refresh rate are appropriate. 2 Connecting and Using a Source Device 2.3.9 Driver Installation z You can set the optimum resolution and frequency for further details. 46 2 Connecting and Using a Source Device z If the...
User Manual Ver.1.0 (English)
Page 82
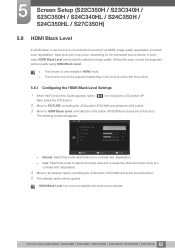
... ports provided with some source devices. 82 5 Screen Setup (S22C350H / S23C340H / S23C350H / S24C340HL / S24C350H / S24C350HL / S27C350H) PICTURE HDMI Black Level H-Position V-Position Coarse Fine Normal Low 50 1936 0 Return Move Enter z Normal: Select this mode to reduce the black level and increase the white level when there is a contrast ratio degradation. 4 Move to adjust the image quality. z The function may not be supported depending on the connected source...
... ports provided with some source devices. 82 5 Screen Setup (S22C350H / S23C340H / S23C350H / S24C340HL / S24C350H / S24C350HL / S27C350H) PICTURE HDMI Black Level H-Position V-Position Coarse Fine Normal Low 50 1936 0 Return Move Enter z Normal: Select this mode to reduce the black level and increase the white level when there is a contrast ratio degradation. 4 Move to adjust the image quality. z The function may not be supported depending on the connected source...
User Manual Ver.1.0 (English)
Page 89
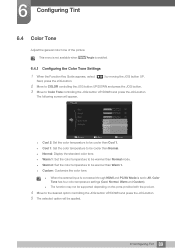
... supported depending on the ports provided with the product. 4 Move to be warmer than Warm 1. The following screen will be applied. 89 6 Configuring Tint z Custom: Customize the color tone. z When the external input is connected through HDMI and PC/AV Mode is enabled. 6.4.1 Configuring the Color Tone Settings 1 When the Function Key Guide appears, select [ ] by moving the JOG button UP. This menu...
... supported depending on the ports provided with the product. 4 Move to be warmer than Warm 1. The following screen will be applied. 89 6 Configuring Tint z Custom: Customize the color tone. z When the external input is connected through HDMI and PC/AV Mode is enabled. 6.4.1 Configuring the Color Tone Settings 1 When the Function Key Guide appears, select [ ] by moving the JOG button UP. This menu...
User Manual Ver.1.0 (English)
Page 117
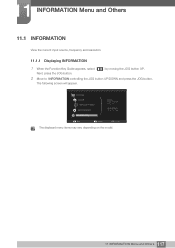
The following screen will appear. 11 INFORMATION Menu and Others 11.1 INFORMATION View the current input source, frequency and resolution. 11.1.1 Displaying INFORMATION 1 When the Function Key Guide appears, select [ ] by moving the JOG button UP. PICTURE COLOR MENU SETTINGS SETUP&RESET INFORMATION Analog **kHz **Hz NP **** x **** Optimal Mode **** x **** **Hz Exit Move Enter The displayed menu items may vary depending on the model. 117 11 INFORMATION Menu and Others Next, press the JOG button. 2 Move to INFORMATION controlling the JOG button UP/DOWN and press the JOG button.
The following screen will appear. 11 INFORMATION Menu and Others 11.1 INFORMATION View the current input source, frequency and resolution. 11.1.1 Displaying INFORMATION 1 When the Function Key Guide appears, select [ ] by moving the JOG button UP. PICTURE COLOR MENU SETTINGS SETUP&RESET INFORMATION Analog **kHz **Hz NP **** x **** Optimal Mode **** x **** **Hz Exit Move Enter The displayed menu items may vary depending on the model. 117 11 INFORMATION Menu and Others Next, press the JOG button. 2 Move to INFORMATION controlling the JOG button UP/DOWN and press the JOG button.
User Manual Ver.1.0 (English)
Page 128
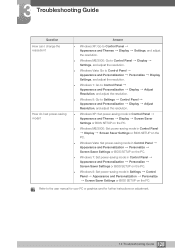
...or BIOS SETUP on the PC. z Windows 8: Set power-saving mode in Control Panel Appearance and Personalization Personalize Screen Saver Settings or BIOS SETUP on adjustment. 128 13 Troubleshooting Guide Answer z Windows XP: Go to Control Panel Display Settings, and adjust the resolution. Refer to Settings Control Panel Appearance and Personalization Display Adjust Resolution, and adjust the resolution. z Windows 8: Go to the user manual for your PC or graphics card for further instructions on the PC. z Windows 7: Set power-saving mode in Settings Control Panel Appearance and...
...or BIOS SETUP on the PC. z Windows 8: Set power-saving mode in Control Panel Appearance and Personalization Personalize Screen Saver Settings or BIOS SETUP on adjustment. 128 13 Troubleshooting Guide Answer z Windows XP: Go to Control Panel Display Settings, and adjust the resolution. Refer to Settings Control Panel Appearance and Personalization Display Adjust Resolution, and adjust the resolution. z Windows 8: Go to the user manual for your PC or graphics card for further instructions on the PC. z Windows 7: Set power-saving mode in Settings Control Panel Appearance and...

User Manual Ver.1.0 (English)
Page 153
... numerous horizontal lines. The horizontal frequency is measured in your PC and monitor. Changes to the screen brightness are then arranged vertically to create an image. A scanning rate of 60Hz means that an image is invisible to the naked eye. Horizontal Frequency Characters or images displayed on -screen settings to optimize the picture quality as it refreshes to display an image, although the refreshing is transmitted 60 times per second by those horizontal lines. Pixels...
... numerous horizontal lines. The horizontal frequency is measured in your PC and monitor. Changes to the screen brightness are then arranged vertically to create an image. A scanning rate of 60Hz means that an image is invisible to the naked eye. Horizontal Frequency Characters or images displayed on -screen settings to optimize the picture quality as it refreshes to display an image, although the refreshing is transmitted 60 times per second by those horizontal lines. Pixels...


