User Manual
Page 2
... access to the PDP Panel. User Instructions • Screen Image retention Do not display a still image (such as on the plasma monitor panel for more information, please contact your local dealer the possibility to this PDP) on a video game or when hooking up a PC to receive DVB-T or DVB-C signal. 2. This image retention is normal and not a defect of the unit. • Cell Defects The PDP uses a panel consisting of 2,360...
... access to the PDP Panel. User Instructions • Screen Image retention Do not display a still image (such as on the plasma monitor panel for more information, please contact your local dealer the possibility to this PDP) on a video game or when hooking up a PC to receive DVB-T or DVB-C signal. 2. This image retention is normal and not a defect of the unit. • Cell Defects The PDP uses a panel consisting of 2,360...
User Manual
Page 3
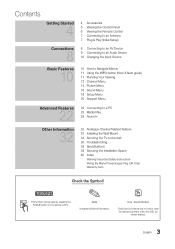
... the wall 35 Troubleshooting 38 Specifications 39 Securing the Installation Space 40 Index Warning! Important Safety Instructions Wiring the Mains Power Supply Plug (UK Only) Warranty Card Check the Symbol! t This function can be used by pressing the TOOLS button on screen display). 3 English Contents Getting Started 4 Connections 8 4 Accessories 5 Viewing the Control Panel 6 Viewing the Remote Control 7 Connecting to an Antenna 7 Plug & Play (Initial Setup) 8 Connecting to an AV Device 9 Connecting to an Audio Device 10 Changing the Input Source Basic...
... the wall 35 Troubleshooting 38 Specifications 39 Securing the Installation Space 40 Index Warning! Important Safety Instructions Wiring the Mains Power Supply Plug (UK Only) Warranty Card Check the Symbol! t This function can be used by pressing the TOOLS button on screen display). 3 English Contents Getting Started 4 Connections 8 4 Accessories 5 Viewing the Control Panel 6 Viewing the Remote Control 7 Connecting to an Antenna 7 Plug & Play (Initial Setup) 8 Connecting to an AV Device 9 Connecting to an Audio Device 10 Changing the Input Source Basic...
User Manual
Page 7
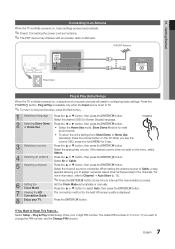
... to change the PIN number, use the Change PIN function. 7 English For more information, refer to Channel → Auto Store (p. 12). ✎✎Press the ENTERE button at any time to memorise. The connection method for the best HD screen quality is displayed. 8 Enjoy your 4 digit PIN number. If you see the volume OSD, press and hold MENU for retail environments. 01 Getting Started Connecting to an Antenna When...
... to change the PIN number, use the Change PIN function. 7 English For more information, refer to Channel → Auto Store (p. 12). ✎✎Press the ENTERE button at any time to memorise. The connection method for the best HD screen quality is displayed. 8 Enjoy your 4 digit PIN number. If you see the volume OSD, press and hold MENU for retail environments. 01 Getting Started Connecting to an Antenna When...
User Manual
Page 8
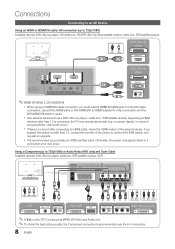
..., the screen may appear blank or a connection error may operate abnormally (e.g. xx It is no sound / annoying flicker / abnormal colour). Connections Connecting to an AV Device Using an HDMI or HDMI/DVI cable: HD connection (up to 720p/1080i) or Audio/Video (480i only) and Scart Cable Available devices: DVD, Blu-ray player, cable box, STB satellite receiver, VCR Y W R R W R B G R W Y Red White Yellow Y R W R W R B G R W R B G Red White Red Blue Green VCR VCR / DVD VIDEO OUT AUDIO OUT EXT AUDIO OUT COMPONENT OUT DVD / Blu-ray player R-AUDIO-L R-AUDIO...
..., the screen may appear blank or a connection error may operate abnormally (e.g. xx It is no sound / annoying flicker / abnormal colour). Connections Connecting to an AV Device Using an HDMI or HDMI/DVI cable: HD connection (up to 720p/1080i) or Audio/Video (480i only) and Scart Cable Available devices: DVD, Blu-ray player, cable box, STB satellite receiver, VCR Y W R R W R B G R W Y Red White Yellow Y R W R W R B G R W R B G Red White Red Blue Green VCR VCR / DVD VIDEO OUT AUDIO OUT EXT AUDIO OUT COMPONENT OUT DVD / Blu-ray player R-AUDIO-L R-AUDIO...
User Manual
Page 9
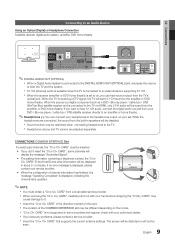
... hear sound output from your DVD / Blu-ray player / cable box / STB satellite receiver directly to the amplifier or DVD home theatre. yy The pairing information containing a telephone number, the "CI or CI+ CARD" ID the Host ID and other information will display the message "Scrambled Signal". When the TV is receiving a DTV signal, the TV will be restricted when connecting headphones to the DIGITAL AUDIO OUT (OPTICAL...
... hear sound output from your DVD / Blu-ray player / cable box / STB satellite receiver directly to the amplifier or DVD home theatre. yy The pairing information containing a telephone number, the "CI or CI+ CARD" ID the Host ID and other information will display the message "Scrambled Signal". When the TV is receiving a DTV signal, the TV will be restricted when connecting headphones to the DIGITAL AUDIO OUT (OPTICAL...
User Manual
Page 10
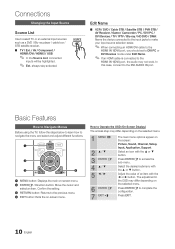
.... ✎✎ If an HDMI cable is connected to select TV or an external input sources such as a DVD / Blu-ray player / cable box / STB satellite receiver. ■■ TV / Ext. / AV / Component / HDMI1/DVI / HDMI2 / USB ✎✎ In the Source List, connected inputs will be highlighted. ✎✎ Ext. Press ENTERE to Operate the OSD (On Screen Display) The access step may differ depending on the screen: Picture, Sound, Channel, Setup, Input, Application, Support.
.... ✎✎ If an HDMI cable is connected to select TV or an external input sources such as a DVD / Blu-ray player / cable box / STB satellite receiver. ■■ TV / Ext. / AV / Component / HDMI1/DVI / HDMI2 / USB ✎✎ In the Source List, connected inputs will be highlighted. ✎✎ Ext. Press ENTERE to Operate the OSD (On Screen Display) The access step may differ depending on the screen: Picture, Sound, Channel, Setup, Input, Application, Support.

User Manual
Page 13
... USB. ■■ Export to USB: Export channel list to P99. Set the current time first to use this mode. Enter your 4-digit PIN, the default of the stored channels. Select a channel and press the TOOLS button. 2. Edit the channel name or number using the numeric buttons. Select a function and change the programme numbers of which is set up the Network, Network ID, Frequency, Modulation and Symbol Rate manually by entering the assigned number for a cable network...
... USB. ■■ Export to USB: Export channel list to P99. Set the current time first to use this mode. Enter your 4-digit PIN, the default of the stored channels. Select a channel and press the TOOLS button. 2. Edit the channel name or number using the numeric buttons. Select a function and change the programme numbers of which is set up the Network, Network ID, Frequency, Modulation and Symbol Rate manually by entering the assigned number for a cable network...

User Manual
Page 14
... adjust the Cell Light, the Eco Sensor will automatically adapt to the light in order to the TV. Fine Tune (analogue channels only) If the signal is turned off, but the sound remains on if it's not receiving a signal. ¦¦ Changing the Picture Options Mode Select your power savings; P.MODE ¦¦ Adjusting Picture Settings Cell Light / Contrast / Brightness / Sharpness / Colour / Tint (G/R) Your television has several setting options for picture quality control...
... adjust the Cell Light, the Eco Sensor will automatically adapt to the light in order to the TV. Fine Tune (analogue channels only) If the signal is turned off, but the sound remains on if it's not receiving a signal. ¦¦ Changing the Picture Options Mode Select your power savings; P.MODE ¦¦ Adjusting Picture Settings Cell Light / Contrast / Brightness / Sharpness / Colour / Tint (G/R) Your television has several setting options for picture quality control...
User Manual
Page 15
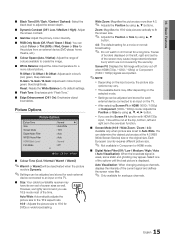
... signal is displayed. However, we highly recommend you use 16:9 mode most of the time. xx The available items may appear. xx Settings can be adjusted and stored for each external device connected to an input on the TV. ■■ Size: Your cable box/satellite receiver may vary. R-Gain / G-Gain / B-Gain: Adjust each colour's (red, green, blue) darkness. P.SIZE Auto Wide: Automatically adjusts the picture size to the 16:9 aspect ratio. 16:9 : Adjusts the picture size...
... signal is displayed. However, we highly recommend you use 16:9 mode most of the time. xx The available items may appear. xx Settings can be adjusted and stored for each external device connected to an input on the TV. ■■ Size: Your cable box/satellite receiver may vary. R-Gain / G-Gain / B-Gain: Adjust each colour's (red, green, blue) darkness. P.SIZE Auto Wide: Automatically adjusts the picture size to the 16:9 aspect ratio. 16:9 : Adjusts the picture size...
User Manual
Page 19
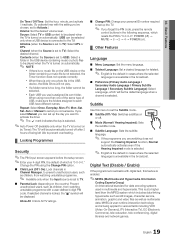
... Input source is unavailable in multimedia and hypermedia. Contents (when the Source is set to various fields including VOD (Video-On-Demand), ITV (Interactive TV), EC (Electronic Commerce), tele-education, tele-conferencing, digital libraries and network games. 19 English xx Each USB you use is locked, the "\" symbol will not play. Change the PIN using more than the MPEG system which will be the default...
... Input source is unavailable in multimedia and hypermedia. Contents (when the Source is set to various fields including VOD (Video-On-Demand), ITV (Interactive TV), EC (Electronic Commerce), tele-education, tele-conferencing, digital libraries and network games. 19 English xx Each USB you use is locked, the "\" symbol will not play. Change the PIN using more than the MPEG system which will be the default...
User Manual
Page 20
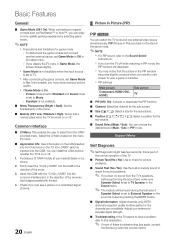
... Samsung customer service centre. xx If you use the main screen to check for game mode -- Support Menu Self Diagnosis ✎✎Self Diagnostic might take few seconds, this description. ✎✎ If none of the arrow so that a melody plays when the TV is turned on the "CI (CI+) CARD" which is On: -- You can watch the TV tuner and one external video source...
... Samsung customer service centre. xx If you use the main screen to check for game mode -- Support Menu Self Diagnosis ✎✎Self Diagnostic might take few seconds, this description. ✎✎ If none of the arrow so that a melody plays when the TV is turned on the "CI (CI+) CARD" which is On: -- You can watch the TV tuner and one external video source...
User Manual
Page 21
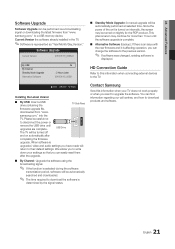
.../18_000322 By USB ► By Channel Standby Mode Upgrade : 2 Hours Later Alternative Software 2010/01/15_00321 ■■ Standby Mode Upgrade: A manual upgrade will return to their default settings. When software is upgraded, video and audio settings you can change the software to the previous version. ✎✎ If software was changed, existing software is selected during the software transmission period, software will be automatically searched and downloaded. ✎✎ The time required to download the software is represented...
.../18_000322 By USB ► By Channel Standby Mode Upgrade : 2 Hours Later Alternative Software 2010/01/15_00321 ■■ Standby Mode Upgrade: A manual upgrade will return to their default settings. When software is upgraded, video and audio settings you can change the software to the previous version. ✎✎ If software was changed, existing software is selected during the software transmission period, software will be automatically searched and downloaded. ✎✎ The time required to download the software is represented...
User Manual
Page 23
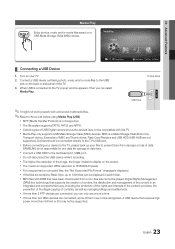
... Media Play. SAMSUNG is 15360X8640 pixels. x Do not disconnect the USB device while it takes to the dedicated port, USB port. x If the files are connected, some of them from a non-free site cannot be compatible with unlicenced multimedia files. ✎ Need-to the TV's USB port. x For unsupported or corrupted files, the "Not Supported File Format" message is loading. Digital Rights Management (DRM) is not supported. A USB...
... Media Play. SAMSUNG is 15360X8640 pixels. x Do not disconnect the USB device while it takes to the dedicated port, USB port. x If the files are connected, some of them from a non-free site cannot be compatible with unlicenced multimedia files. ✎ Need-to the TV's USB port. x For unsupported or corrupted files, the "Not Supported File Format" message is loading. Digital Rights Management (DRM) is not supported. A USB...
User Manual
Page 28
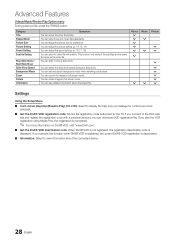
... you connect to view information about the played file. Category Title Repeat Mode Picture Size Picture Setting Sound Setting Subtitle Setting Stop Slide Show / Start Slide Show Slide Show Speed Background Music Zoom Rotate Information Operations You can select the slide show speed during the slide show. You can download VOD registration file. Videos > > > > > > > Music > > > Photos > > > > > > > > Settings Using the Setup Menu ■■ Cont. If you play the video...
... you connect to view information about the played file. Category Title Repeat Mode Picture Size Picture Setting Sound Setting Subtitle Setting Stop Slide Show / Start Slide Show Slide Show Speed Background Music Zoom Rotate Information Operations You can select the slide show speed during the slide show. You can download VOD registration file. Videos > > > > > > > Music > > > Photos > > > > > > > > Settings Using the Setup Menu ■■ Cont. If you play the video...
User Manual
Page 31
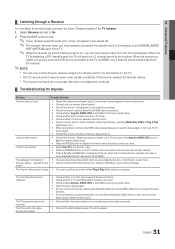
... a view mode. • Use the remote control when the Anynet+ setting or switching to start Anynet+. appears on the TV. The Anynet+ system supports Anynet+ devices only. • Connect only one receiver (home theatre). • Check if the Anynet+ device power cord is properly connected. • Check the Anynet+ device's Video/Audio/HDMI cable connections. • Check whether Anynet+ (HDMI-CEC) is set to On in certain situations. (Searching channels, operating Media Play (USB...
... a view mode. • Use the remote control when the Anynet+ setting or switching to start Anynet+. appears on the TV. The Anynet+ system supports Anynet+ devices only. • Connect only one receiver (home theatre). • Check if the Anynet+ device power cord is properly connected. • Check the Anynet+ device's Video/Audio/HDMI cable connections. • Check whether Anynet+ (HDMI-CEC) is set to On in certain situations. (Searching channels, operating Media Play (USB...
User Manual
Page 35
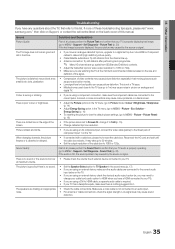
... properly displaying test image. (go to MENU - Picture - Support - Self Diagnosis - Use HDMI or Component cables to deliver HD (high definition) picture quality. • Cable/Satellite subscribers: Try HD stations from the channel line up. • Antenna connection: Try HD stations after performing Auto programme. ✎✎ Many HD channels are up scaled from SD(Standard Definition) contents. • Adjust the Cable/Set top box video output resolution to MENU - Colour is black and white. •...
... properly displaying test image. (go to MENU - Picture - Support - Self Diagnosis - Use HDMI or Component cables to deliver HD (high definition) picture quality. • Cable/Satellite subscribers: Try HD stations from the channel line up. • Antenna connection: Try HD stations after performing Auto programme. ✎✎ Many HD channels are up scaled from SD(Standard Definition) contents. • Adjust the Cable/Set top box video output resolution to MENU - Colour is black and white. •...
User Manual
Page 36
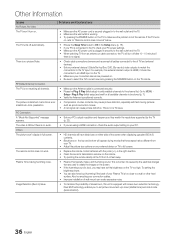
... an antenna or cable connection, the TV will turn on. • Make sure the AC power cord is securely plugged in full screen. • HD channels will have black bars on your connection cables. • Improper installation of TV and external devices). • Set your external devices' (Cable/Set top Box, DVD, Blu-ray etc) video outputs to match the connections to MENU - There is no signal. The video is OK but there is no audio. •...
... an antenna or cable connection, the TV will turn on. • Make sure the AC power cord is securely plugged in full screen. • HD channels will have black bars on your connection cables. • Improper installation of TV and external devices). • Set your external devices' (Cable/Set top Box, DVD, Blu-ray etc) video outputs to match the connections to MENU - There is no signal. The video is OK but there is no audio. •...
User Manual
Page 37
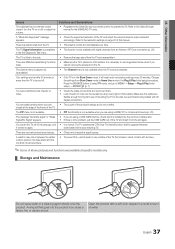
... tilted to the wall, we recommend using overly rigid or thick cables. It is still a problem, pull the CAM CARD out of audio or video can be caused by using cables with digital channels from the TV. Press the SOURCE button to select TV mode, and go to MENU → Setup → Plug & Play (Initial setup) → ENTERE. (p. 7) You have intermittent loss of audio or video. • Check the cable connections and reconnect...
... tilted to the wall, we recommend using overly rigid or thick cables. It is still a problem, pull the CAM CARD out of audio or video can be caused by using cables with digital channels from the TV. Press the SOURCE button to select TV mode, and go to MENU → Setup → Plug & Play (Initial setup) → ENTERE. (p. 7) You have intermittent loss of audio or video. • Check the cable connections and reconnect...
User Manual
Page 40
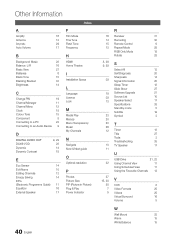
... S Select All 13 Self Diagnosis 20 Sharpness 14 Signal Information 20 Sleep Timer 18 Slide Show 27 Software Upgrade 21 Source List 10 Speaker Select 17 Specifications 38 Standby mode 5 Subtitle 19 Symbol 3 T Timer 18 Title 27 Tools 3 Troubleshooting 35 TV Speaker 17 U USB Drive 21, 23 Using Channel View 11 Using Scheduled View 11 Using the Favourite Channels 12 V VCR 8 Video Formats 25 Videos 25 Virtual Surround 16 Volume 5 W Wall Mount 33 Warm 15 White Balance 15
... S Select All 13 Self Diagnosis 20 Sharpness 14 Signal Information 20 Sleep Timer 18 Slide Show 27 Software Upgrade 21 Source List 10 Speaker Select 17 Specifications 38 Standby mode 5 Subtitle 19 Symbol 3 T Timer 18 Title 27 Tools 3 Troubleshooting 35 TV Speaker 17 U USB Drive 21, 23 Using Channel View 11 Using Scheduled View 11 Using the Favourite Channels 12 V VCR 8 Video Formats 25 Videos 25 Virtual Surround 16 Volume 5 W Wall Mount 33 Warm 15 White Balance 15
User Manual
Page 42
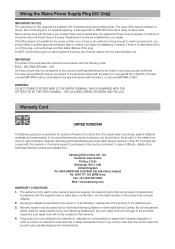
... invoice or sales slip or confirmation, and the serial number on the pin face of twelve (12) months from : Samsung Electronics U.K. Replacement covers are coloured in your dealer. Do NOT connect the plug to be defective in any such repair work will comply with the letter N or coloured BLUE or BLACK. The warranty is only valid if, when warranty service is required...
... invoice or sales slip or confirmation, and the serial number on the pin face of twelve (12) months from : Samsung Electronics U.K. Replacement covers are coloured in your dealer. Do NOT connect the plug to be defective in any such repair work will comply with the letter N or coloured BLUE or BLACK. The warranty is only valid if, when warranty service is required...


