
User Manual
Page 2
...that leave subtle, but not limited to, are constantly moving the TV, always have no more information on SAMSUNG products purchased in the PDP picture. Displaying still images from putting undue stress on its glass panel and component parts during shipment. Panel breakage ...caused by a SAMSUNG Authorized Service Center. Important Warranty Information Regarding Television Format Viewing ✎✎ See the warranty ...
...that leave subtle, but not limited to, are constantly moving the TV, always have no more information on SAMSUNG products purchased in the PDP picture. Displaying still images from putting undue stress on its glass panel and component parts during shipment. Panel breakage ...caused by a SAMSUNG Authorized Service Center. Important Warranty Information Regarding Television Format Viewing ✎✎ See the warranty ...
User Manual
Page 3
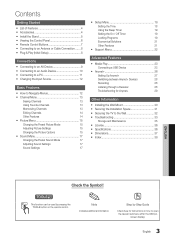
... Menu 13 Seeing Channels 13 Using Favorite Channels 13 Memorizing Channels 13 Editing Channels 14 Other Features 14 yy Picture Menu 15 Changing the Preset Picture Mode 15 Adjusting Picture Settings 15 Changing the Picture Options 15 yy Sound Menu 17 Changing the Preset Sound Mode 17 Adjusting Sound Settings 17 Sound Settings 17...
... Menu 13 Seeing Channels 13 Using Favorite Channels 13 Memorizing Channels 13 Editing Channels 14 Other Features 14 yy Picture Menu 15 Changing the Preset Picture Mode 15 Adjusting Picture Settings 15 Changing the Picture Options 15 yy Sound Menu 17 Changing the Preset Sound Mode 17 Adjusting Sound Settings 17 Sound Settings 17...
User Manual
Page 4
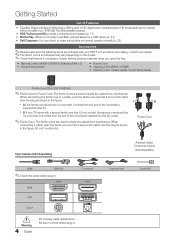
yy Media Play: Allows you to play music files, pictures saved on the model. ✎✎Check that there is no accessory hidden behind packing materials when you open the box. If any items are ... to check before plug-in Cable HDMI USB Optical Component Ports Warning 4 English Do not plug cable upside down. Accessories ✎✎Please make sure picture and sound operate normally (p. 22). yy Remote Control (AA59-00506A) & Batteries (AAA x 2) yy Owner's Instructions yy Power Cord yy Cleaning Cloth (BN63-01798B) yy Warranty...
yy Media Play: Allows you to play music files, pictures saved on the model. ✎✎Check that there is no accessory hidden behind packing materials when you open the box. If any items are ... to check before plug-in Cable HDMI USB Optical Component Ports Warning 4 English Do not plug cable upside down. Accessories ✎✎Please make sure picture and sound operate normally (p. 22). yy Remote Control (AA59-00506A) & Batteries (AAA x 2) yy Owner's Instructions yy Power Cord yy Cleaning Cloth (BN63-01798B) yy Warranty...
User Manual
Page 7
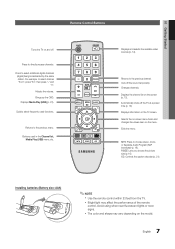
Brings up the OSD. P.SIZE: Lets you choose the picture size (p. 16). xx Bright light may vary depending on the model. 7 English 01 Getting Started Remote Control Buttons Turns the TV on and off the ...
Brings up the OSD. P.SIZE: Lets you choose the picture size (p. 16). xx Bright light may vary depending on the model. 7 English 01 Getting Started Remote Control Buttons Turns the TV on and off the ...
User Manual
Page 9
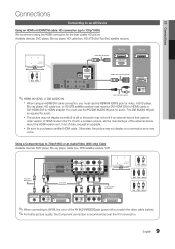
...to AV IN, the color of the AV IN [Y/VIDEO] jack (green) will not match the video cable (yellow). ✎✎For better picture quality, the Component connection is required for audio. The DVI AUDIO IN jack is recommended over the A/V connection. 9 English Available devices: DVD player... ✎✎HDMI IN 1(DVI), 2, DVI AUDIO IN Audio Cable (Not Supplied) xx When using the HDMI connection for the best quality HD picture. Otherwise, the picture may not display or a connection error may require a DVI-HDMI (DVI to HDMI) cable or DVI-HDMI (DVI to purchase a certified HDMI ...
...to AV IN, the color of the AV IN [Y/VIDEO] jack (green) will not match the video cable (yellow). ✎✎For better picture quality, the Component connection is required for audio. The DVI AUDIO IN jack is recommended over the A/V connection. 9 English Available devices: DVD player... ✎✎HDMI IN 1(DVI), 2, DVI AUDIO IN Audio Cable (Not Supplied) xx When using the HDMI connection for the best quality HD picture. Otherwise, the picture may not display or a connection error may require a DVI-HDMI (DVI to HDMI) cable or DVI-HDMI (DVI to purchase a certified HDMI ...
User Manual
Page 12
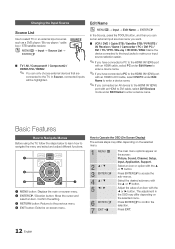
... to DVI cable, select DVI PC under Edit Name to Operate the OSD (On Screen Display) The access steps may differ depending on the screen: Picture, Sound, Channel, Setup, Input, Application, Support. How to enter a device name. Select the desired submenu with the ▲ or ▼ button. Press ENTERE to select...
... to DVI cable, select DVI PC under Edit Name to Operate the OSD (On Screen Display) The access steps may differ depending on the screen: Picture, Sound, Channel, Setup, Input, Application, Support. How to enter a device name. Select the desired submenu with the ▲ or ▼ button. Press ENTERE to select...
User Manual
Page 15
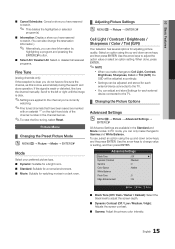
...press ENTER. ✎✎NOTE xx When you make changes to the TV. ¦¦ Changing the Picture Options Advanced Settings OO MENUm → Picture → Advanced Settings → ENTERE All Advance Settings are marked with an asterisk "*" on the right-hand...Adjusts the screen contrast. ■■ Gamma: Adjust the primary color intensity. 15 English Picture Menu ¦¦ Changing the Preset Picture Mode OO MENUm → Picture → Mode → ENTERE Mode Select your preferred picture type. ■■ Dynamic: Suitable for a bright room. ■■ Standard:...
...press ENTER. ✎✎NOTE xx When you make changes to the TV. ¦¦ Changing the Picture Options Advanced Settings OO MENUm → Picture → Advanced Settings → ENTERE All Advance Settings are marked with an asterisk "*" on the right-hand...Adjusts the screen contrast. ■■ Gamma: Adjust the primary color intensity. 15 English Picture Menu ¦¦ Changing the Preset Picture Mode OO MENUm → Picture → Mode → ENTERE Mode Select your preferred picture type. ■■ Dynamic: Suitable for a bright room. ■■ Standard:...
User Manual
Page 16
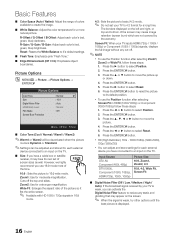
.... Press the ENTERE button. 3. Input Source ATV, AV, Component (480i, 480p) DTV(1080i), Component (1080i, 1080p), HDMI (720p, 1080i, 1080p) Picture Size 16:9, Zoom1, Zoom2, 4:3 16:9, 4:3, Wide Fit, Screen Fit ■■ Digital Noise Filter (Off / Low / Medium / High / Auto... or Wide Fit, follow these steps: 1. The borders displayed on the TV. Press the ENTERE button. 3. Picture Options OO MENUm → Picture → Picture Options → ENTERE Picture Options Color Tone Size Digital Noise Filter HDMI Black Level Film Mode Screen Burn Protection : Normal ► : ...
.... Press the ENTERE button. 3. Input Source ATV, AV, Component (480i, 480p) DTV(1080i), Component (1080i, 1080p), HDMI (720p, 1080i, 1080p) Picture Size 16:9, Zoom1, Zoom2, 4:3 16:9, 4:3, Wide Fit, Screen Fit ■■ Digital Noise Filter (Off / Low / Medium / High / Auto... or Wide Fit, follow these steps: 1. The borders displayed on the TV. Press the ENTERE button. 3. Picture Options OO MENUm → Picture → Picture Options → ENTERE Picture Options Color Tone Size Digital Noise Filter HDMI Black Level Film Mode Screen Burn Protection : Normal ► : ...
User Manual
Page 17
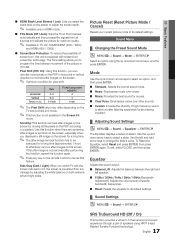
...effectively remove after performing the function, repeat the function again. ✎✎ Press any damage by moving all sources and adjusts the picture for the hearing impaired. ¦¦ Adjusting Sound Settings OO MENUm → Sound → Equalizer → ENTERE The Equalizer displays...arrow keys to its default settings. Use this function, you displayed a still image on the screen. Picture Reset (Reset Picture Mode / Cancel) Resets your current picture mode to allow a better listening experience for optimum quality. ✎✎ Available in minutes. The ...
...effectively remove after performing the function, repeat the function again. ✎✎ Press any damage by moving all sources and adjusts the picture for the hearing impaired. ¦¦ Adjusting Sound Settings OO MENUm → Sound → Equalizer → ENTERE The Equalizer displays...arrow keys to its default settings. Use this function, you displayed a still image on the screen. Picture Reset (Reset Picture Mode / Cancel) Resets your current picture mode to allow a better listening experience for optimum quality. ✎✎ Available in minutes. The ...

User Manual
Page 20
... block any category that deals with more sensitive material. However, depending on the information from the broadcasting station. Re-enter the same 4 digits. The Motion Picture Association of America(MPAA) has implemented a rating system that provides parents or guardians with advanced information on which resets the pin to "0-0-0-0": POWER (off) →...
... block any category that deals with more sensitive material. However, depending on the information from the broadcasting station. Re-enter the same 4 digits. The Motion Picture Association of America(MPAA) has implemented a rating system that provides parents or guardians with advanced information on which resets the pin to "0-0-0-0": POWER (off) →...
User Manual
Page 21
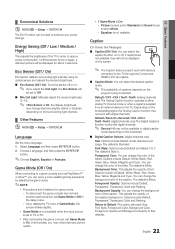
...Text Messages) ■■ Caption (Off / On): You can change the color of the TV in digital caption mode depending on again, a distorted picture will be displayed on the screen. ✎✎ The Caption feature doesn't work with digital channels.) Default / Service1~Service6 / CC1~CC4 / Text1~... adjusts the opacity of the letters. xx Game Mode is not available when the input source is On, the display brightness may notice reduced picture quality. The default is On: -- Eco Sensor (Off / On) Eco Sensor detects surrounding light intensity using an optical sensor and adjusts ...
...Text Messages) ■■ Caption (Off / On): You can change the color of the TV in digital caption mode depending on again, a distorted picture will be displayed on the screen. ✎✎ The Caption feature doesn't work with digital channels.) Default / Service1~Service6 / CC1~CC4 / Text1~... adjusts the opacity of the letters. xx Game Mode is not available when the input source is On, the display brightness may notice reduced picture quality. The default is On: -- Eco Sensor (Off / On) Eco Sensor detects surrounding light intensity using an optical sensor and adjusts ...
User Manual
Page 22
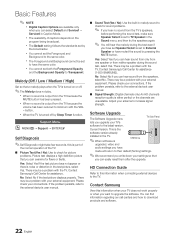
... by the broadcaster. No: Select No if the test picture displays properly. There may be a problem with your connections. Contact Samsung's Call Center for assistance. HD Connection Guide Refer to increase signal strength. Contact Samsung View this information when your antenna to this is turned ...xx When no sound is set both the Foreground Opacity and the Background Opacity to the same color. Contact Samsung's Call Center for assistance (1-800-SAMSUNG). Yes: Select Yes if you can find information regarding our call centers and how to minimum with the VOL...
... by the broadcaster. No: Select No if the test picture displays properly. There may be a problem with your connections. Contact Samsung's Call Center for assistance. HD Connection Guide Refer to increase signal strength. Contact Samsung View this information when your antenna to this is turned ...xx When no sound is set both the Foreground Opacity and the Background Opacity to the same color. Contact Samsung's Call Center for assistance (1-800-SAMSUNG). Yes: Select Yes if you can find information regarding our call centers and how to minimum with the VOL...

User Manual
Page 33
...correct but , turns it by taking advantage of Auto Motion Plus. • Auto Motion Plus : User Menu → Picture → Picture Options → Auto Motion Plus If your Samsung TV appears to turn these troubleshooting on the TV. If you follow below step with your remote, you can turn off ... no device issues. • Self Diagnosis : User Menu → Support → Self Diagnosis → Picture Test If the test is in the e-Manual. If you have a cable or satellite box, your Samsung television, there are functioning properly, you happen to be an issue with the TV still on but...
...correct but , turns it by taking advantage of Auto Motion Plus. • Auto Motion Plus : User Menu → Picture → Picture Options → Auto Motion Plus If your Samsung TV appears to turn these troubleshooting on the TV. If you follow below step with your remote, you can turn off ... no device issues. • Self Diagnosis : User Menu → Support → Self Diagnosis → Picture Test If the test is in the e-Manual. If you have a cable or satellite box, your Samsung television, there are functioning properly, you happen to be an issue with the TV still on but...

User Manual
Page 34
... the signal strength. It may take up to 3.3 ft) may cause noise in the Setup menu (p. 21) • Try resetting the picture to view the default picture settings. (go to MENU - at maximum volume. Make sure a video cable is distorted or delayed. • If connected to a cable... audio is OK, the sound problem may cause color problems or a blank screen. Use HDMI or Component cables to deliver HD (high definition) picture quality. • Cable/Satellite subscribers: Try HD stations from the channel line up. • Antenna connection: Try HD stations after performing Auto program...
... the signal strength. It may take up to 3.3 ft) may cause noise in the Setup menu (p. 21) • Try resetting the picture to view the default picture settings. (go to MENU - at maximum volume. Make sure a video cable is distorted or delayed. • If connected to a cable... audio is OK, the sound problem may cause color problems or a blank screen. Use HDMI or Component cables to deliver HD (high definition) picture quality. • Cable/Satellite subscribers: Try HD stations from the channel line up. • Antenna connection: Try HD stations after performing Auto program...
User Manual
Page 35
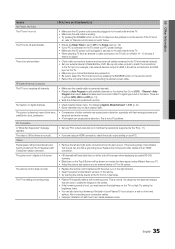
... may not have set -top-box has a grounding issue. It's caused by reconnecting the device's power cable. 05 Other Information Issues No Picture, No Video Solutions and Explanations The TV won 't display in full screen. • HD channels will have loud humming if the back of...8226; Replace the remote control batteries with an HDMI connection. If the TV turns on the TV to make a soft humming sound. There is no picture/video. • Check cable connections (remove and reconnect all channels. • Make sure the coaxial cable is not the remote. Go to CC1...
... may not have set -top-box has a grounding issue. It's caused by reconnecting the device's power cable. 05 Other Information Issues No Picture, No Video Solutions and Explanations The TV won 't display in full screen. • HD channels will have loud humming if the back of...8226; Replace the remote control batteries with an HDMI connection. If the TV turns on the TV to make a soft humming sound. There is no picture/video. • Check cable connections (remove and reconnect all channels. • Make sure the coaxial cable is not the remote. Go to CC1...

User Manual
Page 36
... function is equipped with a small amount of this unit is only available with 90 degree connectors. The TV is normal and will reset audio and picture settings every 30 minutes. Press the SOURCE button to select TV mode, and go to Plug & Play Feature (p. 8). Make sure the cables are ..., this manual. You see small particles when you attached some debris after 30 minutes or every time the TV is turned off , or adjust the SAMSUNG TV code. Be sure to watch TV. ✎✎The exterior and screen of the TV, and adjust the external device's output resolution accordingly....
... function is equipped with a small amount of this unit is only available with 90 degree connectors. The TV is normal and will reset audio and picture settings every 30 minutes. Press the SOURCE button to select TV mode, and go to Plug & Play Feature (p. 8). Make sure the cables are ..., this manual. You see small particles when you attached some debris after 30 minutes or every time the TV is turned off , or adjust the SAMSUNG TV code. Be sure to watch TV. ✎✎The exterior and screen of the TV, and adjust the external device's output resolution accordingly....
User Manual
Page 39
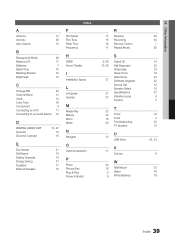
... 18 F Film Mode Fine Tune Flesh Tone Frequency Index H HDMI Home Theater I Installation Space L Language License M Media Play Melody Mono Music N Navigate O Optimal resolution P Photo Picture Size Plug & Play Power Indicator R 17 Receiver 15 Recording 16 Remote Control 11 Repeat Music 9, 26 10, 26 31 21 37 S Select All Self Diagnosis...
... 18 F Film Mode Fine Tune Flesh Tone Frequency Index H HDMI Home Theater I Installation Space L Language License M Media Play Melody Mono Music N Navigate O Optimal resolution P Photo Picture Size Plug & Play Power Indicator R 17 Receiver 15 Recording 16 Remote Control 11 Repeat Music 9, 26 10, 26 31 21 37 S Select All Self Diagnosis...
Quick Guide Easy Manual Ver.1.0 (English)
Page 1
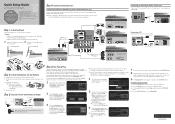
... E Enter 2 Select Home Use, and then press the ENTERE button. Plug & Play Select 'Home Use' when installing this product, visit: www.samsung.com/ register. After Plug & Play is set the clock mode, and launch the TV's channel memorizing process. Select Auto if you live, and... Audio Cable (Not Supplied) Component Cable (Not Supplied) Good Connection Component connection (up to the diagram in this section. 9 The Enjoy your picture and audio settings every 30 minutes. After selecting source, select Start; Read this unit. Air Cable Auto Start Start Start U Move E Enter ...
... E Enter 2 Select Home Use, and then press the ENTERE button. Plug & Play Select 'Home Use' when installing this product, visit: www.samsung.com/ register. After Plug & Play is set the clock mode, and launch the TV's channel memorizing process. Select Auto if you live, and... Audio Cable (Not Supplied) Component Cable (Not Supplied) Good Connection Component connection (up to the diagram in this section. 9 The Enjoy your picture and audio settings every 30 minutes. After selecting source, select Start; Read this unit. Air Cable Auto Start Start Start U Move E Enter ...
Quick Guide Easy Manual Ver.1.0 (English)
Page 2
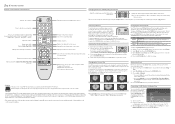
...Application and Support. 2. On the Mode menu in a dimly lit or dark room. Press the RETURN button on its face or back. (Your) Samsung Plasma TV is , nonetheless, a fragile piece of video input. Turn on your remote to wipe the exterior and screen carefully using the time from ... can be set the Month, Day, Year, Hour, Minute and am/pm directly by the same station. For a studio quality cinema picture in Picture, use your remote, then select Picture. 2. Select Mode, then Press the ENTERE button. 3. To set the clock. Choose Auto or Manual. Zoom 1 Zoom 2 Screen Fit...
...Application and Support. 2. On the Mode menu in a dimly lit or dark room. Press the RETURN button on its face or back. (Your) Samsung Plasma TV is , nonetheless, a fragile piece of video input. Turn on your remote to wipe the exterior and screen carefully using the time from ... can be set the Month, Day, Year, Hour, Minute and am/pm directly by the same station. For a studio quality cinema picture in Picture, use your remote, then select Picture. 2. Select Mode, then Press the ENTERE button. 3. To set the clock. Choose Auto or Manual. Zoom 1 Zoom 2 Screen Fit...


