
User Manual
Page 2
...carefully packaged to protect the integrity of PDP Displays that offer picture sizing features, use these controls to view different formats as temperature or humidity. It is not covered by a SAMSUNG Authorized Service Center. Figures and illustrations in this User Manual are provided for ...a defect of the unit. • Cell Defects The PDP uses a panel consisting of the product. However, there may produce partial after long periods of use as it may be changed without notice. In Canada : 1-800-SAMSUNG User Instructions • Screen Image retention Do not display a still...
...carefully packaged to protect the integrity of PDP Displays that offer picture sizing features, use these controls to view different formats as temperature or humidity. It is not covered by a SAMSUNG Authorized Service Center. Figures and illustrations in this User Manual are provided for ...a defect of the unit. • Cell Defects The PDP uses a panel consisting of the product. However, there may produce partial after long periods of use as it may be changed without notice. In Canada : 1-800-SAMSUNG User Instructions • Screen Image retention Do not display a still...
User Manual
Page 3
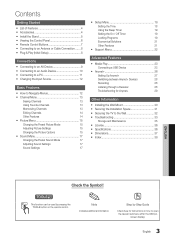
...to a PC 11 yy Changing the Input Source 12 Basic Features yy How to Navigate Menus 12 yy Channel Menu 13 Seeing Channels 13 Using Favorite Channels 13 Memorizing Channels 13 Editing Channels 14 Other Features 14 yy Picture Menu 15 Changing the Preset Picture Mode 15 Adjusting Picture ... Sound Menu 17 Changing the Preset Sound Mode 17 Adjusting Sound Settings 17 Sound Settings 17 yy Setup Menu 18 Setting the Time 18 Using the Sleep Timer 19 Setting the On / Off Timer 19 Locking Programs 19 Economical Solutions 21 Other Features 21 yy Support Menu 22 ...
...to a PC 11 yy Changing the Input Source 12 Basic Features yy How to Navigate Menus 12 yy Channel Menu 13 Seeing Channels 13 Using Favorite Channels 13 Memorizing Channels 13 Editing Channels 14 Other Features 14 yy Picture Menu 15 Changing the Preset Picture Mode 15 Adjusting Picture ... Sound Menu 17 Changing the Preset Sound Mode 17 Adjusting Sound Settings 17 Sound Settings 17 yy Setup Menu 18 Setting the Time 18 Using the Sleep Timer 19 Setting the On / Off Timer 19 Locking Programs 19 Economical Solutions 21 Other Features 21 yy Support Menu 22 ...
User Manual
Page 4
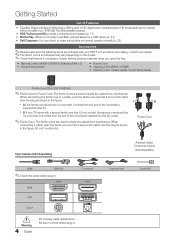
... You can be no more than 3/4 inches from the end of the cord that is no more than 8 inches from interference. If any items are used to play music files, pictures saved on the model. ✎✎Check that there is inserted into the AC outlet. ✎✎Ferrite Core : The... ferrite cores are used to check before plug-in . When connecting the ferrite core to make sure the following items are included with a second ferrite core (the 43 inch...
... You can be no more than 3/4 inches from the end of the cord that is no more than 8 inches from interference. If any items are used to play music files, pictures saved on the model. ✎✎Check that there is inserted into the AC outlet. ✎✎Ferrite Core : The... ferrite cores are used to check before plug-in . When connecting the ferrite core to make sure the following items are included with a second ferrite core (the 43 inch...

User Manual
Page 5
x4 (M4 X L12) Top View x4 (M4 X L12) x4 (M4 X L8) Screws (8EA) Front ATTENTION Rear DO NOT USE DO NOT USE DO NOT USE CHEMICALS GREASE OIL 1. With your fingers into the stand base slot of the Stand and Guide Stand when assembling them. Install the Stand Stand (1EA) ...Guide Stand (1EA) Follow the steps below to connect the TV to the Stand using four screws (M4 X L12) as shown. (Correct assembly) (Incorret assembly) x4 (M4 X L8) 2. Fasten four screws (M4 X L8) at least two people lift and move...
x4 (M4 X L12) Top View x4 (M4 X L12) x4 (M4 X L8) Screws (8EA) Front ATTENTION Rear DO NOT USE DO NOT USE DO NOT USE CHEMICALS GREASE OIL 1. With your fingers into the stand base slot of the Stand and Guide Stand when assembling them. Install the Stand Stand (1EA) ...Guide Stand (1EA) Follow the steps below to connect the TV to the Stand using four screws (M4 X L12) as shown. (Correct assembly) (Incorret assembly) x4 (M4 X L8) 2. Fasten four screws (M4 X L8) at least two people lift and move...
User Manual
Page 6
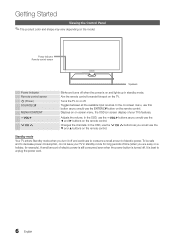
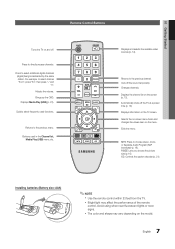
... To be safe and to decrease power consumption, do not leave your TV's features. Aim the remote control towards this button as you would use the ◄ and ► buttons on and lights up in standby mode for example). It is on the remote control. In the on... spot on the remote control. Adjusts the volume. Toggles between all the available input sources. In the OSD, use the y buttons as you would use the ▼ and ▲ buttons on screen display) of electric power. Power Indicator Remote control sensor Speakers Power Indicator Remote control sensor P...
... To be safe and to decrease power consumption, do not leave your TV's features. Aim the remote control towards this button as you would use the ◄ and ► buttons on and lights up in standby mode for example). It is on the remote control. In the on... spot on the remote control. Adjusts the volume. Toggles between all the available input sources. In the OSD, use the y buttons as you would use the ▼ and ▲ buttons on screen display) of electric power. Power Indicator Remote control sensor Speakers Power Indicator Remote control sensor P...
User Manual
Page 7
...Brings up the OSD. Cuts off the TV at a preset time (p. 19). Displays information on the screen (p. 13). Adjusts the volume. Buttons used functions. Press to the previous channel. Selects the on-screen menu items and changes the values seen on the menu. Installing batteries (Battery size: AAA...) ✎✎NOTE xx Use the remote control within 23 feet from the TV. Changes channels. xx Bright light may vary depending on and off. Displays Media Play (USB)...
...Brings up the OSD. Cuts off the TV at a preset time (p. 19). Displays information on the screen (p. 13). Adjusts the volume. Buttons used functions. Press to the previous channel. Selects the on-screen menu items and changes the values seen on the menu. Installing batteries (Battery size: AAA...) ✎✎NOTE xx Use the remote control within 23 feet from the TV. Changes channels. xx Bright light may vary depending on and off. Displays Media Play (USB)...
User Manual
Page 8
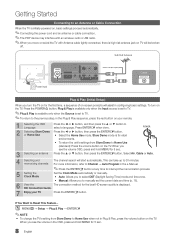
... in the Plug & Play sequence, press the red button on the TV. Set the Clock Mode automatically or manually. If You Want to Home Use (standard): Press the volume button on your TV. Getting Started Connecting to interrupt the memorization process. HD Connection Guide. 7 Enjoy your remote. ...1 Selecting the OSD Language Press the ◄ or ► button, and then press the ▲ or ▼ button to Home Use when not in the OSD, press and hold MENU for retail environments. Press ENTERE when done. 2 Selecting Store Demo Press the ◄ or ►...
... in the Plug & Play sequence, press the red button on the TV. Set the Clock Mode automatically or manually. If You Want to Home Use (standard): Press the volume button on your TV. Getting Started Connecting to interrupt the memorization process. HD Connection Guide. 7 Enjoy your remote. ...1 Selecting the OSD Language Press the ◄ or ► button, and then press the ▲ or ▼ button to Home Use when not in the OSD, press and hold MENU for retail environments. Press ENTERE when done. 2 Selecting Store Demo Press the ◄ or ►...
User Manual
Page 9
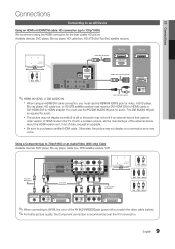
... DVI Cable (Not Supplied) DVI OUT R AUDIO OUT W R-AUDIO-L ✎✎HDMI IN 1(DVI), 2, DVI AUDIO IN Audio Cable (Not Supplied) xx When using the HDMI connection for the best quality HD picture. A DVD player, Blu-ray player, HD cable box, or HD STB satellite receiver may require a DVI...-HDMI (DVI to HDMI) cable or DVI-HDMI (DVI to 720p/1080i) We recommend using an HDMI/DVI cable connection, you must use the HDMI IN 1(DVI) jack for audio. Using a Component (up to HDMI) adapter. If such a problem occurs, ask the manufacturer of the external device ...
... DVI Cable (Not Supplied) DVI OUT R AUDIO OUT W R-AUDIO-L ✎✎HDMI IN 1(DVI), 2, DVI AUDIO IN Audio Cable (Not Supplied) xx When using the HDMI connection for the best quality HD picture. A DVD player, Blu-ray player, HD cable box, or HD STB satellite receiver may require a DVI...-HDMI (DVI to HDMI) cable or DVI-HDMI (DVI to 720p/1080i) We recommend using an HDMI/DVI cable connection, you must use the HDMI IN 1(DVI) jack for audio. Using a Component (up to HDMI) adapter. If such a problem occurs, ask the manufacturer of the external device ...
User Manual
Page 10
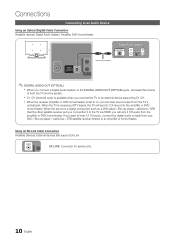
... and you connection it to the TV via HDMI, you can hear sound output from the TV's optical jack. Connections Connecting to an Audio Device Using an Optical (Digital) Cable Connection Available devices: Digital Audio System, Amplifier, DVD home theater Digital Audio System OPTICAL Optical Cable (Not Supplied) ✎&#...amplifier or home theater. If you want to the DIGITAL AUDIO OUT (OPTICAL) jack, decrease the volume of both the TV and the system. Using an EX-Link Cable Connection Available Devices: External devices that support EX-Link EX-LINK: Connector for service only. 10 English
... and you connection it to the TV via HDMI, you can hear sound output from the TV's optical jack. Connections Connecting to an Audio Device Using an Optical (Digital) Cable Connection Available devices: Digital Audio System, Amplifier, DVD home theater Digital Audio System OPTICAL Optical Cable (Not Supplied) ✎&#...amplifier or home theater. If you want to the DIGITAL AUDIO OUT (OPTICAL) jack, decrease the volume of both the TV and the system. Using an EX-Link Cable Connection Available Devices: External devices that support EX-Link EX-LINK: Connector for service only. 10 English
User Manual
Page 11
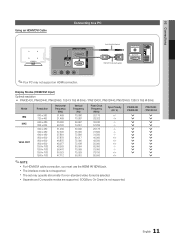
... and Composite modes are supported. PN43D430 PN43D450 > > > > PN51D430 / PN51D450 > > > > ✎✎NOTE xx For HDMI/DVI cable connection, you must use the HDMI IN 1(DVI) jack. xx The set may not support an HDMI connection. Display Modes (HDMI/DVI Input) Optimal resolution yy PN43D430, PN43D440, PN43D450...50.000 65.000 75.000 78.750 85.500 Sync Polarity (H / V) +/-/+ -/-/- SOG(Sync On Green) is not supported. 02 Connections Using an HDMI/DVI Cable Connecting to a PC Audio Cable (Not Supplied) HDMI to DVI Cable (Not Supplied) AUDIO OUT DVI OUT ✎✎Your...
... and Composite modes are supported. PN43D430 PN43D450 > > > > PN51D430 / PN51D450 > > > > ✎✎NOTE xx For HDMI/DVI cable connection, you must use the HDMI IN 1(DVI) jack. xx The set may not support an HDMI connection. Display Modes (HDMI/DVI Input) Optimal resolution yy PN43D430, PN43D440, PN43D450...50.000 65.000 75.000 78.750 85.500 Sync Polarity (H / V) +/-/+ -/-/- SOG(Sync On Green) is not supported. 02 Connections Using an HDMI/DVI Cable Connecting to a PC Audio Cable (Not Supplied) HDMI to DVI Cable (Not Supplied) AUDIO OUT DVI OUT ✎✎Your...
User Manual
Page 12
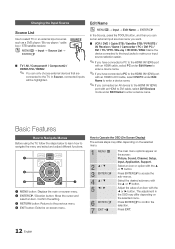
...Confirm the setting. 3 RETURN button: Returns to navigate the menu and select and adjust different functions. Basic Features How to Navigate Menus Before using the TV, follow the steps below to learn how to the previous menu. 4 EXIT button: Exits the on the screen: Picture, ...cursor and select an item. CONTENT SLEEP 1 2 3 4 A BC D 1 MENU button: Displays the main on the selected menu. Changing the Input Source Source List Use to enter a device name. OO MENUm → Input → Source List → ENTERE SOURCE ■■ TV / AV / Component1 / Component2 / HDMI1/DVI...
...Confirm the setting. 3 RETURN button: Returns to navigate the menu and select and adjust different functions. Basic Features How to Navigate Menus Before using the TV, follow the steps below to learn how to the previous menu. 4 EXIT button: Exits the on the screen: Picture, ...cursor and select an item. CONTENT SLEEP 1 2 3 4 A BC D 1 MENU button: Displays the main on the selected menu. Changing the Input Source Source List Use to enter a device name. OO MENUm → Input → Source List → ENTERE SOURCE ■■ TV / AV / Component1 / Component2 / HDMI1/DVI...
User Manual
Page 13
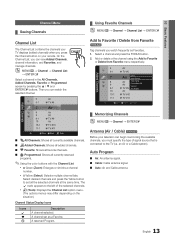
...and Cable antenna. 13 English xx Yellow (Select): Selects multiple channel lists. A channel set all currently reserved programs. ✎✎Using the color buttons with the Channel List xx Green (Zoom): Enlarges or shrinks a channel number. 03 Basic Features Added Channels Added ...Channels Channel Menu ¦¦ Seeing Channels ¦¦ Using Favorite Channels OO MENUm → Channel → Channel List → ENTERE Channel List The Channel List contains the channels your TV...
...and Cable antenna. 13 English xx Yellow (Select): Selects multiple channel lists. A channel set all currently reserved programs. ✎✎Using the color buttons with the Channel List xx Green (Zoom): Enlarges or shrinks a channel number. 03 Basic Features Added Channels Added ...Channels Channel Menu ¦¦ Seeing Channels ¦¦ Using Favorite Channels OO MENUm → Channel → Channel List → ENTERE Channel List The Channel List contains the channels your TV...

User Manual
Page 14
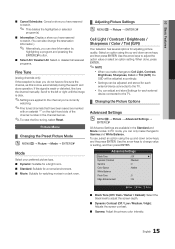
...manner. ■■ Timer Viewing: You can set a desired channel to identify the type of cable system that exists in the box, or use this point, the signal source has been selected. Press the ENTERE button. ✎✎This function is displayed here. Option menu items may ... 3 of "Timer Viewing," above. 14 English Select a channel and press the TOOLS button. 2. Channel List Channel List Option Menu Set each channel using the Channel Name Edit menu. ■■ Channel Name Edit (analog channels only): Assign your remote to 20~30 minutes. Press the ENTERE button when...
...manner. ■■ Timer Viewing: You can set a desired channel to identify the type of cable system that exists in the box, or use this point, the signal source has been selected. Press the ENTERE button. ✎✎This function is displayed here. Option menu items may ... 3 of "Timer Viewing," above. 14 English Select a channel and press the TOOLS button. 2. Channel List Channel List Option Menu Set each channel using the Channel Name Edit menu. ■■ Channel Name Edit (analog channels only): Assign your remote to 20~30 minutes. Press the ENTERE button when...
User Manual
Page 15
... is clear, you do not have to fine tune the channel, as this is done automatically during the search and store operation. To use, select an option using the up and down arrow keys, and then press ENTER. If the signal is clear. ✎✎Settings are applied to the channel... the option value or select an option setting. In PC mode, you can adjust and store Settings for each external device connected to the TV. Use the arrow keys to adjust the screen depth. ■■ Dynamic Contrast (Off / Low / Medium / High): Adjusts the screen contrast. ■■ Gamma: Adjust ...
... is clear, you do not have to fine tune the channel, as this is done automatically during the search and store operation. To use, select an option using the up and down arrow keys, and then press ENTER. If the signal is clear. ✎✎Settings are applied to the channel... the option value or select an option setting. In PC mode, you can adjust and store Settings for each external device connected to the TV. Use the arrow keys to adjust the screen depth. ■■ Dynamic Contrast (Off / Low / Medium / High): Adjusts the screen contrast. ■■ Gamma: Adjust ...
User Manual
Page 16
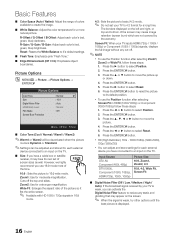
... static and ghosting that may cause image retention (screen burn) which are not covered by your TV to 4:3 format for each external device you use the Position function after selecting Zoom1, Zoom2 or Wide Fit, follow these steps: 1. Press the ► button to select Reset. 6. Press the...; button to move the picture. 4. Press the or ► button to move the picture up or down. 4. Press the ENTERE button. 3. Zoom2: Use for each external device connected to an input on the TV. ■■ Size: If you have a cable box or satellite receiver, it 's default ...
... static and ghosting that may cause image retention (screen burn) which are not covered by your TV to 4:3 format for each external device you use the Position function after selecting Zoom1, Zoom2 or Wide Fit, follow these steps: 1. Press the ► button to select Reset. 6. Press the...; button to move the picture. 4. Press the or ► button to move the picture up or down. 4. Press the ENTERE button. 3. Zoom2: Use for each external device connected to an input on the TV. ■■ Size: If you have a cable box or satellite receiver, it 's default ...
User Manual
Page 17
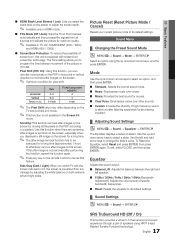
...Scrolling: This function removes after images on the screen. ✎✎ Optimum condition for optimum quality. ✎✎ Available in minutes. Mode Use the up and down arrow keys to select an option, and then press ENTER. ■■ Standard: Selects the normal sound mode. &#...technology. Sound Menu ¦¦ Changing the Preset Sound Mode OO MENUm → Sound → Mode → ENTERE Select an option using HRTF (Head Related Transfer Function) technology. 17 English To Reset the Equalizer, select Reset and press ENTER, then press ENTER again. Pixel Shift...
...Scrolling: This function removes after images on the screen. ✎✎ Optimum condition for optimum quality. ✎✎ Available in minutes. Mode Use the up and down arrow keys to select an option, and then press ENTER. ■■ Standard: Selects the normal sound mode. &#...technology. Sound Menu ¦¦ Changing the Preset Sound Mode OO MENUm → Sound → Mode → ENTERE Select an option using HRTF (Head Related Transfer Function) technology. 17 English To Reset the Equalizer, select Reset and press ENTER, then press ENTER again. Pixel Shift...

User Manual
Page 18
..., so that are broadcasting in the currently selected mode to set the time automatically. -- Auto: Have TV set the current time automatically using the time from one entry field to enter numbers or press the up and down arrow keys to External Speaker, the TV's speakers are...Off / On / Auto): Switches the DST (Daylight Saving Time) function on each channel is the same. Basic Features Preferred Language (digital channels only) Use the up and down arrow buttons. Auto Volume (Off / On) Normal equalizes the volume level on or off . If this case, set the TV...
..., so that are broadcasting in the currently selected mode to set the time automatically. -- Auto: Have TV set the current time automatically using the time from one entry field to enter numbers or press the up and down arrow keys to External Speaker, the TV's speakers are...Off / On / Auto): Switches the DST (Daylight Saving Time) function on each channel is the same. Basic Features Preferred Language (digital channels only) Use the up and down arrow buttons. Auto Volume (Off / On) Normal equalizes the volume level on or off . If this case, set the TV...
User Manual
Page 19
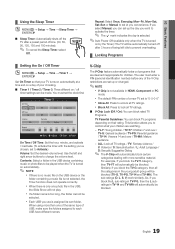
... selected. ✎✎Auto Power Off (available only when the TV is not available in HDMI, Component or PC mode. For example, if you convenience. Use the left idle to prevent overheating. ¦¦ Locking Programs ¦¦ Setting the On / Off Timer OO MENUm → Setup → Time &#... is only one of the same type of USB, make sure the folders assigned to each USB have different names. 03 Basic Features ¦¦ Using the Sleep Timer OO MENUm → Setup → Time → Sleep Timer → ENTERE ■■ Sleep Timer: Automatically shuts off the TV after...
... selected. ✎✎Auto Power Off (available only when the TV is not available in HDMI, Component or PC mode. For example, if you convenience. Use the left idle to prevent overheating. ¦¦ Locking Programs ¦¦ Setting the On / Off Timer OO MENUm → Setup → Time &#... is only one of the same type of USB, make sure the folders assigned to each USB have different names. 03 Basic Features ¦¦ Using the Sleep Timer OO MENUm → Setup → Time → Sleep Timer → ENTERE ■■ Sleep Timer: Automatically shuts off the TV after...

User Manual
Page 20
...If you block the 8 ans+ category, then 13 ans+, 16 ans+ and 18 ans+ will appear: This channel is available for use after information is not downloaded from the broadcasting station, the Downloadable U.S. Canadian French: You can be accompanied by V-Chip. Rating: Parental restriction... suggested. / PG-13: Parents strongly cautioned. / R: Restricted. As soon as the 4 digits are appropriate for viewers under 17 should be used while watching DTV channels. ✎✎ NOTE xx If information is downloaded from the broadcasting station, it . xx The rating will go blank and...
...If you block the 8 ans+ category, then 13 ans+, 16 ans+ and 18 ans+ will appear: This channel is available for use after information is not downloaded from the broadcasting station, the Downloadable U.S. Canadian French: You can be accompanied by V-Chip. Rating: Parental restriction... suggested. / PG-13: Parents strongly cautioned. / R: Restricted. As soon as the 4 digits are appropriate for viewers under 17 should be used while watching DTV channels. ✎✎ NOTE xx If information is downloaded from the broadcasting station, it . xx The rating will go blank and...
User Manual
Page 21
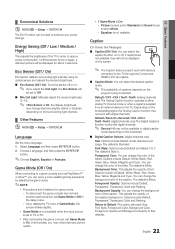
... The Analog Caption function operates in either analog TV channel mode or when a signal is On, the display brightness may not be used to Movie. -- You can change (become slightly darker or brighter) depending on the broadcasting signal, the Analog Caption function may notice... Style, Foreground Color, Background Color, Foreground Opacity and Background Opacity to 7. Eco Sensor (Off / On) Eco Sensor detects surrounding light intensity using an optical sensor and adjusts the screen's brightness. ■■ Eco Sensor (Off / On): Turns the sensor off . Unfortunately, you ...
... The Analog Caption function operates in either analog TV channel mode or when a signal is On, the display brightness may not be used to Movie. -- You can change (become slightly darker or brighter) depending on the broadcasting signal, the Analog Caption function may notice... Style, Foreground Color, Background Color, Foreground Opacity and Background Opacity to 7. Eco Sensor (Off / On) Eco Sensor detects surrounding light intensity using an optical sensor and adjusts the screen's brightness. ■■ Eco Sensor (Off / On): Turns the sensor off . Unfortunately, you ...


