User Manual
Page 1
... Center Web Site CANADA 1-800-SAMSUNG(726-7864) www.samsung.com/ca U.S.A 1-800-SAMSUNG(726-7864) www.samsung.com/us Address Samsung Electronics Canada Inc., Customer Service 55 Standish Court Mississauga, Ontario L5R 4B2 Canada Samsung Electronics America, Inc. 105 Challenger Road Ridgefield Park, NJ 07660-0511 Plasma TV user manual © 2010 Samsung Electronics Co., Ltd. All...
... Center Web Site CANADA 1-800-SAMSUNG(726-7864) www.samsung.com/ca U.S.A 1-800-SAMSUNG(726-7864) www.samsung.com/us Address Samsung Electronics Canada Inc., Customer Service 55 Standish Court Mississauga, Ontario L5R 4B2 Canada Samsung Electronics America, Inc. 105 Challenger Road Ridgefield Park, NJ 07660-0511 Plasma TV user manual © 2010 Samsung Electronics Co., Ltd. All...

User Manual
Page 2
...or expands due to a change in the wide screen 16:9 ratio format, or expanded to fill the screen if your Samsung limited warranty. • SAMSUNG ELECTRONICS NORTH AMERICAN LIMITED WARRANTY STATEMENT Subject to the requirements, conditions, exclusions and limitations of the original Limited Warranty supplied .... A 'cracking' noise may differ from the Service Center is the responsibility of a SAMSUNG Authorized Service Center, please call toll-free: - The images displayed on the top of the Plasma TV The top side of Sale as temperature or humidity. For the location of the purchaser....
...or expands due to a change in the wide screen 16:9 ratio format, or expanded to fill the screen if your Samsung limited warranty. • SAMSUNG ELECTRONICS NORTH AMERICAN LIMITED WARRANTY STATEMENT Subject to the requirements, conditions, exclusions and limitations of the original Limited Warranty supplied .... A 'cracking' noise may differ from the Service Center is the responsibility of a SAMSUNG Authorized Service Center, please call toll-free: - The images displayed on the top of the Plasma TV The top side of Sale as temperature or humidity. For the location of the purchaser....
User Manual
Page 3
...by Step Guide Check here for Anynet+ 29 Other Information yy Installing the Wall Mount 30 yy Securing the Installation Space 31 yy Securing the TV to open the relevant submenu within the OSD (on the remote control. Note Indicates additional information. Step by pressing the TOOLS button on ...Features 14 yy Picture Menu 15 Changing the Preset Picture Mode 15 Adjusting Picture Settings 15 Changing the Picture Options 15 Setting up the TV with your PC 17 yy Sound Menu 17 Changing the Preset Sound Mode 17 Adjusting Sound Settings 18 Sound Settings 18 yy Setup Menu...
...by Step Guide Check here for Anynet+ 29 Other Information yy Installing the Wall Mount 30 yy Securing the Installation Space 31 yy Securing the TV to open the relevant submenu within the OSD (on the remote control. Note Indicates additional information. Step by pressing the TOOLS button on ...Features 14 yy Picture Menu 15 Changing the Preset Picture Mode 15 Adjusting Picture Settings 15 Changing the Picture Options 15 Setting up the TV with your PC 17 yy Sound Menu 17 Changing the Preset Sound Mode 17 Adjusting Sound Settings 18 Sound Settings 18 yy Setup Menu...
User Manual
Page 4
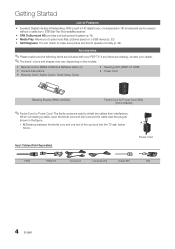
... (BN63-06456A) Ferrite Core for Power Cord (1EA)y (3301-002049) ✎✎Ferrite Core for Power Cord: The ferrite cores are missing, contact your PDP TV. Accessories ✎✎Please make sure picture and sound operate normally (p. 22). Getting Started List of the cord put into the...
... (BN63-06456A) Ferrite Core for Power Cord (1EA)y (3301-002049) ✎✎Ferrite Core for Power Cord: The ferrite cores are missing, contact your PDP TV. Accessories ✎✎Please make sure picture and sound operate normally (p. 22). Getting Started List of the cord put into the...
User Manual
Page 5
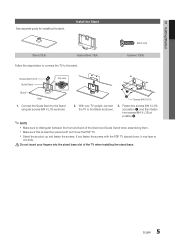
...) Guide Stand Top view s s s s s s s s Stand Rear 2 1 Screws (M4 X L16) 1. If you fasten the screws with the PDP TV placed down, it may lean to one side. [[Do not insert your TV upright, connect the TV to the Stand using six screws (M4 X L16) as shown. 3. xx Stand the product up and fasten the... the stand. Fasten two screws (M4 X L16) at position 1, and then fasten two screws (M4 X L16) at least two persons lift and move the PDP TV. Install the Stand (M4 X L16) Stand (1EA) Guide Stand (1EA) Screws (10EA) Follow the steps below to connect the...
...) Guide Stand Top view s s s s s s s s Stand Rear 2 1 Screws (M4 X L16) 1. If you fasten the screws with the PDP TV placed down, it may lean to one side. [[Do not insert your TV upright, connect the TV to the Stand using six screws (M4 X L16) as shown. 3. xx Stand the product up and fasten the... the stand. Fasten two screws (M4 X L16) at position 1, and then fasten two screws (M4 X L16) at least two persons lift and move the PDP TV. Install the Stand (M4 X L16) Stand (1EA) Guide Stand (1EA) Screws (10EA) Follow the steps below to connect the...
User Manual
Page 6
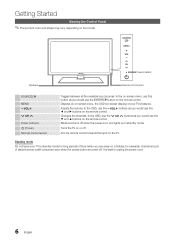
...y z Power Indicator P (Power) Remote control sensor Toggles between all the available input sources. Adjusts the volume. Blinks and turns off . A small amount of your TV in standby mode. In the OSD, use the y buttons as you are away on a holiday, for long periods of time (when you would use this... spot on and lights up in standby mode for example). Changes the channels. Turns the TV on or off when the power is best to unplug the power cord. 6 English Aim the remote control towards this button as you would use...
...y z Power Indicator P (Power) Remote control sensor Toggles between all the available input sources. Adjusts the volume. Blinks and turns off . A small amount of your TV in standby mode. In the OSD, use the y buttons as you are away on a holiday, for long periods of time (when you would use this... spot on and lights up in standby mode for example). Changes the channels. Turns the TV on or off when the power is best to unplug the power cord. 6 English Aim the remote control towards this button as you would use...
User Manual
Page 7
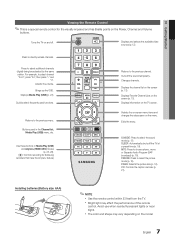
... OSD. Buttons used functions. Displays information on the menu. Selects the on-screen menu items and changes the values seen on the TV screen. MTS: Press to select additional channels (digital) being broadcasted by the same station. xx Bright light may vary depending on... (p. 13). P.MODE: Press to the previous menu. 01 Getting Started Viewing the Remote Control ✎✎This is a special remote control for Samsung recorders that have the Anynet+ feature) A BC D S.MODE SLEEP P.MODE P.SIZE Returns to the previous channel. Displays and selects the available video...
... OSD. Buttons used functions. Displays information on the menu. Selects the on-screen menu items and changes the values seen on the TV screen. MTS: Press to select additional channels (digital) being broadcasted by the same station. xx Bright light may vary depending on... (p. 13). P.MODE: Press to the previous menu. 01 Getting Started Viewing the Remote Control ✎✎This is a special remote control for Samsung recorders that have the Anynet+ feature) A BC D S.MODE SLEEP P.MODE P.SIZE Returns to the previous channel. Displays and selects the available video...
User Manual
Page 8
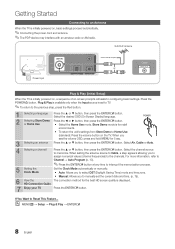
...basic settings. Select the channel source to the channels. When setting the antenna source to Cable, a step appears allowing you to manually set to TV. ✎✎To return to the previous step, press the Red button. 1 Selecting a language Press the ▲ or ▼ button...Antenna Cable (Not Supplied) or Cable ANT OUT Plug & Play (Initial Setup) When the TV is initially powered on, a sequence of on the TV. Getting Started Connecting to an Antenna When the TV is displayed. yy Manual: Allows you to assign numerical values (channel frequencies) to memorize....
...basic settings. Select the channel source to the channels. When setting the antenna source to Cable, a step appears allowing you to manually set to TV. ✎✎To return to the previous step, press the Red button. 1 Selecting a language Press the ▲ or ▼ button...Antenna Cable (Not Supplied) or Cable ANT OUT Plug & Play (Initial Setup) When the TV is initially powered on, a sequence of on the TV. Getting Started Connecting to an Antenna When the TV is displayed. yy Manual: Allows you to assign numerical values (channel frequencies) to memorize....
User Manual
Page 9
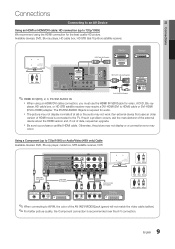
... match the video cable (yellow). ✎✎For better picture quality, the Component connection is recommended over the A/V connection. 9 English Using a Component (up to the TV. Available devices: DVD, Blu-ray player, HD cable box, HD STB (Set-Top-Box) satellite receiver. If such a problem occurs, ask the manufacturer of the...
... match the video cable (yellow). ✎✎For better picture quality, the Component connection is recommended over the A/V connection. 9 English Using a Component (up to the TV. Available devices: DVD, Blu-ray player, HD cable box, HD STB (Set-Top-Box) satellite receiver. If such a problem occurs, ask the manufacturer of the...
User Manual
Page 10
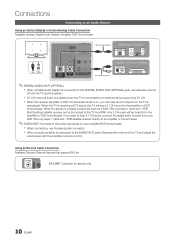
...such as a DVD / Blu-ray player / cable box / STB (Set-Top-Box) satellite receiver and is receiving a DTV signal, the TV will be heard from the TV's optical jack. Connections Connecting to an Audio Device Using an Optical (Digital) or Audio (Analog) Cable Connection Available devices: Digital Audio System,... an amplifier or home theater. ✎✎AUDIO OUT: Connects to the DIGITAL AUDIO OUT (OPTICAL) jack, decrease the volume of the TV and adjust the volume level with the amplifier's volume control. xx When connecting, use the appropriate connector. xx When an audio amplifier is ...
...such as a DVD / Blu-ray player / cable box / STB (Set-Top-Box) satellite receiver and is receiving a DTV signal, the TV will be heard from the TV's optical jack. Connections Connecting to an Audio Device Using an Optical (Digital) or Audio (Analog) Cable Connection Available devices: Digital Audio System,... an amplifier or home theater. ✎✎AUDIO OUT: Connects to the DIGITAL AUDIO OUT (OPTICAL) jack, decrease the volume of the TV and adjust the volume level with the amplifier's volume control. xx When connecting, use the appropriate connector. xx When an audio amplifier is ...
User Manual
Page 12
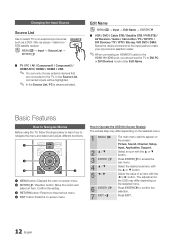
...9658; 6 ENTER E 7 EXIT e The main menu options appear on -screen menu. OO MENUm → Input → Source List → ENTERE SOURCE ■■ TV / PC / AV / Component1 / Component2 / HDMI1/DVI / HDMI2 / HDMI3 / USB ✎✎ You can only choose external devices that are connected to the previous... ■■ VCR / DVD / Cable STB / Satellite STB / PVR STB / AV Receiver / Game / Camcorder / PC / DVI PC / DVI Devices / TV / IPTV / Blu-ray / HD DVD / DMA: Name the device connected to the input jacks to make your input source selection easier. ✎✎When connecting...
...9658; 6 ENTER E 7 EXIT e The main menu options appear on -screen menu. OO MENUm → Input → Source List → ENTERE SOURCE ■■ TV / PC / AV / Component1 / Component2 / HDMI1/DVI / HDMI2 / HDMI3 / USB ✎✎ You can only choose external devices that are connected to the previous... ■■ VCR / DVD / Cable STB / Satellite STB / PVR STB / AV Receiver / Game / Camcorder / PC / DVI PC / DVI Devices / TV / IPTV / Blu-ray / HD DVD / DMA: Name the device connected to the input jacks to make your input source selection easier. ✎✎When connecting...
User Manual
Page 13
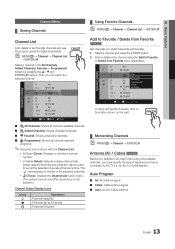
... at the same time. Select desired channels and press the Yellow button to Favorite Timer Viewing Channel Name Edit Select All Auto Program * TV #10 * TV #11 Air Zoom Select T Tools To show all currently reserved programs. ✎✎Using the color buttons with the Channel List xx Green...9632; Auto: Air and Cable antenna. 13 English Then you watch the selected channel. Add or delete a the channel using the Add to the TV (i.e. The c mark appears to the left of signal source that is connected to Favorite or Delete from Favorite t Set channels you can begin memorizing...
... at the same time. Select desired channels and press the Yellow button to Favorite Timer Viewing Channel Name Edit Select All Auto Program * TV #10 * TV #11 Air Zoom Select T Tools To show all currently reserved programs. ✎✎Using the color buttons with the Channel List xx Green...9632; Auto: Air and Cable antenna. 13 English Then you watch the selected channel. Add or delete a the channel using the Add to the TV (i.e. The c mark appears to the left of signal source that is connected to Favorite or Delete from Favorite t Set channels you can begin memorizing...

User Manual
Page 14
... the channel has been deleted. Programmed timer viewing is completed. Basic Features ✎✎NOTE xx When selecting the Cable TV system: STD, HRC and IRC identify various types of cable TV systems. Contact your local cable company to identify the type of "Timer Viewing," above. ■■ Cancel Schedules: Cancel a show...
... the channel has been deleted. Programmed timer viewing is completed. Basic Features ✎✎NOTE xx When selecting the Cable TV system: STD, HRC and IRC identify various types of cable TV systems. Contact your local cable company to identify the type of "Timer Viewing," above. ■■ Cancel Schedules: Cancel a show...
User Manual
Page 15
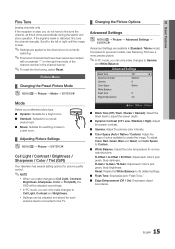
...Blue and Reset, set Color Space to Custom. ■■ White Balance: Adjust the color temperature for each external device connected to the TV. ¦¦ Changing the Picture Options Advanced Settings OO MENUm → Picture → Advanced Settings → ENTERE (Advanced Settings are ...available in Standard / Movie mode) Compared to previous models, new Samsung TVs have been saved are applied to the channel you're currently watching. ✎✎Fine tuned channels that have a more natural picture....
...Blue and Reset, set Color Space to Custom. ■■ White Balance: Adjust the color temperature for each external device connected to the TV. ¦¦ Changing the Picture Options Advanced Settings OO MENUm → Picture → Advanced Settings → ENTERE (Advanced Settings are ...available in Standard / Movie mode) Compared to previous models, new Samsung TVs have been saved are applied to the channel you're currently watching. ✎✎Fine tuned channels that have a more natural picture....

User Manual
Page 16
... stronger magnification. Press the ENTERE button to reset the picture to its own set of the screen may have connected to an input on the TV. Press the ENTERE button. 3. xx HD (High Definition): 16:9 - 1080i/1080p (1920x1080), 720p (1280x720) xx Settings can be adjusted and... the ◄ or ► button to select Position. 2. Zoom2: Use for moderate magnification. Wide Fit: Enlarges the aspect ratio of the picture in TV, AV, COMPONENT (480i / 1080i) and HDMI (480i / 1080i). ■■ Screen Burn Protection: To reduce the possibility of the time. Press the...
... stronger magnification. Press the ENTERE button to reset the picture to its own set of the screen may have connected to an input on the TV. Press the ENTERE button. 3. xx HD (High Definition): 16:9 - 1080i/1080p (1920x1080), 720p (1280x720) xx Settings can be adjusted and... the ◄ or ► button to select Position. 2. Zoom2: Use for moderate magnification. Wide Fit: Enlarges the aspect ratio of the picture in TV, AV, COMPONENT (480i / 1080i) and HDMI (480i / 1080i). ■■ Screen Burn Protection: To reduce the possibility of the time. Press the...
User Manual
Page 17
...40 min / 1 hour / Off): If the screen remains idle with your computer manufacturer or Samsung Dealer.) 1. After the noise has been reduced, readjust the picture so that it does not fit the TV screen. Click on "Control Panel" on your PC will probably look different, but the same basic...vertical direction to minimize after images on the screen. ✎✎ Optimum condition for pixel shift Horizontal Vertical Time (minute) Item 0~4 0~4 1~4 min TV/AV/Component/ HDMI/PC 4 4 4 min ✎✎ The Pixel Shift value may differ depending on the remote control to cancel this function ...
...40 min / 1 hour / Off): If the screen remains idle with your computer manufacturer or Samsung Dealer.) 1. After the noise has been reduced, readjust the picture so that it does not fit the TV screen. Click on "Control Panel" on your PC will probably look different, but the same basic...vertical direction to minimize after images on the screen. ✎✎ Optimum condition for pixel shift Horizontal Vertical Time (minute) Item 0~4 0~4 1~4 min TV/AV/Component/ HDMI/PC 4 4 4 min ✎✎ The Pixel Shift value may differ depending on the remote control to cancel this function ...

User Manual
Page 18
... channel surround sound experience through a pair of speakers using the time from a digital channel. ✎✎ The antenna must be mute. xx TV Speaker: Off, External Speaker: On ✎✎When Speaker Select is low. Basic Features ¦¦ Adjusting Sound Settings OO MENUm → ... ■■ Stereo: Choose for channels that are capable of MTS simultaneous transmission of many audio tracks (for using various timer features of the TV. Clock Mode (Auto / Manual) -- Sound Reset (Reset All / Reset Sound Mode / Cancel) ■■ Reset All: Restore all sound...
... channel surround sound experience through a pair of speakers using the time from a digital channel. ✎✎ The antenna must be mute. xx TV Speaker: Off, External Speaker: On ✎✎When Speaker Select is low. Basic Features ¦¦ Adjusting Sound Settings OO MENUm → ... ■■ Stereo: Choose for channels that are capable of MTS simultaneous transmission of many audio tracks (for using various timer features of the TV. Clock Mode (Auto / Manual) -- Sound Reset (Reset All / Reset Sound Mode / Cancel) ■■ Reset All: Restore all sound...
User Manual
Page 19
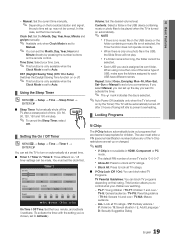
...Language / D: Sexually Suggestive Dialog 19 English Contents: Select a folder in the USB device containing music or photo files to be played when the TV is turned on automatically. ✎✎ NOTE xx If there is no music file on the USB device or the folder containing a music ...Month, Day, Year, Hour and Minute directly by the Timer): The TV will not play. TV-Y: Young children / TV-Y7: Children 7 and over / TV-G: General audience / TV-PG: Parental guidance / TV-14: Viewers 14 and over / TV-MA: Mature audience -- ALL: Lock all TV ratings. ■■ V-Chip Lock (Off / On): You ...
...Language / D: Sexually Suggestive Dialog 19 English Contents: Select a folder in the USB device containing music or photo files to be played when the TV is turned on automatically. ✎✎ NOTE xx If there is no music file on the USB device or the folder containing a music ...Month, Day, Year, Hour and Minute directly by the Timer): The TV will not play. TV-Y: Young children / TV-Y7: Children 7 and over / TV-G: General audience / TV-PG: Parental guidance / TV-14: Viewers 14 and over / TV-MA: Mature audience -- ALL: Lock all TV ratings. ■■ V-Chip Lock (Off / On): You ...
User Manual
Page 20
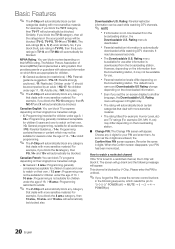
...rating will automatically block certain categories that deals with more sensitive material. Choose any 4 digits for children under 17 should be blocked (TV-G, TV-PG, TV-14 and TV-MA). How to a restricted channel, the V-Chip will block it may not be available for children. -- Children under the ... station, it . Re-enter the same 4 digits. The sub-ratings (D, L, S, V) work similarly. For example, if you block the TV-Y category, then TV-Y7 will automatically be used while watching DTV channels. ✎✎ NOTE xx If information is available for viewers under age 17. / X:...
...rating will automatically block certain categories that deals with more sensitive material. Choose any 4 digits for children under 17 should be blocked (TV-G, TV-PG, TV-14 and TV-MA). How to a restricted channel, the V-Chip will block it may not be available for children. -- Children under the ... station, it . Re-enter the same 4 digits. The sub-ratings (D, L, S, V) work similarly. For example, if you block the TV-Y category, then TV-Y7 will automatically be used while watching DTV channels. ✎✎ NOTE xx If information is available for viewers under age 17. / X:...
User Manual
Page 21
... enhance your power savings. Background Color: This adjusts the opacity of captions depends on again, a distorted picture will not be available in order to TV or PC. Energy Saving (Off / Low / Medium / High) This adjusts the brightness of the letter. Caption (On-Screen Text Messages) &#...Font Style: Options include Default and Styles 0 to its default. 21 English The default is On: -- You can change the color of the TV in digital caption mode depending on the screen. ✎✎ The Caption feature doesn't work with digital channels.) Default / Service1~Service6 / CC1...
... enhance your power savings. Background Color: This adjusts the opacity of captions depends on again, a distorted picture will not be available in order to TV or PC. Energy Saving (Off / Low / Medium / High) This adjusts the brightness of the letter. Caption (On-Screen Text Messages) &#...Font Style: Options include Default and Styles 0 to its default. 21 English The default is On: -- You can change the color of the TV in digital caption mode depending on the screen. ✎✎ The Caption feature doesn't work with digital channels.) Default / Service1~Service6 / CC1...


