
User Manual
Page 2
...the Warranty. • After-images on them should primarily be in the wide screen 16:9 ratio format, or expanded to fill the screen if your Samsung limited warranty. • SAMSUNG ELECTRONICS NORTH AMERICAN LIMITED WARRANTY STATEMENT Subject to the requirements, conditions, exclusions and ...(FHD-level) pixels which require sophisticated technology to view different formats as a full screen picture. In the United States : 1-800-SAMSUNG (1-800-726-7864) - In Canada : 1-800-SAMSUNG User Instructions • Screen Image retention Do not display a still image (such as on a video game)...
...the Warranty. • After-images on them should primarily be in the wide screen 16:9 ratio format, or expanded to fill the screen if your Samsung limited warranty. • SAMSUNG ELECTRONICS NORTH AMERICAN LIMITED WARRANTY STATEMENT Subject to the requirements, conditions, exclusions and ...(FHD-level) pixels which require sophisticated technology to view different formats as a full screen picture. In the United States : 1-800-SAMSUNG (1-800-726-7864) - In Canada : 1-800-SAMSUNG User Instructions • Screen Image retention Do not display a still image (such as on a video game)...
User Manual
Page 3
Step by pressing the TOOLS button on screen display). 3 English Contents Getting Started yy List of Features 4 yy Accessories 4 yy Install the Stand 5 yy Viewing the Control Panel 6 yy Viewing the Remote Control 7 ...
Step by pressing the TOOLS button on screen display). 3 English Contents Getting Started yy List of Features 4 yy Accessories 4 yy Install the Stand 5 yy Viewing the Control Panel 6 yy Viewing the Remote Control 7 ...
User Manual
Page 6
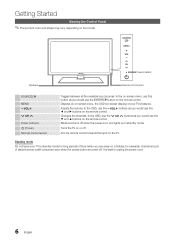
Displays an on-screen menu, the OSD (on screen display) of your TV in standby mode. In the OSD, use the y buttons as you would use the ◄ and ► buttons on a holiday, for ... Started Viewing the Control Panel ✎✎The product color and shape may vary depending on the remote control. Adjusts the volume. In the on-screen menu, use the ENTERE button on the model.
Displays an on-screen menu, the OSD (on screen display) of your TV in standby mode. In the OSD, use the y buttons as you would use the ◄ and ► buttons on a holiday, for ... Started Viewing the Control Panel ✎✎The product color and shape may vary depending on the remote control. Adjusts the volume. In the on-screen menu, use the ENTERE button on the model.
User Manual
Page 7
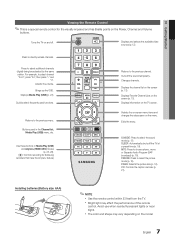
...54-3", press "54", then press "-" and "3". Brings up the OSD. Buttons used functions. Displays the channel list on the TV screen. Displays information on the screen (p. 13). xx Bright light may vary depending on the model. 7 English Displays and selects the available video sources (p. 12). Displays... Remote Control ✎✎This is a special remote control for Samsung recorders that have the Anynet+ feature) A BC D S.MODE SLEEP P.MODE P.SIZE Returns to select the sound mode (p. 17). Selects the on-screen menu items and changes the values seen on the Power, Channel and...
...54-3", press "54", then press "-" and "3". Brings up the OSD. Buttons used functions. Displays the channel list on the TV screen. Displays information on the screen (p. 13). xx Bright light may vary depending on the model. 7 English Displays and selects the available video sources (p. 12). Displays... Remote Control ✎✎This is a special remote control for Samsung recorders that have the Anynet+ feature) A BC D S.MODE SLEEP P.MODE P.SIZE Returns to select the sound mode (p. 17). Selects the on-screen menu items and changes the values seen on the Power, Channel and...
User Manual
Page 8
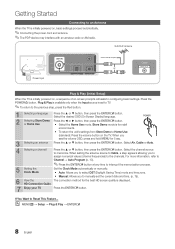
... available only when the Input source is set the current date and time. (p. 19). 6 View the The connection method for the best HD screen quality is initially powered on, basic settings proceed automatically. ✎✎Connecting the power cord and antenna. ✎✎The PDP device may interfere ... → Auto Program (p. 13). ✎✎Press the ENTERE button at any time to Home Use (standard): Press the volume button on -screen prompts will assist in configuring basic settings. Set the Clock Mode automatically or manually. Press the ENTERE button. Select the desired OSD (On...
... available only when the Input source is set the current date and time. (p. 19). 6 View the The connection method for the best HD screen quality is initially powered on, basic settings proceed automatically. ✎✎Connecting the power cord and antenna. ✎✎The PDP device may interfere ... → Auto Program (p. 13). ✎✎Press the ENTERE button at any time to Home Use (standard): Press the volume button on -screen prompts will assist in configuring basic settings. Set the Clock Mode automatically or manually. Press the ENTERE button. Select the desired OSD (On...
User Manual
Page 12
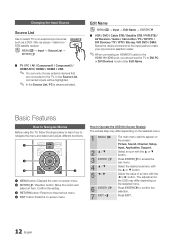
.... 1 MENU m 2 ▲/▼ 3 ENTER E 4 ▲/▼ 5 ◄/► 6 ENTER E 7 EXIT e The main menu options appear on the screen: Picture, Sound, Channel, Setup, Input, Application, Support. Confirm the setting. Select an icon with the ◄ or ► button. Press EXIT. 12 English Changing...to navigate the menu and select and adjust different functions. 1 MEDIA.P 2 3 4 A BC D 1 MENU button: Displays the main on-screen menu. 2 ENTERE / DirSe.McOtDioEn bSuLtEtEoPn: Move the cursor and select an item. Basic Features How to Navigate Menus Before using the TV, follow...
.... 1 MENU m 2 ▲/▼ 3 ENTER E 4 ▲/▼ 5 ◄/► 6 ENTER E 7 EXIT e The main menu options appear on the screen: Picture, Sound, Channel, Setup, Input, Application, Support. Confirm the setting. Select an icon with the ◄ or ► button. Press EXIT. 12 English Changing...to navigate the menu and select and adjust different functions. 1 MEDIA.P 2 3 4 A BC D 1 MENU button: Displays the main on-screen menu. 2 ENTERE / DirSe.McOtDioEn bSuLtEtEoPn: Move the cursor and select an item. Basic Features How to Navigate Menus Before using the TV, follow...
User Manual
Page 13
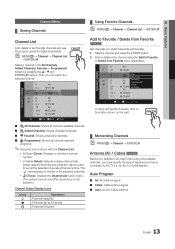
... can watch frequently as a Favorite. OO MENUm → Channel → Channel List → ENTERE Select a channel in the All Channels, Added Channels, Favorite or Programmed screen by pressing the ▲ / ▼ and ENTERE buttons. Select a channel and press the TOOLS button. 2. Add or delete a the channel using the Add to set...
... can watch frequently as a Favorite. OO MENUm → Channel → Channel List → ENTERE Select a channel in the All Channels, Added Channels, Favorite or Programmed screen by pressing the ▲ / ▼ and ENTERE buttons. Select a channel and press the TOOLS button. 2. Add or delete a the channel using the Add to set...
User Manual
Page 15
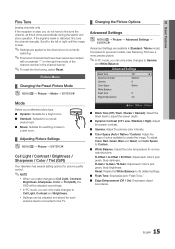
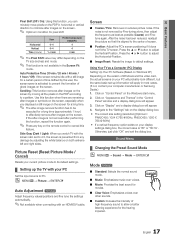
...Enter R Return ■■ Black Tone (Off / Dark / Darker / Darkest): Select the black level to adjust the screen depth. ■■ Dynamic Contrast (Off / Low / Medium / High): Adjust the screen contrast. ■■ Gamma: Adjust the primary color intensity. ■■ Color Space (Auto / Native / Custom): ...watching. ✎✎Fine tuned channels that have been saved are available in Standard / Movie mode) Compared to previous models, new Samsung TVs have a more precise picture. ✎✎In PC mode, you can only make changes to Cell Light, Contrast, Brightness, ...
...Enter R Return ■■ Black Tone (Off / Dark / Darker / Darkest): Select the black level to adjust the screen depth. ■■ Dynamic Contrast (Off / Low / Medium / High): Adjust the screen contrast. ■■ Gamma: Adjust the primary color intensity. ■■ Color Space (Auto / Native / Custom): ...watching. ✎✎Fine tuned channels that have been saved are available in Standard / Movie mode) Compared to previous models, new Samsung TVs have a more precise picture. ✎✎In PC mode, you can only make changes to Cell Light, Contrast, Brightness, ...

User Manual
Page 16
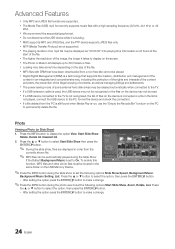
...(480i, 480p) DTV(1080i), Component (1080i, 1080p), HDMI (720p, 1080i, 1080p) PC Picture Size 16:9, Zoom1, Zoom2, 4:3 16:9, 4:3, Wide Fit, Screen Fit 16:9, 4:3 ■■ Digital Noise Filter (Off / Low / Medium / High / Auto / Auto Visualization): If the broadcast signal received by the ...Wide Fit: 1. However, we highly recommend you to program the time between movement of the picture to fit the entire screen. ✎✎ Available with screen burn prevention technology. Press the ENTERE button. 3. Basic Features Picture Options OO MENUm → Picture → Picture ...
...(480i, 480p) DTV(1080i), Component (1080i, 1080p), HDMI (720p, 1080i, 1080p) PC Picture Size 16:9, Zoom1, Zoom2, 4:3 16:9, 4:3, Wide Fit, Screen Fit 16:9, 4:3 ■■ Digital Noise Filter (Off / Low / Medium / High / Auto / Auto Visualization): If the broadcast signal received by the ...Wide Fit: 1. However, we highly recommend you to program the time between movement of the picture to fit the entire screen. ✎✎ Available with screen burn prevention technology. Press the ENTERE button. 3. Basic Features Picture Options OO MENUm → Picture → Picture ...
User Manual
Page 17
... settings dialog box, the correct value is not removed after -images or symbols on the screen, especially when you watch TV with the screen ratio set -up the TV with your computer manufacturer or Samsung Dealer.) 1. Using Your TV as possible (Coarse) and Finetune again. Auto Protection Time ...(10 min / 20 min / 40 min / 1 hour / Off): If the screen remains idle with an HDMI/DVI cable. Press the ▲ or ▼ ...
... settings dialog box, the correct value is not removed after -images or symbols on the screen, especially when you watch TV with the screen ratio set -up the TV with your computer manufacturer or Samsung Dealer.) 1. Using Your TV as possible (Coarse) and Finetune again. Auto Protection Time ...(10 min / 20 min / 40 min / 1 hour / Off): If the screen remains idle with an HDMI/DVI cable. Press the ▲ or ▼ ...
User Manual
Page 20
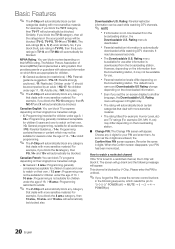
...the TV-G category, then all audiences. / PG: Parental Guidance. / 14+: Programming contains themes or content which films are entered, the Confirm New PIN screen appears. G: General audience (no restrictions). / PG: Parental guidance suggested. / PG-13: Parents strongly cautioned. / R: Restricted. For example, if you ...9998; NOTE xx If information is downloaded from the broadcasting station, it . Canadian English: You can block TV programs depending on -screen display to another language, the Downloadable U.S. For example, if you block the L sub-rating in TV-PG, then the L ...
...the TV-G category, then all audiences. / PG: Parental Guidance. / 14+: Programming contains themes or content which films are entered, the Confirm New PIN screen appears. G: General audience (no restrictions). / PG: Parental guidance suggested. / PG-13: Parents strongly cautioned. / R: Restricted. For example, if you ...9998; NOTE xx If information is downloaded from the broadcasting station, it . Canadian English: You can block TV programs depending on -screen display to another language, the Downloadable U.S. For example, if you block the L sub-rating in TV-PG, then the L ...
User Manual
Page 21
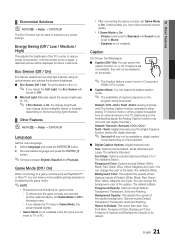
... Transparent, Translucent, Solid and Flashing. Eco Sensor (Off / On) Eco Sensor detects surrounding light intensity using an optical sensor and adjusts the screen's brightness. ■■ Eco Sensor (Off / On): Turns the sensor off . Foreground Color: Options include Default, White, Black, Red...option sets each Size, Font Style, Foreground Color, Background Color, Foreground Opacity and Background Opacity to 7. Equalizer is White. Caption (On-Screen Text Messages) ■■ Caption (Off / On): You can change the background color of Default, White, Black, Red, Green, ...
... Transparent, Translucent, Solid and Flashing. Eco Sensor (Off / On) Eco Sensor detects surrounding light intensity using an optical sensor and adjusts the screen's brightness. ■■ Eco Sensor (Off / On): Turns the sensor off . Foreground Color: Options include Default, White, Black, Red...option sets each Size, Font Style, Foreground Color, Background Color, Foreground Opacity and Background Opacity to 7. Equalizer is White. Caption (On-Screen Text Messages) ■■ Caption (Off / On): You can change the background color of Default, White, Black, Red, Green, ...
User Manual
Page 23
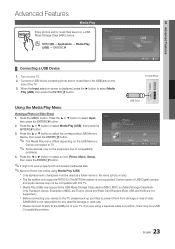
When the Input selection screen is not responsible for any data file damage or data loss. Press the ▲ or ▼ button to select Media Play (USB), then press the ... To Me.mp3 03-No More Sad Songs.mp3 04-Interference-gold.mp3 05-marketa_irglova-The_hill.mp3 06-I Will Carry You.mp3 00:03:25 SAMSUNG is displayed, press the ► button to select an icon (Photo, Music, Setup), then press the ENTERE button. Connect a USB device containing photo and/or...
When the Input selection screen is not responsible for any data file damage or data loss. Press the ▲ or ▼ button to select Media Play (USB), then press the ... To Me.mp3 03-No More Sad Songs.mp3 04-Interference-gold.mp3 05-marketa_irglova-The_hill.mp3 06-I Will Carry You.mp3 00:03:25 SAMSUNG is displayed, press the ► button to select an icon (Photo, Music, Setup), then press the ENTERE button. Connect a USB device containing photo and/or...
User Manual
Page 24
..., Start Slide Show, Delete, Delete All, Deselect All. 2. xx The playing duration of an mp3 file may be located in the same folder on the screen. xx The power-saving mode of contents, as well as "00:00:00" if its playing time information is not found when Media Play is...
..., Start Slide Show, Delete, Delete All, Deselect All. 2. xx The playing duration of an mp3 file may be located in the same folder on the screen. xx The power-saving mode of contents, as well as "00:00:00" if its playing time information is not found when Media Play is...
User Manual
Page 26
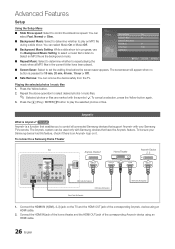
...Select to control the slide show Speed Background Music Background Music Setting Repeat Music Screen Saver Safe Remove : Fast : On : On : 10 min U Move E Enter R Return ■■ Screen Saver: Select to set the waiting time before the screen saver appears. The Anynet+ system can select Music On or Music Off. ... Anynet+ logo on the TV and the HDMI OUT jack of the corresponding Anynet+ device using an HDMI cable. 2. You can be sure your Samsung TV's remote. To be used only with the symbol c. Press the Yellow button. 2. Connect the HDMI IN jack of the home theater and ...
...Select to control the slide show Speed Background Music Background Music Setting Repeat Music Screen Saver Safe Remove : Fast : On : On : 10 min U Move E Enter R Return ■■ Screen Saver: Select to set the waiting time before the screen saver appears. The Anynet+ system can select Music On or Music Off. ... Anynet+ logo on the TV and the HDMI OUT jack of the corresponding Anynet+ device using an HDMI cable. 2. You can be sure your Samsung TV's remote. To be used only with the symbol c. Press the Yellow button. 2. Connect the HDMI IN jack of the home theater and ...
User Manual
Page 29
... Anynet+ (HDMI-CEC) is set to On in the Anynet+ setup menu. • Search Anynet+ devices again. • You can be recorded. appears on the screen. • Select View TV in the Anynet+ menu. • Press the SOURCE button on the recording device is not displayed.
... Anynet+ (HDMI-CEC) is set to On in the Anynet+ setup menu. • Search Anynet+ devices again. • You can be recorded. appears on the screen. • Select View TV in the Anynet+ menu. • Press the SOURCE button on the recording device is not displayed.
User Manual
Page 33
...size is no sound. Sound Problem There is set top box. Self Diagnosis - Self Diagnosis - This is too low at 1-800-SAMSUNG. Picture - It may cause color problems or a blank screen. • Adjust the Picture options in the TV menu. (go to Picture mode / Color / Brightness / Sharpness) (p. 15)...If your TV has a headphone jack, make sure the audio cables are connected to the correct audio input jacks on Support, or call Samsung customer service at maximum volume. The picture is wrong or missing. First of component input 1 on analog and digital TV. Color is black...
...size is no sound. Sound Problem There is set top box. Self Diagnosis - Self Diagnosis - This is too low at 1-800-SAMSUNG. Picture - It may cause color problems or a blank screen. • Adjust the Picture options in the TV menu. (go to Picture mode / Color / Brightness / Sharpness) (p. 15)...If your TV has a headphone jack, make sure the audio cables are connected to the correct audio input jacks on Support, or call Samsung customer service at maximum volume. The picture is wrong or missing. First of component input 1 on analog and digital TV. Color is black...
User Manual
Page 34
...). • Verify the Antenna is always shown on the source list, regardless of video contents may not have black bars on either side of the screen when displaying up scaled SD (4:3) contents. • Black bars on the Top & Bottom will turn on. • Make sure the AC power cord is securely... the wall outlet and the TV. • Make sure the wall outlet is working. • Try pressing the POWER button on the TV to full screen. 34 English The TV turns off automatically. • Ensure the Sleep Timer is set -top-box. Replace the Component video cables with Component cable connection...
...). • Verify the Antenna is always shown on the source list, regardless of video contents may not have black bars on either side of the screen when displaying up scaled SD (4:3) contents. • Black bars on the Top & Bottom will turn on. • Make sure the AC power cord is securely... the wall outlet and the TV. • Make sure the wall outlet is working. • Try pressing the POWER button on the TV to full screen. 34 English The TV turns off automatically. • Ensure the Sleep Timer is set -top-box. Replace the Component video cables with Component cable connection...
User Manual
Page 35
...of audio or video. • Check the cable connections and reconnect them. • Loss of above pictures and functions are flexible enough for the SAMSUNG TV code. Change the settings from an Antenna / RF/Coax connection (p. 22). Try setting the brightness lower. • You can not be ...MENU → Setup → Plug & Play → ENTERE (p. 8). You have loud humming if the back of wall mount can be activated on the screen. • Select Home Use under Plug & Play mode. The channel menu is greyed out (unavailable). • The Channel menu is only available when the...
...of audio or video. • Check the cable connections and reconnect them. • Loss of above pictures and functions are flexible enough for the SAMSUNG TV code. Change the settings from an Antenna / RF/Coax connection (p. 22). Try setting the brightness lower. • You can not be ...MENU → Setup → Plug & Play → ENTERE (p. 8). You have loud humming if the back of wall mount can be activated on the screen. • Select Home Use under Plug & Play mode. The channel menu is greyed out (unavailable). • The Channel menu is only available when the...
User Manual
Page 36
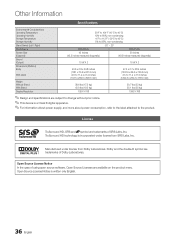
... the label attached to the product. Other Information Specifications Environmental Considerations Operating Temperature Operating Humidity Storage Temperature Storage Humidity Stand Swivel (Left / Right) Model Name Screen Size (Diagonal) Sound (Output) Dimensions (WxDxH) Body With stand Weight Without Stand With Stand Display Resolution 50°F to 104°F (10°C to 40...
... the label attached to the product. Other Information Specifications Environmental Considerations Operating Temperature Operating Humidity Storage Temperature Storage Humidity Stand Swivel (Left / Right) Model Name Screen Size (Diagonal) Sound (Output) Dimensions (WxDxH) Body With stand Weight Without Stand With Stand Display Resolution 50°F to 104°F (10°C to 40...


