User Manual (ENGLISH)
Page 5
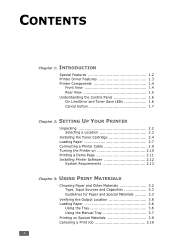
... Control Panel 1.6 On Line/Error and Toner Save LEDs 1.6 Cancel button 1.7 Chapter 2: SETTING UP YOUR PRINTER Unpacking 2.2 Selecting a Location 2.3 Installing the Toner Cartridge 2.4 Loading Paper 2.7 Connecting a Printer Cable 2.9 Turning the Printer on 2.10 Printing a Demo Page 2.11 Installing Printer Software 2.12 System Requirements 2.13 Chapter 3: USING PRINT MATERIALS Choosing Paper and Other Materials 3.2 Type, Input...
... Control Panel 1.6 On Line/Error and Toner Save LEDs 1.6 Cancel button 1.7 Chapter 2: SETTING UP YOUR PRINTER Unpacking 2.2 Selecting a Location 2.3 Installing the Toner Cartridge 2.4 Loading Paper 2.7 Connecting a Printer Cable 2.9 Turning the Printer on 2.10 Printing a Demo Page 2.11 Installing Printer Software 2.12 System Requirements 2.13 Chapter 3: USING PRINT MATERIALS Choosing Paper and Other Materials 3.2 Type, Input...
User Manual (ENGLISH)
Page 6
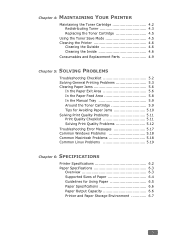
Chapter 4: MAINTAINING YOUR PRINTER Maintaining the Toner Cartridge 4.2 Redistributing Toner 4.3 Replacing the Toner Cartridge 4.5 Using the Toner Save Mode 4.5 Cleaning the Printer 4.6 Cleaning the Outside 4.6 Cleaning the Inside 4.6 Consumables and Replacement Parts 4.9 Chapter 5: SOLVING PROBLEMS Troubleshooting Checklist 5.2 Solving General Printing Problems 5.3 Clearing Paper Jams 5.6 In the Paper ...
Chapter 4: MAINTAINING YOUR PRINTER Maintaining the Toner Cartridge 4.2 Redistributing Toner 4.3 Replacing the Toner Cartridge 4.5 Using the Toner Save Mode 4.5 Cleaning the Printer 4.6 Cleaning the Outside 4.6 Cleaning the Inside 4.6 Consumables and Replacement Parts 4.9 Chapter 5: SOLVING PROBLEMS Troubleshooting Checklist 5.2 Solving General Printing Problems 5.3 Clearing Paper Jams 5.6 In the Paper ...
User Manual (ENGLISH)
Page 17
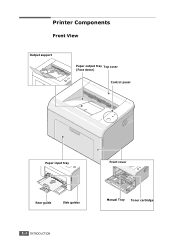
Printer Components Front View Output support Paper output tray Top cover (Face down) Control panel Paper input tray Front cover Rear guide Side guides Manual Tray Toner cartridge 1.4 INTRODUCTION
Printer Components Front View Output support Paper output tray Top cover (Face down) Control panel Paper input tray Front cover Rear guide Side guides Manual Tray Toner cartridge 1.4 INTRODUCTION

User Manual (ENGLISH)
Page 19
... LED slowly blinks green. Understanding the Control Panel LED On Line/Error and Toner Save LEDs Description If the On Line/Error lights green, the printer is receiving data, the On Line/Error LED blinks red to print. See "Troubleshooting Error Messages" on page 5.17. If the On Line/Error lights... red, the printer is no paper, the open top or front cover, or the empty toner cartridge. If you press the Cancel button while the printer is ready to cancel printing.
... LED slowly blinks green. Understanding the Control Panel LED On Line/Error and Toner Save LEDs Description If the On Line/Error lights green, the printer is receiving data, the On Line/Error LED blinks red to print. See "Troubleshooting Error Messages" on page 5.17. If the On Line/Error lights... red, the printer is no paper, the open top or front cover, or the empty toner cartridge. If you press the Cancel button while the printer is ready to cancel printing.
User Manual (ENGLISH)
Page 21
This chapter includes: • Unpacking • Installing the Toner Cartridge • Loading Paper • Connecting a Printer Cable • Turning the Printer on setting up your printer. 2 Setting Up Your Printer This chapter provides step by step information on • Printing a Demo Page • Installing Printer Software
This chapter includes: • Unpacking • Installing the Toner Cartridge • Loading Paper • Connecting a Printer Cable • Turning the Printer on setting up your printer. 2 Setting Up Your Printer This chapter provides step by step information on • Printing a Demo Page • Installing Printer Software

User Manual (ENGLISH)
Page 22
... been packed with the following items: 2 Toner Cartridge Power Cord CD-ROM Quick Install Guide Paper Cover a a. SETTING UP YOUR PRINTER 2.2 When you need to prevent dust and moisture from contaminating your machine. Notes: • If any items are missing or damaged, notify ...open the machine (for example, cleaning inside of the machine, removing the jammed paper or installing the toner cartridge), remove the paper cover from the packing carton. Unpacking 1 Remove the printer and all accessories from your paper loaded in the tray. The paper cover is differ depending on the ...
... been packed with the following items: 2 Toner Cartridge Power Cord CD-ROM Quick Install Guide Paper Cover a a. SETTING UP YOUR PRINTER 2.2 When you need to prevent dust and moisture from contaminating your machine. Notes: • If any items are missing or damaged, notify ...open the machine (for example, cleaning inside of the machine, removing the jammed paper or installing the toner cartridge), remove the paper cover from the packing carton. Unpacking 1 Remove the printer and all accessories from your paper loaded in the tray. The paper cover is differ depending on the ...
User Manual (ENGLISH)
Page 24
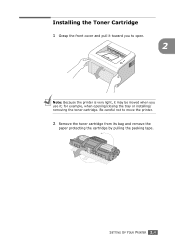
Be careful not to open. 2 Note: Because the printer is very light, it may be moved when you use it toward you to move the printer. 2 Remove the toner cartridge from its bag and remove the paper protecting the cartridge by pulling the packing tape. SETTING UP YOUR PRINTER 2.4 for example, when opening/closing the tray or installing/ removing the toner cartridge. Installing the Toner Cartridge 1 Grasp the front cover and pull it ;
Be careful not to open. 2 Note: Because the printer is very light, it may be moved when you use it toward you to move the printer. 2 Remove the toner cartridge from its bag and remove the paper protecting the cartridge by pulling the packing tape. SETTING UP YOUR PRINTER 2.4 for example, when opening/closing the tray or installing/ removing the toner cartridge. Installing the Toner Cartridge 1 Grasp the front cover and pull it ;
User Manual (ENGLISH)
Page 25
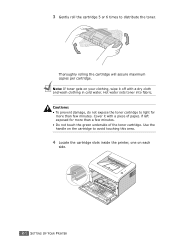
... toner. Hot water sets toner into fabric. 3 Gently roll the cartridge 5 or 6 times to avoid touching this area. 4 Locate the cartridge slots inside the printer, one on each side. 2.5 SETTING UP YOUR PRINTER Cautions: • To prevent damage, do not expose the toner cartridge to light for more than a few minutes. Cover it off with...
... toner. Hot water sets toner into fabric. 3 Gently roll the cartridge 5 or 6 times to avoid touching this area. 4 Locate the cartridge slots inside the printer, one on each side. 2.5 SETTING UP YOUR PRINTER Cautions: • To prevent damage, do not expose the toner cartridge to light for more than a few minutes. Cover it off with...
User Manual (ENGLISH)
Page 26
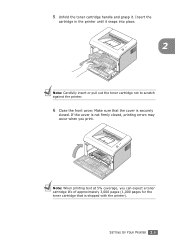
Insert the cartridge in the printer until it . Note: When printing text at 5% coverage, you print. SETTING UP YOUR PRINTER 2.6 5 Unfold the toner cartridge handle and grasp it snaps into place. 2 Note: Carefully insert or pull out the toner cartridge not to scratch against the printer. 6 Close the front cover. If the cover is shipped with the printer). Make sure that the cover is securely closed , printing errors may occur when you can expect a toner cartridge life of approximately 3,000 pages (1,000 pages for the toner cartridge that is not firmly closed .
Insert the cartridge in the printer until it . Note: When printing text at 5% coverage, you print. SETTING UP YOUR PRINTER 2.6 5 Unfold the toner cartridge handle and grasp it snaps into place. 2 Note: Carefully insert or pull out the toner cartridge not to scratch against the printer. 6 Close the front cover. If the cover is shipped with the printer). Make sure that the cover is securely closed , printing errors may occur when you can expect a toner cartridge life of approximately 3,000 pages (1,000 pages for the toner cartridge that is not firmly closed .
User Manual (ENGLISH)
Page 27
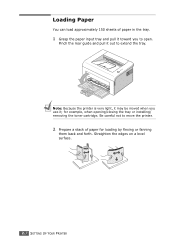
Note: Because the printer is very light, it may be moved when you to extend the tray. Straighten the edges on a level surface. 2.7 SETTING UP YOUR PRINTER Pinch the rear guide and pull it ; Be careful not to move the printer. 2 Prepare a stack of paper in the tray. 1 Grasp the paper input tray and pull it toward you use it out to open. for loading by flexing or fanning them back and forth. Loading Paper You can load approximately 150 sheets of paper for example, when opening/closing the tray or installing/ removing the toner cartridge.
Note: Because the printer is very light, it may be moved when you to extend the tray. Straighten the edges on a level surface. 2.7 SETTING UP YOUR PRINTER Pinch the rear guide and pull it ; Be careful not to move the printer. 2 Prepare a stack of paper in the tray. 1 Grasp the paper input tray and pull it toward you use it out to open. for loading by flexing or fanning them back and forth. Loading Paper You can load approximately 150 sheets of paper for example, when opening/closing the tray or installing/ removing the toner cartridge.

User Manual (ENGLISH)
Page 45
This chapter includes: • Maintaining the Toner Cartridge • Using the Toner Save Mode • Cleaning the Printer • Consumables and Replacement Parts 4 Maintaining Your Printer This chapter provides suggestions for maintaining the toner cartridge and the printer.
This chapter includes: • Maintaining the Toner Cartridge • Using the Toner Save Mode • Cleaning the Printer • Consumables and Replacement Parts 4 Maintaining Your Printer This chapter provides suggestions for maintaining the toner cartridge and the printer.
User Manual (ENGLISH)
Page 46
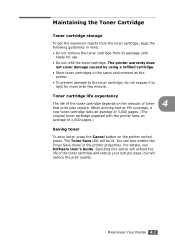
... this option will extend the life of toner 4 that print jobs require. When printing text at 5% coverage, a new toner cartridge lasts an average of 3,000 pages. (The original toner cartridge supplied with the printer lasts an average of 1,000 pages.) Saving toner To save toner, press the Cancel button on the amount of...
... this option will extend the life of toner 4 that print jobs require. When printing text at 5% coverage, a new toner cartridge lasts an average of 3,000 pages. (The original toner cartridge supplied with the printer lasts an average of 1,000 pages.) Saving toner To save toner, press the Cancel button on the amount of...

User Manual (ENGLISH)
Page 47
...green underside of the toner cartridge. The following procedures may be able to temporarily improve the print quality by redistributing the toner. Use the handle on a printed page. You may appear on the cartridge to avoid touching this area. 4.3 MAINTAINING YOUR PRINTER Cautions: • Avoid... reaching too far into the printer. Redistributing Toner When toner is low, faded or light areas may be hot. •...
...green underside of the toner cartridge. The following procedures may be able to temporarily improve the print quality by redistributing the toner. Use the handle on a printed page. You may appear on the cartridge to avoid touching this area. 4.3 MAINTAINING YOUR PRINTER Cautions: • Avoid... reaching too far into the printer. Redistributing Toner When toner is low, faded or light areas may be hot. •...
User Manual (ENGLISH)
Page 48
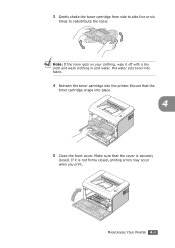
Hot water sets toner into fabric. 4 Reinsert the toner cartridge into place. 4 5 Close the front cover. Make sure that the toner cartridge snaps into the printer. MAINTAINING YOUR PRINTER 4.4 Ensure that the cover is not firmly closed . If it off with a dry cloth and wash clothing in cold water. Note: If the toner gets on your clothing, wipe it is securely closed , printing errors may occur when you print. 3 Gently shake the toner cartridge from side to side five or six times to redistribute the toner.
Hot water sets toner into fabric. 4 Reinsert the toner cartridge into place. 4 5 Close the front cover. Make sure that the toner cartridge snaps into the printer. MAINTAINING YOUR PRINTER 4.4 Ensure that the cover is not firmly closed . If it off with a dry cloth and wash clothing in cold water. Note: If the toner gets on your clothing, wipe it is securely closed , printing errors may occur when you print. 3 Gently shake the toner cartridge from side to side five or six times to redistribute the toner.

User Manual (ENGLISH)
Page 49
... You can also enable the Toner Save mode in the normal mode. Replacing the Toner Cartridge If the print remains light after redistributing toner (see Software User's Guide. 4.5 MAINTAINING YOUR PRINTER There are two ways to print a page. • If the Toner Save LED is off, the mode is ... reduce your cost per page, but will extend the life of the printer properties. For details, see page 4.3), replace the toner cartridge. See "Installing the Toner Cartridge" on , the mode is on page 2.4. The printer must be in Ready mode (On Line/Error green LED is on). • If the Toner ...
... You can also enable the Toner Save mode in the normal mode. Replacing the Toner Cartridge If the print remains light after redistributing toner (see Software User's Guide. 4.5 MAINTAINING YOUR PRINTER There are two ways to print a page. • If the Toner Save LED is off, the mode is ... reduce your cost per page, but will extend the life of the printer properties. For details, see page 4.3), replace the toner cartridge. See "Installing the Toner Cartridge" on , the mode is on page 2.4. The printer must be in Ready mode (On Line/Error green LED is on). • If the Toner ...
User Manual (ENGLISH)
Page 50
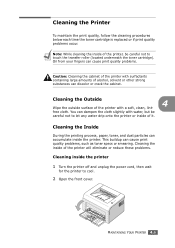
... specs or smearing. Cleaning the inside the printer 1 Turn the printer off and unplug the power cord, then wait for the printer to touch the transfer roller (located underneath the toner cartridge). Note: While cleaning the inside of the printer, be careful not to let any water ...careful not to cool. 2 Open the front cover. Cleaning the Printer To maintain the print quality, follow the cleaning procedures below each time the toner cartridge is replaced or if print quality problems occur. MAINTAINING YOUR PRINTER 4.6 free cloth. You can cause print quality problems. Caution:...
... specs or smearing. Cleaning the inside the printer 1 Turn the printer off and unplug the power cord, then wait for the printer to touch the transfer roller (located underneath the toner cartridge). Note: While cleaning the inside of the printer, be careful not to let any water ...careful not to cool. 2 Open the front cover. Cleaning the Printer To maintain the print quality, follow the cleaning procedures below each time the toner cartridge is replaced or if print quality problems occur. MAINTAINING YOUR PRINTER 4.6 free cloth. You can cause print quality problems. Caution:...
User Manual (ENGLISH)
Page 51
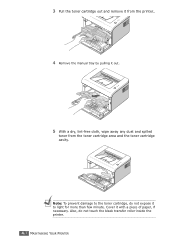
Note: To prevent damage to light for more than few minute. Cover it to the toner cartridge, do not touch the black transfer roller inside the printer. 4.7 MAINTAINING YOUR PRINTER 3 Pull the toner cartridge out and remove it from the printer.. 4 Remove the manual tray by pulling it out. 5 With a dry, lint-free cloth, wipe away any dust and spilled toner from the toner cartridge area and the toner cartridge cavity. Also, do not expose it with a piece of paper, if necessary.
Note: To prevent damage to light for more than few minute. Cover it to the toner cartridge, do not touch the black transfer roller inside the printer. 4.7 MAINTAINING YOUR PRINTER 3 Pull the toner cartridge out and remove it from the printer.. 4 Remove the manual tray by pulling it out. 5 With a dry, lint-free cloth, wipe away any dust and spilled toner from the toner cartridge area and the toner cartridge cavity. Also, do not expose it with a piece of paper, if necessary.
User Manual (ENGLISH)
Page 52
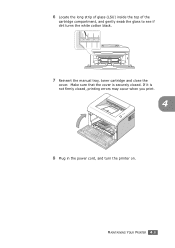
Make sure that the cover is not firmly closed . If it is securely closed , printing errors may occur when you print. 4 8 Plug in the power cord, and turn the printer on. MAINTAINING YOUR PRINTER 4.8 6 Locate the long strip of glass (LSU) inside the top of the cartridge compartment, and gently swab the glass to see if dirt turns the white cotton black. 7 Reinsert the manual tray, toner cartridge and close the cover.
Make sure that the cover is not firmly closed . If it is securely closed , printing errors may occur when you print. 4 8 Plug in the power cord, and turn the printer on. MAINTAINING YOUR PRINTER 4.8 6 Locate the long strip of glass (LSU) inside the top of the cartridge compartment, and gently swab the glass to see if dirt turns the white cotton black. 7 Reinsert the manual tray, toner cartridge and close the cover.
User Manual (ENGLISH)
Page 56
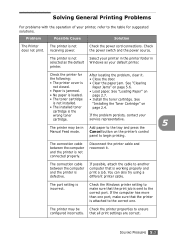
... to ensure configured incorrectly. the following: • Close the door. • The printer cover is the wrong toner If the problem persists, contact your cartridge. "Installing the Toner Cartridge" on the printer's control panel to the correct port. cartridge is • Clear the paper jam. The port setting is not installed. Check the power switch...
... to ensure configured incorrectly. the following: • Close the door. • The printer cover is the wrong toner If the problem persists, contact your cartridge. "Installing the Toner Cartridge" on the printer's control panel to the correct port. cartridge is • Clear the paper jam. The port setting is not installed. Check the power switch...
User Manual (ENGLISH)
Page 58
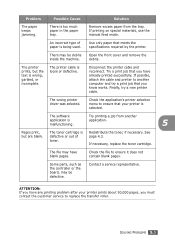
...you must contact the customer service to replace the transfer roller. If necessary, replace the toner cartridge. Remove excess paper from another computer and try a new printer cable. The printer cable is being used. The software Try printing a job from the tray. See page ... service representative. An incorrect type of toner. Redistribute the toner, if necessary. The file may have any printing problem after your printer is selected. ATTENTION: If you know works. Problem Possible Cause Solution The paper keeps jamming. There is wrong, garbled, or...
...you must contact the customer service to replace the transfer roller. If necessary, replace the toner cartridge. Remove excess paper from another computer and try a new printer cable. The printer cable is being used. The software Try printing a job from the tray. See page ... service representative. An incorrect type of toner. Redistribute the toner, if necessary. The file may have any printing problem after your printer is selected. ATTENTION: If you know works. Problem Possible Cause Solution The paper keeps jamming. There is wrong, garbled, or...


