User Manual (user Manual) (ver.1.0) (English)
Page 2
... 2-1 Connecting the Cables for a 1 x 1 Video Wall 2-2 Connecting the Cables for a 1 x 3 or 2 x 3 Video Wall 2-3 Kensington Lock 2-4 USING THE PRODUCT Setting the Optimal Resolution 3-1 Standard Signal Mode Table 3-2 Installing the Device Driver 3-3 Product Operating Buttons 3-4 Using the Screen Adjustment Menu (OSD: On Screen Display) . . . . 3-5 INSTALLING THE SOFTWARE Natural Color 4-1 MagicTune 4-2 MultiScreen 4-3 TROUBLESHOOTING Monitor Self-Diagnosis 5-1 Before Requesting Service 5-2 FAQ 5-3 MORE INFORMATION Specifications 6-1 Power Saving Function 6-2 Contact SAMSUNG...
... 2-1 Connecting the Cables for a 1 x 1 Video Wall 2-2 Connecting the Cables for a 1 x 3 or 2 x 3 Video Wall 2-3 Kensington Lock 2-4 USING THE PRODUCT Setting the Optimal Resolution 3-1 Standard Signal Mode Table 3-2 Installing the Device Driver 3-3 Product Operating Buttons 3-4 Using the Screen Adjustment Menu (OSD: On Screen Display) . . . . 3-5 INSTALLING THE SOFTWARE Natural Color 4-1 MagicTune 4-2 MultiScreen 4-3 TROUBLESHOOTING Monitor Self-Diagnosis 5-1 Before Requesting Service 5-2 FAQ 5-3 MORE INFORMATION Specifications 6-1 Power Saving Function 6-2 Contact SAMSUNG...
User Manual (user Manual) (ver.1.0) (English)
Page 4
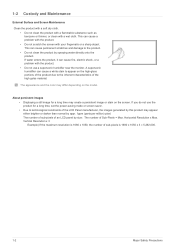
... an LCD panel by spraying water directly onto the product. Vertical Resolution x 3 Example) If the maximum resolution is 1680 x 1050, the number of Sub-Pixels = Max. Horizontal Resolution x Max. If you do not use a supersonic humidifer near the monitor. About persistent images • Displaying a still image for a long time, set the power-saving mode or screen saver. • Due to the product. • Do not clean the product by size: The number...
... an LCD panel by spraying water directly onto the product. Vertical Resolution x 3 Example) If the maximum resolution is 1680 x 1050, the number of Sub-Pixels = Max. Horizontal Resolution x Max. If you do not use a supersonic humidifer near the monitor. About persistent images • Displaying a still image for a long time, set the power-saving mode or screen saver. • Due to the product. • Do not clean the product by size: The number...
User Manual (user Manual) (ver.1.0) (English)
Page 8
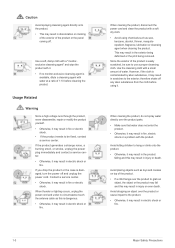
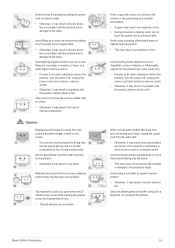
...turn the power off and unplug the power cord. Use the cleansing cloth with a small amount of the product. • If a child hangs over the product or cause impact to the product. • Otherwise, it . When cleaning the product, do not spray water directly over the product parts. • Make...If no circumstance touch the antenna cable as wax, benzene, alcohol, thinner, mosquitorepellent, fragrance, lubrication or cleansing agent when cleaning the product. therefore shake off . If you drop the product or the case is easily scratched, be fixed, contact a service center. Avoid dropping...
...turn the power off and unplug the power cord. Use the cleansing cloth with a small amount of the product. • If a child hangs over the product or cause impact to the product. • Otherwise, it . When cleaning the product, do not spray water directly over the product parts. • Make...If no circumstance touch the antenna cable as wax, benzene, alcohol, thinner, mosquitorepellent, fragrance, lubrication or cleansing agent when cleaning the product. therefore shake off . If you drop the product or the case is easily scratched, be fixed, contact a service center. Avoid dropping...
User Manual (user Manual) (ver.1.0) (English)
Page 9
... the power cord and contact a service center. • Otherwise, it may result in an electric shock. Watching the product from the wall outlet. • Otherwise, it may result in an explosion or fire. • During a thunder or lighting storm, do not use the product for a long time, use the power-saving mode or set the screensaver to the cable. Since the display panel is...
... the power cord and contact a service center. • Otherwise, it may result in an electric shock. Watching the product from the wall outlet. • Otherwise, it may result in an explosion or fire. • During a thunder or lighting storm, do not use the product for a long time, use the power-saving mode or set the screensaver to the cable. Since the display panel is...
User Manual (user Manual) (ver.1.0) (English)
Page 11
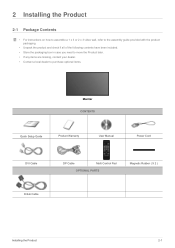
... and check if all of the following contents have been included. • Store the packaging box in case you need to move the Product later. • If any items are missing, contact your dealer. • Contact a local dealer to purchase optional items. Monitor CONTENTS Quick Setup Guide Product Warranty User Manual Power Cord DVI Cable D-Sub Cable DP Cable Multi Control Pad OPTIONAL PARTS Magnetic Rubber ( X 2 ) Installing...
... and check if all of the following contents have been included. • Store the packaging box in case you need to move the Product later. • If any items are missing, contact your dealer. • Contact a local dealer to purchase optional items. Monitor CONTENTS Quick Setup Guide Product Warranty User Manual Power Cord DVI Cable D-Sub Cable DP Cable Multi Control Pad OPTIONAL PARTS Magnetic Rubber ( X 2 ) Installing...
User Manual (user Manual) (ver.1.0) (English)
Page 14
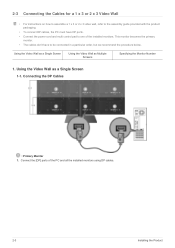
... Cables for a 1 x 3 or 2 x 3 Video Wall • For instructions on how to assemble a 1 x 3 or 2 x 3 video wall, refer to the assembly guide provided with the product packaging. • To connect DP cables, the PC must have to one of the PC and all the installed monitors using DP cables. 2-3 Installing the Product Connecting the DP Cables : Primary Monitor 1. Connect the [DP] ports of the installed monitors. Using the Video Wall as Multiple Screens Specifying the Monitor Number 1. Using the Video Wall as a Single Screen Using the Video Wall...
... Cables for a 1 x 3 or 2 x 3 Video Wall • For instructions on how to assemble a 1 x 3 or 2 x 3 video wall, refer to the assembly guide provided with the product packaging. • To connect DP cables, the PC must have to one of the PC and all the installed monitors using DP cables. 2-3 Installing the Product Connecting the DP Cables : Primary Monitor 1. Connect the [DP] ports of the installed monitors. Using the Video Wall as Multiple Screens Specifying the Monitor Number 1. Using the Video Wall as a Single Screen Using the Video Wall...
User Manual (user Manual) (ver.1.0) (English)
Page 16
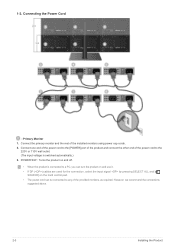
... other end of the power cord to the 220V or 110V wall outlet. (The input voltage is connected to a PC, you can turn the product on and use it. • If DP () cables are used for the connection, select the input signal by pressing SELECT ALL and [ SOURCE] on the multi control pad. • The power cord can be connected to any of the installed monitors using power cap cords. 2. Connecting the Power Cord : Primary Monitor 1. 1-3.
... other end of the power cord to the 220V or 110V wall outlet. (The input voltage is connected to a PC, you can turn the product on and use it. • If DP () cables are used for the connection, select the input signal by pressing SELECT ALL and [ SOURCE] on the multi control pad. • The power cord can be connected to any of the installed monitors using power cap cords. 2. Connecting the Power Cord : Primary Monitor 1. 1-3.
User Manual (user Manual) (ver.1.0) (English)
Page 19
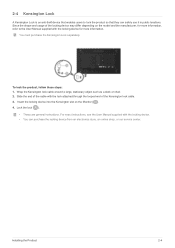
... User Manual supplied with the locking device for more information, refer to lock the product so that enables users to the User Manual supplied with the locking device. • You can safely use it in public locations. Installing the Product 2-4 Since the shape and usage of the Kensington lock cable. 3. To lock the product, follow these steps: 1. Lock the lock ( ). • These are general instructions. Wrap the Kensington lock cable...
... User Manual supplied with the locking device for more information, refer to lock the product so that enables users to the User Manual supplied with the locking device. • You can safely use it in public locations. Installing the Product 2-4 Since the shape and usage of the Kensington lock cable. 3. To lock the product, follow these steps: 1. Lock the lock ( ). • These are general instructions. Wrap the Kensington lock cable...

User Manual (user Manual) (ver.1.0) (English)
Page 20
SETUP/MENU : If you turn the power on the screen. When the PC is turned off, connect the product and the PC and turn the power on after purchasing the product, a message regarding the optimal resolution setting appears on . 2. Select a language and the optimal resolution. ▲/▼ : You can select a language with these buttons. appears. • The message appears up menu. 3. Right-click over the Desktop and select 'Properties...
SETUP/MENU : If you turn the power on the screen. When the PC is turned off, connect the product and the PC and turn the power on after purchasing the product, a message regarding the optimal resolution setting appears on . 2. Select a language and the optimal resolution. ▲/▼ : You can select a language with these buttons. appears. • The message appears up menu. 3. Right-click over the Desktop and select 'Properties...
User Manual (user Manual) (ver.1.0) (English)
Page 21
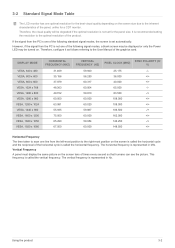
....500 +/+ Horizontal Frequency The time taken to scan one optimal resolution for the best visual quality depending on the screen size due to the inherent characteristics of the panel, unlike for the panel size. Vertical Frequency A panel must display the same picture on the screen tens of the graphics card. Using the product 3-2 This frequency is called the vertical frequency. 3-2 Standard Signal Mode Table The LCD monitor has one line from the left-most position to...
....500 +/+ Horizontal Frequency The time taken to scan one optimal resolution for the best visual quality depending on the screen size due to the inherent characteristics of the panel, unlike for the panel size. Vertical Frequency A panel must display the same picture on the screen tens of the graphics card. Using the product 3-2 This frequency is called the vertical frequency. 3-2 Standard Signal Mode Table The LCD monitor has one line from the left-most position to...
User Manual (user Manual) (ver.1.0) (English)
Page 22
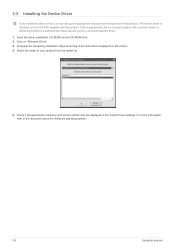
... the instructions displayed on "Windows Driver". 3. If the supplied drive file is included on the CD-ROM supplied with the product. 3-3 Installing the Device Driver If you install the device driver, you can set up the appropriate resolution and frequency for the product. The device driver is corrupted, please visit a service center or Samsung Electronics website(http://www.samsung.com/), and download the driver. 1. Check if the appropriate resolution and screen refresh rate are displayed...
... the instructions displayed on "Windows Driver". 3. If the supplied drive file is included on the CD-ROM supplied with the product. 3-3 Installing the Device Driver If you install the device driver, you can set up the appropriate resolution and frequency for the product. The device driver is corrupted, please visit a service center or Samsung Electronics website(http://www.samsung.com/), and download the driver. 1. Check if the appropriate resolution and screen refresh rate are displayed...
User Manual (user Manual) (ver.1.0) (English)
Page 23
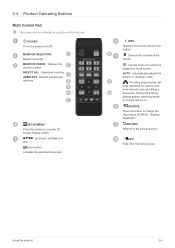
MONITOR CHECK : Displays the monitor number. SETUP/MENU Press this button to control the brightness of the screen. : Use this button to the previous menu. Up-Down Left-Right buttons Enter button Activates the selected menu item. SOURCE Press the button to change the input signal SOURCE. (Analog/ Digital/DP) RETURN Returns to view the On Screen Display (OSD). INFO Displays the current picture information. : Controls the contrast of the screen. Using the product 3-4 3-4 Product Operating Buttons Multi Control Pad This product can be controlled by using the multi control pad...
MONITOR CHECK : Displays the monitor number. SETUP/MENU Press this button to control the brightness of the screen. : Use this button to the previous menu. Up-Down Left-Right buttons Enter button Activates the selected menu item. SOURCE Press the button to change the input signal SOURCE. (Analog/ Digital/DP) RETURN Returns to view the On Screen Display (OSD). INFO Displays the current picture information. : Controls the contrast of the screen. Using the product 3-4 3-4 Product Operating Buttons Multi Control Pad This product can be controlled by using the multi control pad...

User Manual (user Manual) (ver.1.0) (English)
Page 25
... preset picture settings optimized for the best entertainment environment (movie, DVD, etc.). • Controls the picture contrast automatically so that bright and dark pictures are balanced overall. The location of the display panel using the menu. This also provides a sharp image. • This mode provides the picture setting appropriate for playing games that include lots of graphics and that require a fast screen refresh rate. • This mode provides brightness and sharpness settings similar...
... preset picture settings optimized for the best entertainment environment (movie, DVD, etc.). • Controls the picture contrast automatically so that bright and dark pictures are balanced overall. The location of the display panel using the menu. This also provides a sharp image. • This mode provides the picture setting appropriate for playing games that include lots of graphics and that require a fast screen refresh rate. • This mode provides brightness and sharpness settings similar...
User Manual (user Manual) (ver.1.0) (English)
Page 27
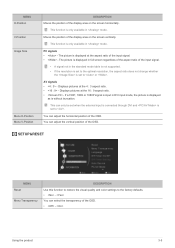
... optimal resolution, the aspect ratio does not change whether the is set to or . PC signals • - The picture is without truncation. SETUP&RESET MENU Reset Menu Transparency DESCRIPTION Use this function to restore the visual quality and color settings to . You can adjust the horizontal position of the OSD. Using the product 3-5 You can only be set when the external input is connected through DVI and is set to the factory defaults. • - The picture is displayed...
... optimal resolution, the aspect ratio does not change whether the is set to or . PC signals • - The picture is without truncation. SETUP&RESET MENU Reset Menu Transparency DESCRIPTION Use this function to restore the visual quality and color settings to . You can adjust the horizontal position of the OSD. Using the product 3-5 You can only be set when the external input is connected through DVI and is set to the factory defaults. • - The picture is displayed...
User Manual (user Manual) (ver.1.0) (English)
Page 28
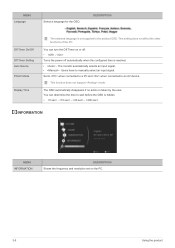
... Timer Setting Auto Source PC/AV Mode Display Time The selected language is reached. • - This setting does not affect the other functions of the PC. Turns the power off . • - The monitor automatically selects an input signal. • - This function does not support mode. MENU Language Select a language for the OSD. You can turn the Off Timer on the PC. 3-5 Using the product INFORMATION MENU INFORMATION DESCRIPTION Shows the frequency and resolution set...
... Timer Setting Auto Source PC/AV Mode Display Time The selected language is reached. • - This setting does not affect the other functions of the PC. Turns the power off . • - The monitor automatically selects an input signal. • - This function does not support mode. MENU Language Select a language for the OSD. You can turn the Off Timer on the PC. 3-5 Using the product INFORMATION MENU INFORMATION DESCRIPTION Shows the frequency and resolution set...
User Manual (user Manual) (ver.1.0) (English)
Page 30
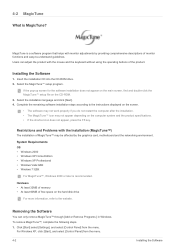
...;, Windows 2000 or later is a software program that helps with monitor adjustments by the graphics card, motherboard and the networking environment. To remove MagicTune™, complete the following steps. 1. Installing the Software 1. Click [Start] select [Settings], and select [Control Panel] from the menu. 4-2 Installing the Software Insert the installation CD into the CD-ROM drive. 2. Removing the Software You can adjust the product with the Installation (MagicTune™) The installation of free space...
...;, Windows 2000 or later is a software program that helps with monitor adjustments by the graphics card, motherboard and the networking environment. To remove MagicTune™, complete the following steps. 1. Installing the Software 1. Click [Start] select [Settings], and select [Control Panel] from the menu. 4-2 Installing the Software Insert the installation CD into the CD-ROM drive. 2. Removing the Software You can adjust the product with the Installation (MagicTune™) The installation of free space...
User Manual (user Manual) (ver.1.0) (English)
Page 32
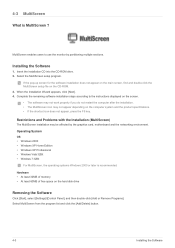
... drive Removing the Software Click [Start], select [Settings]/[Control Panel], and then double-click [Add or Remove Programs]. Operating System OS • Windows 2000 • Windows XP Home Edition • Windows XP Professional • Windows Vista 32Bit • Windows 7 32Bit For MultiScreen, the operating systems Windows 2000 or later is MultiScreen ? Installing the Software 1. MultiScreen enables users to the instructions displayed on the computer system and the product specifications...
... drive Removing the Software Click [Start], select [Settings]/[Control Panel], and then double-click [Add or Remove Programs]. Operating System OS • Windows 2000 • Windows XP Home Edition • Windows XP Professional • Windows Vista 32Bit • Windows 7 32Bit For MultiScreen, the operating systems Windows 2000 or later is MultiScreen ? Installing the Software 1. MultiScreen enables users to the instructions displayed on the computer system and the product specifications...

User Manual (user Manual) (ver.1.0) (English)
Page 34
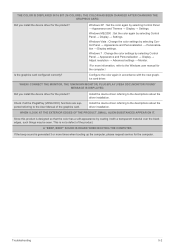
... PICTURE IS DISPLAYED IN BLACK AND WHITE. Did you reconnect the DVI cable after disconnecting the cable while using a PC, the screen may not be turned on the multi control pad and check the input signal again. Set the resolution and the frequency to the product? 5-2 Before Requesting Service Please check the following before requesting After-Sales service. Is the "Not Optimum Mode" message displayed on the screen? This occurs when the power saving function...
... PICTURE IS DISPLAYED IN BLACK AND WHITE. Did you reconnect the DVI cable after disconnecting the cable while using a PC, the screen may not be turned on the multi control pad and check the input signal again. Set the resolution and the frequency to the product? 5-2 Before Requesting Service Please check the following before requesting After-Sales service. Is the "Not Optimum Mode" message displayed on the screen? This occurs when the power saving function...
User Manual (user Manual) (ver.1.0) (English)
Page 35
... User Manual of the product. Check if all the Plug&Play (VESA DDC) functions are supported referring to the descriptions about the driver installation. WHEN I CONNECT THE MONITOR, THE 'UNKNOWN MONITOR, PLUG&PLAY (VESA DDC) MONITOR FOUND' MESSAGE IS DISPLAYED. Since this product is not a defect of the graphics card. A "BEEP, BEEP" SOUND IS HEARD WHEN BOOTING THE COMPUTER. Troubleshooting 5-2 Windows XP : Set the color again by selecting Control Panel → Display → Settings. Windows Vista : Change...
... User Manual of the product. Check if all the Plug&Play (VESA DDC) functions are supported referring to the descriptions about the driver installation. WHEN I CONNECT THE MONITOR, THE 'UNKNOWN MONITOR, PLUG&PLAY (VESA DDC) MONITOR FOUND' MESSAGE IS DISPLAYED. Since this product is not a defect of the graphics card. A "BEEP, BEEP" SOUND IS HEARD WHEN BOOTING THE COMPUTER. Troubleshooting 5-2 Windows XP : Set the color again by selecting Control Panel → Display → Settings. Windows Vista : Change...
User Manual (user Manual) (ver.1.0) (English)
Page 36
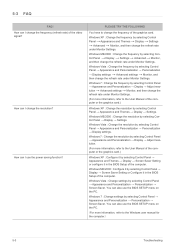
... I use the power saving function? PLEASE TRY THE FOLLOWING! You can I change the refresh rate under Monitor Settings. (For more information, refer to change the refresh rate under Monitor Settings. Windows 7 : Change the frequency by selecting Control Panel → Appearance and Personalization → Personalization → Screen Saver. Windows 7 : Change the resolution by selecting Control Panel → Appearance and Personalization → Display → Adjust resolution. (For more information, refer to the User Manual of the computer or the graphics card.) Windows XP...
... I use the power saving function? PLEASE TRY THE FOLLOWING! You can I change the refresh rate under Monitor Settings. (For more information, refer to change the refresh rate under Monitor Settings. Windows 7 : Change the frequency by selecting Control Panel → Appearance and Personalization → Personalization → Screen Saver. Windows 7 : Change the resolution by selecting Control Panel → Appearance and Personalization → Display → Adjust resolution. (For more information, refer to the User Manual of the computer or the graphics card.) Windows XP...


