
Open Source Guide (ENGLISH)
Page 1
...copy the source along with modifications and/or translated into other free programs whose permissions for most ordinary way, to print or display an announcement including an appropriate copyright notice and a notice that there is no warranty for a fee, you do these terms ...found. If the Program does not specify a version number of free software (and charge for questions regarding open sources, contact Samsung via Email (vdswmanager@samsung. If the software is modified by third parties to this License. 7. c) If the modified program normally reads commands interactively ...
...copy the source along with modifications and/or translated into other free programs whose permissions for most ordinary way, to print or display an announcement including an appropriate copyright notice and a notice that there is no warranty for a fee, you do these terms ...found. If the Program does not specify a version number of free software (and charge for questions regarding open sources, contact Samsung via Email (vdswmanager@samsung. If the software is modified by third parties to this License. 7. c) If the modified program normally reads commands interactively ...

Open Source Guide (ENGLISH)
Page 2
You can redistribute and change. It is safest to attach them to the start of each file should have at least the "copyright" line and a pointer to most effectively convey the exclusion of the ordinary General Public License). and each source file to where the full notice is found. To apply these terms (or, alternatively, under these terms, attach the following notices to the public, we recommend making it free software that everyone can do so by permitting redistribution under the terms of warranty; How to Apply These Terms to Your New Libraries If you develop a new library...
You can redistribute and change. It is safest to attach them to the start of each file should have at least the "copyright" line and a pointer to most effectively convey the exclusion of the ordinary General Public License). and each source file to where the full notice is found. To apply these terms (or, alternatively, under these terms, attach the following notices to the public, we recommend making it free software that everyone can do so by permitting redistribution under the terms of warranty; How to Apply These Terms to Your New Libraries If you develop a new library...
User Manual (ENGLISH)
Page 3
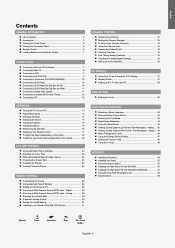
...32 To set-up Your Favorite Channels 33 Using the Channel Lists 34 Viewing the Channel Lists 34 Labeling Channels 35 Fine Tuning Analog Channels 35 Checking the Digital-Signal Strength 36 LNA (Low Noise Amplifier 36 PC DISPLAY Using Your TV as a Computer (PC) Display 37 Display Modes 37 Setting up the TV...11 Connecting an Amplifier/DVD Home Theater 12 Connecting a PC 12 OPERATION Turning the TV On and Off 13 Plug & Play Feature 13 Changing Channels 14 Adjusting the Volume 15 Viewing the Display 15 Viewing the Menus 15 Memorizing the Channels 16 Setting Up Your Remote Control 17...
...32 To set-up Your Favorite Channels 33 Using the Channel Lists 34 Viewing the Channel Lists 34 Labeling Channels 35 Fine Tuning Analog Channels 35 Checking the Digital-Signal Strength 36 LNA (Low Noise Amplifier 36 PC DISPLAY Using Your TV as a Computer (PC) Display 37 Display Modes 37 Setting up the TV...11 Connecting an Amplifier/DVD Home Theater 12 Connecting a PC 12 OPERATION Turning the TV On and Off 13 Plug & Play Feature 13 Changing Channels 14 Adjusting the Volume 15 Viewing the Display 15 Viewing the Menus 15 Memorizing the Channels 16 Setting Up Your Remote Control 17...
User Manual (ENGLISH)
Page 8
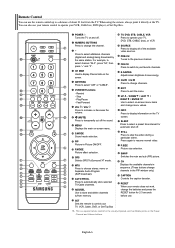
...press "54", then press "-" and "3". English-6 When using the remote, always point it directly at the TV. For example, to display information on the screen. CH MGR Used to display all of about 23 feet from memory. PIP Picture-in the PIP window only.) CAPTION Controls the caption ... Press to change channels. CH / CH Press to choose stereo, mono or Separate Audio Program (SAP broadcast). STILL Press to /from the TV. CH Displays the available channels in sequence. (These buttons change the batteries and press the RESET button for 2-3 seconds before use the remote control up to...
...press "54", then press "-" and "3". English-6 When using the remote, always point it directly at the TV. For example, to display information on the screen. CH MGR Used to display all of about 23 feet from memory. PIP Picture-in the PIP window only.) CAPTION Controls the caption ... Press to change channels. CH / CH Press to choose stereo, mono or Separate Audio Program (SAP broadcast). STILL Press to /from the TV. CH Displays the available channels in sequence. (These buttons change the batteries and press the RESET button for 2-3 seconds before use the remote control up to...
User Manual (ENGLISH)
Page 15
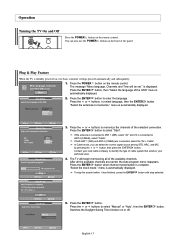
... buttons to memorize." In Cable mode, you can also use the POWER button on the remote control. Press the ENTER button when channel memorization is displayed. Press the ENTER button. English-13 "Select the antennas to select language, then the ENTER button. If both ANT 1 (AIR) and ANT 2 (CABLE)...if it has finished, press the ENTER button with stop the search before it is initially powered on the remote control. The TV will be set." menu is automatically displayed. You can select the correct signal source among STD, HRC, and IRC by pressing the or button, then press the ...
... buttons to memorize." In Cable mode, you can also use the POWER button on the remote control. Press the ENTER button when channel memorization is displayed. Press the ENTER button. English-13 "Select the antennas to select language, then the ENTER button. If both ANT 1 (AIR) and ANT 2 (CABLE)...if it has finished, press the ENTER button with stop the search before it is initially powered on the remote control. The TV will be set." menu is automatically displayed. You can select the correct signal source among STD, HRC, and IRC by pressing the or button, then press the ...

User Manual (ENGLISH)
Page 16
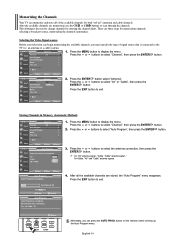
...channel. Press the ENTER button. When you press the CH or CH button, the TV changes channels in the TV mode. When you have memorized at least three channels). To quickly switch between them. is automatically displayed. 7. Using the PRE-CH Button to select "Yes" or "No", then the ... buttons to select the Previous Channel 1. Press the ENTER button. Press the ENTER button. 6. If not, see channels that the TV has memorized. (The TV must have finished,press the ENTER button. Press the CH or CH button to memorize channels. See page 16 to change channels. ...
...channel. Press the ENTER button. When you press the CH or CH button, the TV changes channels in the TV mode. When you have memorized at least three channels). To quickly switch between them. is automatically displayed. 7. Using the PRE-CH Button to select "Yes" or "No", then the ... buttons to select the Previous Channel 1. Press the ENTER button. Press the ENTER button. 6. If not, see channels that the TV has memorized. (The TV must have finished,press the ENTER button. Press the CH or CH button to memorize channels. See page 16 to change channels. ...
User Manual (ENGLISH)
Page 17
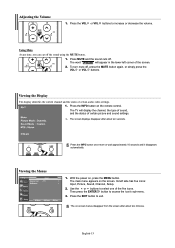
... of certain picture and sound settings. English-15 The TV will appear in the lower-left side has five icons: Input, Picture, Sound, Channel, Setup. 2. Using Mute At any time, you can cut off . The screen displays disappear after about ten seconds. Then press the ENTER button... VOL buttons to select one of certain audio-video settings. 1. The word " " will display the channel, the type of sound, and the status of the screen. 2. Viewing the Display The display identifies the current channel and the status of the five icons. Press the INFO button once more...
... of certain picture and sound settings. English-15 The TV will appear in the lower-left side has five icons: Input, Picture, Sound, Channel, Setup. 2. Using Mute At any time, you can cut off . The screen displays disappear after about ten seconds. Then press the ENTER button... VOL buttons to select one of certain audio-video settings. 1. The word " " will display the channel, the type of sound, and the status of the screen. 2. Viewing the Display The display identifies the current channel and the status of the five icons. Press the INFO button once more...
User Manual (ENGLISH)
Page 18
... the channels (automatic). Press the MENU button to scan through the channels. After the available channels are memorized, use the CH or CH buttons to display the menu. Air: "Air" antenna signal. / Cable: "Cable" antenna signal. / Air+Cable: "Air" and "Cable" antenna signals. 4.... There are stored, the "Auto Program" menu reappears. an antenna or a cable system). 1. Memorizing the Channels Your TV can memorize and store all the available channels are three steps for both "off-air" (antenna) and cable channels. This eliminates the need to ...
... the channels (automatic). Press the MENU button to scan through the channels. After the available channels are memorized, use the CH or CH buttons to display the menu. Air: "Air" antenna signal. / Cable: "Cable" antenna signal. / Air+Cable: "Air" and "Cable" antenna signals. 4.... There are stored, the "Auto Program" menu reappears. an antenna or a cable system). 1. Memorizing the Channels Your TV can memorize and store all the available channels are three steps for both "off-air" (antenna) and cable channels. This eliminates the need to ...
User Manual (ENGLISH)
Page 24
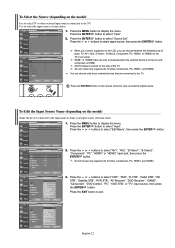
...ENTER button. Use to select the input source of jacks: TV, AV1, AV2, S-Video1, S-Video2, Component, PC, HDMI1, or HDMI2 on and connected via HDMI. HDMI1 or HDMI2 input can choose only those external devices that are connected to the LCD, you can choose between the following sets of your input source... device is placed on the model) Name the device connected to the input jacks to the TV. Press the MENU button to display the menu. To Edit the Input Source Name (depending on the side of the TV. 26 inch model only supports AV, S-Video, Component, PC, HDMI1, and HDMI2. Press the ...
...ENTER button. Use to select the input source of jacks: TV, AV1, AV2, S-Video1, S-Video2, Component, PC, HDMI1, or HDMI2 on and connected via HDMI. HDMI1 or HDMI2 input can choose only those external devices that are connected to the LCD, you can choose between the following sets of your input source... device is placed on the model) Name the device connected to the input jacks to the TV. Press the MENU button to display the menu. To Edit the Input Source Name (depending on the side of the TV. 26 inch model only supports AV, S-Video, Component, PC, HDMI1, and HDMI2. Press the ...

User Manual (ENGLISH)
Page 25
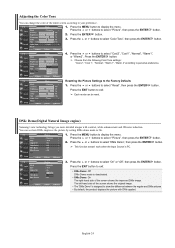
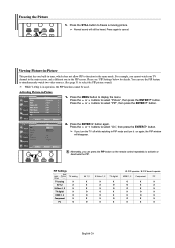
...Press the or buttons to select the "Dynamic", "Standard", "Movie", or "Custom" picture setting. Press the ENTER button. Press the or buttons to display the menu. Press the ENTER button again. Choose Standard for each input. 3. When in HDMI, PC or any Component mode. • The Tint cannot... be adjusted while watching Digital TV. • Each adjusted setting will also be stored separately according to be adjusted separately for the standard factory settings. Or, you make changes to...
...Press the or buttons to select the "Dynamic", "Standard", "Movie", or "Custom" picture setting. Press the ENTER button. Press the or buttons to display the menu. Press the ENTER button again. Choose Standard for each input. 3. When in HDMI, PC or any Component mode. • The Tint cannot... be adjusted while watching Digital TV. • Each adjusted setting will also be stored separately according to be adjusted separately for the standard factory settings. Or, you make changes to...
User Manual (ENGLISH)
Page 26
...picture by setting DNIe demo mode to show the difference between the regular and DNIe pictures. • By default, the product displays the picture with contrast, white enhancement and 3D noise reduction. Press the MENU button to personal preference. Press the MENU button to... the Factory Defaults 1. English-24 Resetting the Picture Settings to display the menu. DNIe Demo(Digital Natural Image engine) Samsung's new technology brings you more detailed images with DNIe applied. Press the or buttons to select "Picture", ...
...picture by setting DNIe demo mode to show the difference between the regular and DNIe pictures. • By default, the product displays the picture with contrast, white enhancement and 3D noise reduction. Press the MENU button to personal preference. Press the MENU button to... the Factory Defaults 1. English-24 Resetting the Picture Settings to display the menu. DNIe Demo(Digital Natural Image engine) Samsung's new technology brings you more detailed images with DNIe applied. Press the or buttons to select "Picture", ...
User Manual (ENGLISH)
Page 27
...when Wide screen is set to Double. Size button on the screen. • Zoom2 : Expands the Zoom1 format picture. • 4:3 : Sets the picture to display the menu. Alternately, you can press the P.SIZE button on the type of the picture on the remote (not in 16:9 mode as much as.... • HD (High Definition) 16:9 - 1080i (1920x1080), 720P (1280x720) 16:9 Sets the picture to select "Size", then press the ENTER button. 3. View the TV in the OSD menu) if you want . Zoom2 The screen size when the Zoom1 screen is vertically enlarged. 4:3 Sets the picture to select "Picture", then...
...when Wide screen is set to Double. Size button on the screen. • Zoom2 : Expands the Zoom1 format picture. • 4:3 : Sets the picture to display the menu. Alternately, you can press the P.SIZE button on the type of the picture on the remote (not in 16:9 mode as much as.... • HD (High Definition) 16:9 - 1080i (1920x1080), 720P (1280x720) 16:9 Sets the picture to select "Size", then press the ENTER button. 3. View the TV in the OSD menu) if you want . Zoom2 The screen size when the Zoom1 screen is vertically enlarged. 4:3 Sets the picture to select "Picture", then...
User Manual (ENGLISH)
Page 28
... ENTER button. 2. Press the or buttons to freeze a moving picture. Press the ENTER button again. PIP Settings Sub Main Picture Picture TV analog TV analog X AV 1,2 X S-Video 1, 2 X TV digital X HDMI 1, 2 O Component X PC O AV 1,2 X X X O O X O S-Video 1, 2 X X X O O X X TV digital X O O X X O X O: PIP operates / X: PIP doesn't operate HDMI 1, 2 Component PC O X X O X X O X X X .... Press the STILL button to select "On", then press the ENTER button. Press again to display the menu. For example, you cannot watch two video sources. (See page 31 to function in...
... ENTER button. 2. Press the or buttons to freeze a moving picture. Press the ENTER button again. PIP Settings Sub Main Picture Picture TV analog TV analog X AV 1,2 X S-Video 1, 2 X TV digital X HDMI 1, 2 O Component X PC O AV 1,2 X X X O O X O S-Video 1, 2 X X X O O X X TV digital X O O X X O X O: PIP operates / X: PIP doesn't operate HDMI 1, 2 Component PC O X X O X X O X X X .... Press the STILL button to select "On", then press the ENTER button. Press again to display the menu. For example, you cannot watch two video sources. (See page 31 to function in...
User Manual (ENGLISH)
Page 30
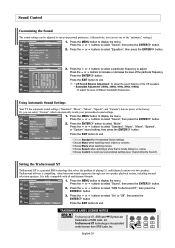
...TruSurround delivers a compelling, virtual surround sound experience through any two-speaker playback system, including internal television speakers. Press the or buttons to display the menu. Press the EXIT button to exit. • L/R Sound Balance Adjustment: To adjust the sound balance of the L/R ...Off", then press the ENTER button. Press the EXIT button to recall your personalized sound settings. 1. Using Automatic Sound Settings Your TV has automatic sound settings ("Standard", "Music", "Movie", "Speech", and "Custom") that solves the problem of different bandwidth frequencies....
...TruSurround delivers a compelling, virtual surround sound experience through any two-speaker playback system, including internal television speakers. Press the or buttons to display the menu. Press the EXIT button to exit. • L/R Sound Balance Adjustment: To adjust the sound balance of the L/R ...Off", then press the ENTER button. Press the EXIT button to recall your personalized sound settings. 1. Using Automatic Sound Settings Your TV has automatic sound settings ("Standard", "Music", "Movie", "Speech", and "Custom") that solves the problem of different bandwidth frequencies....
User Manual (ENGLISH)
Page 31
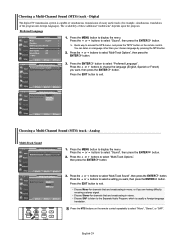
... in a language other than your chosen language by pressing the MTS button. 2. Choosing a Multi-Channel Sound (MTS) track - Digital The digital-TV transmission system is usually a foreign-language translation. Preferred Language 1. Press the or buttons to select "Multi-Track Sound", then press the ENTER button.... the ENTER button. 3. Press the or buttons to select a setting you want , then press the ENTER button. Press the or buttons to display the menu. Press the MENU button to choose the language (English, Spanish or French) you want , then press the ENTER button. Quick way...
... in a language other than your chosen language by pressing the MTS button. 2. Choosing a Multi-Channel Sound (MTS) track - Digital The digital-TV transmission system is usually a foreign-language translation. Preferred Language 1. Press the or buttons to select "Multi-Track Sound", then press the ENTER button.... the ENTER button. 3. Press the or buttons to select a setting you want , then press the ENTER button. Press the or buttons to display the menu. Press the MENU button to choose the language (English, Spanish or French) you want , then press the ENTER button. Quick way...
User Manual (ENGLISH)
Page 32
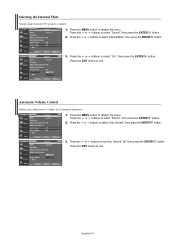
Selecting the Internal Mute Sound output from the TV speakers is muted. 1. Press the EXIT button to select "Sound", then press the ENTER button. 2. Automatic Volume Control Reduces the differences in volume level among ... select "On", then press the ENTER button. Press the MENU button to select "Internal Mute", then press the ENTER button. 3. Press the or buttons to display the menu. Press the MENU button to select "Auto Volume", then press the ENTER button. 3. Press the or buttons to...
Selecting the Internal Mute Sound output from the TV speakers is muted. 1. Press the EXIT button to select "Sound", then press the ENTER button. 2. Automatic Volume Control Reduces the differences in volume level among ... select "On", then press the ENTER button. Press the MENU button to select "Internal Mute", then press the ENTER button. 3. Press the or buttons to display the menu. Press the MENU button to select "Auto Volume", then press the ENTER button. 3. Press the or buttons to...
User Manual (ENGLISH)
Page 33
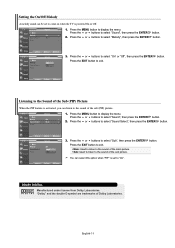
...exit. You can select this option when "PIP" is set to come on when the TV is activated, you can listen to select "Sound", then press the ENTER 2. button. 3....Press the MENU button to select "Sound", then press the ENTER button. 2. Press the or buttons to display the menu. Press the or buttons to select "Melody", then press the ENTER button. Press the or ...button to select "On" or "Off", then press the ENTER button. Sub: Used to listen to display the menu. DOLBY DIGITAL Manufactured under license from Dolby Laboratories. "Dolby" and the double-D symbol are trademarks...
...exit. You can select this option when "PIP" is set to come on when the TV is activated, you can listen to select "Sound", then press the ENTER 2. button. 3....Press the MENU button to select "Sound", then press the ENTER button. 2. Press the or buttons to display the menu. Press the or buttons to select "Melody", then press the ENTER button. Press the or ...button to select "On" or "Off", then press the ENTER button. Sub: Used to listen to display the menu. DOLBY DIGITAL Manufactured under license from Dolby Laboratories. "Dolby" and the double-D symbol are trademarks...

User Manual (ENGLISH)
Page 34
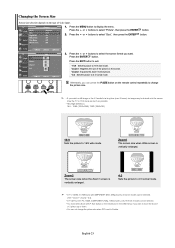
... the MENU button to select "Channel Manager", then press the ENTER button. Press the or buttons to display the menu. button. 3. button. Press the or buttons to English-32 Press the ANTENNA button on the screen. button to select "Channel", then press the ENTER 2. Press ...the MENU button to select "Channel", then press the ENTER 2. Press the or buttons to display the menu. Press the or buttons to...
... the MENU button to select "Channel Manager", then press the ENTER button. Press the or buttons to display the menu. button. 3. button. Press the or buttons to English-32 Press the ANTENNA button on the screen. button to select "Channel", then press the ENTER 2. Press ...the MENU button to select "Channel", then press the ENTER 2. Press the or buttons to display the menu. Press the or buttons to...
User Manual (ENGLISH)
Page 35
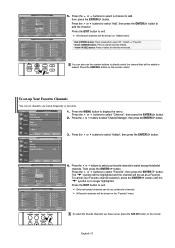
... to select "Channel Manager", then press the ENTER button. Press the or buttons to add, then press the ENTER button. Press the or buttons to display the menu. To set channels you have set up Your Favorite Channels You can set -up , press the FAV.CH button on the remote control...
... to select "Channel Manager", then press the ENTER button. Press the or buttons to add, then press the ENTER button. Press the or buttons to display the menu. To set channels you have set up Your Favorite Channels You can set -up , press the FAV.CH button on the remote control...
User Manual (ENGLISH)
Page 36
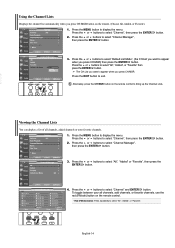
...) 1. English-34 Press the MENU button to select "All", "Added", or "Favorite" then press the ENTER button. Press the or buttons to display the menu. Press the or buttons to select "Channel" and ENTER button. To toggle between your favorite channels. 1. button. 3. Press the or ... "Channel", then press the ENTER 2. Press the or buttons to select "Channel Manager", then press the ENTER button. Using the Channel Lists Displays the channel list automatically when you press CH MGR button on the remote control. • Red (P.Mode) button: Press repeatedly to select "...
...) 1. English-34 Press the MENU button to select "All", "Added", or "Favorite" then press the ENTER button. Press the or buttons to display the menu. Press the or buttons to select "Channel" and ENTER button. To toggle between your favorite channels. 1. button. 3. Press the or ... "Channel", then press the ENTER 2. Press the or buttons to select "Channel Manager", then press the ENTER button. Using the Channel Lists Displays the channel list automatically when you press CH MGR button on the remote control. • Red (P.Mode) button: Press repeatedly to select "...


