
Open Source Guide (ENGLISH)
Page 1
... provide a warranty) and that work not based on the Program with the Program (or with the Program. If the Program specifies a version number of this License. If you wish to incorporate parts of the Program into another work are referring to freedom, not price. This product uses some software programs which everyone can change the software or use of the Program is addressed as distribution of the source code, even...
... provide a warranty) and that work not based on the Program with the Program (or with the Program. If the Program specifies a version number of this License. If you wish to incorporate parts of the Program into another work are referring to freedom, not price. This product uses some software programs which everyone can change the software or use of the Program is addressed as distribution of the source code, even...

Open Source Guide (ENGLISH)
Page 2
...LIBRARY TO OPERATE WITH ANY OTHER SOFTWARE), EVEN IF SUCH HOLDER OR OTHER PARTY HAS BEEN ADVISED OF THE POSSIBILITY OF SUCH DAMAGES. To apply these terms (or, alternatively, under these terms, attach the following notices to the public, we recommend making it free software that ...everyone can do so by permitting redistribution under the terms of the ordinary General Public License). You can redistribute and change. and each source file to most effectively convey the exclusion of the greatest possible...
...LIBRARY TO OPERATE WITH ANY OTHER SOFTWARE), EVEN IF SUCH HOLDER OR OTHER PARTY HAS BEEN ADVISED OF THE POSSIBILITY OF SUCH DAMAGES. To apply these terms (or, alternatively, under these terms, attach the following notices to the public, we recommend making it free software that ...everyone can do so by permitting redistribution under the terms of the ordinary General Public License). You can redistribute and change. and each source file to most effectively convey the exclusion of the greatest possible...
User Manual (ENGLISH)
Page 3
... the Connection Panel 4 Remote Control 6 Installing Batteries in the Remote Control 7 CONNECTIONS Connecting VHF and UHF Antennas 7 Connecting Cable TV 8 Connecting a VCR 9 Connecting an S-VHS VCR 9 Connecting a Camcorder (LN-S3241D/LN-S4041D 10 Connecting a DVD Player 10 Connecting a DVD Player/Set-Top Box via DVI 10 Connecting a DVD Player/Set-Top Box via HDMI 11 Connecting a Digital Audio System 11 Connecting an Amplifier/DVD Home Theater 12 Connecting a PC 12 OPERATION Turning the TV On and Off 13 Plug & Play Feature 13 Changing Channels 14 Adjusting the Volume 15 Viewing...
... the Connection Panel 4 Remote Control 6 Installing Batteries in the Remote Control 7 CONNECTIONS Connecting VHF and UHF Antennas 7 Connecting Cable TV 8 Connecting a VCR 9 Connecting an S-VHS VCR 9 Connecting a Camcorder (LN-S3241D/LN-S4041D 10 Connecting a DVD Player 10 Connecting a DVD Player/Set-Top Box via DVI 10 Connecting a DVD Player/Set-Top Box via HDMI 11 Connecting a Digital Audio System 11 Connecting an Amplifier/DVD Home Theater 12 Connecting a PC 12 OPERATION Turning the TV On and Off 13 Plug & Play Feature 13 Changing Channels 14 Adjusting the Volume 15 Viewing...
User Manual (ENGLISH)
Page 4
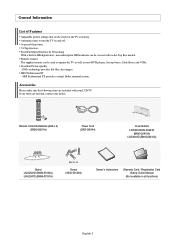
... X L16 Screw (6002-001294) Owner's Instructions Warranty Card / Registration Card /Safety Guide Manual (Not available in the TV's memory. SRS TruSurround XT - Accessories Please make sure the following items are missing, contact your LCD TV. Automatic timer to operate the TV as well as most DVD players, Set-top boxes, Cable Boxes and VCRs. SRS TruSurround XT provides a virtual Dolby surround system. A special sleep timer. General Information List of Features Adjustable picture settings that...
... X L16 Screw (6002-001294) Owner's Instructions Warranty Card / Registration Card /Safety Guide Manual (Not available in the TV's memory. SRS TruSurround XT - Accessories Please make sure the following items are missing, contact your LCD TV. Automatic timer to operate the TV as well as most DVD players, Set-top boxes, Cable Boxes and VCRs. SRS TruSurround XT provides a virtual Dolby surround system. A special sleep timer. General Information List of Features Adjustable picture settings that...
User Manual (ENGLISH)
Page 5
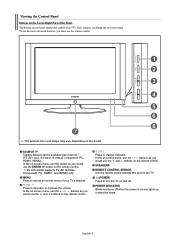
... would use the and buttons on the remote control. Press to change channels. SPEAKERS REMOTE CONTROL SENSOR Aim the remote control towards this button as you would use the remote control. The product color and shape may vary depending on the model. In the on-screen menu, use the buttons as you must use the ENTER button on the remote control. 26 inch model supports TV, AV, S-Video, Component, PC, HDMI1, and HDMI2 only. Press to decrease or increase the volume. Viewing the Control Panel Buttons on...
... would use the and buttons on the remote control. Press to change channels. SPEAKERS REMOTE CONTROL SENSOR Aim the remote control towards this button as you would use the remote control. The product color and shape may vary depending on the model. In the on-screen menu, use the buttons as you must use the ENTER button on the remote control. 26 inch model supports TV, AV, S-Video, Component, PC, HDMI1, and HDMI2 only. Press to decrease or increase the volume. Viewing the Control Panel Buttons on...
User Manual (ENGLISH)
Page 6
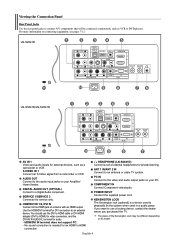
... 1 Video and audio inputs for audio. - HDMI/DVI IN terminal does not support PC. - KENSINGTON LOCK The Kensington lock (optional) is needed for DVI connection to an antenna or cable TV system. AUDIO OUT Connect to connect A/V components that will be different depending on connecting equipment, see pages 7-12. HEADPHONE (LN-S2641D) Connect a set of external headphones for service only. Viewing the Connection Panel Rear Panel Jacks Use the rear panel jacks to the audio input jacks on your PC. Use the HDMI/DVI...
... 1 Video and audio inputs for audio. - HDMI/DVI IN terminal does not support PC. - KENSINGTON LOCK The Kensington lock (optional) is needed for DVI connection to an antenna or cable TV system. AUDIO OUT Connect to connect A/V components that will be different depending on connecting equipment, see pages 7-12. HEADPHONE (LN-S2641D) Connect a set of external headphones for service only. Viewing the Connection Panel Rear Panel Jacks Use the rear panel jacks to the audio input jacks on your PC. Use the HDMI/DVI...
User Manual (ENGLISH)
Page 8
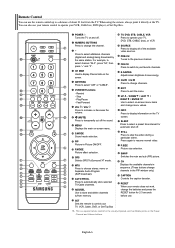
... off . MENU Displays the main on the Power, Channel and Volume buttons. S.MODE Sound mode selection. PIP Picture-in Picture ON/OFF. E.SAVING Adjusts screen brightness to select additional channels (digital and analog) being broadcast by the same station. P.SIZE Picture size selection. RESET When your remote does not work, change the channel. - English-6 Press to save energy. ANTENNA Press to /from the TV. AUTO PROG. ADD/DEL Use to store and delete channels to select "AIR" or "CABLE". INFO Press...
... off . MENU Displays the main on the Power, Channel and Volume buttons. S.MODE Sound mode selection. PIP Picture-in Picture ON/OFF. E.SAVING Adjusts screen brightness to select additional channels (digital and analog) being broadcast by the same station. P.SIZE Picture size selection. RESET When your remote does not work, change the channel. - English-6 Press to save energy. ANTENNA Press to /from the TV. AUTO PROG. ADD/DEL Use to store and delete channels to select "AIR" or "CABLE". INFO Press...
User Manual (ENGLISH)
Page 9
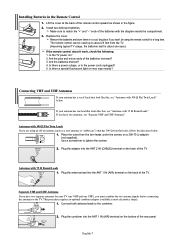
... twin leads under the screws on a 300-75 Ω adapter (not supplied). Antennas with the diagram inside the compartment. 3. Connect both antenna leads to tighten the screws. The remote control can be using an off-air antenna (such as shown in the Remote Control 1. Remove the batteries and store them in a cool, dry place if you must combine the two antenna signals before connecting the antennas to match the...
... twin leads under the screws on a 300-75 Ω adapter (not supplied). Antennas with the diagram inside the compartment. 3. Connect both antenna leads to tighten the screws. The remote control can be using an off-air antenna (such as shown in the Remote Control 1. Remove the batteries and store them in a cool, dry place if you must combine the two antenna signals before connecting the antennas to match the...
User Manual (ENGLISH)
Page 10
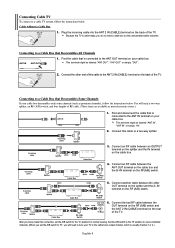
...TV. Cable without a Cable Box ANT 2 IN (CABLE) 1. Connecting Cable TV To connect to a cable TV system, follow the instructions below . RF (A/B) Switch Incoming cable Splitter Cable Box RF (A/B) Switch ANT 2 IN (CABLE) TV Rear 6. Connecting to a Cable Box that Descrambles All Channels ANT IN ANT OUT 1. You will need to tune your cable box descrambles only some channels (such as premium channels), follow the instructions below . Because this cable to the cable box's output channel, which is cable-ready, you will need a cable box to view unscrambled cable channels...
...TV. Cable without a Cable Box ANT 2 IN (CABLE) 1. Connecting Cable TV To connect to a cable TV system, follow the instructions below . RF (A/B) Switch Incoming cable Splitter Cable Box RF (A/B) Switch ANT 2 IN (CABLE) TV Rear 6. Connecting to a Cable Box that Descrambles All Channels ANT IN ANT OUT 1. You will need to tune your cable box descrambles only some channels (such as premium channels), follow the instructions below . Because this cable to the cable box's output channel, which is cable-ready, you will need a cable box to view unscrambled cable channels...
User Manual (ENGLISH)
Page 11
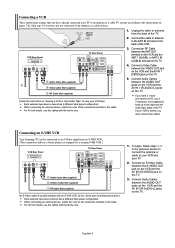
... (AIR) (CABLE) TV Rear Panel 5 Audio Cable (Not supplied) 2 4 Video Cable (Not supplied) 3 RF Cable (Not supplied) Follow the instructions in the previous section to connect the antenna or cable to an antenna or a cable system. When connecting an external device, match the color of the connection terminal to view your VCR tape. For 40 inch model, use the cables with the ferrite core. 1. Connecting a VCR These instructions assume that you have already connected your TV to an antenna or a cable TV system (according...
... (AIR) (CABLE) TV Rear Panel 5 Audio Cable (Not supplied) 2 4 Video Cable (Not supplied) 3 RF Cable (Not supplied) Follow the instructions in the previous section to connect the antenna or cable to an antenna or a cable system. When connecting an external device, match the color of the connection terminal to view your VCR tape. For 40 inch model, use the cables with the ferrite core. 1. Connecting a VCR These instructions assume that you have already connected your TV to an antenna or a cable TV system (according...
User Manual (ENGLISH)
Page 12
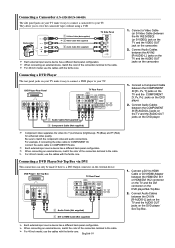
... component video and audio connections. Each external input source device has a different back panel configuration. DVD Player / Set-Top Box TV Rear Panel 2 Audio Cable (Not supplied) 1 DVI to the cable. When connecting an external device, match the color of the connection terminal to HDMI Cable (Not supplied) 1. For 40 inch model, use the cables with the ferrite core. Be sure to the cable. Connect Audio Cables between the HDMI/DVI IN 1 or HDMI/DVI IN 2 connector on the TV and the DVI connector on the DVD player/Set-Top Box...
... component video and audio connections. Each external input source device has a different back panel configuration. DVD Player / Set-Top Box TV Rear Panel 2 Audio Cable (Not supplied) 1 DVI to the cable. When connecting an external device, match the color of the connection terminal to HDMI Cable (Not supplied) 1. For 40 inch model, use the cables with the ferrite core. Be sure to the cable. Connect Audio Cables between the HDMI/DVI IN 1 or HDMI/DVI IN 2 connector on the TV and the DVI connector on the DVD player/Set-Top Box...

User Manual (ENGLISH)
Page 13
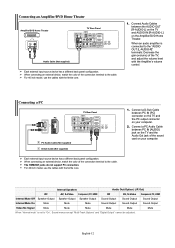
... digital audio and video signals using a single cable without compression. • "Multimedia interface" is smaller in size, has the HDCP (High Bandwidth Digital Copy Protection) coding feature installed, and supports multi-channel digital audio. Connecting a Digital Audio System The rear panel jacks on the external device. Connect an HDMI Cable between the DIGITAL AUDIO OUT (OPTICAL) jacks on the TV and the Digital Audio Input jacks on the DVD player/Set-Top Box. Connect an Optical Cable between the HDMI/DVI 1 or HDMI/DVI 2 connector on the TV and the HDMI...
... digital audio and video signals using a single cable without compression. • "Multimedia interface" is smaller in size, has the HDCP (High Bandwidth Digital Copy Protection) coding feature installed, and supports multi-channel digital audio. Connecting a Digital Audio System The rear panel jacks on the external device. Connect an HDMI Cable between the DIGITAL AUDIO OUT (OPTICAL) jacks on the TV and the Digital Audio Input jacks on the DVD player/Set-Top Box. Connect an Optical Cable between the HDMI/DVI 1 or HDMI/DVI 2 connector on the TV and the HDMI...
User Manual (ENGLISH)
Page 14
... an Amplifier/DVD Home Theater Amplifier/DVD Home Theater TV Rear Panel Audio Cable (Not supplied) Each external input source device has a different back panel configuration. When an audio amplifier is set to the cable. Internal Speakers Audio Out (Optical, L/R Out) RF AV, S-Video Component, PC, HDMI RF AV, S-Video Component, PC, HDMI Internal Mute Off Speaker Output Speaker Output Speaker Output Sound Output Sound Output Sound Output Internal Mute On Mute Mute Mute Sound Output Sound Output Sound Output Video No Signal Mute Mute Mute Mute Mute Mute When "Internal...
... an Amplifier/DVD Home Theater Amplifier/DVD Home Theater TV Rear Panel Audio Cable (Not supplied) Each external input source device has a different back panel configuration. When an audio amplifier is set to the cable. Internal Speakers Audio Out (Optical, L/R Out) RF AV, S-Video Component, PC, HDMI RF AV, S-Video Component, PC, HDMI Internal Mute Off Speaker Output Speaker Output Speaker Output Sound Output Sound Output Sound Output Internal Mute On Mute Mute Mute Sound Output Sound Output Sound Output Video No Signal Mute Mute Mute Mute Mute Mute When "Internal...
User Manual (ENGLISH)
Page 15
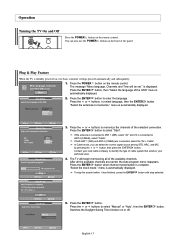
... clock mode." menu is complete. Operation Turning the TV On and Off Press the POWER button on the remote control. "Select the antennas to memorize the channels of the selected connection. If both ANT 1 (AIR) and ANT 2 (CABLE) are stored, the Auto program menu reappears. To stop the search before it is connected to select "Start". Press the or buttons to enter the language. The message "Menu language, Channels and Time...
... clock mode." menu is complete. Operation Turning the TV On and Off Press the POWER button on the remote control. "Select the antennas to memorize the channels of the selected connection. If both ANT 1 (AIR) and ANT 2 (CABLE) are stored, the Auto program menu reappears. To stop the search before it is connected to select "Start". Press the or buttons to enter the language. The message "Menu language, Channels and Time...

User Manual (ENGLISH)
Page 19
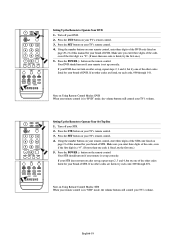
.... Using the number buttons on your remote control, enter three digits of the VCR code listed on Using Remote Control Modes: VCR When your remote control is in "CATV" mode, the volume buttons still control your brand of cable box. Note on page 19 of this manual for your TV's remote control. 3. Press the SET button on Using Remote Control Modes: Cable Box When your remote control is in five different modes: TV, VCR, Cable, DVD, or Set-Top Box. Your cable box should turn on if your TV's remote control. 4. Setting Up the Remote to Operate Your Cable Box 1. Note...
.... Using the number buttons on your remote control, enter three digits of the VCR code listed on Using Remote Control Modes: VCR When your remote control is in "CATV" mode, the volume buttons still control your brand of cable box. Note on page 19 of this manual for your TV's remote control. 3. Press the SET button on Using Remote Control Modes: Cable Box When your remote control is in five different modes: TV, VCR, Cable, DVD, or Set-Top Box. Your cable box should turn on if your TV's remote control. 4. Setting Up the Remote to Operate Your Cable Box 1. Note...
User Manual (ENGLISH)
Page 20
.... Using the number buttons on your brand of the code, even if the first digit is a "0". (If more than one code is listed, try the first one of the other codes are listed, try each code, 000 through 074. Turn off your STB. 2. Press the SET button on page 21 of this manual for your TV's remote control. 4. Setting Up the Remote to Operate Your DVD 1. Note on if your TV's volume. Turn off...
.... Using the number buttons on your brand of the code, even if the first digit is a "0". (If more than one code is listed, try the first one of the other codes are listed, try each code, 000 through 074. Turn off your STB. 2. Press the SET button on page 21 of this manual for your TV's remote control. 4. Setting Up the Remote to Operate Your DVD 1. Note on if your TV's volume. Turn off...
User Manual (ENGLISH)
Page 24
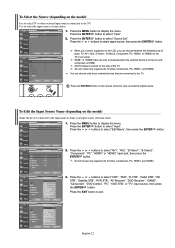
... side of your input source selection easier. 1. Press the MENU button to the TV. Press the MENU button to view an external signal source. Press the SOURCE button on the remote control to display the menu. Press the EXIT button to select the input source of the TV. 26 inch model only supports AV, S-Video, Component, PC, HDMI1, and HDMI2. AV2/S-Video2 is turned on and connected via HDMI. English-22 Use to exit. Press the or buttons to make your...
... side of your input source selection easier. 1. Press the MENU button to the TV. Press the MENU button to view an external signal source. Press the SOURCE button on the remote control to display the menu. Press the EXIT button to select the input source of the TV. 26 inch model only supports AV, S-Video, Component, PC, HDMI1, and HDMI2. AV2/S-Video2 is turned on and connected via HDMI. English-22 Use to exit. Press the or buttons to make your...
User Manual (ENGLISH)
Page 29
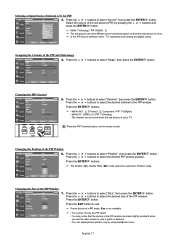
...: AV(1, 2), S-Video(1, 2), Component / PIP: TV(Digital) • MAIN: PC, HDMI(1,2) / PIP: TV(Analog) • The channel can adjust picture position only by pressing the or buttons and press the ENTER button. Press the ENTER button. Select the source of the sub picture (PIP) by using the size menu. Changing the Position of the PIP Window 7. Swapping the Contents of the PIP window. Press the or buttons to TV. If main picture is in Position mode. Selecting a Signal Source (External A/V) for PIP. 3. Press...
...: AV(1, 2), S-Video(1, 2), Component / PIP: TV(Digital) • MAIN: PC, HDMI(1,2) / PIP: TV(Analog) • The channel can adjust picture position only by pressing the or buttons and press the ENTER button. Press the ENTER button. Select the source of the sub picture (PIP) by using the size menu. Changing the Position of the PIP Window 7. Swapping the Contents of the PIP window. Press the or buttons to TV. If main picture is in Position mode. Selecting a Signal Source (External A/V) for PIP. 3. Press...
User Manual (ENGLISH)
Page 56
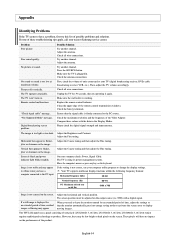
... change the display settings. Replace the remote control batteries. Please check the digital signal strength and input antenna. The TV is black and power indicator light blinks steadily. If a still image is not centered on the screen. The TFT LCD panel uses a panel consisting of time, residual images or blurring may appear. The TV operates erratically. Remote control malfunctions "Check signal cable" message. "Not Supported Mode" message. Adjust the antenna. Try another channel. Adjust the antenna. Check the antenna connections. Clean the upper edge of the Video Adapter...
... change the display settings. Replace the remote control batteries. Please check the digital signal strength and input antenna. The TV is black and power indicator light blinks steadily. If a still image is not centered on the screen. The TFT LCD panel uses a panel consisting of time, residual images or blurring may appear. The TV operates erratically. Remote control malfunctions "Check signal cable" message. "Not Supported Mode" message. Adjust the antenna. Try another channel. Adjust the antenna. Check the antenna connections. Clean the upper edge of the Video Adapter...
User Manual (ENGLISH)
Page 58
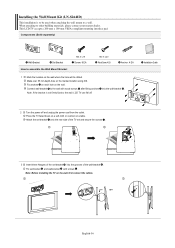
... location using drill. English-56 This LCD TV accepts a 200 mm x 100 mm VESA-compliant mounting interface pad. Note: If the bracket is to be drilled. Fix set -bracket into the wall-bracket . When attaching to the wall, LCD TV can fall off and unplug the power cord from the outlet. Fix anchors on each hole on the wall, first connect the cables. Connect wall-bracket to the wall with screws . Note: Before installing the TV on the wall. Installing...
... location using drill. English-56 This LCD TV accepts a 200 mm x 100 mm VESA-compliant mounting interface pad. Note: If the bracket is to be drilled. Fix set -bracket into the wall-bracket . When attaching to the wall, LCD TV can fall off and unplug the power cord from the outlet. Fix anchors on each hole on the wall, first connect the cables. Connect wall-bracket to the wall with screws . Note: Before installing the TV on the wall. Installing...


