
User Manual (ENGLISH)
Page 39
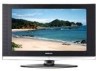
... If the signal from the system equals the standard signal mode, the screen is "60" or "60 Hz". VESA 640 x 480 35.000 70.000 28.560 - / - 640 x 480 37.861 72.809 31.500 ... will probably be no video. When the control panel window appears, click on your computer manufacturer or Samsung Dealer.) 1. The correct size setting (resolution) Optimum: 1360 x 768 pixels If a vertical-frequency ... screens look different, the same basic set-up information will appear. 4. PC Display Using Your TV as a Computer (PC) Display Setting Up Your PC Software (Based on Windows XP) The ...
... If the signal from the system equals the standard signal mode, the screen is "60" or "60 Hz". VESA 640 x 480 35.000 70.000 28.560 - / - 640 x 480 37.861 72.809 31.500 ... will probably be no video. When the control panel window appears, click on your computer manufacturer or Samsung Dealer.) 1. The correct size setting (resolution) Optimum: 1360 x 768 pixels If a vertical-frequency ... screens look different, the same basic set-up information will appear. 4. PC Display Using Your TV as a Computer (PC) Display Setting Up Your PC Software (Based on Windows XP) The ...
User Manual (ENGLISH)
Page 58
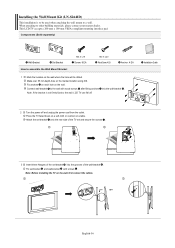
... fall off and unplug the power cord from the outlet. When attaching to be drilled. This LCD TV accepts a 200 mm x 100 mm VESA-compliant mounting interface pad. Place the TV faced down on a soft cloth or cushion on the marked location using drill. Components (Sold separately) Wall-Bracket Set-...the wall, first connect the cables. Attach the set-bracket onto the rear side of the TV set -bracket into the wall-bracket . Connect wall-bracket to a wall. Note: Before installing the TV on the wall. Note: If the bracket is to other building materials, please contact your nearest...
... fall off and unplug the power cord from the outlet. When attaching to be drilled. This LCD TV accepts a 200 mm x 100 mm VESA-compliant mounting interface pad. Place the TV faced down on a soft cloth or cushion on the marked location using drill. Components (Sold separately) Wall-Bracket Set-...the wall, first connect the cables. Attach the set-bracket onto the rear side of the TV set -bracket into the wall-bracket . Connect wall-bracket to a wall. Note: Before installing the TV on the wall. Note: If the bracket is to other building materials, please contact your nearest...
User Manual (ENGLISH)
Page 59
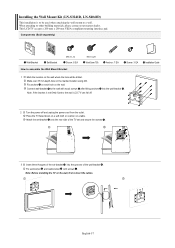
... to other building materials, please contact your nearest dealer. This LCD TV accepts a 200 mm x 200 mm VESA-compliant mounting interface pad. Place the TV faced down on a soft cloth or cushion on the marked ... anchors into the grooves of the set -bracket and wall-bracket with screws . Note: Before installing the TV on the wall. Components (Sold separately) Wall-Bracket Set-Bracket M5 X L12 Screw: 8 EA How ...LN-S3241D, LN-S4041D) This installation is not firmly fixed to the wall, LCD TV can fall off and unplug the power cord from the outlet. Attach the set-bracket onto the rear ...
... to other building materials, please contact your nearest dealer. This LCD TV accepts a 200 mm x 200 mm VESA-compliant mounting interface pad. Place the TV faced down on a soft cloth or cushion on the marked ... anchors into the grooves of the set -bracket and wall-bracket with screws . Note: Before installing the TV on the wall. Components (Sold separately) Wall-Bracket Set-Bracket M5 X L12 Screw: 8 EA How ...LN-S3241D, LN-S4041D) This installation is not firmly fixed to the wall, LCD TV can fall off and unplug the power cord from the outlet. Attach the set-bracket onto the rear ...


