Owners Instructions
Page 3
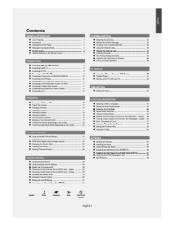
... One-Touch Button Nnglish- I Digital ■ Choosing a Multi-Channel Sound (MTS) track -Analog ■ Selecting the Internal Mute ■ Automatic Volume Control ■ Setting the On/Off Melody ■ Listening to the Sound of Features ■ Accessories ■ Viewing the Control Panel ■ Viewing the Connection Panel ■ Remote Control ■ Installing Batteries in the Remote Control CONNECTIONS ■ Connecting VHF and UHF Antennas ■ Connecting Cable TV ■ Connecting a VCR ■ Connecting an S-VHS VCR ■ Connecting a Camcorder...
... One-Touch Button Nnglish- I Digital ■ Choosing a Multi-Channel Sound (MTS) track -Analog ■ Selecting the Internal Mute ■ Automatic Volume Control ■ Setting the On/Off Melody ■ Listening to the Sound of Features ■ Accessories ■ Viewing the Control Panel ■ Viewing the Connection Panel ■ Remote Control ■ Installing Batteries in the Remote Control CONNECTIONS ■ Connecting VHF and UHF Antennas ■ Connecting Cable TV ■ Connecting a VCR ■ Connecting an S-VHS VCR ■ Connecting a Camcorder...
Owners Instructions
Page 4
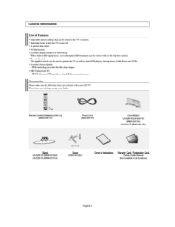
... used to turn the TV on and off. • A special sleep timer. • V-Chip function. • Excellent Digital Interface & Networking With a built-in all locations) English-2 DNIe technology provides life-like clear images. • SRS TruSurround XT - General Information List of Features • Adjustable picture settings that can be stored in the TV's memory. • Automatic timer to operate the TV as well as most DVD players, Set-top boxes, Cable Boxes...
... used to turn the TV on and off. • A special sleep timer. • V-Chip function. • Excellent Digital Interface & Networking With a built-in all locations) English-2 DNIe technology provides life-like clear images. • SRS TruSurround XT - General Information List of Features • Adjustable picture settings that can be stored in the TV's memory. • Automatic timer to operate the TV as well as most DVD players, Set-top boxes, Cable Boxes...
Owners Instructions
Page 5
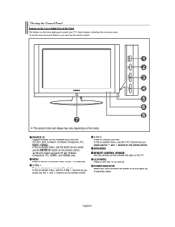
... the remote control. 26 inch model supports TV, AV, S-Video, Component, PC, HDMI1, and HDMI2 only. 0 MENU Press to change channels. The product color and shape may vary depending on and lights up in stand-by mode. To use the more advanced features, you would use the + VOL - Press to tum the TV on and off. 0 POWER INDICATOR Blinks and turns off when the power is on the model. 0 SOURCE G' Toggles between all the available input sources (TV...
... the remote control. 26 inch model supports TV, AV, S-Video, Component, PC, HDMI1, and HDMI2 only. 0 MENU Press to change channels. The product color and shape may vary depending on and lights up in stand-by mode. To use the more advanced features, you would use the + VOL - Press to tum the TV on and off. 0 POWER INDICATOR Blinks and turns off when the power is on the model. 0 SOURCE G' Toggles between all the available input sources (TV...
Owners Instructions
Page 6
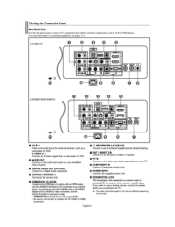
.... 0 COMPONENT IN Connect Component video/audio. English-4 For more information on its model. O POWER INPUT Connect the supplied power cord. AUDIO -0 VIDEO 840E0 0 O-AUDIO COMPONENT IN O=O PC PC IN 10 O AV IN 1 Video and audio inputs for audio. - You should use a locking device, contact the dealer where you want to use the DVI to HDMI cable or DVI-HDMI adapter (DVI to HDMI) for video connection, and the DVI-IN R-AUDIO-L' terminal for external devices, such as VCR or DVD players. Viewing the Connection Panel Rear Panel Jacks Use the rear panel...
.... 0 COMPONENT IN Connect Component video/audio. English-4 For more information on its model. O POWER INPUT Connect the supplied power cord. AUDIO -0 VIDEO 840E0 0 O-AUDIO COMPONENT IN O=O PC PC IN 10 O AV IN 1 Video and audio inputs for audio. - You should use a locking device, contact the dealer where you want to use the DVI to HDMI cable or DVI-HDMI adapter (DVI to HDMI) for video connection, and the DVI-IN R-AUDIO-L' terminal for external devices, such as VCR or DVD players. Viewing the Connection Panel Rear Panel Jacks Use the rear panel...

Owners Instructions
Page 8
...can also use . Cable box. P.SIZE Picture size selection. 0 SWAP Switches the main and sub (PIP) picture. 0 CH Displays the available channels in sequence. (These buttons change channels in Picture ON/OFF. O SET Sets the remote to resume normal video. Press to choose stereo, mono or Separate Audio Program (SAP broadcast). 0 AUTO PROG. a) PIP Picture-in the PIP window only.) 0 CAPTION Controls the caption decoder. 0 RESET When your remote does not work, change channels. 0 EXIT Press to operate your TV, VCR, Cable, DVD, or Set-Top Box - Play/Pause - P.MODE Picture effect...
...can also use . Cable box. P.SIZE Picture size selection. 0 SWAP Switches the main and sub (PIP) picture. 0 CH Displays the available channels in sequence. (These buttons change channels in Picture ON/OFF. O SET Sets the remote to resume normal video. Press to choose stereo, mono or Separate Audio Program (SAP broadcast). 0 AUTO PROG. a) PIP Picture-in the PIP window only.) 0 CAPTION Controls the caption decoder. 0 RESET When your remote does not work, change channels. 0 EXIT Press to operate your TV, VCR, Cable, DVD, or Set-Top Box - Play/Pause - P.MODE Picture effect...

Owners Instructions
Page 9
... (CABLE) terminal on the bottom of the TV. Replace the cover. Connect both antenna leads to tighten the screws. Plug the adaptor into the ANT 1 IN (AIR) terminal on the back of the rear panel. Remove the batteries and store them in a cool, dry place if you won't be used up to about one UHF), you are using the remote control for your antenna has a set...
... (CABLE) terminal on the bottom of the TV. Replace the cover. Connect both antenna leads to tighten the screws. Plug the adaptor into the ANT 1 IN (AIR) terminal on the back of the rear panel. Remove the batteries and store them in a cool, dry place if you won't be used up to about one UHF), you are using the remote control for your antenna has a set...
Owners Instructions
Page 10
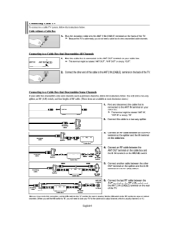
... cable to "B", you will need a cable box to a Cable Box that is cable-ready, you set theNB switch to the ANT OUT terminal on your cable box. Incoming cable riff la' Splitt I RF (NB) Switch ANT 2 IN (CABLE: ® TV Rear 6. Inconlinp cable Splitter Oa& OW Cable Box IBI I - Find and disconnect the cable that Descrambles Some Channels If your cable box descrambles only some channels (such as premium channels), follow the instructions below . Connect an RF cable...
... cable to "B", you will need a cable box to a Cable Box that is cable-ready, you set theNB switch to the ANT OUT terminal on your cable box. Incoming cable riff la' Splitt I RF (NB) Switch ANT 2 IN (CABLE: ® TV Rear 6. Inconlinp cable Splitter Oa& OW Cable Box IBI I - Find and disconnect the cable that Descrambles Some Channels If your cable box descrambles only some channels (such as premium channels), follow the instructions below . Connect an RF cable...

Owners Instructions
Page 11
... external device, match the color of the connection terminal to the cable. • For 40 inch model, use the cables with the ferrite core. 1. English-9 ANT ' IN (AIR: ANT 2 IN (CABLE) VCR Rear Panel oI 0 TV Rear Panel 0 00 • ol=lo 00 kV, I:1 Audio Cable (Not supplied) ID Video Cable (Not supplied) ▪ RF Cable (Not supplied) Follow the instructions in the previous section to connect the antenna or cable to the right and left audio input...
... external device, match the color of the connection terminal to the cable. • For 40 inch model, use the cables with the ferrite core. 1. English-9 ANT ' IN (AIR: ANT 2 IN (CABLE) VCR Rear Panel oI 0 TV Rear Panel 0 00 • ol=lo 00 kV, I:1 Audio Cable (Not supplied) ID Video Cable (Not supplied) ▪ RF Cable (Not supplied) Follow the instructions in the previous section to connect the antenna or cable to the right and left audio input...
Owners Instructions
Page 12
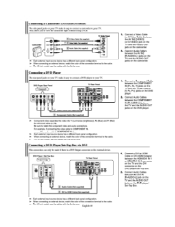
... external input source device has a different back panel configuration. • When connecting an external device, match the color of the connection terminal to the cable. 1.- Each external input source device has a different bad< panel configuration. • When connecting an external device, match the color of the connection terminal to the cable. For example, if connecting the video cable to COMPONENT IN, connect the audio cable to HDMI Cable (Not supplied 1. This t I be made if there is Dv Output DVD Player / Set-Top Box TV Rear Panel...
... external input source device has a different back panel configuration. • When connecting an external device, match the color of the connection terminal to the cable. 1.- Each external input source device has a different bad< panel configuration. • When connecting an external device, match the color of the connection terminal to the cable. For example, if connecting the video cable to COMPONENT IN, connect the audio cable to HDMI Cable (Not supplied 1. This t I be made if there is Dv Output DVD Player / Set-Top Box TV Rear Panel...
Owners Instructions
Page 13
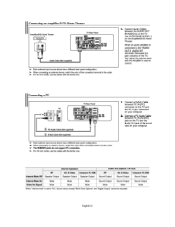
... TV, and adjust the volume level with the ferrite core. The difference between the HDMI/DVI 1 or HDMI/DVI 2 connector on the TV and the HDMI connector on your TV. When a Digital Audio System is smaller in size, has the HDCP (High Bandwidth Digital Copy Protection) coding feature installed, and supports multichannel digital audio. • Each external input source device has a different back panel configuration. )0. Connecting a Digital Audio System The rear panel jacks on the DVD player/Set-Top Box...
... TV, and adjust the volume level with the ferrite core. The difference between the HDMI/DVI 1 or HDMI/DVI 2 connector on the TV and the HDMI connector on your TV. When a Digital Audio System is smaller in size, has the HDCP (High Bandwidth Digital Copy Protection) coding feature installed, and supports multichannel digital audio. • Each external input source device has a different back panel configuration. )0. Connecting a Digital Audio System The rear panel jacks on the DVD player/Set-Top Box...
Owners Instructions
Page 14
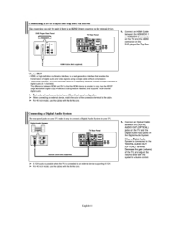
...supplied) > Each external input source device has a different back panel configuration. 1•• When connecting an external device, match the color of the connection terminal to the cable. ›- Connect a PC Audio Cable between PC IN [AUDIO] jack on your computer. 2. Internal Speakers Audio Out (Optical, LJR Out) RF AV, S-Video Component, PC, HDMI RF AV, S-Video Component, PC, HDMI Internal Mute Off Speaker Output Speaker Output Speaker Output Sound Output Sound Output Sound Output Internal Mute On Mute Mute Mute Sound Output Sound Output Sound Output Video No Signal...
...supplied) > Each external input source device has a different back panel configuration. 1•• When connecting an external device, match the color of the connection terminal to the cable. ›- Connect a PC Audio Cable between PC IN [AUDIO] jack on your computer. 2. Internal Speakers Audio Out (Optical, LJR Out) RF AV, S-Video Component, PC, HDMI RF AV, S-Video Component, PC, HDMI Internal Mute Off Speaker Output Speaker Output Speaker Output Sound Output Sound Output Sound Output Internal Mute On Mute Mute Mute Sound Output Sound Output Sound Output Video No Signal...
Owners Instructions
Page 15
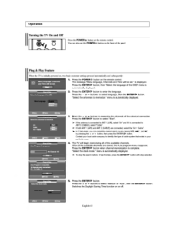
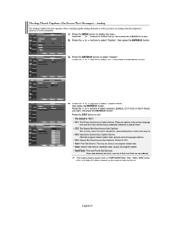
.... *Move 3. In Cable mode, you can also use the POWER button on the remote control. select the clock mods. 5. two basic customer settings proceed automatically and subsequently: Menu language, Channels and Time wIN be set . 1. Press the ENTERS' button when channel memorization is displayed. Mime Auto Program Is completed. 12 Channels were mementos& Air 12, Cable: 0. The message "Menu language, Channels and Time will begin memorizing all the available channels are connected, select the...
.... *Move 3. In Cable mode, you can also use the POWER button on the remote control. select the clock mods. 5. two basic customer settings proceed automatically and subsequently: Menu language, Channels and Time wIN be set . 1. Press the ENTERS' button when channel memorization is displayed. Mime Auto Program Is completed. 12 Channels were mementos& Air 12, Cable: 0. The message "Menu language, Channels and Time will begin memorizing all the available channels are connected, select the...

Owners Instructions
Page 19
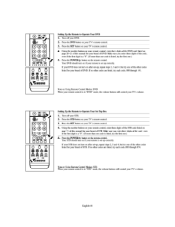
... Using the number buttons on your remote control, enter three digits of the VCR code listed on Using Remote Control Modes: Cable Box When your remote control is listed, try one of the other codes listed for your brand of VCR. Setting Up the Remote to Operate Your Cable Box 1. Press the SET button on your TV's remote control. 4. O OM alD 50- 5 ±)(- Press the SET button on the remote control. Press the POWERb button on your TV's remote control. 3. The remote control might not be compatible with all DVD Players, VCRs, Cable boxes...
... Using the number buttons on your remote control, enter three digits of the VCR code listed on Using Remote Control Modes: Cable Box When your remote control is listed, try one of the other codes listed for your brand of VCR. Setting Up the Remote to Operate Your Cable Box 1. Press the SET button on your TV's remote control. 4. O OM alD 50- 5 ±)(- Press the SET button on the remote control. Press the POWERb button on your TV's remote control. 3. The remote control might not be compatible with all DVD Players, VCRs, Cable boxes...
Owners Instructions
Page 20
... your DVD does not turn on page 21 of this manual for your brand of the code, even if the first digit is a "0". (If more than one code is in "STB" mode, the volume buttons still control your TV's remote control. 3. Make sure you enter three digits of STB. Turn off your TV's remote control. 4. Turn off your TV's remote control. 3. Using the number buttons on your remote control, enter three digits of the STB code listed on after set -up...
... your DVD does not turn on page 21 of this manual for your brand of the code, even if the first digit is a "0". (If more than one code is in "STB" mode, the volume buttons still control your TV's remote control. 3. Make sure you enter three digits of STB. Turn off your TV's remote control. 4. Turn off your TV's remote control. 3. Using the number buttons on your remote control, enter three digits of the STB code listed on after set -up...
Owners Instructions
Page 24
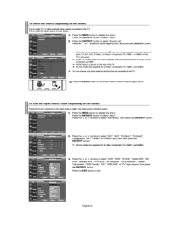
.../S-Video2 is turned on the N's rear panel. Name the device connected to the nput jacks to display the menu. Press the SOURCE button on the model) Use to select TV or other external input sources connected to the TV. Press the or buttons to select "Source List". Press the ENTERS' button to select "AV1", "AV2", "S-Videol", "S-Video2", "Component", "PC", "HDMI1" or "HDMI2" input jack, then press the ENTERS' button. 26 inch model only supports AV, S-Video, Component, PC, HDMI1...
.../S-Video2 is turned on the N's rear panel. Name the device connected to the nput jacks to display the menu. Press the SOURCE button on the model) Use to select TV or other external input sources connected to the TV. Press the or buttons to select "Source List". Press the ENTERS' button to select "AV1", "AV2", "S-Videol", "S-Video2", "Component", "PC", "HDMI1" or "HDMI2" input jack, then press the ENTERS' button. 26 inch model only supports AV, S-Video, Component, PC, HDMI1...

Owners Instructions
Page 29
... O. Selecting a Signal Source (External A/V) for PIP. 3. Press the or v buttons to . • In the PIP Source selection menu, 'TV' represents both analog and digital tuning. Changing the Position of the PIP and Main image IWO CP so.n• SOV/01 Eke Position :On : HOMO MEI 4. Pimp am ›- MAIN: TV(Analog) / PIP: HDMI(1, 2) x••• The sub picture can be selected in PC mode, Size is set to select "Source", then...
... O. Selecting a Signal Source (External A/V) for PIP. 3. Press the or v buttons to . • In the PIP Source selection menu, 'TV' represents both analog and digital tuning. Changing the Position of the PIP and Main image IWO CP so.n• SOV/01 Eke Position :On : HOMO MEI 4. Pimp am ›- MAIN: TV(Analog) / PIP: HDMI(1, 2) x••• The sub picture can be selected in PC mode, Size is set to select "Source", then...
Owners Instructions
Page 47
... have an analog external component (such as a VCR) connected. This may be used only if Texti and Text2 are captions in the primary language that is "CC1". • CC1: The Primary Synchronous Caption Service. Plug & Play Language Time :English 1. or buttons to display the menu. These are not sufficient. • The Caption feature doesn't work in the program. • CC3: Secondary Synchronous Caption Service. Press the MENU button to select "Setup", then...
... have an analog external component (such as a VCR) connected. This may be used only if Texti and Text2 are captions in the primary language that is "CC1". • CC1: The Primary Synchronous Caption Service. Plug & Play Language Time :English 1. or buttons to display the menu. These are not sufficient. • The Caption feature doesn't work in the program. • CC3: Secondary Synchronous Caption Service. Press the MENU button to select "Setup", then...

Owners Instructions
Page 56
... your computer utility program to change the display settings. "Not Supported Mode" message. Adjust the antenna. Clean the upper edge of the Video Adapter. Remote control malfunctions "Check signal cable" message. Digital broadcasting screen problem. Check all wire connections. Compare these troubleshooting tips apply, call your computer check: Power, Signal Cable. Adjust the Brightness and Contrast. Try another channel. First, check the volume of possible problems and solutions. Adjust the Fine tuning. Your TV supports multiscan display functions within the...
... your computer utility program to change the display settings. "Not Supported Mode" message. Adjust the antenna. Clean the upper edge of the Video Adapter. Remote control malfunctions "Check signal cable" message. Digital broadcasting screen problem. Check all wire connections. Compare these troubleshooting tips apply, call your computer check: Power, Signal Cable. Adjust the Brightness and Contrast. Try another channel. First, check the volume of possible problems and solutions. Adjust the Fine tuning. Your TV supports multiscan display functions within the...
Owners Instructions
Page 58
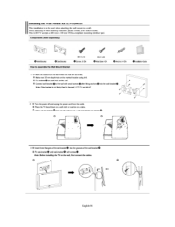
... bracket is not firmly fixed to the wall, LCD TV can fall off. 0 Instalation Guide 2 0 Turn the power off and unplug the power cord from the outlet. 0 Place the TV faced down on a soft cloth or cushion on the wall. 0 Connect wall-bracket 0 to a wall. ITnhs. This LCD TV accepts a 200 mm x 100 mm VESA-compliant mounting interface pad. Components (Sold separately) O Wall-Bracket O Set racket M4 X L15 0 Screw: 8 EA How to assemble the Wall Mount Bracket 0 M4 X L20 Wad Screw...
... bracket is not firmly fixed to the wall, LCD TV can fall off. 0 Instalation Guide 2 0 Turn the power off and unplug the power cord from the outlet. 0 Place the TV faced down on a soft cloth or cushion on the wall. 0 Connect wall-bracket 0 to a wall. ITnhs. This LCD TV accepts a 200 mm x 100 mm VESA-compliant mounting interface pad. Components (Sold separately) O Wall-Bracket O Set racket M4 X L15 0 Screw: 8 EA How to assemble the Wall Mount Bracket 0 M4 X L20 Wad Screw...
Owners Instructions
Page 59
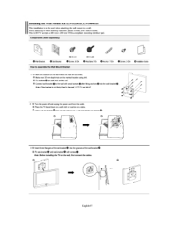
...;Installation Guide How to assemble the Wall Mount Bracket 1 0 Mark the location on the wall 0 Connect wall-bracket 0 to a wall. OO Attach the set-bracket 0 onto the rear side of the TV set and secure the screws 0 0 0 a a 3 0 Insert three Hangers of the set-bracket 0 into the grooves of the wall-bracket() . 0 Fix set-bracket 0 and wall-bracket 0 with wood screws 0 after fitting anchors 0 into the wall-bracket O. This LCD TV accepts a 200 mm x 200 mm VESA-compliant mounting interface pad. Note: Before installing the TV on a table...
...;Installation Guide How to assemble the Wall Mount Bracket 1 0 Mark the location on the wall 0 Connect wall-bracket 0 to a wall. OO Attach the set-bracket 0 onto the rear side of the TV set and secure the screws 0 0 0 a a 3 0 Insert three Hangers of the set-bracket 0 into the grooves of the wall-bracket() . 0 Fix set-bracket 0 and wall-bracket 0 with wood screws 0 after fitting anchors 0 into the wall-bracket O. This LCD TV accepts a 200 mm x 200 mm VESA-compliant mounting interface pad. Note: Before installing the TV on a table...


