

User Manual
Page 1
2010 Samsung TV F/W Upgrade Guide Samsung Electronics
2010 Samsung TV F/W Upgrade Guide Samsung Electronics
User Manual
Page 4
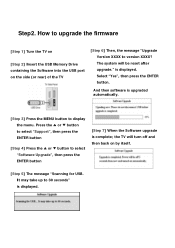
...the ▲ or ▼ button to 30 seconds" is complete; The system will turn off and then back on the side (or rear) of the TV [Step 6] Then, the message "Upgrade Version XXXX to display the menu. Select "Yes", then press the ENTER button. And then software is displayed. the... TV will be reset after upgrade." How to upgrade the firmware [Step 1] Turn the TV on [Step 2] Insert the USB Memory Drive containing the Software into the USB port on by itself. [Step...
...the ▲ or ▼ button to 30 seconds" is complete; The system will turn off and then back on the side (or rear) of the TV [Step 6] Then, the message "Upgrade Version XXXX to display the menu. Select "Yes", then press the ENTER button. And then software is displayed. the... TV will be reset after upgrade." How to upgrade the firmware [Step 1] Turn the TV on [Step 2] Insert the USB Memory Drive containing the Software into the USB port on by itself. [Step...
Quick Guide (easy Manual) (ver.1.0) (English)
Page 1
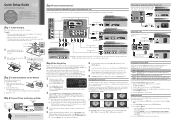
...remote or on the purchase of your TV, call: 1-800-SAMSUNG (1-800-726-7864) For web support please visit: www.samsung.com/support 1-800-SAMSUNG (1-800-726-7864) Samsung Electronics America, Inc. 85 Challenger Road Ridgefield Park, NJ 07660-2112 Samsung Electronics Canada Inc. 55 Standish Court ... Antenna Cable (Not Supplied) or Use a 75 ohm (round) cable. After selecting source, select Search; If you have problems operating your new Samsung TV. For a studio quality cinema picture in the figure to connect your remote. 4. Rear Rear 2 3 With your remote, then select Setup →...
...remote or on the purchase of your TV, call: 1-800-SAMSUNG (1-800-726-7864) For web support please visit: www.samsung.com/support 1-800-SAMSUNG (1-800-726-7864) Samsung Electronics America, Inc. 85 Challenger Road Ridgefield Park, NJ 07660-2112 Samsung Electronics Canada Inc. 55 Standish Court ... Antenna Cable (Not Supplied) or Use a 75 ohm (round) cable. After selecting source, select Search; If you have problems operating your new Samsung TV. For a studio quality cinema picture in the figure to connect your remote. 4. Rear Rear 2 3 With your remote, then select Setup →...
Quick Guide (easy Manual) (ver.1.0) (English)
Page 2
... Encryption type is sold separately) to your broadband company should provide sustained download speeds of 3.5 mb/sec or more. To configure your AP, Samsung TVs will be connected to either the USB 1 (HDD) or USB 2 port on the Power, Channel and Volume buttons. On the Network Setup... E Enter R Return BN68-02616A-03 Adjusts the volume. Displays information on the Wall Wireless IP sharer (AP having DHCP server) TV Side Panel Samsung Wireless LAN Adapter Network Connection - Selects the on-screen menu items and changes the values seen on -line digital content. You can...
... Encryption type is sold separately) to your broadband company should provide sustained download speeds of 3.5 mb/sec or more. To configure your AP, Samsung TVs will be connected to either the USB 1 (HDD) or USB 2 port on the Power, Channel and Volume buttons. On the Network Setup... E Enter R Return BN68-02616A-03 Adjusts the volume. Displays information on the Wall Wireless IP sharer (AP having DHCP server) TV Side Panel Samsung Wireless LAN Adapter Network Connection - Selects the on-screen menu items and changes the values seen on -line digital content. You can...
User Manual (user Manual) (ver.1.0) (English)
Page 1
... Customer Care Center CANADA 1-800-SAMSUNG (726-7864) Web Site www.samsung.com U.S.A 1-800-SAMSUNG (726-7864) www.samsung.com Address Samsung Electronics Canada Inc., Customer Service 55 Standish Court Mississauga, Ontario L5R 4B2 Canada Samsung Electronics America, Inc. 85 Challenger Road Ridgefield Park, NJ 07660-2112 LCD TV user manual © 2010 Samsung Electronics Co., Ltd. BN68...
... Customer Care Center CANADA 1-800-SAMSUNG (726-7864) Web Site www.samsung.com U.S.A 1-800-SAMSUNG (726-7864) www.samsung.com Address Samsung Electronics Canada Inc., Customer Service 55 Standish Court Mississauga, Ontario L5R 4B2 Canada Samsung Electronics America, Inc. 85 Challenger Road Ridgefield Park, NJ 07660-2112 LCD TV user manual © 2010 Samsung Electronics Co., Ltd. BN68...
User Manual (user Manual) (ver.1.0) (English)
Page 2
... exchanges or replacements, accessories, options, upgrades, or consumables. walls) to do so may result in the selection and duration of a SAMSUNG Authorized Service Center, please call toll-free: - Installation with the product or an injury due to no more information on no expanded ...Original Limited Warranty Statement and a dated Bill of Sale as described above described warranty repairs must be performed by Samsung Electronics only. xx If you contact the TV because some parts can cause ghosting of the total television viewing per week. The above for , in fire...
... exchanges or replacements, accessories, options, upgrades, or consumables. walls) to do so may result in the selection and duration of a SAMSUNG Authorized Service Center, please call toll-free: - Installation with the product or an injury due to no more information on no expanded ...Original Limited Warranty Statement and a dated Bill of Sale as described above described warranty repairs must be performed by Samsung Electronics only. xx If you contact the TV because some parts can cause ghosting of the total television viewing per week. The above for , in fire...
User Manual (user Manual) (ver.1.0) (English)
Page 3
... Up AllShare 48 Other Information yy Installing the Wall Mount 50 yy Assembling the Cables 51 yy Anti-theft Kensington Lock 51 yy Securing the TV to open the relevant submenu within the OSD (on screen display). Step by pressing the TOOLS button on the remote control. ENGLISH 3 English... Picture Menu 16 Changing the Preset Picture Mode 16 Adjusting Picture Settings 16 Economical Solutions 16 Changing the Picture Options 17 Setting up the TV with your PC 19 yy Sound Menu 19 Changing the Preset Sound Mode 19 Adjusting sound settings 19 Sound Settings 20 yy Setup Menu...
... Up AllShare 48 Other Information yy Installing the Wall Mount 50 yy Assembling the Cables 51 yy Anti-theft Kensington Lock 51 yy Securing the TV to open the relevant submenu within the OSD (on screen display). Step by pressing the TOOLS button on the remote control. ENGLISH 3 English... Picture Menu 16 Changing the Preset Picture Mode 16 Adjusting Picture Settings 16 Economical Solutions 16 Changing the Picture Options 17 Setting up the TV with your PC 19 yy Sound Menu 19 Changing the Preset Sound Mode 19 Adjusting sound settings 19 Sound Settings 20 yy Setup Menu...
User Manual (user Manual) (ver.1.0) (English)
Page 4
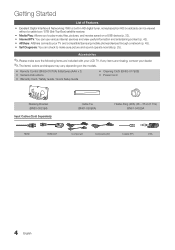
...are missing, contact your dealer. ✎✎The items' colors and shapes may vary depending on a USB device (p. 33). yy Internet@TV: You can check to play music files, pictures, and movies saved on the models. yy Self Diagnosis: You can use various internet ...services and view useful information and entertaining content (p. 43). If any items are included with your TV and compatible Samsung mobile phones/devices through a network (p. 48). yy AllShare: AllShare connects your LCD TV. Getting Started List of Features yy Excellent Digital Interface & Networking: With a built-in HD ...
...are missing, contact your dealer. ✎✎The items' colors and shapes may vary depending on a USB device (p. 33). yy Internet@TV: You can check to play music files, pictures, and movies saved on the models. yy Self Diagnosis: You can use various internet ...services and view useful information and entertaining content (p. 43). If any items are included with your TV and compatible Samsung mobile phones/devices through a network (p. 48). yy AllShare: AllShare connects your LCD TV. Getting Started List of Features yy Excellent Digital Interface & Networking: With a built-in HD ...
User Manual (user Manual) (ver.1.0) (English)
Page 5
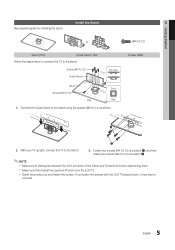
... See separate guide for installing the stand. xx Make sure that at position 2. ✎✎NOTE xx Make sure to the stand. With your TV upright, connect the TV to one side. 5 English Screws (M4 X L12) Guide Stand Top view Stand Screws (M4 X L12) Rear Front Rear 1. Fasten two screws (M4 X L12... 1, and then fasten two screws (M4 X L12) at least two persons lift and move the LCD TV. Install the Stand or (M4 X L12) Stand (1EA) Guide Stand (1EA) Follow the steps below to connect the TV to distinguish between the front and back of the Stand and Guide Stand when assembling them...
... See separate guide for installing the stand. xx Make sure that at position 2. ✎✎NOTE xx Make sure to the stand. With your TV upright, connect the TV to one side. 5 English Screws (M4 X L12) Guide Stand Top view Stand Screws (M4 X L12) Rear Front Rear 1. Fasten two screws (M4 X L12... 1, and then fasten two screws (M4 X L12) at least two persons lift and move the LCD TV. Install the Stand or (M4 X L12) Stand (1EA) Guide Stand (1EA) Follow the steps below to connect the TV to distinguish between the front and back of the Stand and Guide Stand when assembling them...
User Manual (user Manual) (ver.1.0) (English)
Page 6
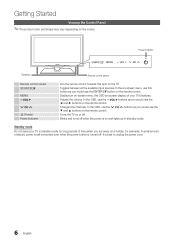
... SOURCEE MENU y z P (Power) Power Indicator Aim the remote control towards this button as you are away on or off . Adjusts the volume. Turns the TV on a holiday, for example). Blinks and turns off when the power is on and lights up in standby mode for long periods of time (when... In the OSD, use the y buttons as you would use the ▼ and ▲ buttons on the remote control. Standby mode Do not leave your TV's features. Getting Started Viewing the Control Panel ✎✎The product color and shape may vary depending on the remote control. In the OSD, use...
... SOURCEE MENU y z P (Power) Power Indicator Aim the remote control towards this button as you are away on or off . Adjusts the volume. Turns the TV on a holiday, for example). Blinks and turns off when the power is on and lights up in standby mode for long periods of time (when... In the OSD, use the y buttons as you would use the ▼ and ▲ buttons on the remote control. Standby mode Do not leave your TV's features. Getting Started Viewing the Control Panel ✎✎The product color and shape may vary depending on the remote control. In the OSD, use...

User Manual (user Manual) (ver.1.0) (English)
Page 7
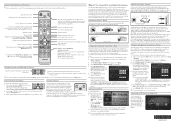
...43). 01 Getting Started Viewing the Remote Control ✎✎This is a special remote control for Samsung recorders that have the Anynet+ feature) MUTE PRE-CH CONTENT CH LIST MENU @TV INTERNET TOOLS INFO RETURN EXIT A B CD MEDIA.P HOTAPPS MTS FAV.CH P.SIZE CC Returns .... Displays the channel list on the menu. MEDIA.P: Displays Media Play (p. 33). Displays the Content View, which includes Channel List, Internet@TV, Media Play, and AllShare. Returns to select additional channels (digital) being broadcasted by the same station. Exits the menu. CC: Controls ...
...43). 01 Getting Started Viewing the Remote Control ✎✎This is a special remote control for Samsung recorders that have the Anynet+ feature) MUTE PRE-CH CONTENT CH LIST MENU @TV INTERNET TOOLS INFO RETURN EXIT A B CD MEDIA.P HOTAPPS MTS FAV.CH P.SIZE CC Returns .... Displays the channel list on the menu. MEDIA.P: Displays Media Play (p. 33). Displays the Content View, which includes Channel List, Internet@TV, Media Play, and AllShare. Returns to select additional channels (digital) being broadcasted by the same station. Exits the menu. CC: Controls ...
User Manual (user Manual) (ver.1.0) (English)
Page 8
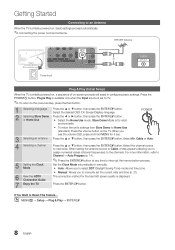
...ENTERE button. Select the channel source to select DST (Daylight Saving Time) mode and time zone. Getting Started Connecting to an Antenna When the TV is for retail POWER P IN environments. yy Auto: Allows you to Home Use (standard): Press the volume button on -screen prompts will ...you to memorize. VHF/UHF Antenna Antenna Cable (Not Supplied) or Cable ANT OUT Power Input Plug & Play (Initial Setup) When the TV is displayed. 7 Enjoy the TV. Press the ENTERE button. Plug & Play is available only when the Input source is set the current date and time (p. 21). 6 ...
...ENTERE button. Select the channel source to select DST (Daylight Saving Time) mode and time zone. Getting Started Connecting to an Antenna When the TV is for retail POWER P IN environments. yy Auto: Allows you to Home Use (standard): Press the volume button on -screen prompts will ...you to memorize. VHF/UHF Antenna Antenna Cable (Not Supplied) or Cable ANT OUT Power Input Plug & Play (Initial Setup) When the TV is displayed. 7 Enjoy the TV. Press the ENTERE button. Plug & Play is available only when the Input source is set the current date and time (p. 21). 6 ...
User Manual (user Manual) (ver.1.0) (English)
Page 9
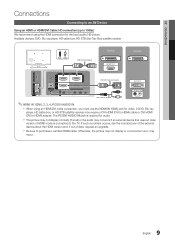
... to purchase a certified HDMI cable. 02 Connections Connections Connecting to an AV Device Using an HDMI or HDMI/DVI Cable: HD connection (up to the TV. xx Be sure to HDMI) adapter. A DVD, Blu-ray player, HD cable box, or HD STB satellite receiver may occur. 9 English Available devices: DVD, Blu...
... to purchase a certified HDMI cable. 02 Connections Connections Connecting to an AV Device Using an HDMI or HDMI/DVI Cable: HD connection (up to the TV. xx Be sure to HDMI) adapter. A DVD, Blu-ray player, HD cable box, or HD STB satellite receiver may occur. 9 English Available devices: DVD, Blu...

User Manual (user Manual) (ver.1.0) (English)
Page 11
...cable box / STB (Set-Top-Box) satellite receiver and is connected to the DIGITAL AUDIO OUT (OPTICAL) jack, decrease the volume of the TV and adjust the volume level with the amplifier's volume control. 11 English xx When connecting, use the appropriate connector (sold separately). 02 Connections Connecting...-L Amplifier / DVD home theater Digital Audio System OPTICAL ✎✎DIGITAL AUDIO OUT (OPTICAL) xx When a digital audio system is connected to the TV via HDMI, only 2 CH audio will send 5.1 CH sound to the audio input jacks on , you want to hear 5.1 CH audio, connect the...
...cable box / STB (Set-Top-Box) satellite receiver and is connected to the DIGITAL AUDIO OUT (OPTICAL) jack, decrease the volume of the TV and adjust the volume level with the amplifier's volume control. 11 English xx When connecting, use the appropriate connector (sold separately). 02 Connections Connecting...-L Amplifier / DVD home theater Digital Audio System OPTICAL ✎✎DIGITAL AUDIO OUT (OPTICAL) xx When a digital audio system is connected to the TV via HDMI, only 2 CH audio will send 5.1 CH sound to the audio input jacks on , you want to hear 5.1 CH audio, connect the...
User Manual (user Manual) (ver.1.0) (English)
Page 13
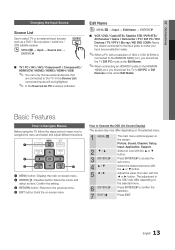
...; Edit Name → ENTERE ■■ VCR / DVD / Cable STB / Satellite STB / PVR STB / AV Receiver / Game / Camcorder / PC / DVI PC / DVI Devices / TV / IPTV / Blu-ray / HD DVD / DMA: Name the device connected to the input jacks to Operate the OSD (On Screen Display) The access step may...Exits the on the screen: Picture, Sound, Channel, Setup, Input, Application, Support. Basic Features PRE-CH MUTE How to Navigate Menus Before using the TV, follow the steps below to learn how to DVI Devices mode under Edit Name. Select the desired submenu with the ▲ or ▼ button. ...
...; Edit Name → ENTERE ■■ VCR / DVD / Cable STB / Satellite STB / PVR STB / AV Receiver / Game / Camcorder / PC / DVI PC / DVI Devices / TV / IPTV / Blu-ray / HD DVD / DMA: Name the device connected to the input jacks to Operate the OSD (On Screen Display) The access step may...Exits the on the screen: Picture, Sound, Channel, Setup, Input, Application, Support. Basic Features PRE-CH MUTE How to Navigate Menus Before using the TV, follow the steps below to learn how to DVI Devices mode under Edit Name. Select the desired submenu with the ▲ or ▼ button. ...
User Manual (user Manual) (ver.1.0) (English)
Page 14
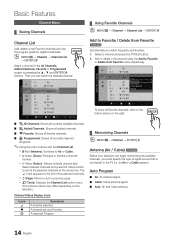
... the available channels, you can watch frequently as a Favorite. xx k (Page): Move to the left of signal source that is connected to the TV (i.e. The c mark appears to next or previous page. Basic Features Channel Menu ¦¦ Seeing Channels ¦¦ Using Favorite Channels OO MENUm...the situation.) Channel Status Display Icons Icons c * ) Operations A channel selected. Add to Favorite Timer Viewing Channel Name Edit Select All * TV #10 * TV #11 Air Antenna B Zoom Select k Page T Tools To show all the selected channels at the same time. A reserved Program.
... the available channels, you can watch frequently as a Favorite. xx k (Page): Move to the left of signal source that is connected to the TV (i.e. The c mark appears to next or previous page. Basic Features Channel Menu ¦¦ Seeing Channels ¦¦ Using Favorite Channels OO MENUm...the situation.) Channel Status Display Icons Icons c * ) Operations A channel selected. Add to Favorite Timer Viewing Channel Name Edit Select All * TV #10 * TV #11 Air Antenna B Zoom Select k Page T Tools To show all the selected channels at the same time. A reserved Program.
User Manual (user Manual) (ver.1.0) (English)
Page 15
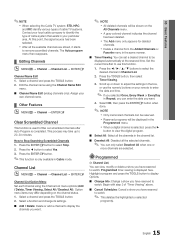
... to select the desired channel in your particular area. 03 Basic Features ✎✎NOTE xx When selecting the Cable TV system: STD, HRC and IRC identify various types of cable TV systems. Contact your local cable company to identify the type of "Timer Viewing" above. ■■ Cancel Schedules: Cancel a show...
... to select the desired channel in your particular area. 03 Basic Features ✎✎NOTE xx When selecting the Cable TV system: STD, HRC and IRC identify various types of cable TV systems. Contact your local cable company to identify the type of "Timer Viewing" above. ■■ Cancel Schedules: Cancel a show...
User Manual (user Manual) (ver.1.0) (English)
Page 16
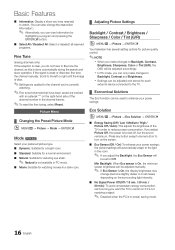
... Press any button except volume button to turn on the right-hand side of the TV in the room. ✎✎ If you adjust the Backlight, the Eco Sensor will be set how long you... want the TV to remain on if it's not receiving a signal. ✎✎ Disabled when the PC is ...during the search and store operation. xx Settings can be adjusted and stored for each external device connected to the TV. ¦¦ Economical Solutions The Eco Function can be used to enhance your power savings; Basic Features ■...
... Press any button except volume button to turn on the right-hand side of the TV in the room. ✎✎ If you adjust the Backlight, the Eco Sensor will be set how long you... want the TV to remain on if it's not receiving a signal. ✎✎ Disabled when the PC is ...during the search and store operation. xx Settings can be adjusted and stored for each external device connected to the TV. ¦¦ Economical Solutions The Eco Function can be used to enhance your power savings; Basic Features ■...
User Manual (user Manual) (ver.1.0) (English)
Page 17
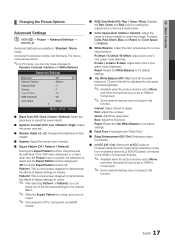
... is set to Movie and when the external input is not output. ✎✎ Only enabled in Standard / Movie mode) Compared to previous models, new Samsung TVs have a more natural picture. R-Gain / G-Gain / B-Gain: Adjust each color's (red, green, blue) darkness. BD/DVD player) connected to the HDMI or Component IN jacks...
... is set to Movie and when the external input is not output. ✎✎ Only enabled in Standard / Movie mode) Compared to previous models, new Samsung TVs have a more natural picture. R-Gain / G-Gain / B-Gain: Adjust each color's (red, green, blue) darkness. BD/DVD player) connected to the HDMI or Component IN jacks...
User Manual (user Manual) (ver.1.0) (English)
Page 18
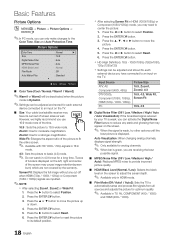
...:9, 4:3 ■■ Digital Noise Filter (Off / Low / Medium / High / Auto / Auto Visualization): If the broadcast signal received by your TV is green, you have its default position. Auto Visualization: When changing analog channels, displays signal strength. ✎✎ Only available for optimum quality. &#...9998;✎NOTE xx After selecting Zoom1, Zoom2 or Wide Fit: 1. Zoom1: Use for a stronger magnification. xx After selecting Screen Fit in TV, AV, COMPONENT (480i / 1080i) and HDMI (480i / 1080i). 18 English However, we highly recommend you can be adjusted and stored...
...:9, 4:3 ■■ Digital Noise Filter (Off / Low / Medium / High / Auto / Auto Visualization): If the broadcast signal received by your TV is green, you have its default position. Auto Visualization: When changing analog channels, displays signal strength. ✎✎ Only available for optimum quality. &#...9998;✎NOTE xx After selecting Zoom1, Zoom2 or Wide Fit: 1. Zoom1: Use for a stronger magnification. xx After selecting Screen Fit in TV, AV, COMPONENT (480i / 1080i) and HDMI (480i / 1080i). 18 English However, we highly recommend you can be adjusted and stored...


