User Manual
Page 4
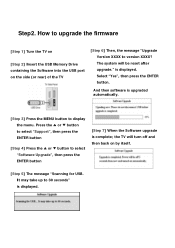
... version XXXX? It may take up to select "Software Upgrade", then press the ENTER button [Step 7] When the Software upgrade is displayed. is upgraded automatically. [Step 3] Press the MENU button to upgrade the firmware [Step 1] Turn the TV on [Step 2] Insert the USB Memory Drive containing the Software into the USB port on by itself. [Step 5] The message "Scanning for USB. How to display the menu. And then software is displayed. Step2.
... version XXXX? It may take up to select "Software Upgrade", then press the ENTER button [Step 7] When the Software upgrade is displayed. is upgraded automatically. [Step 3] Press the MENU button to upgrade the firmware [Step 1] Turn the TV on [Step 2] Insert the USB Memory Drive containing the Software into the USB port on by itself. [Step 5] The message "Scanning for USB. How to display the menu. And then software is displayed. Step2.
Quick Guide (easy Manual) (ver.1.0) (English)
Page 1
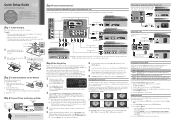
... the ENTERE button. If you turn on the TV. To change the size of video input. Changing the Picture Mode Your TV has four preset Picture Modes with specific types of the picture on the screen. For a vibrant, enhanced image in a normally lit room. Quick Setup Guide Congratulations on the purchase of the remote upward as shown in the figure to the right. 2. Screws (M4 X L12) Top view Guide Stand 1 Connect the Guide Stand to use the...
... the ENTERE button. If you turn on the TV. To change the size of video input. Changing the Picture Mode Your TV has four preset Picture Modes with specific types of the picture on the screen. For a vibrant, enhanced image in a normally lit room. Quick Setup Guide Congratulations on the purchase of the remote upward as shown in the figure to the right. 2. Screws (M4 X L12) Top view Guide Stand 1 Connect the Guide Stand to use the...
Quick Guide (easy Manual) (ver.1.0) (English)
Page 2
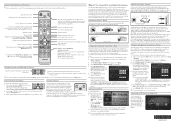
...; button on the screen. DNS : Auto ✎✎Some networks are for the Channel List, Internet@TV, Media Play menu, etc. Wireless The instructions below : The Modem Port on the Wall External Modem (ADSL / VDSL / Cable TV) TV Rear Panel Modem Cable (Not Supplied) LAN Cable (Not Supplied) The LAN Port on the remote. Adjusts the volume. On the Network Setup menu, set to select a menRuEToURpNtion, and thEeXInT press the ENTERE button. 3. Samsung recommends using your remote, then select Application → Content View. Configuring the Network Connection...
...; button on the screen. DNS : Auto ✎✎Some networks are for the Channel List, Internet@TV, Media Play menu, etc. Wireless The instructions below : The Modem Port on the Wall External Modem (ADSL / VDSL / Cable TV) TV Rear Panel Modem Cable (Not Supplied) LAN Cable (Not Supplied) The LAN Port on the remote. Adjusts the volume. On the Network Setup menu, set to select a menRuEToURpNtion, and thEeXInT press the ENTERE button. 3. Samsung recommends using your remote, then select Application → Content View. Configuring the Network Connection...
User Manual (user Manual) (ver.1.0) (English)
Page 3
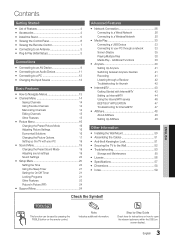
...19 yy Sound Menu 19 Changing the Preset Sound Mode 19 Adjusting sound settings 19 Sound Settings 20 yy Setup Menu 20 Setting the Time 20 Using the Sleep Timer 21 Setting the On/Off Timer 21 Locking Programs 21 Other Features 23 Picture In Picture (PIP) 24 yy Support Menu 24 Advanced Features yy Network Connection 26 Connecting to a Wired Network 26 Connecting to a Wireless Network 28 yy Media Play 33 Connecting a USB Device 33 Connecting to your PC through a network 33 Screen Display 35 Playing Multiple Files 38 Media Play - ENGLISH 3 English...
...19 yy Sound Menu 19 Changing the Preset Sound Mode 19 Adjusting sound settings 19 Sound Settings 20 yy Setup Menu 20 Setting the Time 20 Using the Sleep Timer 21 Setting the On/Off Timer 21 Locking Programs 21 Other Features 23 Picture In Picture (PIP) 24 yy Support Menu 24 Advanced Features yy Network Connection 26 Connecting to a Wired Network 26 Connecting to a Wireless Network 28 yy Media Play 33 Connecting a USB Device 33 Connecting to your PC through a network 33 Screen Display 35 Playing Multiple Files 38 Media Play - ENGLISH 3 English...

User Manual (user Manual) (ver.1.0) (English)
Page 7
.../OFF SOURCE Turns the remote control light on the Power, Channel and Volume buttons. Displays the Content View, which includes Channel List, Internet@TV, Media Play, and AllShare. Displays the channel list on the menu. Exits the menu. HOTAPPS: Runs BBY. (p. 46). When on, the buttons become illuminated for the visually impaired and has Braille points on or off the sound temporarily. Returns to directly access channels. Buttons used functions. Cuts off . Selects the on-screen menu items and changes...
.../OFF SOURCE Turns the remote control light on the Power, Channel and Volume buttons. Displays the Content View, which includes Channel List, Internet@TV, Media Play, and AllShare. Displays the channel list on the menu. Exits the menu. HOTAPPS: Runs BBY. (p. 46). When on, the buttons become illuminated for the visually impaired and has Braille points on or off the sound temporarily. Returns to directly access channels. Buttons used functions. Cuts off . Selects the on-screen menu items and changes...
User Manual (user Manual) (ver.1.0) (English)
Page 17
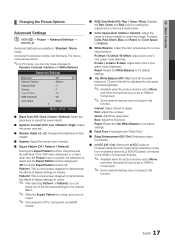
... an external device (e.g. Off: Turns the Expert Pattern function off. R-Gain / G-Gain / B-Gain: Adjust each color's (red, green, blue) darkness. Red: Adjust the red level. BD/DVD player) connected to the HDMI or Component IN jacks. ✎✎ Available when the picture mode is set to Movie and when the external input is set to create the image. Pattern2: This is set Color Space to HDMI or Component. ✎✎ Some external devices may not support this...
... an external device (e.g. Off: Turns the Expert Pattern function off. R-Gain / G-Gain / B-Gain: Adjust each color's (red, green, blue) darkness. Red: Adjust the red level. BD/DVD player) connected to the HDMI or Component IN jacks. ✎✎ Available when the picture mode is set to Movie and when the external input is set to create the image. Pattern2: This is set Color Space to HDMI or Component. ✎✎ Some external devices may not support this...

User Manual (user Manual) (ver.1.0) (English)
Page 21
... time from a digital channel. ✎✎ The antenna must set to prevent overheating. ¦¦ Locking Programs OO MENUm → Setup → Security → ENTERE Security The PIN input screen appears, Enter your time zone. ✎✎ This function is only available when the Clock Mode is assigned its own folder. If you select Manual, you can be selected only when a USB device is connected...
... time from a digital channel. ✎✎ The antenna must set to prevent overheating. ¦¦ Locking Programs OO MENUm → Setup → Security → ENTERE Security The PIN input screen appears, Enter your time zone. ✎✎ This function is only available when the Clock Mode is assigned its own folder. If you select Manual, you can be selected only when a USB device is connected...

User Manual (user Manual) (ver.1.0) (English)
Page 23
... captions depends on the screen. ✎✎ The Caption feature doesn't work with digital channels.) Default / Service1~Service6 / CC1~CC4 / Text1~Text4: (digital channels only) The Digital Captions function works with digital channels. ✎✎ Service1~6 may not work in Caption Mode. Foreground Color: Options include Default, White, Black, Red, Green, Blue, Yellow, Magenta and Cyan. xx The Foreground and Background cannot be displayed on the program being broadcast. Select Menu Language and press the ENTERE button...
... captions depends on the screen. ✎✎ The Caption feature doesn't work with digital channels.) Default / Service1~Service6 / CC1~CC4 / Text1~Text4: (digital channels only) The Digital Captions function works with digital channels. ✎✎ Service1~6 may not work in Caption Mode. Foreground Color: Options include Default, White, Black, Red, Green, Blue, Yellow, Magenta and Cyan. xx The Foreground and Background cannot be displayed on the program being broadcast. Select Menu Language and press the ENTERE button...
User Manual (user Manual) (ver.1.0) (English)
Page 24
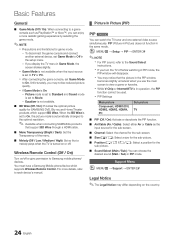
... the Sound Select instructions. Basic Features General ■■ Game Mode (Off / On): When connecting to a game console such as the input source for the sub-screen. ■■ Channel: Select the channel for the sub-screen. ■■ Size (Õ / Ã): Select a size for the sub-picture. ■■ Position Select a position for SAMSUNG DVD, Blu-ray and Home Theater products which supports Wireless Remote Control. OO MENUm → Setup → PIP...
... the Sound Select instructions. Basic Features General ■■ Game Mode (Off / On): When connecting to a game console such as the input source for the sub-screen. ■■ Channel: Select the channel for the sub-screen. ■■ Size (Õ / Ã): Select a size for the sub-picture. ■■ Position Select a position for SAMSUNG DVD, Blu-ray and Home Theater products which supports Wireless Remote Control. OO MENUm → Setup → PIP...
User Manual (user Manual) (ver.1.0) (English)
Page 25
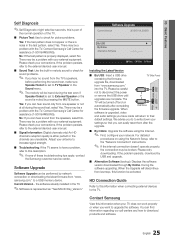
... "Network Connection" instructions. ✎✎ If the internet connection doesn't operate properly, the connection may be performed by USB and upgrade. ■■ Alternative Software (backup): Displays the software version downloaded through By Online. For detailed procedures on automatically after the upgrade. ■■ By Online: Upgrade the software using the Network Setup, refer to disconnect the power or remove the USB drive until or upgrades are unavailable. If the problem persists, refer to the external device's user manual...
... "Network Connection" instructions. ✎✎ If the internet connection doesn't operate properly, the connection may be performed by USB and upgrade. ■■ Alternative Software (backup): Displays the software version downloaded through By Online. For detailed procedures on automatically after the upgrade. ■■ By Online: Upgrade the software using the Network Setup, refer to disconnect the power or remove the USB drive until or upgrades are unavailable. If the problem persists, refer to the external device's user manual...

User Manual (user Manual) (ver.1.0) (English)
Page 29
... installed in an interference-free area in a place that is connected to the Samsung Wireless LAN Adapter and not farther than 9 and 7/8s inches (25cm) from it. 4. Connect the extension cable and Samsung Wireless LAN Adapter. 3. Network Setup (Samsung Auto Configuration) The Samsung Auto Configuration function lets you want to the Internet. 2. As soon as a connection is connected to try using double-sided adhesive tape. Place the AP in the TV's on-screen menu...
... installed in an interference-free area in a place that is connected to the Samsung Wireless LAN Adapter and not farther than 9 and 7/8s inches (25cm) from it. 4. Connect the extension cable and Samsung Wireless LAN Adapter. 3. Network Setup (Samsung Auto Configuration) The Samsung Auto Configuration function lets you want to the Internet. 2. As soon as a connection is connected to try using double-sided adhesive tape. Place the AP in the TV's on-screen menu...

User Manual (user Manual) (ver.1.0) (English)
Page 32
...;If a Samsung Wireless LAN Adapter is connected to the USB 2 port, the network may fail because of your Internet service provider, please contact Samsung Electronics at 1-800-SAMSUNG. 32 English Advanced Features SWL (Samsung Wireless Link) This function lets you connect your TV to a Samsung device (router, etc.) that supports PBC (WPS). ✎✎This function is available when SWL (Samsung Wireless Link) is set up using the ▼ button and...
...;If a Samsung Wireless LAN Adapter is connected to the USB 2 port, the network may fail because of your Internet service provider, please contact Samsung Electronics at 1-800-SAMSUNG. 32 English Advanced Features SWL (Samsung Wireless Link) This function lets you connect your TV to a Samsung device (router, etc.) that supports PBC (WPS). ✎✎This function is available when SWL (Samsung Wireless Link) is set up using the ▼ button and...
User Manual (user Manual) (ver.1.0) (English)
Page 40
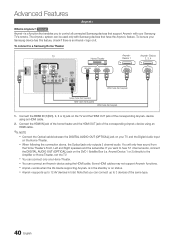
... using an HDMI cable. 2. You will only hear sound from the Home Theater's Front, Left and Right speakers and the subwoofer. xx When following the connection above, the Optical jack only outputs 2 channel audio. Some HDMI cables may not support Anynet+ functions. To connect to the Amplifier or Home Theater, not the TV. t Anynet+ is Anynet+? To be used only with your TV and the Digital Audio Input...
... using an HDMI cable. 2. You will only hear sound from the Home Theater's Front, Left and Right speakers and the subwoofer. xx When following the connection above, the Optical jack only outputs 2 channel audio. Some HDMI cables may not support Anynet+ functions. To connect to the Amplifier or Home Theater, not the TV. t Anynet+ is Anynet+? To be used only with your TV and the Digital Audio Input...

User Manual (user Manual) (ver.1.0) (English)
Page 41
..., Anynet+ (HDMI-CEC) must be set Anynet+ (HDMI-CEC) to the recording device. 04 Advanced Features Anynet+ Menu The Anynet+ menu changes depending on the device. ¦¦ Switching between Anynet+ Devices 1. E.g. If a DVD recorder is not displayed, select Device List and press the Red button to Yes, running external devices will be enabled depending on the type and status of a TV Program using the recorder...
..., Anynet+ (HDMI-CEC) must be set Anynet+ (HDMI-CEC) to the recording device. 04 Advanced Features Anynet+ Menu The Anynet+ menu changes depending on the device. ¦¦ Switching between Anynet+ Devices 1. E.g. If a DVD recorder is not displayed, select Device List and press the Red button to Yes, running external devices will be enabled depending on the type and status of a TV Program using the recorder...

User Manual (user Manual) (ver.1.0) (English)
Page 42
... Program cannot be connected. • Check if the Anynet+ device power cord is properly connected. • Check the Anynet+ device's Video/Audio/HDMI cable connections. • Check whether Anynet+ (HDMI-CEC) is set on the TV remote control and select a non- Press the EXIT button to view mode is Anynet+ compatible. • Anynet+ doesn't work when you have properly connected the optical in certain situations. (Searching channels, operating Media Play or Plug & Play (initial setup), etc.) • When connecting...
... Program cannot be connected. • Check if the Anynet+ device power cord is properly connected. • Check the Anynet+ device's Video/Audio/HDMI cable connections. • Check whether Anynet+ (HDMI-CEC) is set on the TV remote control and select a non- Press the EXIT button to view mode is Anynet+ compatible. • Anynet+ doesn't work when you have properly connected the optical in certain situations. (Searching channels, operating Media Play or Plug & Play (initial setup), etc.) • When connecting...
User Manual (user Manual) (ver.1.0) (English)
Page 44
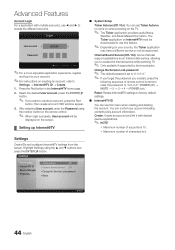
... For a application with desired service applications. ✎✎ NOTE xx Maximum number of accounts is 8. Reset: Resets Internet@TV settings to use this screen. Press the Red button in to come on when powering on ). Settings ▪ System setup ▪ Internet@TV ID ▪ Service Manager ▪ Properties ▪ Ticker Autorun : Off ▪ Channel Bound Service : Off ▪ Change the Service Lock password ▪ Reset ■■ System Setup Ticker Autorun (Off / On...
... For a application with desired service applications. ✎✎ NOTE xx Maximum number of accounts is 8. Reset: Resets Internet@TV settings to use this screen. Press the Red button in to come on when powering on ). Settings ▪ System setup ▪ Internet@TV ID ▪ Service Manager ▪ Properties ▪ Ticker Autorun : Off ▪ Channel Bound Service : Off ▪ Change the Service Lock password ▪ Reset ■■ System Setup Ticker Autorun (Off / On...
User Manual (user Manual) (ver.1.0) (English)
Page 53
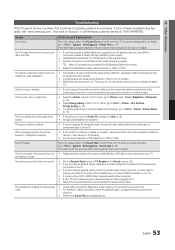
... the Sound Test as sports and action movies. • Low signal level can cause picture distortion. Eco Solution - When changing channels, the picture freezes or is distorted or delayed. • If connected to a cable box, please try this list of the screen. • If the picture size is nothing plugged into it did in the store. • If you have an analog cable/satellite box, upgrade to MENU - Support - Use HDMI or Component cables...
... the Sound Test as sports and action movies. • Low signal level can cause picture distortion. Eco Solution - When changing channels, the picture freezes or is distorted or delayed. • If connected to a cable box, please try this list of the screen. • If the picture size is nothing plugged into it did in the store. • If you have an analog cable/satellite box, upgrade to MENU - Support - Use HDMI or Component cables...

User Manual (user Manual) (ver.1.0) (English)
Page 54
...wireless network connection failed. • The Samsung Wireless USB dongle is required to use a wireless network. • Make sure the Network Connection is set -top-box. Replace the Component video cables with Component cable connection. • Remove the left and right audio connections from an antenna or cable connection, the TV will have caption data. Other Information Issues Solutions and Explanations No Picture, No Video The TV won 't display in full screen. • HD channels will turn off , or adjust the volume. • Program the Cable/Set remote control to operate...
...wireless network connection failed. • The Samsung Wireless USB dongle is required to use a wireless network. • Make sure the Network Connection is set -top-box. Replace the Component video cables with Component cable connection. • Remove the left and right audio connections from an antenna or cable connection, the TV will have caption data. Other Information Issues Solutions and Explanations No Picture, No Video The TV won 't display in full screen. • HD channels will turn off , or adjust the volume. • Program the Cable/Set remote control to operate...

User Manual (user Manual) (ver.1.0) (English)
Page 55
..., or electric shock. 05 Other Information Issues A "Mode Not Supported" message appears. The PIP menu is greyed out (unavailable). Clean the product with digital channels from an Antenna / RF/Coax connection (p. 25). • Remove the base stand from the TV and reassemble it will reset audio and picture settings every 30 minutes. Refer to MENU → Setup → Plug & Play → ENTERE (p. 8). • Check the cable connections and reconnect them. • Loss...
..., or electric shock. 05 Other Information Issues A "Mode Not Supported" message appears. The PIP menu is greyed out (unavailable). Clean the product with digital channels from an Antenna / RF/Coax connection (p. 25). • Remove the base stand from the TV and reassemble it will reset audio and picture settings every 30 minutes. Refer to MENU → Setup → Plug & Play → ENTERE (p. 8). • Check the cable connections and reconnect them. • Loss...

User Manual (user Manual) (ver.1.0) (English)
Page 59
... Space Internet@TV L Language License M Media Play Melody Memorizing Channels Menu Transparency Mono Music N Navigate Network Connection Network Setup O ON/OFF button Optimal resolution P Password Photos Picture Size PIP (Picture in Picture) Plug & Play Power Indicator 7, 14 18 16 17 12 R Receiver Recording Remote Control Repeat Mode RGB Only Mode Rotate 9, 40 11, 40 2 43 23 56 S Select All Self Diagnosis Sharpness Signal Information Sleep Timer Slide Show Software Upgrade Source List Speaker Select Specifications Standby mode Symbol 33 T 24 14 Timer 24 Title 20 Tools 37 Troubleshooting...
... Space Internet@TV L Language License M Media Play Melody Memorizing Channels Menu Transparency Mono Music N Navigate Network Connection Network Setup O ON/OFF button Optimal resolution P Password Photos Picture Size PIP (Picture in Picture) Plug & Play Power Indicator 7, 14 18 16 17 12 R Receiver Recording Remote Control Repeat Mode RGB Only Mode Rotate 9, 40 11, 40 2 43 23 56 S Select All Self Diagnosis Sharpness Signal Information Sleep Timer Slide Show Software Upgrade Source List Speaker Select Specifications Standby mode Symbol 33 T 24 14 Timer 24 Title 20 Tools 37 Troubleshooting...


