Samsung LN32D403E2D Research
View Results Below
Free Samsung LN32D403E2D manuals!
Problems with Samsung LN32D403E2D?
Ask a Question
Free Samsung LN32D403E2D manuals!
Problems with Samsung LN32D403E2D?
Ask a Question
Related Manual Pages


Related Videos

tv lcd samsung mod. LN32D403E2D
Duration: 1:55
Total Views: 2,605
Duration: 1:55
Total Views: 2,605
Similar Questions

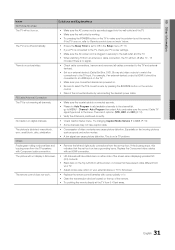
What Is The Firmware Update Of The Ln32d403e2dxzp???
My tv is old and I want to be able to connect it to WiFi.
My tv is old and I want to be able to connect it to WiFi.
(Posted by kamila130902 6 years ago)

Manual Please. How To Set Up Directv On This?
just got this tv and dont know how to hook it up to directv and my blue-ray.
just got this tv and dont know how to hook it up to directv and my blue-ray.
(Posted by whittlegirls 6 years ago)

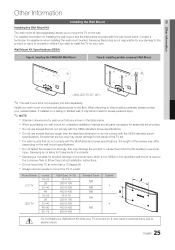
How Do I Remove The Base So I Can Mount The Tv On The Wall
(Posted by scottraugh 8 years ago)

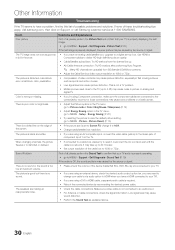
Power Problem.
Nearby lightning strike, no power..... main power board replaced, no change. Next step?
Nearby lightning strike, no power..... main power board replaced, no change. Next step?
(Posted by msayre435 9 years ago)

Firmware Update
I got a Samsung TV Model LN32D403E2d it had firmware Samsung 2010 analogic TV by mistake I updated m...
I got a Samsung TV Model LN32D403E2d it had firmware Samsung 2010 analogic TV by mistake I updated m...
(Posted by albertomartinezsardinas 11 years ago)