User Manual
Page 2
... the user manual for a Class B digital device, pursuant to Part 15 of symbols which can radiate radio frequency energy and, if not installed and used to connect the unit to protective earth (ground). Dispose unwanted electronics through an approved recycler. Keep these instructions. 2. NO USER-SERVICEABLE PARTS ARE INSIDE. Class II product : This symbol indicates that interference will not occur in accordance with a power cord, the...
... the user manual for a Class B digital device, pursuant to Part 15 of symbols which can radiate radio frequency energy and, if not installed and used to connect the unit to protective earth (ground). Dispose unwanted electronics through an approved recycler. Keep these instructions. 2. NO USER-SERVICEABLE PARTS ARE INSIDE. Class II product : This symbol indicates that interference will not occur in accordance with a power cord, the...
User Manual
Page 4
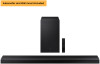
... Panel of the Soundbar 7 03 Using the Soundbar Remote Control 9 Inserting Batteries before using the Remote Control (AA batteries X 2 9 How to Use the Remote Control 9 Using the Hidden Buttons (Buttons with more than one function 11 Output specifications for the different sound effect modes 11 Adjusting the Soundbar volume with a TV remote control 12 04 Connecting the Soundbar 13 Connecting the power and units 13 ‒ Manually connecting the Subwoofer 13 ‒ LED Indicator Lights on Amazon Product (Works with...
... Panel of the Soundbar 7 03 Using the Soundbar Remote Control 9 Inserting Batteries before using the Remote Control (AA batteries X 2 9 How to Use the Remote Control 9 Using the Hidden Buttons (Buttons with more than one function 11 Output specifications for the different sound effect modes 11 Adjusting the Soundbar volume with a TV remote control 12 04 Connecting the Soundbar 13 Connecting the power and units 13 ‒ Manually connecting the Subwoofer 13 ‒ LED Indicator Lights on Amazon Product (Works with...
User Manual
Page 5
12 Installing the Soundbar above a TV Stand 28 Component ...28 13 Software Update 29 Auto Update ...29 USB Update...29 Initialization ...29 14 Troubleshooting 30 15 License 31 16 Open Source License Notice 31 17 Important Notes About Service 31 18 Specifications and Guide 32 Specifications ...32 ENG - 5
12 Installing the Soundbar above a TV Stand 28 Component ...28 13 Software Update 29 Auto Update ...29 USB Update...29 Initialization ...29 14 Troubleshooting 30 15 License 31 16 Open Source License Notice 31 17 Important Notes About Service 31 18 Specifications and Guide 32 Specifications ...32 ENG - 5
User Manual
Page 7
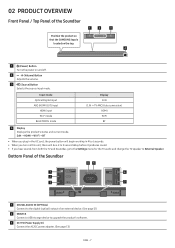
... power button will begin working in 4 to 6 seconds. • When you turn on and off. 2 (Volume) Button Adjusts the volume. 3 (Source) Button Selects the source input mode. Input mode Optical Digital input ARC (HDMI OUT) input HDMI input Wi-Fi mode BLUETOOTH mode Display D.IN D.IN → TV ARC (Auto conversion) HDMI WIFI BT 4 Display Displays the product's status and current mode. Bottom Panel of the Soundbar NETWORNKETWIODRSKET ID SET D(OIGPTITIACLAD(LAOI)UGPDTITIIACOLAILNA)UDIO IN SERVICESERVICE NETWORK ID SET DC D(1O9IGPVTITDIACCLA1LA9)UVDIO IN SERVICE DC 19V HDMI...
... power button will begin working in 4 to 6 seconds. • When you turn on and off. 2 (Volume) Button Adjusts the volume. 3 (Source) Button Selects the source input mode. Input mode Optical Digital input ARC (HDMI OUT) input HDMI input Wi-Fi mode BLUETOOTH mode Display D.IN D.IN → TV ARC (Auto conversion) HDMI WIFI BT 4 Display Displays the product's status and current mode. Bottom Panel of the Soundbar NETWORNKETWIODRSKET ID SET D(OIGPTITIACLAD(LAOI)UGPDTITIIACOLAILNA)UDIO IN SERVICESERVICE NETWORK ID SET DC D(1O9IGPVTITDIACCLA1LA9)UVDIO IN SERVICE DC 19V HDMI...
User Manual
Page 10
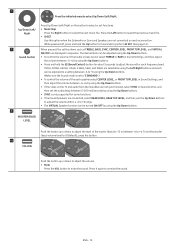
....) 8 When pressed, the setting items such as TREBLE, BASS, SYNC, CENTER LEVEL, FRONT TOP LEVEL, and VIRTUAL ON/OFF are not connected or need reconnection. Sound Control • To control the volume of the woofer (bass) to -12 or between -6 to select the previous music file. • ID SET Use this option when the Subwoofer or Surround Speakers are displayed in Sound Settings, and then adjust the volume between -6~+6 by using the Up/Down buttons. Up/Down/Left...
....) 8 When pressed, the setting items such as TREBLE, BASS, SYNC, CENTER LEVEL, FRONT TOP LEVEL, and VIRTUAL ON/OFF are not connected or need reconnection. Sound Control • To control the volume of the woofer (bass) to -12 or between -6 to select the previous music file. • ID SET Use this option when the Subwoofer or Surround Speakers are displayed in Sound Settings, and then adjust the volume between -6~+6 by using the Up/Down buttons. Up/Down/Left...
User Manual
Page 11
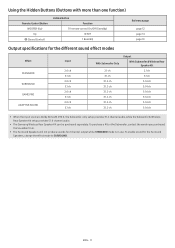
... • When the input source is in use. ENG - 11 Using the Hidden Buttons (Buttons with more than one function) Remote Control Button WOOFER (Up) Up (Sound Control) Hidden Button Function TV remote control On/Off (Standby) ID SET 7 Band EQ Reference page page 12 page 14 page 10 Output specifications for 2 channel output while STANDARD mode is Dolby Atmos®, DTS:X, the Subwoofer-only setup provides 3.1.2 channel audio, while the Subwoofer & Wireless Rear Speaker Kit setup provides 5.1.4 channel audio. • The Samsung Wireless Rear Speaker Kit can be purchased...
... • When the input source is in use. ENG - 11 Using the Hidden Buttons (Buttons with more than one function) Remote Control Button WOOFER (Up) Up (Sound Control) Hidden Button Function TV remote control On/Off (Standby) ID SET 7 Band EQ Reference page page 12 page 14 page 10 Output specifications for 2 channel output while STANDARD mode is Dolby Atmos®, DTS:X, the Subwoofer-only setup provides 3.1.2 channel audio, while the Subwoofer & Wireless Rear Speaker Kit setup provides 5.1.4 channel audio. • The Samsung Wireless Rear Speaker Kit can be purchased...
User Manual
Page 13
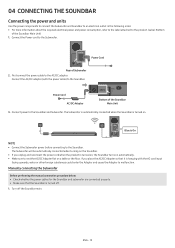
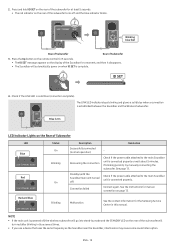
... (OPTICAL) SERVICE DC 19V SERVICE NETWORK ID SET HDMI OUT (TV-ARC) DC 19V Bottom of Subwoofer 2. DIGITAL AUDIO IN (OPTICAL) HDNMETI WINORD(OKIGPTITIACIDLASLAE)UTDIO IN HDM NOTE • Connect the Subwoofer power before connecting to the AC/DC adapter. HDMI TO TV (eARC/ARC Manually connecting the Subwoofer Before performing the manual connection procedure below: • Check whether the power cables for the Soundbar and subwoofer are connected properly. • Make sure that it is turned...
... (OPTICAL) SERVICE DC 19V SERVICE NETWORK ID SET HDMI OUT (TV-ARC) DC 19V Bottom of Subwoofer 2. DIGITAL AUDIO IN (OPTICAL) HDNMETI WINORD(OKIGPTITIACIDLASLAE)UTDIO IN HDM NOTE • Connect the Subwoofer power before connecting to the AC/DC adapter. HDMI TO TV (eARC/ARC Manually connecting the Subwoofer Before performing the manual connection procedure below: • Check whether the power cables for the Soundbar and subwoofer are connected properly. • Make sure that it is turned...
User Manual
Page 14
... the Up button on the display of Subwoofer 3. Check if the power cable attached to the main Soundbar unit is complete. NOTE • If the main unit is On LED Indicator Lights on the Rear of Subwoofer LED Blue Red Status On Blinking On Description Successfully connected (normal operation) Recovering the connection Standby (with the Soundbar main unit turned off , the wireless subwoofer will turn red after blinking in this manual. Check...
... the Up button on the display of Subwoofer 3. Check if the power cable attached to the main Soundbar unit is complete. NOTE • If the main unit is On LED Indicator Lights on the Rear of Subwoofer LED Blue Red Status On Blinking On Description Successfully connected (normal operation) Recovering the connection Standby (with the Soundbar main unit turned off , the wireless subwoofer will turn red after blinking in this manual. Check...
User Manual
Page 16
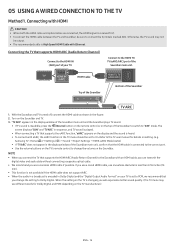
... optical cable are connected, the HDMI signal is connected to the correct port. • Use the volume buttons on the Soundbar. HDMI Cable Top of the Soundbar Bottom of the Soundbar main unit, confirm that supports HDMI ARC (Audio Return Channel) Connect to the TV user manual for Dolby Digital and PCM depending on the Soundbar and TV. 3. Refer to the HDMI IN (ARC) port of your TV is inaudible, press the (Source) button on the remote control...
... optical cable are connected, the HDMI signal is connected to the correct port. • Use the volume buttons on the Soundbar. HDMI Cable Top of the Soundbar Bottom of the Soundbar main unit, confirm that supports HDMI ARC (Audio Return Channel) Connect to the TV user manual for Dolby Digital and PCM depending on the Soundbar and TV. 3. Refer to the HDMI IN (ARC) port of your TV is inaudible, press the (Source) button on the remote control...
User Manual
Page 17
... models. TV menu HDMI Cable OR D.IN Optical Cable (not supplied) • TV menu example: TV + [AV]Soundbar series name [HDMI] NOTE • It can operate according to output sound through two devices for optimum surround effect. To enable this function, turn on the Adaptive Sound+ mode on your Samsung TV menu. (Home ( ) → Settings ( ) → General → Intelligent Mode Settings → Adaptive Sound+) NOTE • The sound mode on your TV. • This function works when the Soundbar connects...
... models. TV menu HDMI Cable OR D.IN Optical Cable (not supplied) • TV menu example: TV + [AV]Soundbar series name [HDMI] NOTE • It can operate according to output sound through two devices for optimum surround effect. To enable this function, turn on the Adaptive Sound+ mode on your Samsung TV menu. (Home ( ) → Settings ( ) → General → Intelligent Mode Settings → Adaptive Sound+) NOTE • The sound mode on your TV. • This function works when the Soundbar connects...
User Manual
Page 18
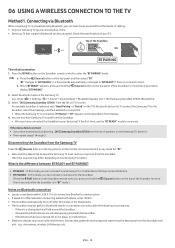
... radio interference. Home ( ) → Settings ( ) → Sound → Sound Output → Bluetooth Speaker List → [AV] Samsung Soundbar Q700A (Bluetooth)) 3. "BT" changes to "BT PAIRING" in "BT" mode.) Notes on Bluetooth connection • Locate a new device within 3.28 ft (1 m) to connect via Bluetooth When a Samsung TV is a strong electrical field around the Soundbar. ‒ If several Bluetooth devices are simultaneously paired with "Need Pairing" or "Paired" on TV's screen. Check the specifications...
... radio interference. Home ( ) → Settings ( ) → Sound → Sound Output → Bluetooth Speaker List → [AV] Samsung Soundbar Q700A (Bluetooth)) 3. "BT" changes to "BT PAIRING" in "BT" mode.) Notes on Bluetooth connection • Locate a new device within 3.28 ft (1 m) to connect via Bluetooth When a Samsung TV is a strong electrical field around the Soundbar. ‒ If several Bluetooth devices are simultaneously paired with "Need Pairing" or "Paired" on TV's screen. Check the specifications...
User Manual
Page 19
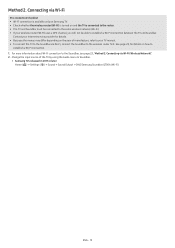
... by using the Audio menu to the Soundbar, see page 23, "Method 2. Contact your Internet service provider for details on and the TV is turned on how to the wireless router first. Change the input source of manufacture, refer to your wireless router (Wi-Fi) uses a DFS channel, you will not be connected to the same wireless network (Wi-Fi). • If your TV manual. • To connect...
... by using the Audio menu to the Soundbar, see page 23, "Method 2. Contact your Internet service provider for details on and the TV is turned on how to the wireless router first. Change the input source of manufacture, refer to your wireless router (Wi-Fi) uses a DFS channel, you will not be connected to the same wireless network (Wi-Fi). • If your TV manual. • To connect...

User Manual
Page 20
...) port on the remote control, and then select "HDMI". 5. Use an HDMI cable to Off. • Make sure that the content supports Dolby Atmos®. NOTE • When you use Dolby Atmos®: If the input source is Dolby Atmos®, 3.1.2 channels are outputted. • When Dolby Atmos® is activated, "DOLBY ATMOS" appears in the front display. • Configuring Dolby Atmos® on your BD player or other device Open the audio output options on a Samsung...
...) port on the remote control, and then select "HDMI". 5. Use an HDMI cable to Off. • Make sure that the content supports Dolby Atmos®. NOTE • When you use Dolby Atmos®: If the input source is Dolby Atmos®, 3.1.2 channels are outputted. • When Dolby Atmos® is activated, "DOLBY ATMOS" appears in the front display. • Configuring Dolby Atmos® on your BD player or other device Open the audio output options on a Samsung...
User Manual
Page 21
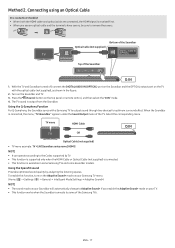
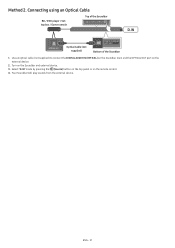
Use an optical cable (not supplied) to connect the DIGITAL AUDIO IN (OPTICAL) on the Soundbar main and the OPTICAL OUT port on the remote control. 4. Select "D.IN" mode by pressing the (Source) button on the top panel or on the external device. 2. Turn on the Soundbar and external device. 3. Your Soundbar will play sounds from the external device. ENG - 21 Connecting using an Optical Cable BD / DVD player / Settop box / Game console Top of the Soundbar D.IN Optical Cable (not supplied) Bottom of the Soundbar 1. Method 2.
Use an optical cable (not supplied) to connect the DIGITAL AUDIO IN (OPTICAL) on the Soundbar main and the OPTICAL OUT port on the remote control. 4. Select "D.IN" mode by pressing the (Source) button on the top panel or on the external device. 2. Turn on the Soundbar and external device. 3. Your Soundbar will play sounds from the external device. ENG - 21 Connecting using an Optical Cable BD / DVD player / Settop box / Game console Top of the Soundbar D.IN Optical Cable (not supplied) Bottom of the Soundbar 1. Method 2.

User Manual
Page 22
... the Soundbar remote control or press and hold the (Source) button on the top panel of the Soundbar 5 Sec OR PAIR Mobile device BT PAIRING SOMUONDDE The initial connection • When connecting to a new Bluetooth device, make sure the device is turned off, not in the front display. 3. Devices that supports only the HF (Hands Free) function. • When connecting the Soundbar to a Bluetooth device, place...
... the Soundbar remote control or press and hold the (Source) button on the top panel of the Soundbar 5 Sec OR PAIR Mobile device BT PAIRING SOMUONDDE The initial connection • When connecting to a new Bluetooth device, make sure the device is turned off, not in the front display. 3. Devices that supports only the HF (Hands Free) function. • When connecting the Soundbar to a Bluetooth device, place...
User Manual
Page 24
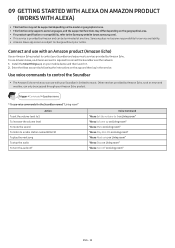
... and then log in the service. Samsung does not assume responsibility for the Soundbar named "Living room" Action To set the volume level to 5 To increase the volume level To mute the sound To listen to a radio station named KISS FM To play the next song To stop the audio To turn the audio off Voice Command "Alexa Set the volume to connect the Soundbar over the network. 1.
... and then log in the service. Samsung does not assume responsibility for the Soundbar named "Living room" Action To set the volume level to 5 To increase the volume level To mute the sound To listen to a radio station named KISS FM To play the next song To stop the audio To turn the audio off Voice Command "Alexa Set the volume to connect the Soundbar over the network. 1.
User Manual
Page 25
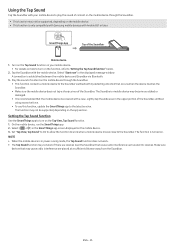
... function connects a mobile device to the Soundbar via Bluetooth. 3. Set "Tap View, Tap Sound" to On to allow the function to work if there are placed at a sufficient distance away from the Soundbar. Select "Start now" in power-saving mode, the Tap Sound function does not work. • The Tap Sound function may not be supported, depending on the mobile device. • This function is only compatible with Samsung mobile...
... function connects a mobile device to the Soundbar via Bluetooth. 3. Set "Tap View, Tap Sound" to On to allow the function to work if there are placed at a sufficient distance away from the Soundbar. Select "Start now" in power-saving mode, the Tap Sound function does not work. • The Tap Sound function may not be supported, depending on the mobile device. • This function is only compatible with Samsung mobile...
User Manual
Page 29
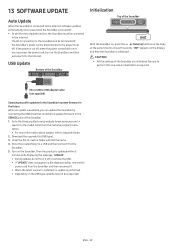
... on the display window, remove the power cord from the customer support menu option. • For more information about update, refer to the Internet. The Wi-Fi connection to the SERVICE port of the Soundbar are initialized. Be sure to the Internet. USB Update Bottom of the Soundbar NETWORK ID SET DIGITAL AUDIO IN (OPTICAL) SERVICE DC 19V HDMI DIGITAL AUDIO INHDMITOTV (eARC/ARC) (OPTICAL) HDMI IN SERVICE DC 19V HDMI OUT (TV-ARC) Micro USB to USB adapter Cable (not...
... on the display window, remove the power cord from the customer support menu option. • For more information about update, refer to the Internet. The Wi-Fi connection to the SERVICE port of the Soundbar are initialized. Be sure to the Internet. USB Update Bottom of the Soundbar NETWORK ID SET DIGITAL AUDIO IN (OPTICAL) SERVICE DC 19V HDMI DIGITAL AUDIO INHDMITOTV (eARC/ARC) (OPTICAL) HDMI IN SERVICE DC 19V HDMI OUT (TV-ARC) Micro USB to USB adapter Cable (not...
User Manual
Page 30
...; Settings ( ) → Sound → Expert Settings → HDMI-eARC Mode (Auto)) There is no signal, the Soundbar automatically turns off the TV. Remove the cable and connect again. • Remove the power cord completely, reconnect, and turn on metal furniture, the sound may be low. Directly connect the Soundbar. • HDMI-CEC may not be set -top box, game machine, etc.). Change the TV's audio output to PCM or Dolby Digital. (For a Samsung TV: Home ( ) → Settings ( ) → Sound → Expert Settings → Digital Output Audio Format...
...; Settings ( ) → Sound → Expert Settings → HDMI-eARC Mode (Auto)) There is no signal, the Soundbar automatically turns off the TV. Remove the cable and connect again. • Remove the power cord completely, reconnect, and turn on metal furniture, the sound may be low. Directly connect the Soundbar. • HDMI-CEC may not be set -top box, game machine, etc.). Change the TV's audio output to PCM or Dolby Digital. (For a Samsung TV: Home ( ) → Settings ( ) → Sound → Expert Settings → Digital Output Audio Format...
User Manual
Page 33
... request as proof of the purchaser. Replacement parts and products assume the remaining original warranty, or ninety (90) days, whichever is valid only on an "AS IS" basis. Non-SAMSUNG manufacturers, suppliers, publishers, and service providers may also have other signal transmission and delivery problems. SAMSUNG does not warrant uninterrupted or error-free operation of purchase, and is longer. altered...
... request as proof of the purchaser. Replacement parts and products assume the remaining original warranty, or ninety (90) days, whichever is valid only on an "AS IS" basis. Non-SAMSUNG manufacturers, suppliers, publishers, and service providers may also have other signal transmission and delivery problems. SAMSUNG does not warrant uninterrupted or error-free operation of purchase, and is longer. altered...


