

Quick Guide (easy Manual) (ver.1.0) (English)
Page 3
... NOT REMOVE REAR COVER. Note to CATV system installer : This reminder is provided to call the CATV system installer's attention to Section 820~40 of cable entry as practical CLASS 1 LASER PRODUCT This Compact Disc player is present inside this appliance to important operating and maintenance instructions accompanying the unit. This symbol alerts you to rain or moisture. NO USER SERVICEABLE PARTS...
... NOT REMOVE REAR COVER. Note to CATV system installer : This reminder is provided to call the CATV system installer's attention to Section 820~40 of cable entry as practical CLASS 1 LASER PRODUCT This Compact Disc player is present inside this appliance to important operating and maintenance instructions accompanying the unit. This symbol alerts you to rain or moisture. NO USER SERVICEABLE PARTS...
Quick Guide (easy Manual) (ver.1.0) (English)
Page 5
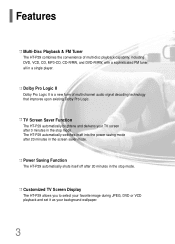
... playback and set it as your TV screen after 20 minutes in the stop mode. Dolby Pro Logic II Dolby Pro Logic II is a new form of multi-disc playback capability, including DVD, VCD, CD, MP3-CD, CD-R/RW, and DVD-R/RW, with a sophisticated FM tuner, all in the screen saver mode. Features Multi-Disc Playback & FM Tuner The HT-P29 combines the convenience of multi-channel audio signal decoding technology...
... playback and set it as your TV screen after 20 minutes in the stop mode. Dolby Pro Logic II Dolby Pro Logic II is a new form of multi-disc playback capability, including DVD, VCD, CD, MP3-CD, CD-R/RW, and DVD-R/RW, with a sophisticated FM tuner, all in the screen saver mode. Features Multi-Disc Playback & FM Tuner The HT-P29 combines the convenience of multi-channel audio signal decoding technology...
Quick Guide (easy Manual) (ver.1.0) (English)
Page 6
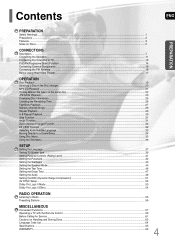
... Using Disc Menu...35 Using the Title Menu...36 SETUP Setting the Language...37 Setting TV Screen type...39 Setting Parental Controls (Rating Level) ...41 Setting the Password...42 Setting the Wallpaper ...43 Setting the Speaker Mode ...45 Setting the Test Tone ...46 Setting the Delay Time ...47 Setting the Audio ...49 Setting the DRC (Dynamic Range Compression) ...51 AV SYNC Setup...52 Dolby Pro Logic II Mode ...53 Dolby Pro Logic II Effect ...54 RADIO OPERATION Listening to Radio ...55 Presetting Stations...56 MISCELLANEOUS Convenient Functions...
... Using Disc Menu...35 Using the Title Menu...36 SETUP Setting the Language...37 Setting TV Screen type...39 Setting Parental Controls (Rating Level) ...41 Setting the Password...42 Setting the Wallpaper ...43 Setting the Speaker Mode ...45 Setting the Test Tone ...46 Setting the Delay Time ...47 Setting the Audio ...49 Setting the DRC (Dynamic Range Compression) ...51 AV SYNC Setup...52 Dolby Pro Logic II Mode ...53 Dolby Pro Logic II Effect ...54 RADIO OPERATION Listening to Radio ...55 Presetting Stations...56 MISCELLANEOUS Convenient Functions...
Quick Guide (easy Manual) (ver.1.0) (English)
Page 7
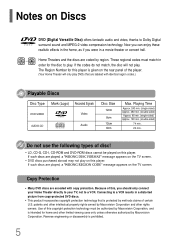
... identical region codes.) Playable Discs Disc Type Mark (Logo) Recorded Signals DVD-VIDEO AUDIO-CD V I D E O COMPACT DIGITAL AUDIO Video Audio Disc Size 12cm 8cm 12cm 8cm Max. Because of this, you were in a movie theater or concert hall. 1 ~6 Home Theaters and the discs are played, a "WRONG REGION CODE" message appears on this player. Reverse engineering or disassembly is protected by region. These regional codes must be played on the TV screen. The Region Number for the disc to Dolby Digital surround sound and MPEG-2 video...
... identical region codes.) Playable Discs Disc Type Mark (Logo) Recorded Signals DVD-VIDEO AUDIO-CD V I D E O COMPACT DIGITAL AUDIO Video Audio Disc Size 12cm 8cm 12cm 8cm Max. Because of this, you were in a movie theater or concert hall. 1 ~6 Home Theaters and the discs are played, a "WRONG REGION CODE" message appears on this player. Reverse engineering or disassembly is protected by region. These regional codes must be played on the TV screen. The Region Number for the disc to Dolby Digital surround sound and MPEG-2 video...

Quick Guide (easy Manual) (ver.1.0) (English)
Page 11
... AUDIO button Cursor/Enter button MUTE button TEST TONE button SOUND EDIT button SLEEP button EZ VIEW, NTSC/PAL button SLIDE MODE button TUNER MEMORY, P.SCAN button TV indicator TV, DVD POWER button MODE button DISC SKIP button Number(0~9) buttons REMAIN button PL II MODE button VOLUME button MENU button SUB TITLE button RETURN button STEP button ZOOM button LOGO COPY button REPEAT button MO/ST, SLOW button DIGEST button 9 DVD RECEIVER indicator OPEN/CLOSE button TV/VIDEO, DIMMER button DVD button TUNER button AUX button CANCEL button Play/Pause button Stop button Tuning Preset...
... AUDIO button Cursor/Enter button MUTE button TEST TONE button SOUND EDIT button SLEEP button EZ VIEW, NTSC/PAL button SLIDE MODE button TUNER MEMORY, P.SCAN button TV indicator TV, DVD POWER button MODE button DISC SKIP button Number(0~9) buttons REMAIN button PL II MODE button VOLUME button MENU button SUB TITLE button RETURN button STEP button ZOOM button LOGO COPY button REPEAT button MO/ST, SLOW button DIGEST button 9 DVD RECEIVER indicator OPEN/CLOSE button TV/VIDEO, DIMMER button DVD button TUNER button AUX button CANCEL button Play/Pause button Stop button Tuning Preset...
Quick Guide (easy Manual) (ver.1.0) (English)
Page 19
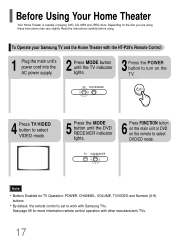
... Samsung TV and the Home Theater with the HT-P29's Remote Control 1 Plug the main unit's power cord into the AC power supply. 2 Press MODE button until the DVD RECEIVER indicator lights. 6 Press FUNCTION button on the main unit or DVD on the remote to select DVD/CD mode. TV DVD RECEIVER 4 Press TV/VIDEO button to select VIDEO mode. 5 Press the MODE button until the TV indicator lights. 3 Press the POWER button to turn on the disc you are using . TV DVD RECEIVER Note • Buttons Enabled for more information remote control operation...
... Samsung TV and the Home Theater with the HT-P29's Remote Control 1 Plug the main unit's power cord into the AC power supply. 2 Press MODE button until the DVD RECEIVER indicator lights. 6 Press FUNCTION button on the main unit or DVD on the remote to select DVD/CD mode. TV DVD RECEIVER 4 Press TV/VIDEO button to select VIDEO mode. 5 Press the MODE button until the TV indicator lights. 3 Press the POWER button to turn on the disc you are using . TV DVD RECEIVER Note • Buttons Enabled for more information remote control operation...
Quick Guide (easy Manual) (ver.1.0) (English)
Page 42
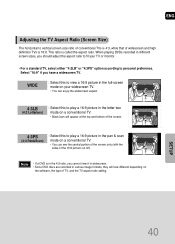
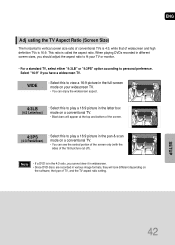
...Select "16:9" if you should adjust the aspect ratio to fit your widescreen TV. • You can see the central portion of the screen only (with the sides of the 16:9 picture cut off). When playing DVDs recorded in the pan & scan mode on the software, the type of TV, and the TV aspect ratio setting. SETUP... • If a DVD is in the 4:3 ratio, you cannot view it in widescreen. • Since DVD discs are recorded in various image formats, they will appear at the top and bottom of the screen. 4:3PS (4:3 Pan&Scan) : Select this to play a 16:9 picture in different screen sizes, you have ...
...Select "16:9" if you should adjust the aspect ratio to fit your widescreen TV. • You can see the central portion of the screen only (with the sides of the 16:9 picture cut off). When playing DVDs recorded in the pan & scan mode on the software, the type of TV, and the TV aspect ratio setting. SETUP... • If a DVD is in the 4:3 ratio, you cannot view it in widescreen. • Since DVD discs are recorded in various image formats, they will appear at the top and bottom of the screen. 4:3PS (4:3 Pan&Scan) : Select this to play a 16:9 picture in different screen sizes, you have ...

Quick Guide (easy Manual) (ver.1.0) (English)
Page 44
... rating level password, do the following: • While the player is in the no disc mode, hold the main unit's the display and all settings will erase all stored settings. button for the Parental (rating level) setting. 1 Press MENU button. 2 Press Cursor button to move to the default values. • Press the POWER button. Do not use this unless necessary. SETUP 3 Press Cursor button to move to "7890" by default. Using the RESET function...
... rating level password, do the following: • While the player is in the no disc mode, hold the main unit's the display and all settings will erase all stored settings. button for the Parental (rating level) setting. 1 Press MENU button. 2 Press Cursor button to move to the default values. • Press the POWER button. Do not use this unless necessary. SETUP 3 Press Cursor button to move to "7890" by default. Using the RESET function...

Quick Guide (easy Manual) (ver.1.0) (English)
Page 47
... SMALL. Note • Depending on PRO LOGIC and STEREO settings, the speaker mode may vary (see page 53). 45 Press Cursor , , 4 , buttons to move to 'Audio' and then press ENTER button. 3 In the Speaker Setup, press the ENTER button again. Setting the Speaker Mode Signal outputs and frequency responses from the speakers will automatically be adjusted according to your speaker configuration and whether certain speakers are connected. NONE : Select this when using the speakers.
... SMALL. Note • Depending on PRO LOGIC and STEREO settings, the speaker mode may vary (see page 53). 45 Press Cursor , , 4 , buttons to move to 'Audio' and then press ENTER button. 3 In the Speaker Setup, press the ENTER button again. Setting the Speaker Mode Signal outputs and frequency responses from the speakers will automatically be adjusted according to your speaker configuration and whether certain speakers are connected. NONE : Select this when using the speakers.

Quick Guide (easy Manual) (ver.1.0) (English)
Page 61
... down POWER, use the TV POWER, VOLUME, CHANNEL, and Numeric buttons (0~9). • The remote control may not be possible. • If you do not set the remote control with the remote control 1 Press the MODE button to turn on a Samsung TV by default. Note • You can use the number buttons to determine which code works. If the TV turns off . • If there is complete. TV DVD RECEIVER 2 Press POWER button to make the TV indicator on the remote control flash...
... down POWER, use the TV POWER, VOLUME, CHANNEL, and Numeric buttons (0~9). • The remote control may not be possible. • If you do not set the remote control with the remote control 1 Press the MODE button to turn on a Samsung TV by default. Note • You can use the number buttons to determine which code works. If the TV turns off . • If there is complete. TV DVD RECEIVER 2 Press POWER button to make the TV indicator on the remote control flash...
Quick Guide (easy Manual) (ver.1.0) (English)
Page 63
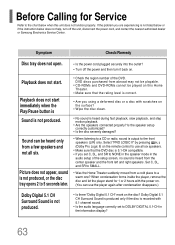
... the speaker mode in the information display? 61 If the problem you set to use the player again after condensation disappears.) Dolby Digital 5.1 CH Surround Sound is heard from the center speaker and the front left and right speakers. Sound can use all six. Dolby Digital 5.1 CH Surround Sound is produced only if the disc is not listed below or if the instruction below when this Home Theater. • Make sure that the DVD disc is 5.1-CH compatible...
... the speaker mode in the information display? 61 If the problem you set to use the player again after condensation disappears.) Dolby Digital 5.1 CH Surround Sound is heard from the center speaker and the front left and right speakers. Sound can use all six. Dolby Digital 5.1 CH Surround Sound is produced only if the disc is not listed below or if the instruction below when this Home Theater. • Make sure that the DVD disc is 5.1-CH compatible...
Quick Guide (easy Manual) (ver.1.0) (English)
Page 64
... the main unit for Using the RESET function will not work for rating level has been forgotten. • Are you using a disc that does not contain menus? • You can be changed. Using the RESET function will return to the DVD disc jacket and then select the appropriate function. • Is the antenna connected properly? • If the antenna's input signal is weak, install an external FM antenna in 4:3 ratio only. angle...
... the main unit for Using the RESET function will not work for rating level has been forgotten. • Are you using a disc that does not contain menus? • You can be changed. Using the RESET function will return to the DVD disc jacket and then select the appropriate function. • Is the antenna connected properly? • If the antenna's input signal is weak, install an external FM antenna in 4:3 ratio only. angle...

User Manual (user Manual) (ver.1.0) (English)
Page 5
... table. The openings should be operated only from the wall outlet and disconnect the antenna or cable system. Never spill liquid of supply to protect it is provided or the manufacturer's instructions have been followed. Any mounting of the video product and to your home, consult your appliance dealer or local power company. POWER SOURCES This video product should use this video product near waterfor...
... table. The openings should be operated only from the wall outlet and disconnect the antenna or cable system. Never spill liquid of supply to protect it is provided or the manufacturer's instructions have been followed. Any mounting of the video product and to your home, consult your appliance dealer or local power company. POWER SOURCES This video product should use this video product near waterfor...
User Manual (user Manual) (ver.1.0) (English)
Page 6
... of any service or repairs to this video product from the wall outlet and refer servicing to grounding electrodes, and requirements for service. ATTACHMENTS Do not use attachments not recommended by the video product manufacturer as the original part. REPLACEMENT PARTS When replacement parts are required, be sure the service technician has used replacement parts specified by the operating instructions as contact with a polarized alternating current line plug (a plug having the...
... of any service or repairs to this video product from the wall outlet and refer servicing to grounding electrodes, and requirements for service. ATTACHMENTS Do not use attachments not recommended by the video product manufacturer as the original part. REPLACEMENT PARTS When replacement parts are required, be sure the service technician has used replacement parts specified by the operating instructions as contact with a polarized alternating current line plug (a plug having the...

User Manual (user Manual) (ver.1.0) (English)
Page 8
... Using Disc Menu...37 Using the Title Menu...38 SETUP Setting the Language...39 Setting TV Screen type...41 Setting Parental Controls (Rating Level) ...43 Setting the Password...44 Setting the Wallpaper ...45 Setting the Speaker Mode ...47 Setting the Test Tone ...48 Setting the Delay Time ...49 Setting the Audio ...51 Setting the DRC (Dynamic Range Compression) ...53 AV SYNC Setup...54 Dolby Pro Logic II Mode ...55 Dolby Pro Logic II Effect ...56 RADIO OPERATION Listening to Radio ...57 Presetting Stations...58 MISCELLANEOUS Convenient Functions...
... Using Disc Menu...37 Using the Title Menu...38 SETUP Setting the Language...39 Setting TV Screen type...41 Setting Parental Controls (Rating Level) ...43 Setting the Password...44 Setting the Wallpaper ...45 Setting the Speaker Mode ...47 Setting the Test Tone ...48 Setting the Delay Time ...49 Setting the Audio ...51 Setting the DRC (Dynamic Range Compression) ...53 AV SYNC Setup...54 Dolby Pro Logic II Mode ...55 Dolby Pro Logic II Effect ...56 RADIO OPERATION Listening to Radio ...57 Presetting Stations...58 MISCELLANEOUS Convenient Functions...

User Manual (user Manual) (ver.1.0) (English)
Page 13
...button MUTE button TEST TONE button SOUND EDIT button SLEEP button EZ VIEW button SLIDE MODE button TUNER MEMORY, P.SCAN button Description -Remote Control- TV indicator TV, DVD POWER button MODE button DISC SKIP button Number(0~9) buttons REMAIN button PL II MODE button VOLUME button MENU button SUB TITLE button RETURN button STEP button ZOOM button LOGO COPY button REPEAT button MO/ST, SLOW button DIGEST button 11 DVD RECEIVER indicator OPEN/CLOSE button TV/VIDEO, DIMMER button DVD button TUNER button AUX button CANCEL button Play/Pause button Stop button Tuning Preset/CD Skip button...
...button MUTE button TEST TONE button SOUND EDIT button SLEEP button EZ VIEW button SLIDE MODE button TUNER MEMORY, P.SCAN button Description -Remote Control- TV indicator TV, DVD POWER button MODE button DISC SKIP button Number(0~9) buttons REMAIN button PL II MODE button VOLUME button MENU button SUB TITLE button RETURN button STEP button ZOOM button LOGO COPY button REPEAT button MO/ST, SLOW button DIGEST button 11 DVD RECEIVER indicator OPEN/CLOSE button TV/VIDEO, DIMMER button DVD button TUNER button AUX button CANCEL button Play/Pause button Stop button Tuning Preset/CD Skip button...
User Manual (user Manual) (ver.1.0) (English)
Page 44
... cannot view it in widescreen. • Since DVD discs are recorded in various image formats, they will appear at the top and bottom of the screen. 4:3PS (4:3 Pan&Scan) : Select this to view a 16:9 picture in the pan & scan mode on your TV or monitor. • For a standard TV, select either "4:3LB" or "4:3PS" option according to personal preference. SETUP 42...
... cannot view it in widescreen. • Since DVD discs are recorded in various image formats, they will appear at the top and bottom of the screen. 4:3PS (4:3 Pan&Scan) : Select this to view a 16:9 picture in the pan & scan mode on your TV or monitor. • For a standard TV, select either "4:3LB" or "4:3PS" option according to personal preference. SETUP 42...
User Manual (user Manual) (ver.1.0) (English)
Page 65
... experiencing is 5.1-CH compatible. • If you set to NONE in the speaker mode in the information display? 63 When condensation forms inside the player, remove the disc and let the player stand for Service Refer to the chart below when this Home Theater. • Make sure that the DVD disc is not listed below or if the instruction below does not help, turn it back on. Playback...
... experiencing is 5.1-CH compatible. • If you set to NONE in the speaker mode in the information display? 63 When condensation forms inside the player, remove the disc and let the player stand for Service Refer to the chart below when this Home Theater. • Make sure that the DVD disc is not listed below or if the instruction below does not help, turn it back on. Playback...

User Manual (user Manual) (ver.1.0) (English)
Page 66
... playable. Can't receive radio broadcast. • The main unit is not working normally. Using the RESET function will erase all settings will return to the DVD disc jacket and then select the appropriate function. • Is the antenna connected properly? • If the antenna's input signal is not working . (Example: The power goes out or strange noise is heard.) • The Home Theater is weak, install an external FM antenna in an...
... playable. Can't receive radio broadcast. • The main unit is not working normally. Using the RESET function will erase all settings will return to the DVD disc jacket and then select the appropriate function. • Is the antenna connected properly? • If the antenna's input signal is not working . (Example: The power goes out or strange noise is heard.) • The Home Theater is weak, install an external FM antenna in an...
User Manual (user Manual) (ver.1.0) (English)
Page 70
...-SAMSUNG hardware and software products, if provided, are set forth in the applicable end user license agreement. This limited warranty covers manufacturing defects in materials and workmanship encountered in normal, and except to the extent otherwise expressly provided for in this statement, noncommercial use of products, equipment, systems, utilities, services, parts, supplies, accessories, applications, installations, repairs, external wiring or connectors not...
...-SAMSUNG hardware and software products, if provided, are set forth in the applicable end user license agreement. This limited warranty covers manufacturing defects in materials and workmanship encountered in normal, and except to the extent otherwise expressly provided for in this statement, noncommercial use of products, equipment, systems, utilities, services, parts, supplies, accessories, applications, installations, repairs, external wiring or connectors not...


