
User Manual
Page 5
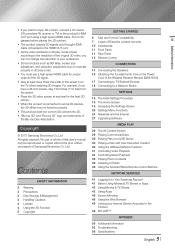
... this user's manual may not operate properly in 3D play 10 Accessories 11 Front Panel 11 Rear Panel 12 Remote Control CONNECTIONS 14 Connecting the Speakers 16 Attaching the Toroidal Ferrite Core to the Power Cord of the Wireless Receiver Module (SWA-6000) 17 Connecting to TV/External Devices 18 Connecting to a Network Router SETTINGS 19 The Initial Settings Procedure 19 The Home Screen 19 Accessing the Settings Screen 20 Settings Menu Functions 24 Networks and the Internet 27 Upgrading Software MEDIA PLAY...
... this user's manual may not operate properly in 3D play 10 Accessories 11 Front Panel 11 Rear Panel 12 Remote Control CONNECTIONS 14 Connecting the Speakers 16 Attaching the Toroidal Ferrite Core to the Power Cord of the Wireless Receiver Module (SWA-6000) 17 Connecting to TV/External Devices 18 Connecting to a Network Router SETTINGS 19 The Initial Settings Procedure 19 The Home Screen 19 Accessing the Settings Screen 20 Settings Menu Functions 24 Networks and the Internet 27 Upgrading Software MEDIA PLAY...
User Manual
Page 6
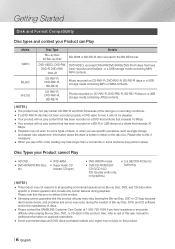
... you use specific operations, such as angle change and aspect ratio adjustment. Getting Started Disk and Format Compatibility Disc types and content your region may occur during playback. DVD-VIDEO, DVD-RW, DVD-VIDEO, recorded DVD+RW/DVD-RW(V)/DVD-R/+R discs that this product will play every disc bearing the Blu-ray Disc, DVD or CD logo because disc formats evolve, and problems and errors may not play a BD-J title, loading may take longer than a normal title or some Blu-ray Disc, DVD...
... you use specific operations, such as angle change and aspect ratio adjustment. Getting Started Disk and Format Compatibility Disc types and content your region may occur during playback. DVD-VIDEO, DVD-RW, DVD-VIDEO, recorded DVD+RW/DVD-RW(V)/DVD-R/+R discs that this product will play every disc bearing the Blu-ray Disc, DVD or CD logo because disc formats evolve, and problems and errors may not play a BD-J title, loading may take longer than a normal title or some Blu-ray Disc, DVD...
User Manual
Page 11
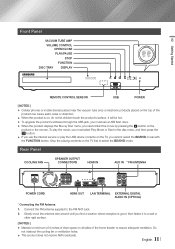
... home theater to ensure adequate ventilation. Rear Panel COOLING FAN SPEAKER OUTPUT CONNECTORS HDMI IN AUX IN * FM ANTENNA POWER SPEAKERS OUT FRONT R FRONT L SUBWOOFER CENTER IMPEDANCE : 3Ÿ LAN HDMI OUT 1 HDMI IN 2 AUX IN FM ANT L R OPTICAL DIGITAL AUDIO IN POWER CORD HDMI OUT LAN TERMINAL EXTERNAL DIGITAL AUDIO IN (OPTICAL) * Connecting the FM Antenna 1. Connect the FM antenna supplied to select the BD/DVD mode. It will be hot. \ To upgrade the product's software through the USB jack, you must select Play Movie or Start in the disc menu...
... home theater to ensure adequate ventilation. Rear Panel COOLING FAN SPEAKER OUTPUT CONNECTORS HDMI IN AUX IN * FM ANTENNA POWER SPEAKERS OUT FRONT R FRONT L SUBWOOFER CENTER IMPEDANCE : 3Ÿ LAN HDMI OUT 1 HDMI IN 2 AUX IN FM ANT L R OPTICAL DIGITAL AUDIO IN POWER CORD HDMI OUT LAN TERMINAL EXTERNAL DIGITAL AUDIO IN (OPTICAL) * Connecting the FM Antenna 1. Connect the FM antenna supplied to select the BD/DVD mode. It will be hot. \ To upgrade the product's software through the USB jack, you must select Play Movie or Start in the disc menu...
User Manual
Page 16
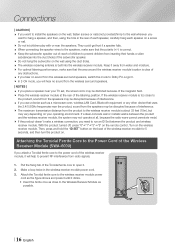
... mode, you will help to open it. 2. Attach the Toroidal ferrite core to the wireless receiver module power cord as the figure shows and press it until it away from radio signals. 1. Make a loop twice in the rear of the magnetic field. \ Place the wireless receiver module at all, because the radio wave cannot penetrate metal. \ If the product doesn't make sure that uses the 2.4/5.8GHz frequencies...
... mode, you will help to open it. 2. Attach the Toroidal ferrite core to the wireless receiver module power cord as the figure shows and press it until it away from radio signals. 1. Make a loop twice in the rear of the magnetic field. \ Place the wireless receiver module at all, because the radio wave cannot penetrate metal. \ If the product doesn't make sure that uses the 2.4/5.8GHz frequencies...

User Manual
Page 17
... input and output jacks. Using a digital optical cable (not supplied), connect the Optical Digital Audio In jack on the back of the TV. Each time you have set the product's remote control to operate your Cable Box/Satellite receiver, you must connect its video output directly to External Devices To select the correct mode for an external device, press the FUNCTION button. IN AUX HDMI1 HDMI2 FM BT Method 1 HDMI IN : Connecting to an External Component with an HDMI Cable Connect an HDMI cable from the HDMI...
... input and output jacks. Using a digital optical cable (not supplied), connect the Optical Digital Audio In jack on the back of the TV. Each time you have set the product's remote control to operate your Cable Box/Satellite receiver, you must connect its video output directly to External Devices To select the correct mode for an external device, press the FUNCTION button. IN AUX HDMI1 HDMI2 FM BT Method 1 HDMI IN : Connecting to an External Component with an HDMI Cable Connect an HDMI cable from the HDMI...
User Manual
Page 18
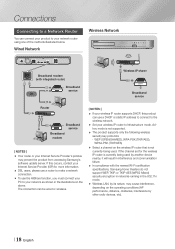
... connection can be wired or wireless. | NOTES | \ If your wireless IP router supports DHCP, this occurs, contact your Internet Service Provider (ISP) for the wireless IP router is currently being used by other radio devices, etc). | 18 English Wired Network Wireless Network POWER SPEAKERS OUT FRONT R FRONT L SUBWOOFER CENTER IMPEDANCE : 3Ÿ LAN HDMI OUT 1 HDMI IN 2 AUX IN FM ANT L R OPTICAL DIGITAL AUDIO IN Broadband modem (with the newest Wi-Fi certification specifications, Samsung home theaters do not support...
... connection can be wired or wireless. | NOTES | \ If your wireless IP router supports DHCP, this occurs, contact your Internet Service Provider (ISP) for the wireless IP router is currently being used by other radio devices, etc). | 18 English Wired Network Wireless Network POWER SPEAKERS OUT FRONT R FRONT L SUBWOOFER CENTER IMPEDANCE : 3Ÿ LAN HDMI OUT 1 HDMI IN 2 AUX IN FM ANT L R OPTICAL DIGITAL AUDIO IN Broadband modem (with the newest Wi-Fi certification specifications, Samsung home theaters do not support...
User Manual
Page 19
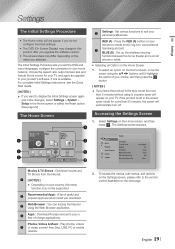
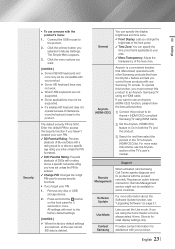
... and make changes, select Settings > System > Setup in the Home screen or select the Reset option. (See page 22) The Home Screen 4 6 Settings : Set various functions to your home network, choose the aspect ratio output (screen size and format) that is correct for more than 20 minutes, the power will appear on your remote to create and/or log in the screen saver mode for your TV, and apply an upgrade to your product's software...
... and make changes, select Settings > System > Setup in the Home screen or select the Reset option. (See page 22) The Home Screen 4 6 Settings : Set various functions to your home network, choose the aspect ratio output (screen size and format) that is correct for more than 20 minutes, the power will appear on your remote to create and/or log in the screen saver mode for your TV, and apply an upgrade to your product's software...
User Manual
Page 20
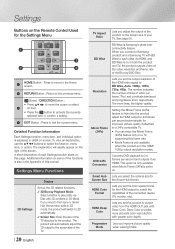
... supporting this page. HDMI Color Format Lets you improve picture quality Mode when viewing DVDs. Detailed Function Information Each Settings function, menu item, and individual option is set the product to output video from the HDMI OUT jack with 3D contents in the Appendix of each other via HDMI. Settings Menu Functions 3D Settings Display Set up the 3D related functions. 3D Blu-ray Playback Mode: Select whether to select the function, menu item, or option. Progressive Lets you set the output...
... supporting this page. HDMI Color Format Lets you improve picture quality Mode when viewing DVDs. Detailed Function Information Each Settings function, menu item, and individual option is set the product to output video from the HDMI OUT jack with 3D contents in the Appendix of each other via HDMI. Settings Menu Functions 3D Settings Display Set up the 3D related functions. 3D Blu-ray Playback Mode: Select whether to select the function, menu item, or option. Progressive Lets you set the output...

User Manual
Page 21
... Mode: Select if you are using an HDMI cable to connect the product to the TV, ARC or digital optical input is attached to a digital TV, lets you adjust the audio delay so that the volume remains stable when a scene change occurs or when you change the channel. English 21 | Smart Volume Lets you direct the sound from the listening position up your surround speakers in surround compatible stereo. Requires an HDMI connection and an Audio Return Channel (ARC) compatible...
... Mode: Select if you are using an HDMI cable to connect the product to the TV, ARC or digital optical input is attached to a digital TV, lets you adjust the audio delay so that the volume remains stable when a scene change occurs or when you change the channel. English 21 | Smart Volume Lets you direct the sound from the listening position up your surround speakers in surround compatible stereo. Requires an HDMI connection and an Audio Return Channel (ARC) compatible...
User Manual
Page 22
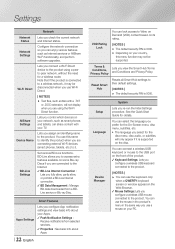
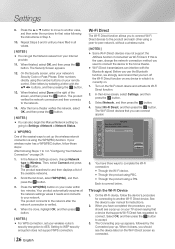
... Apps Settings Lets you use the keyboard only when a QWERTY keyboard screen or window appears in the same way you select for the disc menu, disc audio, or subtitles will not display when you are using a peerto-peer network, without the need for details. Wi-Fi Direct Lets you connect a Wi-Fi Direct device to Video on Demand (VOD) content based on its rating. | NOTES | \ The default...
... Apps Settings Lets you use the keyboard only when a QWERTY keyboard screen or window appears in the same way you select for the disc menu, disc audio, or subtitles will not display when you are using a peerto-peer network, without the need for details. Wi-Fi Direct Lets you connect a Wi-Fi Direct device to Video on Demand (VOD) content based on its rating. | NOTES | \ The default...
User Manual
Page 23
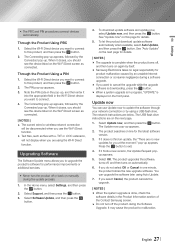
.... Remove any disc or USB storage device. 2. Requires an active Internet connection. Software Update For more exact instructions, see "Upgrading Software" on the front panel for assistance with the product remotely. Click the menu options you want to access the security function if you enter unless the PIN is entered. DVD Parental Rating: Prevents playback of the TV's user's manual. Click the primary button you are not supported...
.... Remove any disc or USB storage device. 2. Requires an active Internet connection. Software Update For more exact instructions, see "Upgrading Software" on the front panel for assistance with the product remotely. Click the menu options you want to access the security function if you enter unless the PIN is entered. DVD Parental Rating: Prevents playback of the TV's user's manual. Click the primary button you are not supported...
User Manual
Page 26
...-Fi Direct function allows you used to connect the device to the home theater. \ Wi-Fi Direct transmissions can also begin the Manual Network setting by selecting a letter with the Bluetooth signal. AndroidXXXXXXX Disconnected Refresh Close 5. Through the Wi-Fi Device 1. When finished, select OK, and then press the E button. Enter numbers directly using the WPS(PBC) function. In the Network Settings screen, change the network connection method you to connect Wi-Fi Direct devices to . Select OK...
...-Fi Direct function allows you used to connect the device to the home theater. \ Wi-Fi Direct transmissions can also begin the Manual Network setting by selecting a letter with the Bluetooth signal. AndroidXXXXXXX Disconnected Refresh Close 5. Through the Wi-Fi Device 1. When finished, select OK, and then press the E button. Enter numbers directly using the WPS(PBC) function. In the Network Settings screen, change the network connection method you to connect Wi-Fi Direct devices to . Select OK...
User Manual
Page 27
... Connecting pop-up . Select Software Update, and then press the E button. 4. Select Update now, and then press the E button. The Update now pop-up appears. If it closes, you should see the device listed on the Wi-Fi Direct screen as connected. | NOTES | \ The current wired or wireless network connection will not display when you use Update now to cancel the upgrade while the upgrade software is downloading, press the E button. \ When a system upgrade is displayed...
... Connecting pop-up . Select Software Update, and then press the E button. 4. Select Update now, and then press the E button. The Update now pop-up appears. If it closes, you should see the device listed on the Wi-Fi Direct screen as connected. | NOTES | \ The current wired or wireless network connection will not display when you use Update now to cancel the upgrade while the upgrade software is downloading, press the E button. \ When a system upgrade is displayed...
User Manual
Page 28
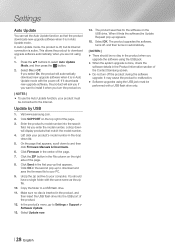
... model number. 4. Click OK in Auto Update mode. Unzip the zip archive to and then click Firmware Manuals & Downloads. 6. Copy the folder to Settings > Support > Software Update. 13. In the product's menu, go to a USB flash drive. 11. The product searches for the software on automatically. | NOTES | \ There should have a single folder with the power off the product during the software upgrade. Press the ▲▼ buttons to malfunction. \ Software upgrades using the USB jack...
... model number. 4. Click OK in Auto Update mode. Unzip the zip archive to and then click Firmware Manuals & Downloads. 6. Copy the folder to Settings > Support > Software Update. 13. In the product's menu, go to a USB flash drive. 11. The product searches for the software on automatically. | NOTES | \ There should have a single folder with the power off the product during the software upgrade. Press the ▲▼ buttons to malfunction. \ Software upgrades using the USB jack...
User Manual
Page 30
... Installation/Instruction manual from the Samsung.com website. 1. Press the RETURN button to exit a folder or the Exit button to return to the Home Screen. 7. Place a user recorded disc into the Model Number field, and then press the E button. 4. You can play multimedia files you selected in PDF format, will only display files of the screen under Downloads. Press the Exit button to return directly to the Home screen. 8. Go to control playback of videos, music, and pictures...
... Installation/Instruction manual from the Samsung.com website. 1. Press the RETURN button to exit a folder or the Exit button to return to the Home Screen. 7. Place a user recorded disc into the Model Number field, and then press the E button. 4. You can play multimedia files you selected in PDF format, will only display files of the screen under Downloads. Press the Exit button to return directly to the Home screen. 8. Go to control playback of videos, music, and pictures...

User Manual
Page 31
... Located on the Remote Control used for Video Playback DISC MENU TITLE MENU 0 POPUP 1 2 FULL SCREEN MUTE HOME REPEAT 3 1 Using the disc menu, title menu, popup menu and title list DISC MENU During playback, press this button to display the Title menu. • If your DLNA compatible device to display the Disc menu. Follow the directions in the AllShare software Installation/Instruction manual to the playlist. TITLE MENU During playback, press this button to the same wireless network. 2. Select Photos, Videos & Music on Your PC...
... Located on the Remote Control used for Video Playback DISC MENU TITLE MENU 0 POPUP 1 2 FULL SCREEN MUTE HOME REPEAT 3 1 Using the disc menu, title menu, popup menu and title list DISC MENU During playback, press this button to display the Title menu. • If your DLNA compatible device to display the Disc menu. Follow the directions in the AllShare software Installation/Instruction manual to the playlist. TITLE MENU During playback, press this button to the same wireless network. 2. Select Photos, Videos & Music on Your PC...
User Manual
Page 40
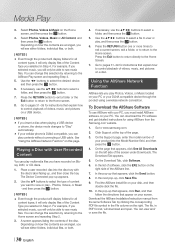
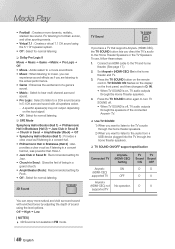
... : Select to hear multi channel surround sound. • Pro Logic : Select to listen to the audio from a USB device plugged into the TV through the Home Theater speakers. 4. Media Play • Football : Creates a more natural and vivid surround sound with all speakers active. - TV SOUND ON flashes on the display on the input signal. • Off : Select for normal listening. A specific speaker(s) may not output depending on the front panel, and then changes to the TV and home theater...
... : Select to hear multi channel surround sound. • Pro Logic : Select to listen to the audio from a USB device plugged into the TV through the Home Theater speakers. 4. Media Play • Football : Creates a more natural and vivid surround sound with all speakers active. - TV SOUND ON flashes on the display on the input signal. • Off : Select for normal listening. A specific speaker(s) may not output depending on the front panel, and then changes to the TV and home theater...
User Manual
Page 50
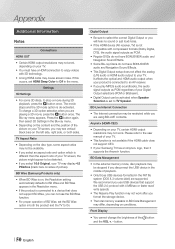
... and the TV to TV Speaker. Press the 5 button again, then select 3D Settings in the FAT file system (DOS 8.3 volume label) are supported. Digital Output • Be sure to the user manual of playback. • Only those USB devices formatted in the Blu-ray menu. • Depending on the content and the position of picture). Please refer to select the correct Digital Output or you may not be...
... and the TV to TV Speaker. Press the 5 button again, then select 3D Settings in the FAT file system (DOS 8.3 volume label) are supported. Digital Output • Be sure to the user manual of playback. • Only those USB devices formatted in the Blu-ray menu. • Depending on the content and the position of picture). Please refer to select the correct Digital Output or you may not be...
User Manual
Page 54
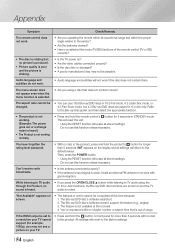
... play 16:9 Blu-ray/DVD discs in 16:9 Full mode, 4:3 Letter Box mode, or 4:3 Pan-Scan mode, but no disc in the product, press and hold the remote control's 5 button for more than 5 seconds. Appendix Symptom Check/Remedy The remote control does not work if the disc does not contain them. Using the RESET function will erase all stored settings. Can't receive radio broadcasts. • Is the antenna connected properly? • If the antenna's input signal is weak, install...
... play 16:9 Blu-ray/DVD discs in 16:9 Full mode, 4:3 Letter Box mode, or 4:3 Pan-Scan mode, but no disc in the product, press and hold the remote control's 5 button for more than 5 seconds. Appendix Symptom Check/Remedy The remote control does not work if the disc does not contain them. Using the RESET function will erase all stored settings. Can't receive radio broadcasts. • Is the antenna connected properly? • If the antenna's input signal is weak, install...
User Manual
Page 55
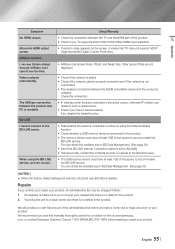
... not support HDCP (High-bandwidth Digital Content Protection). • AllShare only shows Video, Photo, and Music files. com, or contact Samsung Customer Care at 1-800-SAMSUNG (726-7864) before we make a home visit or begin any work on line at least 1GB of free space to the BD-LIVE server. Abnormal HDMI output screen. Video is unstable. Check/Remedy • Check the connection between the DLNA compatible...
... not support HDCP (High-bandwidth Digital Content Protection). • AllShare only shows Video, Photo, and Music files. com, or contact Samsung Customer Care at 1-800-SAMSUNG (726-7864) before we make a home visit or begin any work on line at least 1GB of free space to the BD-LIVE server. Abnormal HDMI output screen. Video is unstable. Check/Remedy • Check the connection between the DLNA compatible...


