
User Manual (user Manual) (ver.1.0) (English)
Page 4
... stop mode. Super Digital Sound Master Equipped with a sophisticated AM/FM tuner, all lines displayed in one remote controller of Samsung TV, using Anynet You can conveniently operate Samsung DVD and other Samsung AV devices with DiMagic Co., Ltd. TV Screen Saver Function The HT-DS650 automatically brightens and darkens the brightness of multi-disc playback capability, including DVD-AUDIO, DVD-VIDEO, VCD, CD, MP3-CD, CD-R/RW, and DVD-R/RW, with a new digital audio technology (Auto Sound Calibration, Magic Sound...
... stop mode. Super Digital Sound Master Equipped with a sophisticated AM/FM tuner, all lines displayed in one remote controller of Samsung TV, using Anynet You can conveniently operate Samsung DVD and other Samsung AV devices with DiMagic Co., Ltd. TV Screen Saver Function The HT-DS650 automatically brightens and darkens the brightness of multi-disc playback capability, including DVD-AUDIO, DVD-VIDEO, VCD, CD, MP3-CD, CD-R/RW, and DVD-R/RW, with a new digital audio technology (Auto Sound Calibration, Magic Sound...
User Manual (user Manual) (ver.1.0) (English)
Page 5
... Using Disc Menu...37 Using the Title Menu ...38 SETUP Setting the Language...39 Setting TV Screen type ...41 Setting Parental Controls (Rating Level)...43 Setting the Password ...45 Setting the Wallpaper...47 DVD Playback Mode...49 AV SYNC Setup...50 Setting the Speaker Mode ...51 Setting the Test Tone...52 Setting the Delay Time...53 Setting the Audio Quality ...55 Setting the DRC (Dynamic Range Compression)...57 Auto Sound Calibration Setup...59 Live Surround Mode...61 Dolby Pro Logic II Mode...63 Dolby Pro Logic II Effect ...64 RADIO OPERATION...
... Using Disc Menu...37 Using the Title Menu ...38 SETUP Setting the Language...39 Setting TV Screen type ...41 Setting Parental Controls (Rating Level)...43 Setting the Password ...45 Setting the Wallpaper...47 DVD Playback Mode...49 AV SYNC Setup...50 Setting the Speaker Mode ...51 Setting the Test Tone...52 Setting the Delay Time...53 Setting the Audio Quality ...55 Setting the DRC (Dynamic Range Compression)...57 Auto Sound Calibration Setup...59 Live Surround Mode...61 Dolby Pro Logic II Mode...63 Dolby Pro Logic II Effect ...64 RADIO OPERATION...

User Manual (user Manual) (ver.1.0) (English)
Page 8
... button Function button Tuning Down & Skip ( ) buttons Disc Change button Remote Control Sensor Auto Sound Calibration Input Jack Stop ( ) button Tuning Up & Skip ( ) buttons Play/Pause ( ) button PRO LOGIC II indicator LINEAR PCM indicator GROUP indicator CHAPTER indicator DTS Disc indicator TITLE indicator TRACK indicator PROGRAM indicator TUNER indicator REPEAT indicator DISC A↔ B indicator P.SCAN indicator DVD AUDIO indicator DOLBY DIGITAL indicator 7 System Status Display DISC(1~5) indicator SPEAKER indicator DSP indicator RADIO FREQUENCY indicator 1p~38p(DS650...
... button Function button Tuning Down & Skip ( ) buttons Disc Change button Remote Control Sensor Auto Sound Calibration Input Jack Stop ( ) button Tuning Up & Skip ( ) buttons Play/Pause ( ) button PRO LOGIC II indicator LINEAR PCM indicator GROUP indicator CHAPTER indicator DTS Disc indicator TITLE indicator TRACK indicator PROGRAM indicator TUNER indicator REPEAT indicator DISC A↔ B indicator P.SCAN indicator DVD AUDIO indicator DOLBY DIGITAL indicator 7 System Status Display DISC(1~5) indicator SPEAKER indicator DSP indicator RADIO FREQUENCY indicator 1p~38p(DS650...

User Manual (user Manual) (ver.1.0) (English)
Page 9
... Video Cable Anynet Cable User's Manual Auto Sound Calibration Microphone 8 Accessories FM Antenna Connector COMPONENT VIDEO OUTPUT/INPUT jacks Connect a TV with an S-Video input connector (S-VIDEO IN), connect it to these jacks. S-Video Output Connector If the TV is equipped with component video inputs to the player's S-Video output jack. 1p~38p(DS650)-SECA GB 11/10/04 1:15 PM Page 11 PREPARATION -Rear Panel- 5.1 Channel Speaker Output Terminals External Video Component Input Connectors External Audio Component Input Connector External Digital Optical Input Connector Use...
... Video Cable Anynet Cable User's Manual Auto Sound Calibration Microphone 8 Accessories FM Antenna Connector COMPONENT VIDEO OUTPUT/INPUT jacks Connect a TV with an S-Video input connector (S-VIDEO IN), connect it to these jacks. S-Video Output Connector If the TV is equipped with component video inputs to the player's S-Video output jack. 1p~38p(DS650)-SECA GB 11/10/04 1:15 PM Page 11 PREPARATION -Rear Panel- 5.1 Channel Speaker Output Terminals External Video Component Input Connectors External Audio Component Input Connector External Digital Optical Input Connector Use...

User Manual (user Manual) (ver.1.0) (English)
Page 16
...: DVD/CD ➝ DIGITAL IN ➝ AUX1 ➝ AUX2 ➝ FM ➝ AM. 15 Optical Cable (not included) 1 Connect Video Out on the DVD player to Video In on the TV. 2 Connect the Digital Input (OPTICAL) to the Digital Output on the external digital component. 3 Press AUX on the remote control to select 'DIGITAL IN'. • Each time the button is pressed, the selection changes as follows: DIGITAL IN ➝ AUX 1 ➝ AUX 2. • You can also use the FUNCTION button...
...: DVD/CD ➝ DIGITAL IN ➝ AUX1 ➝ AUX2 ➝ FM ➝ AM. 15 Optical Cable (not included) 1 Connect Video Out on the DVD player to Video In on the TV. 2 Connect the Digital Input (OPTICAL) to the Digital Output on the external digital component. 3 Press AUX on the remote control to select 'DIGITAL IN'. • Each time the button is pressed, the selection changes as follows: DIGITAL IN ➝ AUX 1 ➝ AUX 2. • You can also use the FUNCTION button...

User Manual (user Manual) (ver.1.0) (English)
Page 43
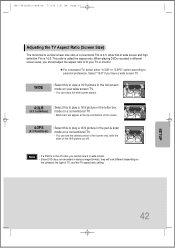
... "4:3PS" option according to personal preference. SETUP 42 Note • If a DVD is in the 4:3 ratio, you cannot view it in widescreen. • Since DVD discs are recorded in various image formats, they will appear at the top and bottom of the screen. 4:3PS (4:3 Pan&Scan) : Select this to play a 16:9 picture in the letter box mode on a conventional TV. •Black...
... "4:3PS" option according to personal preference. SETUP 42 Note • If a DVD is in the 4:3 ratio, you cannot view it in widescreen. • Since DVD discs are recorded in various image formats, they will appear at the top and bottom of the screen. 4:3PS (4:3 Pan&Scan) : Select this to play a 16:9 picture in the letter box mode on a conventional TV. •Black...
User Manual (user Manual) (ver.1.0) (English)
Page 60
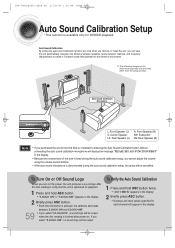
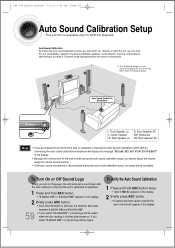
... product. Auto Sound Calibration Microphone L: Front Speaker (L) C: Center Speaker LS: Rear Speaker (L) R: Front Speaker (R) SW: Subwoofer RS: Rear Speaker (R) Note • If you turn on . To Turn On or Off Sound Logo When you purchased the unit for the first time or initialized it, pressing the Auto Sound Calibration button without connecting the auto sound calibration microphone will display the message "PLEASE SET ASC FUNCTION FIRST" in the display. • Because the volume level of the tone is fixed during the auto sound calibration setup, the setup will...
... product. Auto Sound Calibration Microphone L: Front Speaker (L) C: Center Speaker LS: Rear Speaker (L) R: Front Speaker (R) SW: Subwoofer RS: Rear Speaker (R) Note • If you turn on . To Turn On or Off Sound Logo When you purchased the unit for the first time or initialized it, pressing the Auto Sound Calibration button without connecting the auto sound calibration microphone will display the message "PLEASE SET ASC FUNCTION FIRST" in the display. • Because the volume level of the tone is fixed during the auto sound calibration setup, the setup will...

User Manual (user Manual) (ver.1.0) (English)
Page 61
... in the display, unplug the auto sound calibration microphone. If you select "ASC OFF", you will hear sound in the auto sound calibration mode. A result for the first time) • The selection alternates between the listener and the speaker is output. To listen in the auto sound calibration mode, briefly press ASC button. (If you set in the audio setting of the setup screen 60 A tone is below 10 feet: Set the main unit's volume to complete...
... in the display, unplug the auto sound calibration microphone. If you select "ASC OFF", you will hear sound in the auto sound calibration mode. A result for the first time) • The selection alternates between the listener and the speaker is output. To listen in the auto sound calibration mode, briefly press ASC button. (If you set in the audio setting of the setup screen 60 A tone is below 10 feet: Set the main unit's volume to complete...
User Manual (user Manual) (ver.1.0) (English)
Page 72
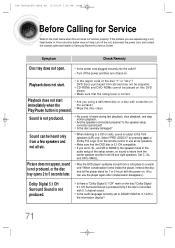
... radio, sound is 5.1-CH compatible. • If you set to SMALL. DVD discs purchased from a cold place to the front speakers (L/R) only. Play/Pause button is heard during fast playback, slow playback, and step motion playback. • Are the speakers connected properly? When condensation forms inside the player, remove the disc and let the player stand for Service Refer to NONE in the speaker mode in the information display...
... radio, sound is 5.1-CH compatible. • If you set to SMALL. DVD discs purchased from a cold place to the front speakers (L/R) only. Play/Pause button is heard during fast playback, slow playback, and step motion playback. • Are the speakers connected properly? When condensation forms inside the player, remove the disc and let the player stand for Service Refer to NONE in the speaker mode in the information display...

User Manual (user Manual) (ver.1.0) (English)
Page 73
... the menu function is selected. • Are you using a disc that does not contain menus? Refer to the default values. • Press the POWER button. The password for rating level has been forgotten. • While "NO DISC" message appears on the display and all settings will return to the DVD disc jacket and then select the appropriate function. • Is the antenna connected properly? • If the antenna's input signal is weak, install...
... the menu function is selected. • Are you using a disc that does not contain menus? Refer to the default values. • Press the POWER button. The password for rating level has been forgotten. • While "NO DISC" message appears on the display and all settings will return to the DVD disc jacket and then select the appropriate function. • Is the antenna connected properly? • If the antenna's input signal is weak, install...

User Manual (user Manual) (ver.1.0) (English)
Page 5
... HT-DS650 automatically switches itself off after 3 minutes in the stop mode. Super Digital Sound Master Equipped with a new digital audio technology (Auto Sound Calibration, Magic Sound Field, and Magic Headphone) developed in terms of DVD-Audio. The on , a sound logo is output from the speakers to deliver exceptional sound quality in cooperation with DiMagic Co., Ltd. DVD-Audio compatible Experience the super high-quality audio performance of dynamic range, low-level resolution and high-frequency...
... HT-DS650 automatically switches itself off after 3 minutes in the stop mode. Super Digital Sound Master Equipped with a new digital audio technology (Auto Sound Calibration, Magic Sound Field, and Magic Headphone) developed in terms of DVD-Audio. The on , a sound logo is output from the speakers to deliver exceptional sound quality in cooperation with DiMagic Co., Ltd. DVD-Audio compatible Experience the super high-quality audio performance of dynamic range, low-level resolution and high-frequency...

User Manual (user Manual) (ver.1.0) (English)
Page 6
... Using the Title Menu ...38 SETUP Setting the Language...39 Setting TV Screen type ...41 Setting Parental Controls (Rating Level)...43 Setting the Password ...45 Setting the Wallpaper...47 DVD Playback Mode...49 Setting the Speaker Mode ...51 Setting the Test Tone...52 Setting the Delay Time...53 Setting the Audio Quality ...55 Setting the DRC (Dynamic Range Compression)...57 Auto Sound Calibration Setup...59 Live Surround Mode...61 Dolby Pro Logic II Mode...63 Dolby Pro Logic II Effect ...64 RADIO OPERATION Listening to Radio ...65 Presetting Stations...
... Using the Title Menu ...38 SETUP Setting the Language...39 Setting TV Screen type ...41 Setting Parental Controls (Rating Level)...43 Setting the Password ...45 Setting the Wallpaper...47 DVD Playback Mode...49 Setting the Speaker Mode ...51 Setting the Test Tone...52 Setting the Delay Time...53 Setting the Audio Quality ...55 Setting the DRC (Dynamic Range Compression)...57 Auto Sound Calibration Setup...59 Live Surround Mode...61 Dolby Pro Logic II Mode...63 Dolby Pro Logic II Effect ...64 RADIO OPERATION Listening to Radio ...65 Presetting Stations...

User Manual (user Manual) (ver.1.0) (English)
Page 10
...Rear Panel- 5.1 Channel Speaker Output Terminals External Video Component Input Connectors External Audio Component Input Connector External Digital Optical Input Connector Use this to the VIDEO OUT connector. Accessories FM Antenna Connector COMPONENT VIDEO OUTPUT/INPUT jacks Connect a TV with an S-Video input connector (S-VIDEO IN), connect it to these jacks. Remote Control Audio Cable AM Antenna FM Antenna Video Cable Anynet Cable User's Manual Auto Sound Calibration Microphone 8 S-Video Output Connector If the TV is equipped with component video inputs to the player's S-Video...
...Rear Panel- 5.1 Channel Speaker Output Terminals External Video Component Input Connectors External Audio Component Input Connector External Digital Optical Input Connector Use this to the VIDEO OUT connector. Accessories FM Antenna Connector COMPONENT VIDEO OUTPUT/INPUT jacks Connect a TV with an S-Video input connector (S-VIDEO IN), connect it to these jacks. Remote Control Audio Cable AM Antenna FM Antenna Video Cable Anynet Cable User's Manual Auto Sound Calibration Microphone 8 S-Video Output Connector If the TV is equipped with component video inputs to the player's S-Video...

User Manual (user Manual) (ver.1.0) (English)
Page 17
...: DVD/CD ➝ DIGITAL IN ➝ AUX1 ➝ AUX2 ➝ FM ➝ AM. 15 Optical Cable (not included) 1 Connect Video Out on the DVD player to Video In on the TV. 2 Connect the Digital Input (OPTICAL) to the Digital Output on the external digital component. 3 Press AUX on the remote control to select 'DIGITAL IN'. • Each time the button is pressed, the selection changes as follows: DIGITAL IN ➝ AUX 1 ➝ AUX 2. • You can also use the FUNCTION button...
...: DVD/CD ➝ DIGITAL IN ➝ AUX1 ➝ AUX2 ➝ FM ➝ AM. 15 Optical Cable (not included) 1 Connect Video Out on the DVD player to Video In on the TV. 2 Connect the Digital Input (OPTICAL) to the Digital Output on the external digital component. 3 Press AUX on the remote control to select 'DIGITAL IN'. • Each time the button is pressed, the selection changes as follows: DIGITAL IN ➝ AUX 1 ➝ AUX 2. • You can also use the FUNCTION button...
User Manual (user Manual) (ver.1.0) (English)
Page 44
... ratio setting. Select "16:9" if you should adjust the aspect ratio to fit your wide screen TV. • You can enjoy the wide screen aspect. 4:3LB (4:3 Letterbox) : Select this to play a 16:9 picture in the letter box mode on a conventional TV. • Black bars will appear at the top and bottom of the screen. 4:3PS (4:3 Pan&Scan) : Select this to view a 16:9 picture in...
... ratio setting. Select "16:9" if you should adjust the aspect ratio to fit your wide screen TV. • You can enjoy the wide screen aspect. 4:3LB (4:3 Letterbox) : Select this to play a 16:9 picture in the letter box mode on a conventional TV. • Black bars will appear at the top and bottom of the screen. 4:3PS (4:3 Pan&Scan) : Select this to view a 16:9 picture in...
User Manual (user Manual) (ver.1.0) (English)
Page 61
Auto Sound Calibration Microphone L: Front Speaker (L) C: Center Speaker LS: Rear Speaker (L) R: Front Speaker (R) SW: Subwoofer RS: Rear Speaker (R) Note • If you purchased the unit for each channel will be cancelled. If you cannot adjust the volume using the volume control buttons. • If the auto sound microphone is disconnected during the auto sound calibration setup, the setup will be output when the disc reading is finished after power-on. To Turn On or Off Sound Logo When you turn on the power, the unit produces...
Auto Sound Calibration Microphone L: Front Speaker (L) C: Center Speaker LS: Rear Speaker (L) R: Front Speaker (R) SW: Subwoofer RS: Rear Speaker (R) Note • If you purchased the unit for each channel will be cancelled. If you cannot adjust the volume using the volume control buttons. • If the auto sound microphone is disconnected during the auto sound calibration setup, the setup will be output when the disc reading is finished after power-on. To Turn On or Off Sound Logo When you turn on the power, the unit produces...

User Manual (user Manual) (ver.1.0) (English)
Page 62
... the display followed by "REMOVE MIC", and the setup is output. To listen in the auto sound calibration mode, briefly press ASC button. (If you set in the audio setting of the setup screen. 60 If you select "ASC OFF", you will hear sound in the auto sound calibration mode. NTSC/PAL SUBTITLE A bell sounds and the setup finishes. 39P~76P(DS650)-NOR-GB 7/1/04 3:01 PM Page 63 SETUP 1 Plug the auto sound calibration microphone into the auto sound calibration input jack. 2 Place the auto sound calibration microphone...
... the display followed by "REMOVE MIC", and the setup is output. To listen in the auto sound calibration mode, briefly press ASC button. (If you set in the audio setting of the setup screen. 60 If you select "ASC OFF", you will hear sound in the auto sound calibration mode. NTSC/PAL SUBTITLE A bell sounds and the setup finishes. 39P~76P(DS650)-NOR-GB 7/1/04 3:01 PM Page 63 SETUP 1 Plug the auto sound calibration microphone into the auto sound calibration input jack. 2 Place the auto sound calibration microphone...
User Manual (user Manual) (ver.1.0) (English)
Page 71
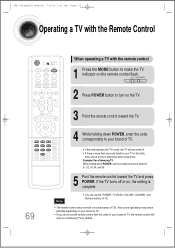
... TV. 3 Point the remote control toward the TV and press POWER. TV DVD RECEIVER 2 Press POWER button to determine which code works. Also some brands of TV. • If you do not set the remote control with the remote control 1 Press the MODE button to your brand of TVs. If the TV turns off . • If there is complete. Note • You can use the number buttons to enter 00...
... TV. 3 Point the remote control toward the TV and press POWER. TV DVD RECEIVER 2 Press POWER button to determine which code works. Also some brands of TV. • If you do not set the remote control with the remote control 1 Press the MODE button to your brand of TVs. If the TV turns off . • If there is complete. Note • You can use the number buttons to enter 00...
User Manual (user Manual) (ver.1.0) (English)
Page 73
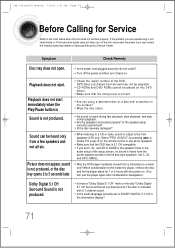
... information display? 71 Dolby Digital 5.1 CH Surround Sound is produced only if the disc is output to use the player again after condensation disappears.) Dolby Digital 5.1 CH Surround Sound is not produced. Picture does not appear, sound is heard from a few speakers and not all six speakers. • Make sure that the rating level is heard during fast playback, slow playback, and step motion playback. • Are the speakers connected properly? DVD discs...
... information display? 71 Dolby Digital 5.1 CH Surround Sound is produced only if the disc is output to use the player again after condensation disappears.) Dolby Digital 5.1 CH Surround Sound is not produced. Picture does not appear, sound is heard from a few speakers and not all six speakers. • Make sure that the rating level is heard during fast playback, slow playback, and step motion playback. • Are the speakers connected properly? DVD discs...

User Manual (user Manual) (ver.1.0) (English)
Page 74
...; Turn off the power and hold the main unit's button for longer than 5 seconds. Audio language and subtitles do not work for Using the RESET function will erase all settings will return to the DVD disc jacket and then select the appropriate function. • Is the antenna connected properly? • If the antenna's input signal is selected. • Are you selected the mode(TV/DVD) functions of the remote control (TV or DVD) correctly? • Audio language...
...; Turn off the power and hold the main unit's button for longer than 5 seconds. Audio language and subtitles do not work for Using the RESET function will erase all settings will return to the DVD disc jacket and then select the appropriate function. • Is the antenna connected properly? • If the antenna's input signal is selected. • Are you selected the mode(TV/DVD) functions of the remote control (TV or DVD) correctly? • Audio language...


