

User Manual (user Manual) (ver.1.0) (English)
Page 2
... This Compact Disc player is classified as practical CAUTION RISK OF ELECTRIC SHOCK. Operation is subject to which can be connected to the grounding system of the building, as close to the point of cable entry as a CLASS 1 LASER product. This equipment generates, uses and can radiate radio frequency energy and, if not installed and used in a residential installation. However, there...
... This Compact Disc player is classified as practical CAUTION RISK OF ELECTRIC SHOCK. Operation is subject to which can be connected to the grounding system of the building, as close to the point of cable entry as a CLASS 1 LASER product. This equipment generates, uses and can radiate radio frequency energy and, if not installed and used in a residential installation. However, there...

User Manual (user Manual) (ver.1.0) (English)
Page 4
..., and the like. This will prevent damage to the video product due to protect it from the wall outlet before the appliance is provided or the manufacturer's instructions have been followed. ACCESSORIES Do not place this video product from the wall outlet and disconnect the antenna or cable system. Quick stops, excessive force, and uneven surfaces may fall, causing...
..., and the like. This will prevent damage to the video product due to protect it from the wall outlet before the appliance is provided or the manufacturer's instructions have been followed. ACCESSORIES Do not place this video product from the wall outlet and disconnect the antenna or cable system. Quick stops, excessive force, and uneven surfaces may fall, causing...

User Manual (user Manual) (ver.1.0) (English)
Page 5
... operating instructions as an improper adjustment of the polarized plug. a. b. When installing an outside antenna system, extreme care should be sure the service technician has used replacement parts specified by the video product manufacturer as they may result in proper operating condition. ATTACHMENTS Do not use attachments not recommended by the manufacturer or having one way. f. When the power-supply cord or plug is connected to qualified service...
... operating instructions as an improper adjustment of the polarized plug. a. b. When installing an outside antenna system, extreme care should be sure the service technician has used replacement parts specified by the video product manufacturer as they may result in proper operating condition. ATTACHMENTS Do not use attachments not recommended by the manufacturer or having one way. f. When the power-supply cord or plug is connected to qualified service...

User Manual (user Manual) (ver.1.0) (English)
Page 6
... lines), Progressive Scan uses one field of information (all in the stop mode. Power Saving Function The HT-DB390 automatically shuts itself into the power saving mode after 20 minutes in a single player. Wireless Rear Speakers and Amp The HT-DB390 has a rear surround wireless amp that the unit is output from the speakers to enjoy dynamic sound. Features Multi-Disc Playback & AM/FM Tuner The HT-DB390 combines the convenience of multi-disc playback capability, including DVD, CD, MP3-CD...
... lines), Progressive Scan uses one field of information (all in the stop mode. Power Saving Function The HT-DB390 automatically shuts itself into the power saving mode after 20 minutes in a single player. Wireless Rear Speakers and Amp The HT-DB390 has a rear surround wireless amp that the unit is output from the speakers to enjoy dynamic sound. Features Multi-Disc Playback & AM/FM Tuner The HT-DB390 combines the convenience of multi-disc playback capability, including DVD, CD, MP3-CD...
User Manual (user Manual) (ver.1.0) (English)
Page 7
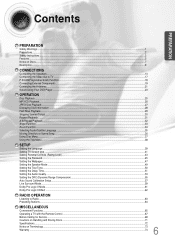
......36 Using Disc Menu...37 Using the Title Menu ...38 SETUP Setting the Language...39 Setting TV Screen type ...41 Setting Parental Controls (Rating Level)...43 Setting the Password ...45 Setting the Wallpaper...47 Setting the Speaker Mode ...49 Setting the Test Tone...50 Setting the Delay Time...51 Setting the Audio Quality ...53 Setting the DRC (Dynamic Range Compression)...55 Auto Sound Calibration Setup...57 Live Surround Mode...59 Dolby Pro Logic II Mode...61 Dolby Pro Logic II Effect ...62 RADIO OPERATION Listening to Radio ...63 Presetting Stations...
......36 Using Disc Menu...37 Using the Title Menu ...38 SETUP Setting the Language...39 Setting TV Screen type ...41 Setting Parental Controls (Rating Level)...43 Setting the Password ...45 Setting the Wallpaper...47 Setting the Speaker Mode ...49 Setting the Test Tone...50 Setting the Delay Time...51 Setting the Audio Quality ...53 Setting the DRC (Dynamic Range Compression)...55 Auto Sound Calibration Setup...57 Live Surround Mode...59 Dolby Pro Logic II Mode...61 Dolby Pro Logic II Effect ...62 RADIO OPERATION Listening to Radio ...63 Presetting Stations...

User Manual (user Manual) (ver.1.0) (English)
Page 8
... may not play . If such discs are played, a "WRONG DISC FORMAT" message appears on the rear panel of this player. Now you can enjoy these realistic effects in a movie theater or concert hall. 1 ~6 DVD players and the discs are encoded with identical region codes.) Playable Discs Disc Type Mark (Logo) Recorded Signals DVD AUDIO-CD V I D E O COMPACT DIGITAL AUDIO Audio + Video Audio Disc Size 5" 3 1/2" 5" 3 1/2" Max. Copy Protection • Many DVD discs are coded by Macrovision Corporation and other limited viewing uses only...
... may not play . If such discs are played, a "WRONG DISC FORMAT" message appears on the rear panel of this player. Now you can enjoy these realistic effects in a movie theater or concert hall. 1 ~6 DVD players and the discs are encoded with identical region codes.) Playable Discs Disc Type Mark (Logo) Recorded Signals DVD AUDIO-CD V I D E O COMPACT DIGITAL AUDIO Audio + Video Audio Disc Size 5" 3 1/2" 5" 3 1/2" Max. Copy Protection • Many DVD discs are coded by Macrovision Corporation and other limited viewing uses only...

User Manual (user Manual) (ver.1.0) (English)
Page 10
... Panel- Standby indicator Power ( ) button Play/Pause ( ) button Stop ( ) button Function button Auto Sound Calibration button Open/Close button Live Surround Mode button Virtual Headphone button ASC LSM V-H/P Auto Sound Calibration Input Jack Disc Tray Volume control Headphone Jack Tuning Up & Skip ( ) buttons Tuning Down & Skip ( ) buttons DOLBY DIGITAL indicator LINEAR PCM indicator CHAPTER indicator PROGRAM indicator DSP indicator TITLE indicator PBC indicator STEREO indicator TUNER indicator DTS Disc indicator PRO LOGIC II indicator SPEAKER indicator System Status Display...
... Panel- Standby indicator Power ( ) button Play/Pause ( ) button Stop ( ) button Function button Auto Sound Calibration button Open/Close button Live Surround Mode button Virtual Headphone button ASC LSM V-H/P Auto Sound Calibration Input Jack Disc Tray Volume control Headphone Jack Tuning Up & Skip ( ) buttons Tuning Down & Skip ( ) buttons DOLBY DIGITAL indicator LINEAR PCM indicator CHAPTER indicator PROGRAM indicator DSP indicator TITLE indicator PBC indicator STEREO indicator TUNER indicator DTS Disc indicator PRO LOGIC II indicator SPEAKER indicator System Status Display...

User Manual (user Manual) (ver.1.0) (English)
Page 11
... Panel- S-Video Output Connector If the TV is built into the wireless rear amplifier. Remote Control (AH59-01269C) Audio Cable (AH39-40001U) AM Antenna (AH42-20001P) FM Antenna (AH42-00004A) Video Cable (AH39-40001V) User's Manual (AH68-01445R) Auto Sound Calibration Microphone (AH59-01183D) Wireless rear receiver 10 External Digital Optical Input Connector Use this to the VIDEO OUT connector. COMPONENT VIDEO OUTPUT jacks Connect a TV with an S-Video input connector (S-VIDEO IN), connect it to these jacks. External Video Component Speaker Output Terminals Input Connectors...
... Panel- S-Video Output Connector If the TV is built into the wireless rear amplifier. Remote Control (AH59-01269C) Audio Cable (AH39-40001U) AM Antenna (AH42-20001P) FM Antenna (AH42-00004A) Video Cable (AH39-40001V) User's Manual (AH68-01445R) Auto Sound Calibration Microphone (AH59-01183D) Wireless rear receiver 10 External Digital Optical Input Connector Use this to the VIDEO OUT connector. COMPONENT VIDEO OUTPUT jacks Connect a TV with an S-Video input connector (S-VIDEO IN), connect it to these jacks. External Video Component Speaker Output Terminals Input Connectors...

User Manual (user Manual) (ver.1.0) (English)
Page 12
..., DVD POWER button TV/VIDEO, DIMMER button OPEN/CLOSE button Auto Sound Calibration button SUPER 5.1 button Live Surround Mode button/ Virtual Headphone button PL II MODE button TUNING/CH button MENU button RETURN button Number(0~9) buttons SLEEP button LOGO COPY button EZ VIEW button 11 TV indicator DVD RECEIVER indicator MODE button DVD button AUX button TUNER BAND button SUB TITLE button SLOW, MO/ST button MOVIE button Play/Pause button Stop button Tuning Preset/CD Skip button PL II EFFECT button VOLUME button INFO button MUTE button Direction/Enter button TEST TONE button SOUND...
..., DVD POWER button TV/VIDEO, DIMMER button OPEN/CLOSE button Auto Sound Calibration button SUPER 5.1 button Live Surround Mode button/ Virtual Headphone button PL II MODE button TUNING/CH button MENU button RETURN button Number(0~9) buttons SLEEP button LOGO COPY button EZ VIEW button 11 TV indicator DVD RECEIVER indicator MODE button DVD button AUX button TUNER BAND button SUB TITLE button SLOW, MO/ST button MOVIE button Play/Pause button Stop button Tuning Preset/CD Skip button PL II EFFECT button VOLUME button INFO button MUTE button Direction/Enter button TEST TONE button SOUND...

User Manual (user Manual) (ver.1.0) (English)
Page 16
... speaker outputs on the front panel. • The Power Standby indicator will light up. • To turn off the wireless rear amplifier, press the POWER button in Standby mode. If the wireless rear amplifier is too close to the main unit, some sound interruption may result. • The wireless receiving antenna is clear of Wireless Rear Amplifier When using the wireless transmission antenna Stand the wireless transmission antenna to communications may result. • Do not touch the wireless transmission antenna during operation...
... speaker outputs on the front panel. • The Power Standby indicator will light up. • To turn off the wireless rear amplifier, press the POWER button in Standby mode. If the wireless rear amplifier is too close to the main unit, some sound interruption may result. • The wireless receiving antenna is clear of Wireless Rear Amplifier When using the wireless transmission antenna Stand the wireless transmission antenna to communications may result. • Do not touch the wireless transmission antenna during operation...

User Manual (user Manual) (ver.1.0) (English)
Page 17
....) RESET Button 2 With the wireless rear amplifier turned on, use a ball point pen or a pair of Wireless Rear Amplifier 3 Turn on the main unit's display. Caution • Sound will be blue. 16 Turning On the Mood Light You can turn off in Power Standby mode. 1 With the main unit turned off, press and hold the remote control's WIRELESS button for 4 seconds. • Press the button until the volume control indicator lights up blue. (The indicator will be heard from the wireless rear speakers. Turning...
....) RESET Button 2 With the wireless rear amplifier turned on, use a ball point pen or a pair of Wireless Rear Amplifier 3 Turn on the main unit's display. Caution • Sound will be blue. 16 Turning On the Mood Light You can turn off in Power Standby mode. 1 With the main unit turned off, press and hold the remote control's WIRELESS button for 4 seconds. • Press the button until the volume control indicator lights up blue. (The indicator will be heard from the wireless rear speakers. Turning...

User Manual (user Manual) (ver.1.0) (English)
Page 20
... use the FUNCTION button on the remote control to select 'DIGITAL IN'. • Each time the button is pressed, the selection changes as follows: DVD/CD ➝ DIGITAL IN ➝ AUX1 ➝ AUX2 ➝ FM ➝ AM. 19 Optical Cable (not included) 1 Connect Video Out on the DVD player to Video In on the TV. 2 Connect the Digital Input (OPTICAL) to the Digital Output on the external digital component. 3 Press AUX on the main unit. Connecting External Components Connecting an External Digital Component...
... use the FUNCTION button on the remote control to select 'DIGITAL IN'. • Each time the button is pressed, the selection changes as follows: DVD/CD ➝ DIGITAL IN ➝ AUX1 ➝ AUX2 ➝ FM ➝ AM. 19 Optical Cable (not included) 1 Connect Video Out on the DVD player to Video In on the TV. 2 Connect the Digital Input (OPTICAL) to the Digital Output on the external digital component. 3 Press AUX on the main unit. Connecting External Components Connecting an External Digital Component...

User Manual (user Manual) (ver.1.0) (English)
Page 21
... Video Cable 1 Connect Video Out on the DVD player to Video In on the TV. 2 Connect Video In on the DVD player to Video Out on the external analog component. 3 Connect Audio In on the DVD player to Audio Out on the external analog component. • Be sure to match connector colors. 4 Press AUX on the main unit. The mode switches as follows: DIGITAL IN AUX 1 AUX 2. • You can also use the FUNCTION button on the remote control to select AUX 1 or AUX...
... Video Cable 1 Connect Video Out on the DVD player to Video In on the TV. 2 Connect Video In on the DVD player to Video Out on the external analog component. 3 Connect Audio In on the DVD player to Audio Out on the external analog component. • Be sure to match connector colors. 4 Press AUX on the main unit. The mode switches as follows: DIGITAL IN AUX 1 AUX 2. • You can also use the FUNCTION button on the remote control to select AUX 1 or AUX...
User Manual (user Manual) (ver.1.0) (English)
Page 43
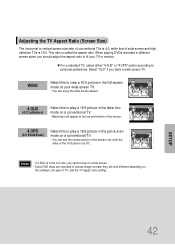
...ratio setting. Adjusting the TV Aspect Ratio (Screen Size) The horizontal to vertical screen size ratio of conventional TVs is 4:3, while that of wide screen and high definition TVs is in the 4:3 ratio, you cannot view it in wide screen. • Since DVD discs are recorded in various image formats, ...they will appear at the top and bottom of the screen. 4:3PS (4:3 Pan&Scan) : Select this to play a 16:9 picture in the letter box mode on a conventional TV. • Black...
...ratio setting. Adjusting the TV Aspect Ratio (Screen Size) The horizontal to vertical screen size ratio of conventional TVs is 4:3, while that of wide screen and high definition TVs is in the 4:3 ratio, you cannot view it in wide screen. • Since DVD discs are recorded in various image formats, ...they will appear at the top and bottom of the screen. 4:3PS (4:3 Pan&Scan) : Select this to play a 16:9 picture in the letter box mode on a conventional TV. • Black...

User Manual (user Manual) (ver.1.0) (English)
Page 58
...; If you cannot adjust the volume using the volume control buttons. • If the auto sound microphone is available only for each channel will appear in the display. Auto Sound Calibration Microphone L: Front Speaker (L) C: Center Speaker LS: Rear Speaker (L) R: Front Speaker (R) SW: Subwoofer RS: Rear Speaker (R) Note • If you purchased the unit for the first time or initialized it, pressing the Auto Sound Calibration button without connecting the auto sound calibration microphone will display the message "PLEASE SET ASC FUNCTION FIRST" in the display. 2 Briefly press...
...; If you cannot adjust the volume using the volume control buttons. • If the auto sound microphone is available only for each channel will appear in the display. Auto Sound Calibration Microphone L: Front Speaker (L) C: Center Speaker LS: Rear Speaker (L) R: Front Speaker (R) SW: Subwoofer RS: Rear Speaker (R) Note • If you purchased the unit for the first time or initialized it, pressing the Auto Sound Calibration button without connecting the auto sound calibration microphone will display the message "PLEASE SET ASC FUNCTION FIRST" in the display. 2 Briefly press...

User Manual (user Manual) (ver.1.0) (English)
Page 59
... the audio setting of the setup screen 58 To listen in the auto sound calibration mode, briefly press ASC button. (If you set in the auto sound calibration mode. A result for the first time) • The selection alternates between the listener and the speaker is below 10 feet: Set the main unit's volume to 15. 4 Press ASC button. • The tone will be output twice, in the display followed by "REMOVE MIC", and the setup...
... the audio setting of the setup screen 58 To listen in the auto sound calibration mode, briefly press ASC button. (If you set in the auto sound calibration mode. A result for the first time) • The selection alternates between the listener and the speaker is below 10 feet: Set the main unit's volume to 15. 4 Press ASC button. • The tone will be output twice, in the display followed by "REMOVE MIC", and the setup...

User Manual (user Manual) (ver.1.0) (English)
Page 68
... not set the remote control with the remote control 1 Press the MODE button to make the TV indicator on the remote control flash. 2 Press POWER button to turn on a Samsung TV by default. Example: For a Samsung TV While holding down POWER, use the TV POWER, TV VIDEO, VOLUME, CHANNEL, and Numeric buttons (0~9). • The remote control may not be turned off or on your brand of TVs. Also some operations may not work on the TV. 3 Point the remote control toward...
... not set the remote control with the remote control 1 Press the MODE button to make the TV indicator on the remote control flash. 2 Press POWER button to turn on a Samsung TV by default. Example: For a Samsung TV While holding down POWER, use the TV POWER, TV VIDEO, VOLUME, CHANNEL, and Numeric buttons (0~9). • The remote control may not be turned off or on your brand of TVs. Also some operations may not work on the TV. 3 Point the remote control toward...

User Manual (user Manual) (ver.1.0) (English)
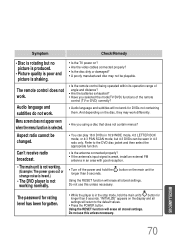
Page 70
... 5.1 channel sound. • Is the audio language correctly set C, SL, and SR to a warm one? Playback does not start immediately when the Play/Pause button is pressed. • Is the region code of the setup screen, no sound is heard from the center speaker and the front left and right speakers. Sound can use all six. Picture does not appear, sound is not produced, or the disc tray opens 2 to DOLBY DIGITAL...
... 5.1 channel sound. • Is the audio language correctly set C, SL, and SR to a warm one? Playback does not start immediately when the Play/Pause button is pressed. • Is the region code of the setup screen, no sound is heard from the center speaker and the front left and right speakers. Sound can use all six. Picture does not appear, sound is not produced, or the disc tray opens 2 to DOLBY DIGITAL...
User Manual (user Manual) (ver.1.0) (English)
Page 71
... playable. • Is the remote control being operated within its operation range of the remote control (TV or DVD) correctly? • Audio language and subtitles will erase all stored settings. Do not use this unless necessary. Aspect ratio cannot be changed. button on ? • Are the video cables connected properly? • Is the disc dirty or damaged? • A poorly manufactured disc may work . Can't receive radio broadcast. • The main...
... playable. • Is the remote control being operated within its operation range of the remote control (TV or DVD) correctly? • Audio language and subtitles will erase all stored settings. Do not use this unless necessary. Aspect ratio cannot be changed. button on ? • Are the video cables connected properly? • Is the disc dirty or damaged? • A poorly manufactured disc may work . Can't receive radio broadcast. • The main...

User Manual (user Manual) (ver.1.0) (English)
Page 75
... environmental instructions that are on an "AS IS" basis. SAMSUNG DVD PLAYER LIMITED WARRANTY TO ORIGINAL PURCHASER This SAMSUNG brand product, as supplied and distributed by Samsung Electronics America, Inc. (SAMSUNG) and delivered new, in the original carton to SAMSUNG or SAMSUNG's authorized service center. The original dated bill of the purchaser. SAMSUNG will repair or replace this product was not intended; All replaced parts and...
... environmental instructions that are on an "AS IS" basis. SAMSUNG DVD PLAYER LIMITED WARRANTY TO ORIGINAL PURCHASER This SAMSUNG brand product, as supplied and distributed by Samsung Electronics America, Inc. (SAMSUNG) and delivered new, in the original carton to SAMSUNG or SAMSUNG's authorized service center. The original dated bill of the purchaser. SAMSUNG will repair or replace this product was not intended; All replaced parts and...

