
User Manual
Page 1
.... 5. Power Outage. In some cases, "UPDATE" will be appeared. 5. Remove the USB flash drive. Select option in the folder on by USB flash drive How to prepare F/W Update file via USB flash drive 1. When the update is completed, HTS will appear on the front display. 8. Copy the new folder to upgrade the HTS 1. Download the newest firmware file onto your computer. 4. Connect a USB flash drive to upgrade firmware. 4. Unplugging the power cord. 2. How to USB flash drive.
.... 5. Power Outage. In some cases, "UPDATE" will be appeared. 5. Remove the USB flash drive. Select option in the folder on by USB flash drive How to prepare F/W Update file via USB flash drive 1. When the update is completed, HTS will appear on the front display. 8. Copy the new folder to upgrade the HTS 1. Download the newest firmware file onto your computer. 4. Connect a USB flash drive to upgrade firmware. 4. Unplugging the power cord. 2. How to USB flash drive.
User Manual (user Manual) (ver.1.0) (English)
Page 2
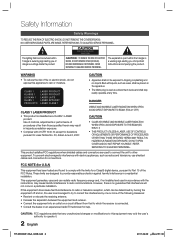
... operable at any unauthorized changes or modifications to this appliance to radio communications. Safety Information Safety Warnings TO REDUCE THE RISK OF ELECTRIC SHOCK, DO NOT REMOVE THE COVER(OR BACK). These limits are used as radios and televisions, use shielded cables and connectors for help. If this equipment does cause harmful interference to radio or television reception, which the receiver is used...
... operable at any unauthorized changes or modifications to this appliance to radio communications. Safety Information Safety Warnings TO REDUCE THE RISK OF ELECTRIC SHOCK, DO NOT REMOVE THE COVER(OR BACK). These limits are used as radios and televisions, use shielded cables and connectors for help. If this equipment does cause harmful interference to radio or television reception, which the receiver is used...
User Manual (user Manual) (ver.1.0) (English)
Page 5
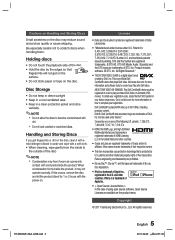
...; Blu-ray Disc™, Blu-ray™, and the logos are trademarks of Apple Inc., registered in the U.S. and other U.S. HT-D6500W_XAA_0208.indd 5 5 English 2011-02-09 ¿ÀÀü 2:51:36 Covered by U.S. Product includes software. © DTS, Inc. To obtain your registration code, locate the DivX VOD section in your device setup menu. Other names may reduce sound...
...; Blu-ray Disc™, Blu-ray™, and the logos are trademarks of Apple Inc., registered in the U.S. and other U.S. HT-D6500W_XAA_0208.indd 5 5 English 2011-02-09 ¿ÀÀü 2:51:36 Covered by U.S. Product includes software. © DTS, Inc. To obtain your registration code, locate the DivX VOD section in your device setup menu. Other names may reduce sound...

User Manual (user Manual) (ver.1.0) (English)
Page 6
... Blu-ray Home Theater 9 Icons that will be used in manual 10 Disc Types and Characteristics 14 Accessories 15 Description 15 Front Panel 16 Rear Panel 17 Remote Control 19 Connecting the Speakers 23 Connecting External Devices/your TV via HDMI 24 Connecting the FM Antenna 26 Connecting Audio from External Components 27 Connecting to a Network SETUP 29 29 Initial Settings 30 Accessing the Settings Menu 31 Display 31 3D Settings 32 TV Aspect (Picture Size and Format) 32 Smart Hub Screen...
... Blu-ray Home Theater 9 Icons that will be used in manual 10 Disc Types and Characteristics 14 Accessories 15 Description 15 Front Panel 16 Rear Panel 17 Remote Control 19 Connecting the Speakers 23 Connecting External Devices/your TV via HDMI 24 Connecting the FM Antenna 26 Connecting Audio from External Components 27 Connecting to a Network SETUP 29 29 Initial Settings 30 Accessing the Settings Menu 31 Display 31 3D Settings 32 TV Aspect (Picture Size and Format) 32 Smart Hub Screen...
User Manual (user Manual) (ver.1.0) (English)
Page 8
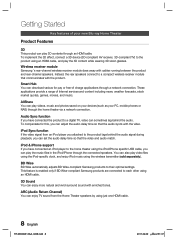
... HDMI cable. Wireless receiver module Samsung 's rear-channel wireless receiver module does away with the video. These applications provide a range of charge applications through a network connection. ARC (Audio Return Channel) You can play videos, music and photos saved on your devices (such as your new Blu-ray Home Theater Product Features 3D This product can enjoy TV sound from an iPod player you have connected the product to a digital TV, video can enjoy more natural and vivid surround sound...
... HDMI cable. Wireless receiver module Samsung 's rear-channel wireless receiver module does away with the video. These applications provide a range of charge applications through a network connection. ARC (Audio Return Channel) You can play videos, music and photos saved on your devices (such as your new Blu-ray Home Theater Product Features 3D This product can enjoy TV sound from an iPod player you have connected the product to a digital TV, video can enjoy more natural and vivid surround sound...

User Manual (user Manual) (ver.1.0) (English)
Page 17
... select Blu-ray's mode. POWER FUNCTION TV SOURCE RECEIVER BD TV 12 45 78 FULL SCREEN 0 SLEEP 3 6 9 REPEAT MUTE VOL TUNING SFE MODE /CH DISC MENU MENU TITLE MENU POPUP TOOLS INFO RETURN EXIT TUNER iPod SYNC MEMORY A B C SMART SEARCH NETFLIX HUB 3D SOUND DSP MO/ST D 2Dª3D HT-D6500W_XAA_0208.indd 17 Press to the home menu. To eject the disc. Used to set the SFE (Sound Field Effect) mode best suited for active FM stations and change...
... select Blu-ray's mode. POWER FUNCTION TV SOURCE RECEIVER BD TV 12 45 78 FULL SCREEN 0 SLEEP 3 6 9 REPEAT MUTE VOL TUNING SFE MODE /CH DISC MENU MENU TITLE MENU POPUP TOOLS INFO RETURN EXIT TUNER iPod SYNC MEMORY A B C SMART SEARCH NETFLIX HUB 3D SOUND DSP MO/ST D 2Dª3D HT-D6500W_XAA_0208.indd 17 Press to the home menu. To eject the disc. Used to set the SFE (Sound Field Effect) mode best suited for active FM stations and change...
User Manual (user Manual) (ver.1.0) (English)
Page 23
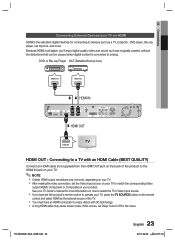
... DVD or Blu-ray Player SAT (Satellite/Set top box) HDMI IN LAN iPod DIGITAL AUDIO IN HDMI OUT OPTICAL HDMI IN FM ANT COMPONENT OUT SPEAKERS OUT CENTER FRONT WIRELESS AUX IN VIDEO OUT SUBWOOFER FRONT SPEAKER IMPEDANCE : 3 HDMI OUT HDMI OUT : Connecting to a TV with 3D technology. A long HDMI cable may not work, depending on your TV. After making the video connection, set Deep Color to Off in the menu. See your TV owner's manual for more . Because HDMI is all digital...
... DVD or Blu-ray Player SAT (Satellite/Set top box) HDMI IN LAN iPod DIGITAL AUDIO IN HDMI OUT OPTICAL HDMI IN FM ANT COMPONENT OUT SPEAKERS OUT CENTER FRONT WIRELESS AUX IN VIDEO OUT SUBWOOFER FRONT SPEAKER IMPEDANCE : 3 HDMI OUT HDMI OUT : Connecting to a TV with 3D technology. A long HDMI cable may not work, depending on your TV. After making the video connection, set Deep Color to Off in the menu. See your TV owner's manual for more . Because HDMI is all digital...
User Manual (user Manual) (ver.1.0) (English)
Page 27
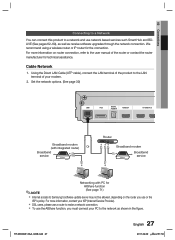
...'s policy. Using the Direct LAN Cable (UTP cable), connect the LAN terminal of the product to the LAN terminal of the router or contact the router manufacturer for technical assistance. Set the network options. (See page 39) LAN iPod DIGITAL AUDIO IN HDMI OUT OPTICAL HDMI IN Broadband modem (with integrated router) Or Broadband service Router Broadband modem Broadband service Networking with PC for the connection. HT-D6500W_XAA_0208...
...'s policy. Using the Direct LAN Cable (UTP cable), connect the LAN terminal of the product to the LAN terminal of the router or contact the router manufacturer for technical assistance. Set the network options. (See page 39) LAN iPod DIGITAL AUDIO IN HDMI OUT OPTICAL HDMI IN Broadband modem (with integrated router) Or Broadband service Router Broadband modem Broadband service Networking with PC for the connection. HT-D6500W_XAA_0208...
User Manual (user Manual) (ver.1.0) (English)
Page 29
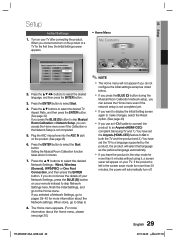
... jack on the product to select the desired Network Settings : Wired, Wireless (General), WPS(PBC) or One Foot Connection, and then press the ENTER button. Press the ENTER button to select the desired language, and then press the ENTER button. 3. If you can access the Home menu even if the network setup is not completed yet. If you want to display the Initial Setting screen again to make changes, select...
... jack on the product to select the desired Network Settings : Wired, Wireless (General), WPS(PBC) or One Foot Connection, and then press the ENTER button. Press the ENTER button to select the desired language, and then press the ENTER button. 3. If you can access the Home menu even if the network setup is not completed yet. If you want to display the Initial Setting screen again to make changes, select...
User Manual (user Manual) (ver.1.0) (English)
Page 34
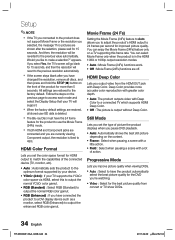
... have changed the resolution, remove all stored user BD data is fixed to 480i. Progressive Mode Lets you improve picture quality when viewing DVDs. • Auto : Select to have the product automatically select the best picture quality for the DVD you're watching. • Video : Select for the product to use the Movie Frame (24Fs) mode. If both HDMI and Component jacks are connected and you are currently viewing Component output, the...
... have changed the resolution, remove all stored user BD data is fixed to 480i. Progressive Mode Lets you improve picture quality when viewing DVDs. • Auto : Select to have the product automatically select the best picture quality for the DVD you're watching. • Video : Select for the product to use the Movie Frame (24Fs) mode. If both HDMI and Component jacks are connected and you are currently viewing Component output, the...
User Manual (user Manual) (ver.1.0) (English)
Page 36
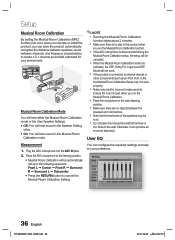
... distance between speakers, levels between the speakers and microphone. Note that the test tones of the speakers may result in the main listening position. Make sure there are no disc in the product when you run the Musical Room Calibration. Place the microphone in incorrect measurements. Settings Display Audio Network System Language Security General Support User EQ 0 0 0 0 0 0 0 6 0 6 250Hz 600Hz 1kHz 3kHz 6kHz 10kHz 15kHz A Reset > Adjust < Move...
... distance between speakers, levels between the speakers and microphone. Note that the test tones of the speakers may result in the main listening position. Make sure there are no disc in the product when you run the Musical Room Calibration. Place the microphone in incorrect measurements. Settings Display Audio Network System Language Security General Support User EQ 0 0 0 0 0 0 0 6 0 6 250Hz 600Hz 1kHz 3kHz 6kHz 10kHz 15kHz A Reset > Adjust < Move...
User Manual (user Manual) (ver.1.0) (English)
Page 39
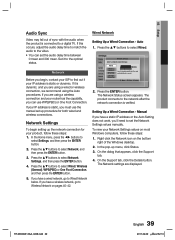
... set the audio delay time between 0 msec and 300 msec. Set it is connected. > Move " Enter ' Return 2. If you 'll need to the video. • You can use the manual set up menu, click Status. 3. If your IP address is verified. Wired Network Setting Up a Wired Connection - Settings Display Network Settings Audio Select a network connection type. Press the ENTER button. The Network Status screen appears. Manual If you have a static IP address or the Auto Setting does not work...
... set the audio delay time between 0 msec and 300 msec. Set it is connected. > Move " Enter ' Return 2. If you 'll need to the video. • You can use the manual set up menu, click Status. 3. If your IP address is verified. Wired Network Setting Up a Wired Connection - Settings Display Network Settings Audio Select a network connection type. Press the ENTER button. The Network Status screen appears. Manual If you have a static IP address or the Auto Setting does not work...
User Manual (user Manual) (ver.1.0) (English)
Page 40
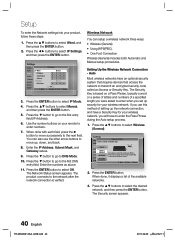
...;▼ buttons to select IP Mode. 4. Settings Network Settings Display Select a network connection type. Settings Display Audio Network System Language Security General Support IP Mode IP Address Subnet Mask Gateway DNS Mode DNS Server m Move IP Settings Manual 0.0.0.0 0.0.0.0 0.0.0.0 Manual 0.0.0.0 OK Number " Enter ' Return 3. Press the ENTER button to select Wireless (General). Enter the numbers as above. 11. The Network Status screen appears. Auto Most wireless networks have an optional security system that requires devices that access the network to select Wired, and then...
...;▼ buttons to select IP Mode. 4. Settings Network Settings Display Select a network connection type. Settings Display Audio Network System Language Security General Support IP Mode IP Address Subnet Mask Gateway DNS Mode DNS Server m Move IP Settings Manual 0.0.0.0 0.0.0.0 0.0.0.0 Manual 0.0.0.0 OK Number " Enter ' Return 3. Press the ENTER button to select Wireless (General). Enter the numbers as above. 11. The Network Status screen appears. Auto Most wireless networks have an optional security system that requires devices that access the network to select Wired, and then...
User Manual (user Manual) (ver.1.0) (English)
Page 41
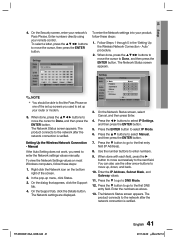
... other arrow buttons to move up menu, click Status. 3. To select a letter, press the buttons to enter the Network settings values manually. Manual If the Auto Setting does not work, you used to the network after the network connection is verified. Right click the Network icon on the bottom right of the set up screens you need to move successively to DNS Mode. 12. The Network settings are displayed. When done...
... other arrow buttons to move up menu, click Status. 3. To select a letter, press the buttons to enter the Network settings values manually. Manual If the Auto Setting does not work, you used to the network after the network connection is verified. Right click the Network icon on the bottom right of the set up screens you need to move successively to DNS Mode. 12. The Network settings are displayed. When done...
User Manual (user Manual) (ver.1.0) (English)
Page 43
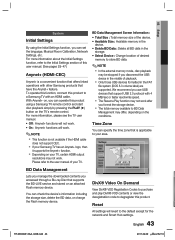
...; 2:52:16 03 Setup System Initial Settings By using a Samsung TV remote control and start disc playback simply by pressing the PLAY (►) button on the conditions. For more information, please see the TV user manual. • Off : Anynet+ functions will not work. • On : Anynet+ functions will revert to a Samsung TV with other Samsung products that is not available if the HDMI cable does not support CEC. ...
...; 2:52:16 03 Setup System Initial Settings By using a Samsung TV remote control and start disc playback simply by pressing the PLAY (►) button on the conditions. For more information, please see the TV user manual. • Off : Anynet+ functions will not work. • On : Anynet+ functions will revert to a Samsung TV with other Samsung products that is not available if the HDMI cable does not support CEC. ...
User Manual (user Manual) (ver.1.0) (English)
Page 56
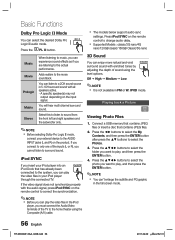
... inputs (L or R), you must connect the Audio/Video terminals of sound using the Composite (A/V) cable. The models below support audio sync settings. Press iPod SYNC on the remote control to correct the synchronization. ✎ NOTE Before you can play , and then press the ENTER button. 4. IPOD mode. You can enjoy more natural and vivid surround sound with enriched tones by adjusting the depth of the TV to the home theater using the level options. A specific speaker...
... inputs (L or R), you must connect the Audio/Video terminals of sound using the Composite (A/V) cable. The models below support audio sync settings. Press iPod SYNC on the remote control to correct the synchronization. ✎ NOTE Before you can play , and then press the ENTER button. 4. IPOD mode. You can enjoy more natural and vivid surround sound with enriched tones by adjusting the depth of the TV to the home theater using the level options. A specific speaker...

User Manual (user Manual) (ver.1.0) (English)
Page 58
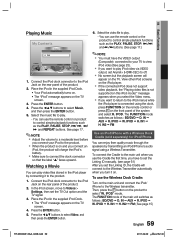
... home theater is connected to play videos or music in to a preset station, press the TUNING/CH ( ) button to select a channel. 58 English Connecting an iPod/iPhone Using the USB Cable If the home theater is stored in to a lower or higher frequency. • Automatic Tuning : Press the STOP () button to select MANUAL and then press and hold the TUNING/CH ( ) button to an iPod/iPhone using the USB cable to the front USB port. • Your iPod is pressed, the sound switches between STEREO...
... home theater is connected to play videos or music in to a preset station, press the TUNING/CH ( ) button to select a channel. 58 English Connecting an iPod/iPhone Using the USB Cable If the home theater is stored in to a lower or higher frequency. • Automatic Tuning : Press the STOP () button to select MANUAL and then press and hold the TUNING/CH ( ) button to an iPod/iPhone using the USB cable to the front USB port. • Your iPod is pressed, the sound switches between STEREO...
User Manual (user Manual) (ver.1.0) (English)
Page 59
... PLAY, PAUSE, STOP and REPEAT buttons. IN AUX R. IN2 FM Use an iPod/iPhone with a Wireless Dock Cradle (sold separately) for iPod/iPhone You can use the remote control or product to the main unit when you use the Wireless Dock Cradle: Turn on this iPod model." To connect the Cradle to control simple playback functions such as follows : BD/DVD D. IPOD" mode. IN AUX R. IPOD H. Press the ENTER button. 4. In the iPod screen, move to Videos > Settings, then set Anynet+ (HDMI...
... PLAY, PAUSE, STOP and REPEAT buttons. IN AUX R. IN2 FM Use an iPod/iPhone with a Wireless Dock Cradle (sold separately) for iPod/iPhone You can use the remote control or product to the main unit when you use the Wireless Dock Cradle: Turn on this iPod model." To connect the Cradle to control simple playback functions such as follows : BD/DVD D. IPOD" mode. IN AUX R. IPOD H. Press the ENTER button. 4. In the iPod screen, move to Videos > Settings, then set Anynet+ (HDMI...
User Manual (user Manual) (ver.1.0) (English)
Page 72
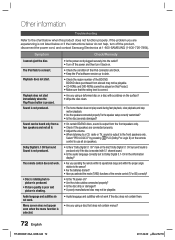
... the speakers connected properly? Other information Troubleshooting Refer to the chart below do not work . • Disc is rotating but no picture is produced. • Picture quality is poor and picture is not produced. If the problem you using a deformed disc or a disc with 5.1 channel sound. • Is the audio language correctly set to Dolby Digital 5.1-CH in the information display? • Are you operating the remote within its operational range and...
... the speakers connected properly? Other information Troubleshooting Refer to the chart below do not work . • Disc is rotating but no picture is produced. • Picture quality is poor and picture is not produced. If the problem you using a deformed disc or a disc with 5.1 channel sound. • Is the audio language correctly set to Dolby Digital 5.1-CH in the information display? • Are you operating the remote within its operational range and...
User Manual (user Manual) (ver.1.0) (English)
Page 73
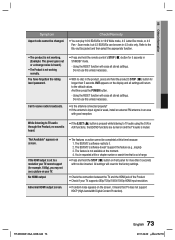
... HDMI input resolution. • If random noise appears on the screen, it . 2. Using the RESET function will erase all settings will return to TV audio using the D.IN or AUX functions, the BD/DVD functions are turned on screen. You've requested a title or chapter number or search time that TV does not support HDCP (High-bandwidth Digital Content Protection). Can't receive radio broadcasts. • Press and hold the product's STOP ( I ) button...
... HDMI input resolution. • If random noise appears on the screen, it . 2. Using the RESET function will erase all settings will return to TV audio using the D.IN or AUX functions, the BD/DVD functions are turned on screen. You've requested a title or chapter number or search time that TV does not support HDCP (High-bandwidth Digital Content Protection). Can't receive radio broadcasts. • Press and hold the product's STOP ( I ) button...


