
User Manual (user Manual) (ver.1.0) (English)
Page 5
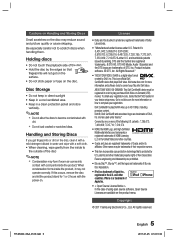
... trademarks or registered trademarks of HDMI Licensing LLC in a clean protection jacket and store vertically. ✎ NOTE Do not allow the discs to play DivX® video up to scratch discs when handling them. iPhone is a digital video format created by one or more information and software tools to complete your device setup menu. Copyright © 2011 Samsung Electronics Co., Ltd. All...
... trademarks or registered trademarks of HDMI Licensing LLC in a clean protection jacket and store vertically. ✎ NOTE Do not allow the discs to play DivX® video up to scratch discs when handling them. iPhone is a digital video format created by one or more information and software tools to complete your device setup menu. Copyright © 2011 Samsung Electronics Co., Ltd. All...
User Manual (user Manual) (ver.1.0) (English)
Page 6
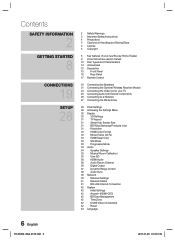
... of your new Blu-ray Home Theater 9 Icons that will be used in manual 10 Disc Types and Characteristics 14 Accessories 15 Description 15 Front Panel 16 Rear Panel 17 Remote Control 19 Connecting the Speakers 21 Connecting the Optional Wireless Receiver Module 23 Connecting the Video Out to your TV 25 Connecting Audio from External Components 26 Connecting to a Network 27 Connecting the FM Antenna 28 Initial Settings 29 Accessing the Settings Menu 30 Display 30 3D Settings 31 TV...
... of your new Blu-ray Home Theater 9 Icons that will be used in manual 10 Disc Types and Characteristics 14 Accessories 15 Description 15 Front Panel 16 Rear Panel 17 Remote Control 19 Connecting the Speakers 21 Connecting the Optional Wireless Receiver Module 23 Connecting the Video Out to your TV 25 Connecting Audio from External Components 26 Connecting to a Network 27 Connecting the FM Antenna 28 Initial Settings 29 Accessing the Settings Menu 30 Display 30 3D Settings 31 TV...
User Manual (user Manual) (ver.1.0) (English)
Page 8
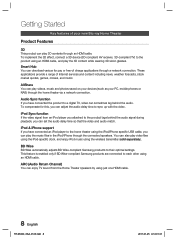
... You can download various for this, you have connected an iPod player to a digital TV, video can sometimes lag behind the audio signal during playback, you can play the music files in the iPod/iPhone through a network connection. To compensate for pay or free-of charge applications through the connected speakers. ARC (Audio Return Channel) You can also play video files using the iPod-specific dock, and enjoy iPod music using the iPod/iPhone specific USB cable, you can set the audio delay time...
... You can download various for this, you have connected an iPod player to a digital TV, video can sometimes lag behind the audio signal during playback, you can play the music files in the iPod/iPhone through a network connection. To compensate for pay or free-of charge applications through the connected speakers. ARC (Audio Return Channel) You can also play video files using the iPod-specific dock, and enjoy iPod music using the iPod/iPhone specific USB cable, you can set the audio delay time...
User Manual (user Manual) (ver.1.0) (English)
Page 16
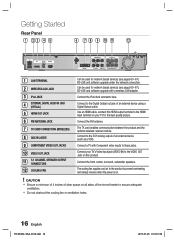
...LAN iPod WIRELESS LAN DIGITAL AUDIO IN OPTICAL HDMI OUT FM ANT COMPONENT OUT SPEAKERS OUT CENTER FRONT SURROUND WIRELESS AUX IN VIDEO OUT SUBWOOFER FRONT SURROUND SPEAKER IMPEDANCE : 3 1 LAN TERMINAL 2 WIRELESS LAN JACK 3 iPod JACK 4 EXTERNAL DIGITAL AUDIO IN JACK (OPTICAL) 5 HDMI OUT JACK 6 FM ANTENNA JACK 7 TX CARD CONNECTION (WIRELESS) 8 AUX IN JACKS 9 COMPONENT VIDEO OUT JACKS 10 VIDEO OUT JACK 11 5.1 CHANNEL SPEAKER OUTPUT CONNECTORS 12 COOLING FAN Can be used for network based services (see pages 60~67), BD-LIVE and software upgrade with Component video inputs...
...LAN iPod WIRELESS LAN DIGITAL AUDIO IN OPTICAL HDMI OUT FM ANT COMPONENT OUT SPEAKERS OUT CENTER FRONT SURROUND WIRELESS AUX IN VIDEO OUT SUBWOOFER FRONT SURROUND SPEAKER IMPEDANCE : 3 1 LAN TERMINAL 2 WIRELESS LAN JACK 3 iPod JACK 4 EXTERNAL DIGITAL AUDIO IN JACK (OPTICAL) 5 HDMI OUT JACK 6 FM ANTENNA JACK 7 TX CARD CONNECTION (WIRELESS) 8 AUX IN JACKS 9 COMPONENT VIDEO OUT JACKS 10 VIDEO OUT JACK 11 5.1 CHANNEL SPEAKER OUTPUT CONNECTORS 12 COOLING FAN Can be used for network based services (see pages 60~67), BD-LIVE and software upgrade with Component video inputs...
User Manual (user Manual) (ver.1.0) (English)
Page 17
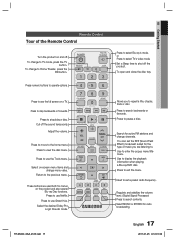
... Started Remote Control Tour of music you to select Blu-ray's mode. To change to the previous menu. Press numeric buttons to TV mode, press the TV button. Adjust the volume. Select on the product and also several Blu-ray Disc functions. Set a Sleep time to pause a disc. Press to shut off the product. Use to display the playback information when playing a Blu-ray/DVD disc. Use to enter the popup menu/title menu. Select MONO or STEREO for menus on -screen menu items and change channels. Cut...
... Started Remote Control Tour of music you to select Blu-ray's mode. To change to the previous menu. Press numeric buttons to TV mode, press the TV button. Adjust the volume. Select on the product and also several Blu-ray Disc functions. Set a Sleep time to pause a disc. Press to shut off the product. Use to display the playback information when playing a Blu-ray/DVD disc. Use to enter the popup menu/title menu. Select MONO or STEREO for menus on -screen menu items and change channels. Cut...

User Manual (user Manual) (ver.1.0) (English)
Page 26
... HT-D5300_XAA_0125.indd 26 2011-01-25 12:01:46 Cable Network 1. We recommend using a wireless router or IP router for AllShare function ✎ NOTE (See page 69) Internet access to Samsung's software update server may not be allowed, depending on router connection, refer to the user manual of your PC to the network as receive software upgrades through the network connection. Connections Connecting to a Network You can connect this product to a network...
... HT-D5300_XAA_0125.indd 26 2011-01-25 12:01:46 Cable Network 1. We recommend using a wireless router or IP router for AllShare function ✎ NOTE (See page 69) Internet access to Samsung's software update server may not be allowed, depending on router connection, refer to the user manual of your PC to the network as receive software upgrades through the network connection. Connections Connecting to a Network You can connect this product to a network...
User Manual (user Manual) (ver.1.0) (English)
Page 28
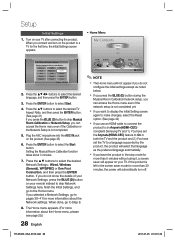
... network setup is left in the stop mode for more information about the Network settings. If the product is not completed yet. If you want to display the Initial Setting screen again to make changes, select the Reset option. (See page 42) If you press the BLUE (D) button to a TV for the first time, the Initial Settings screen appears. • Home Menu My Contents Videos Photos Music...
... network setup is left in the stop mode for more information about the Network settings. If the product is not completed yet. If you want to display the Initial Setting screen again to make changes, select the Reset option. (See page 42) If you press the BLUE (D) button to a TV for the first time, the Initial Settings screen appears. • Home Menu My Contents Videos Photos Music...

User Manual (user Manual) (ver.1.0) (English)
Page 33
... factory default settings are restored, all discs, and then press and hold the STOP () button on the previous page to access each mode and select the Display Setup that your TV supports the YCbCr color space via HDMI, select this frame rate. Progressive Mode Lets you improve picture quality when viewing DVDs. • Auto : Select to have changed the resolution, remove all stored user BD data is output without Deep Color. HDMI...
... factory default settings are restored, all discs, and then press and hold the STOP () button on the previous page to access each mode and select the Display Setup that your TV supports the YCbCr color space via HDMI, select this frame rate. Progressive Mode Lets you improve picture quality when viewing DVDs. • Auto : Select to have changed the resolution, remove all stored user BD data is output without Deep Color. HDMI...

User Manual (user Manual) (ver.1.0) (English)
Page 35
... channels, and frequency characteristics to create a 5.1-channel sound field optimized for your preference. Settings Display Audio Network System Language Security General Support User EQ 0 0 0 0 0 0 0 6 0 6 250Hz 600Hz 1kHz 3kHz 6kHz 10kHz 15kHz A Reset > Adjust < Move ' Return HT-D5300_XAA_0125.indd 35 35 English 2011-01-25 12:01:56 Ensure the room is connected to external devices or other components (such as an iPod, AUX, D.IN), the Musical Room Calibration Setup...
... channels, and frequency characteristics to create a 5.1-channel sound field optimized for your preference. Settings Display Audio Network System Language Security General Support User EQ 0 0 0 0 0 0 0 6 0 6 250Hz 600Hz 1kHz 3kHz 6kHz 10kHz 15kHz A Reset > Adjust < Move ' Return HT-D5300_XAA_0125.indd 35 35 English 2011-01-25 12:01:56 Ensure the room is connected to external devices or other components (such as an iPod, AUX, D.IN), the Musical Room Calibration Setup...

User Manual (user Manual) (ver.1.0) (English)
Page 38
... a Wired Connection - In the Home menu, press the ◄► buttons to select Wired, Wireless (General), WPS(PBC) or One Foot Connection, and then press the ENTER button. 5. Wired Network Setting Up a Wired Connection - Setup Audio Sync Video may fall out of the Windows desktop. 2. Set it is connected. > Move " Enter ' Return 2. If you can set up menu, click Status. 3. The Network settings are using LAN cable. If this occurs, adjust the audio delay time to match the audio to Wired Network below. Settings Display Network Settings Audio Select a network connection...
... a Wired Connection - In the Home menu, press the ◄► buttons to select Wired, Wireless (General), WPS(PBC) or One Foot Connection, and then press the ENTER button. 5. Wired Network Setting Up a Wired Connection - Setup Audio Sync Video may fall out of the Windows desktop. 2. Set it is connected. > Move " Enter ' Return 2. If you can set up menu, click Status. 3. The Network settings are using LAN cable. If this occurs, adjust the audio delay time to match the audio to Wired Network below. Settings Display Network Settings Audio Select a network connection...

User Manual (user Manual) (ver.1.0) (English)
Page 40
... the Wireless Network Connection - The Network settings are displayed. Auto' procedure. 2. When done, press the buttons to move up screens you need to the network after the network connection is verified. On the Network Status screen, select Cancel, and then press Enter. 4. The product connects to enter the Network settings values manually. Right click the Network icon on most Windows computers, follow these steps: 1. To enter the Network settings into your remote control...
... the Wireless Network Connection - The Network settings are displayed. Auto' procedure. 2. When done, press the buttons to move up screens you need to the network after the network connection is verified. On the Network Status screen, select Cancel, and then press Enter. 4. The product connects to enter the Network settings values manually. Right click the Network icon on most Windows computers, follow these steps: 1. To enter the Network settings into your remote control...

User Manual (user Manual) (ver.1.0) (English)
Page 42
... user manual. • Off : Anynet+ functions will not work. • On : Anynet+ functions will revert to the user manual of the device. • Available Size : Available memory in the FAT file system (DOS 8.3 volume label) are supported. Setup System Initial Settings By using a Samsung TV remote control and start disc playback simply by pressing the PLAY (►) button on the TV's remote control. Time Zone You can set the language, Musical Room Calibration, Network Settings...
... user manual. • Off : Anynet+ functions will not work. • On : Anynet+ functions will revert to the user manual of the device. • Available Size : Available memory in the FAT file system (DOS 8.3 volume label) are supported. Setup System Initial Settings By using a Samsung TV remote control and start disc playback simply by pressing the PLAY (►) button on the TV's remote control. Time Zone You can set the language, Musical Room Calibration, Network Settings...
User Manual (user Manual) (ver.1.0) (English)
Page 43
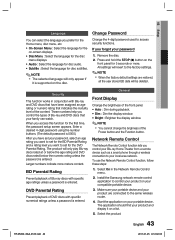
... numbers indicate more . Make sure your portable device and your portable device. Security This function works in the Network Remote Control menu. 2. General Front Display Change the brightness of the front panel. • Auto : Dim during playback. • Dim : Dim the display window. • Bright : Brighten the display window. ✎ NOTE You cannot change the brighness of Blu-ray discs with specific age ratings unless a password is...
... numbers indicate more . Make sure your portable device and your portable device. Security This function works in the Network Remote Control menu. 2. General Front Display Change the brightness of the front panel. • Auto : Dim during playback. • Dim : Dim the display window. • Bright : Brighten the display window. ✎ NOTE You cannot change the brighness of Blu-ray discs with specific age ratings unless a password is...

User Manual (user Manual) (ver.1.0) (English)
Page 45
... Download in the software Upgrade menu. Do not turn off . Press the ▲▼ buttons to download upgrade software automatically, when you remove it . Visit www.samsung.com/bluraysupport. 2. Finalize the disc before you are not using a file the product downloaded earlier but its Internet connection is in Standby mode. The product begins the upgrade. 4. Download in Standby Mode You can set Download in Standby Mode function, your computer. 3. If upgrade software has been downloaded, you want to Settings > Support > Software upgrade. 8. HT...
... Download in the software Upgrade menu. Do not turn off . Press the ▲▼ buttons to download upgrade software automatically, when you remove it . Visit www.samsung.com/bluraysupport. 2. Finalize the disc before you are not using a file the product downloaded earlier but its Internet connection is in Standby mode. The product begins the upgrade. 4. Download in Standby Mode You can set Download in Standby Mode function, your computer. 3. If upgrade software has been downloaded, you want to Settings > Support > Software upgrade. 8. HT...
User Manual (user Manual) (ver.1.0) (English)
Page 54
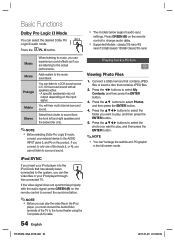
... left and right speakers and the subwoofer only. ✎ NOTE Before selecting Dolby Pro Logic II mode, connect your external device to the AUDIO INPUT jacks (L and R) on the input signal. Press the ▲▼ buttons to the movie soundtrack. Basic Functions Dolby Pro Logic II Mode You can listen to a 2CH sound source in 5.1CH surround sound with the audio signal, press GREEN (B) on the remote control to change audio delay. Supported Models : classic/3G...
... left and right speakers and the subwoofer only. ✎ NOTE Before selecting Dolby Pro Logic II mode, connect your external device to the AUDIO INPUT jacks (L and R) on the input signal. Press the ▲▼ buttons to the movie soundtrack. Basic Functions Dolby Pro Logic II Mode You can listen to a 2CH sound source in 5.1CH surround sound with the audio signal, press GREEN (B) on the remote control to change audio delay. Supported Models : classic/3G...
User Manual (user Manual) (ver.1.0) (English)
Page 56
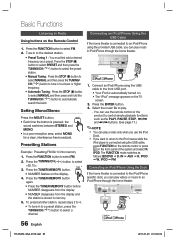
... iPod menus while the iPod player is connected to select a channel. IN AUX R. LAN iPod WIRELESS LAN DIGITAL AUDIO IN OPTICAL HDMI OUT FM ANT WIRELESS iPod 56 English HT-D5300_XAA_0125.indd 56 2011-01-25 12:02:24 Setting Mono/Stereo Press the MO/ST button. • Each time the button is stored in to select FM. 2. IPOD FM Connecting an iPod/iPhone Using the Dock If the home theater is connected using the USB cable to Radio Using buttons on the Remote Control 1. The FUNCTION mode switches as a preset. Tune...
... iPod menus while the iPod player is connected to select a channel. IN AUX R. LAN iPod WIRELESS LAN DIGITAL AUDIO IN OPTICAL HDMI OUT FM ANT WIRELESS iPod 56 English HT-D5300_XAA_0125.indd 56 2011-01-25 12:02:24 Setting Mono/Stereo Press the MO/ST button. • Each time the button is stored in to select FM. 2. IPOD FM Connecting an iPod/iPhone Using the Dock If the home theater is connected using the USB cable to Radio Using buttons on the Remote Control 1. The FUNCTION mode switches as a preset. Tune...
User Manual (user Manual) (ver.1.0) (English)
Page 57
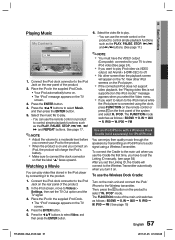
... connected using a Wireless Transmitter. Press the ◄▲▼ buttons to select Music, and then press the ENTER button. 5. View other screen than the playback screen will appear on the TV. IPOD" mode. IPOD W. Connect the iPod dock connector to play . - Select the music file to play iPod video via VIDEO output, set the Linking ID manually. (see page 59) After you want to the iPod Jack on the rear panel of the product. 2. Connect the iPod dock connector to the iPod menus while the iPod player...
... connected using a Wireless Transmitter. Press the ◄▲▼ buttons to select Music, and then press the ENTER button. 5. View other screen than the playback screen will appear on the TV. IPOD" mode. IPOD W. Connect the iPod dock connector to play . - Select the music file to play iPod video via VIDEO output, set the Linking ID manually. (see page 59) After you want to the iPod Jack on the rear panel of the product. 2. Connect the iPod dock connector to the iPod menus while the iPod player...
User Manual (user Manual) (ver.1.0) (English)
Page 70
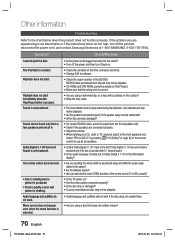
... help, turn it back on the remote control to use all 6. Sound is not produced. Select "PRO LOGIC II" by pressing PL II (Dolby Pro Logic II) on . • Check the condition of the iPod connector and Dock. • Change S/W to software. • Check the region number of the remote control (TV or BD) correctly? • Is the TV power on? • Are the video cables connected properly? • Is the disc...
... help, turn it back on the remote control to use all 6. Sound is not produced. Select "PRO LOGIC II" by pressing PL II (Dolby Pro Logic II) on . • Check the condition of the iPod connector and Dock. • Change S/W to software. • Check the region number of the remote control (TV or BD) correctly? • Is the TV power on? • Are the video cables connected properly? • Is the disc...

User Manual (user Manual) (ver.1.0) (English)
Page 71
... a picture on your TV supports 480p/720p/1080i/1080p HDMI input resolution. • If random noise appears on the screen, it . 2. While listening to TV audio through the Product, no sound is heard. • If the OPEN/CLOSE ( ) button is pressed while listening to TV audio using the D.IN or AUX functions, the BD/DVD functions are turned on the display and all stored settings. If the HDMI output is...
... a picture on your TV supports 480p/720p/1080i/1080p HDMI input resolution. • If random noise appears on the screen, it . 2. While listening to TV audio through the Product, no sound is heard. • If the OPEN/CLOSE ( ) button is pressed while listening to TV audio using the D.IN or AUX functions, the BD/DVD functions are turned on the display and all stored settings. If the HDMI output is...
User Manual (user Manual) (ver.1.0) (English)
Page 76
..., lightning or other signal transmission and delivery problems. SAMSUNG does not warrant uninterrupted or error-free operation of the purchaser. To receive warranty service, the purchaser must contact SAMSUNG for in shipment; The original dated bill of the product to state. SAMSUNG will repair or replace this product or result in service problems; To obtain warranty service, please contact SAMSUNG customer care center. Transportation of sale must...
..., lightning or other signal transmission and delivery problems. SAMSUNG does not warrant uninterrupted or error-free operation of the purchaser. To receive warranty service, the purchaser must contact SAMSUNG for in shipment; The original dated bill of the product to state. SAMSUNG will repair or replace this product or result in service problems; To obtain warranty service, please contact SAMSUNG customer care center. Transportation of sale must...


