

Quick Guide (easy Manual) (ver.1.0) (English)
Page 2
... it for continuous use. Note to the environment. Make sure the ventilation slots are harmful to CATV system installer : This reminder is present inside this unit. Protect the player from the wall outlet. NO USER SERVICEABLE PARTS INSIDE. This symbol alerts you to the stand-by mode does not disconnect the electrical supply. Before moving the player, ensure the disc tray is...
... it for continuous use. Note to the environment. Make sure the ventilation slots are harmful to CATV system installer : This reminder is present inside this unit. Protect the player from the wall outlet. NO USER SERVICEABLE PARTS INSIDE. This symbol alerts you to the stand-by mode does not disconnect the electrical supply. Before moving the player, ensure the disc tray is...
Quick Guide (easy Manual) (ver.1.0) (English)
Page 3
... your home, consult your obsolete outlet. SERVICING •Do not attempt to service this video product from the wall outlet and disconnect the antenna or cable system. a. If liquid has been spilled, or objects have been followed. c. VENTILATION Slots and openings in damage and will often require extensive work by the operating instructions as opening or removing covers may result in proper operating condition...
... your home, consult your obsolete outlet. SERVICING •Do not attempt to service this video product from the wall outlet and disconnect the antenna or cable system. a. If liquid has been spilled, or objects have been followed. c. VENTILATION Slots and openings in damage and will often require extensive work by the operating instructions as opening or removing covers may result in proper operating condition...
Quick Guide (easy Manual) (ver.1.0) (English)
Page 4
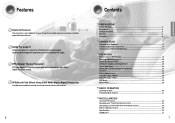
... Digital Input Setup ...26 Setting DRC (Dynamic Range Compression 27 Test Tone ...28 Setting Speaker Level ...30 Dolby Pro Logic ll Mode 32 Dolby Pro Logic ll Effect 34 SFE Mode...36 Stereo Mode ...38 RADIO OPERATION Listening to minimize signal distortion and loss. Features Digital AV Receiver This product is a new form of multi-channel audio signal decoding technology that performs digital signal processing to Radio ...40 Presetting Radio Stations 41 MISCELLANEOUS Convenient Functions...42 Operating your TV with the Remote Control 44 Operating...
... Digital Input Setup ...26 Setting DRC (Dynamic Range Compression 27 Test Tone ...28 Setting Speaker Level ...30 Dolby Pro Logic ll Mode 32 Dolby Pro Logic ll Effect 34 SFE Mode...36 Stereo Mode ...38 RADIO OPERATION Listening to minimize signal distortion and loss. Features Digital AV Receiver This product is a new form of multi-channel audio signal decoding technology that performs digital signal processing to Radio ...40 Presetting Radio Stations 41 MISCELLANEOUS Convenient Functions...42 Operating your TV with the Remote Control 44 Operating...
Quick Guide (easy Manual) (ver.1.0) (English)
Page 5
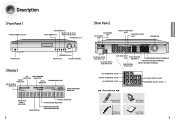
...POWER STANDBY Indicator FUNCTION button INPUT MODE button SELECT ( , ) button TUNING ( , ) button HEADPHONE Jack [ Rear Panel ] AM ANTENNA JACK FM ANTENNA JACK VCR/SAT VIDEO INPUT JACK VCR VIDEO OUTPUT JACK COOLING FAN POWER button SURROUND button SETUP button VOLUME CONTROL [ Display ] DTS LIVE SURROUND INDICATOR INDICATOR DOLBY INDICATOR DOLBY DIGITAL L.PCM INDICATOR INDICATOR SPEAKER INDICATOR RADIO FREQUENCY INDICATOR DOLBY PRO LOGIC II INDICATOR FRONT DISPLAY DIGITAL INDICATOR RADIO STEREO INDICATOR RADIO BROADCASTING RECEIVING INDICATOR 8 DVD OPTICAL DIGITAL AUDIO...
...POWER STANDBY Indicator FUNCTION button INPUT MODE button SELECT ( , ) button TUNING ( , ) button HEADPHONE Jack [ Rear Panel ] AM ANTENNA JACK FM ANTENNA JACK VCR/SAT VIDEO INPUT JACK VCR VIDEO OUTPUT JACK COOLING FAN POWER button SURROUND button SETUP button VOLUME CONTROL [ Display ] DTS LIVE SURROUND INDICATOR INDICATOR DOLBY INDICATOR DOLBY DIGITAL L.PCM INDICATOR INDICATOR SPEAKER INDICATOR RADIO FREQUENCY INDICATOR DOLBY PRO LOGIC II INDICATOR FRONT DISPLAY DIGITAL INDICATOR RADIO STEREO INDICATOR RADIO BROADCASTING RECEIVING INDICATOR 8 DVD OPTICAL DIGITAL AUDIO...

Quick Guide (easy Manual) (ver.1.0) (English)
Page 6
... AMP button POWER button NUMBER(0~9) buttons SLEEP button MO/ST button TUNER button EXTERNAL DEVICE PLAYBACK button MUTE button VOLUME CONTROL button MENU button CURSOR/ENTER button SUBWOOFER button INFO button STEREO button SPK DISTANCE button SPK LEVEL button SFE MODE button 10 DVD button VCR button DIMMER button TV VIDEO, FUNCTION button CD button VCR/SAT button DVD button DRC button INPUT MODE DIGITAL button INPUT MODE ANALOG button TUNER/CHANNEL button TUNING MODE button TUNER MEMORY button MODE button EFFECT button TEST TONE button SPK SELECT button Insert Remote Batteries 1 Remove...
... AMP button POWER button NUMBER(0~9) buttons SLEEP button MO/ST button TUNER button EXTERNAL DEVICE PLAYBACK button MUTE button VOLUME CONTROL button MENU button CURSOR/ENTER button SUBWOOFER button INFO button STEREO button SPK DISTANCE button SPK LEVEL button SFE MODE button 10 DVD button VCR button DIMMER button TV VIDEO, FUNCTION button CD button VCR/SAT button DVD button DRC button INPUT MODE DIGITAL button INPUT MODE ANALOG button TUNER/CHANNEL button TUNING MODE button TUNER MEMORY button MODE button EFFECT button TEST TONE button SPK SELECT button Insert Remote Batteries 1 Remove...
Quick Guide (easy Manual) (ver.1.0) (English)
Page 7
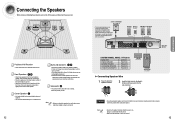
... MODEL NAME : HT-AS610 MAIN UNIT AV-R610 FRONT SPEAKER PS-AF610 CENTER SPEAKER PS-AC610 SURROUND SPEAKER PS-AR610 PASSIVE SUBWOOFER PS-AW610 CENTER PS-AC610 PASSIVE SUBWOOFER PS-AW610 √ Connecting Speaker Wire 1 Press the tab of the subwoofer is best to install it at the same height as the front speakers. • You can connect an additional active subwoofer (not supplied) to the Subwoofer 1or 2 port. Surround Speakers • Place these speakers...
... MODEL NAME : HT-AS610 MAIN UNIT AV-R610 FRONT SPEAKER PS-AF610 CENTER SPEAKER PS-AC610 SURROUND SPEAKER PS-AR610 PASSIVE SUBWOOFER PS-AW610 CENTER PS-AC610 PASSIVE SUBWOOFER PS-AW610 √ Connecting Speaker Wire 1 Press the tab of the subwoofer is best to install it at the same height as the front speakers. • You can connect an additional active subwoofer (not supplied) to the Subwoofer 1or 2 port. Surround Speakers • Place these speakers...

Quick Guide (easy Manual) (ver.1.0) (English)
Page 10
... TUNER button. • You can operate your AMP(this AV receiver), TV, DVD and VCR with this button, FM ➝ AM ➝ DVD ➝ VCR/SAT ➝ CD will be selected in turn . MAIN UNIT Press FUNCTION button. • Each time you press the this remote control. Before Using the AV Receiver Turning On/Off REMOTE CONTROL Press the POWER button of the remote control. • This unit will be turned on or set to Standby mode...
... TUNER button. • You can operate your AMP(this AV receiver), TV, DVD and VCR with this button, FM ➝ AM ➝ DVD ➝ VCR/SAT ➝ CD will be selected in turn . MAIN UNIT Press FUNCTION button. • Each time you press the this remote control. Before Using the AV Receiver Turning On/Off REMOTE CONTROL Press the POWER button of the remote control. • This unit will be turned on or set to Standby mode...
Quick Guide (easy Manual) (ver.1.0) (English)
Page 11
... the INPUT MODE ANALOG button. • DVD ANALOG will be selected. • DVD setup is set to the Optical/Coaxial Digital Audio Input jack on the main unit. 21 OPERATION Press the INPUT MODE DIGITAL button. • DVD OPTICAL or COAXIAL will be selected based on the DVD setup you connect the Digital Audio Output jack of an external audio component to "DVD:OPTICAL,CD:COAXIAL " by factory default. 20 MAIN UNIT For DVD Function Follow steps 1-4 in DVD setup on page 26 before selecting the DVD Input Mode. For CD Function Follow...
... the INPUT MODE ANALOG button. • DVD ANALOG will be selected. • DVD setup is set to the Optical/Coaxial Digital Audio Input jack on the main unit. 21 OPERATION Press the INPUT MODE DIGITAL button. • DVD OPTICAL or COAXIAL will be selected based on the DVD setup you connect the Digital Audio Output jack of an external audio component to "DVD:OPTICAL,CD:COAXIAL " by factory default. 20 MAIN UNIT For DVD Function Follow steps 1-4 in DVD setup on page 26 before selecting the DVD Input Mode. For CD Function Follow...
Quick Guide (easy Manual) (ver.1.0) (English)
Page 12
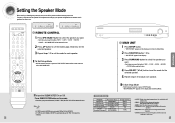
... power cord. Setting the Speaker SPEAKER F.SPK(Front) C.SPK(Center) S.SPK(Surround) SW SPK(Subwoofer) CROVR (Crossover Frequency) Possible Settings LARGE,SMALL LARGE,SMALL,NONE LARGE,SMALL,NONE YES,NO 60,80,100,120, 150,180,200(Hz) Default Setting SMALL SMALL SMALL YES 150Hz • LARGE : Select when using small speakers. MAIN UNIT 1 Press SETUP button. • "SETUP MODE" appears on the display and exits Setup Mode. Setting the Speaker Mode Before moving or installing...
... power cord. Setting the Speaker SPEAKER F.SPK(Front) C.SPK(Center) S.SPK(Surround) SW SPK(Subwoofer) CROVR (Crossover Frequency) Possible Settings LARGE,SMALL LARGE,SMALL,NONE LARGE,SMALL,NONE YES,NO 60,80,100,120, 150,180,200(Hz) Default Setting SMALL SMALL SMALL YES 150Hz • LARGE : Select when using small speakers. MAIN UNIT 1 Press SETUP button. • "SETUP MODE" appears on the display and exits Setup Mode. Setting the Speaker Mode Before moving or installing...

Quick Guide (easy Manual) (ver.1.0) (English)
Page 13
... MAIN UNIT 1 Press SETUP button. • "SETUP MODE" appears on the display and enters into Setup Mode. 2 Press FUNCTION button 2 times. • "DIST SETUP" appears on the display. 3 Press SURROUND button to select the speaker you want . • Each time you press this button, F.L ➝ CEN ➝ F.R ➝ S.R ➝ S.L ➝ S.W will be selected in turn . 2 Press ...† button to set the speaker distance. • For F.L, CEN, F.R, S.W, S.R, S.L Speaker, you can set the distance from...
... MAIN UNIT 1 Press SETUP button. • "SETUP MODE" appears on the display and enters into Setup Mode. 2 Press FUNCTION button 2 times. • "DIST SETUP" appears on the display. 3 Press SURROUND button to select the speaker you want . • Each time you press this button, F.L ➝ CEN ➝ F.R ➝ S.R ➝ S.L ➝ S.W will be selected in turn . 2 Press ...† button to set the speaker distance. • For F.L, CEN, F.R, S.W, S.R, S.L Speaker, you can set the distance from...

Quick Guide (easy Manual) (ver.1.0) (English)
Page 14
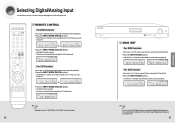
... the display. 3 Press SURROUND button. • "DRC : STD" appears on the display. 3 Press SURROUND button to select CD. 4 Press SELECT( , ) button to minimum. 27 OPERATION "SETUP MODE OFF" appears on the display and the unit exits Setup Mode. MAIN UNIT 1 Press SETUP button. • "SETUP MODE" appears on the display and enters into Setup Mode. 2 Press FUNCTION button 3 times. • "DIGITAL IN" appears on the display . 4 Press SELECT( , ) button to enjoy Dolby Digital sound when watching movies at low volume at night. √ REMOTE CONTROL...
... the display. 3 Press SURROUND button. • "DRC : STD" appears on the display. 3 Press SURROUND button to select CD. 4 Press SELECT( , ) button to minimum. 27 OPERATION "SETUP MODE OFF" appears on the display and the unit exits Setup Mode. MAIN UNIT 1 Press SETUP button. • "SETUP MODE" appears on the display and enters into Setup Mode. 2 Press FUNCTION button 3 times. • "DIGITAL IN" appears on the display . 4 Press SELECT( , ) button to enjoy Dolby Digital sound when watching movies at low volume at night. √ REMOTE CONTROL...
Quick Guide (easy Manual) (ver.1.0) (English)
Page 15
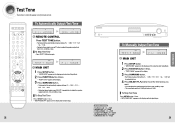
...; CEN (Center) : -10 ~ +10dB • F.R (Front-Right) : -10 ~ +10dB • S.R (Surround-Right) : -10 ~ +10dB • S.L (Surround-Left): -10 ~ +10dB • S.W (Subwoofer): -10 ~ +10dB 29 OPERATION F.L ➝ CEN ➝ F.R ➝ S.R ➝ S.L ➝ S.W . • During test signal output, press SELECT ( , ) button to adjust the speaker output level from -10 to +10 dB by 1 step. To Automatically Output Test Tone √ REMOTE CONTROL Press TEST TONE button. • Test signal will be automatically output as follows; Test Tone Use test tone to +10dB...
...; CEN (Center) : -10 ~ +10dB • F.R (Front-Right) : -10 ~ +10dB • S.R (Surround-Right) : -10 ~ +10dB • S.L (Surround-Left): -10 ~ +10dB • S.W (Subwoofer): -10 ~ +10dB 29 OPERATION F.L ➝ CEN ➝ F.R ➝ S.R ➝ S.L ➝ S.W . • During test signal output, press SELECT ( , ) button to adjust the speaker output level from -10 to +10 dB by 1 step. To Automatically Output Test Tone √ REMOTE CONTROL Press TEST TONE button. • Test signal will be automatically output as follows; Test Tone Use test tone to +10dB...
Quick Guide (easy Manual) (ver.1.0) (English)
Page 16
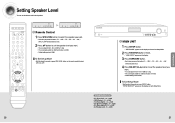
... or press SETUP button. MAIN UNIT 1 Press SETUP button. • "SETUP MODE" appears on the display and enters into Setup Mode. 2 Press FUNCTION button 8 times. • "LEVEL SETUP" appears on the display. 3 Press SURROUND button. • Each time you press this button, F.L ➝ CEN ➝ F.R ➝ S.R ➝ S.L ➝ S.W ➝ SPK LVL OFF will be selected in turn . 2 Press ...† button to set the speaker level you want . • You can adjust it from -10...
... or press SETUP button. MAIN UNIT 1 Press SETUP button. • "SETUP MODE" appears on the display and enters into Setup Mode. 2 Press FUNCTION button 8 times. • "LEVEL SETUP" appears on the display. 3 Press SURROUND button. • Each time you press this button, F.L ➝ CEN ➝ F.R ➝ S.R ➝ S.L ➝ S.W ➝ SPK LVL OFF will be selected in turn . 2 Press ...† button to set the speaker level you want . • You can adjust it from -10...

Quick Guide (easy Manual) (ver.1.0) (English)
Page 17
... sampling frequencies of 32KHz,44KHz or 48KHz. 33 OPERATION To Exit Setup Mode • Wait for PCM audio signals with just the front left and right speakers. • You cannot use Dolby Pro Logic ll Mode for multi channel signals such as Dolby Digital and DTS. • Pro Logic works only for about 5 seconds. Dolby Pro Logic ll Mode This mode provides 5.1 channel sound from 2 channel sources REMOTE CONTROL Press MODE button. • Each time you press SELECT ( ) button, MUSIC ➝...
... sampling frequencies of 32KHz,44KHz or 48KHz. 33 OPERATION To Exit Setup Mode • Wait for PCM audio signals with just the front left and right speakers. • You cannot use Dolby Pro Logic ll Mode for multi channel signals such as Dolby Digital and DTS. • Pro Logic works only for about 5 seconds. Dolby Pro Logic ll Mode This mode provides 5.1 channel sound from 2 channel sources REMOTE CONTROL Press MODE button. • Each time you press SELECT ( ) button, MUSIC ➝...
Quick Guide (easy Manual) (ver.1.0) (English)
Page 18
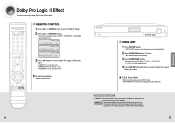
... Setup Mode. 2 Press FUNCTION button 10 times. • "DPL ll MODE"appears on the display and exits Setup Mode. To Exit Setup Mode • Wait for about 5 seconds. To Exit Setup Mode • Wait for about 5 seconds or press SETUP button. OPERATION Dolby Pro Logic ll Effect • C-WIDTH : This sets the width of the center image. The higher the setting, the less sound comes from the center speaker. • DIMENSION : Incrementally adjusts...
... Setup Mode. 2 Press FUNCTION button 10 times. • "DPL ll MODE"appears on the display and exits Setup Mode. To Exit Setup Mode • Wait for about 5 seconds. To Exit Setup Mode • Wait for about 5 seconds or press SETUP button. OPERATION Dolby Pro Logic ll Effect • C-WIDTH : This sets the width of the center image. The higher the setting, the less sound comes from the center speaker. • DIMENSION : Incrementally adjusts...

Quick Guide (easy Manual) (ver.1.0) (English)
Page 20
...) C : Center Speaker SL/SR : Rear Speaker (Left/Right) SW : Subwoofer OPERATION • When PCM and Analog Stereo signals are input, the left and right channels are dependent on the speaker configuration. • SFE Mode works with 2ch signals. 39 To Exit Setup Mode • Wait for about 5 seconds. EX Dolby Digital 5.1 Output Channel L/R C SL Sub SR Woofer O OOO Display Signal Format DIGITAL Display Information Channel Status L, C, R, SL, SR, SW DOLBY (MUSIC, CINEMA, MATRIX, GAME, PROLOGIC) Dolby D (5.1ch) Dolby D (2ch) Dolby D (2ch Surr) L.PCM (Audio) Dolby Digital 5.1 Pro...
...) C : Center Speaker SL/SR : Rear Speaker (Left/Right) SW : Subwoofer OPERATION • When PCM and Analog Stereo signals are input, the left and right channels are dependent on the speaker configuration. • SFE Mode works with 2ch signals. 39 To Exit Setup Mode • Wait for about 5 seconds. EX Dolby Digital 5.1 Output Channel L/R C SL Sub SR Woofer O OOO Display Signal Format DIGITAL Display Information Channel Status L, C, R, SL, SR, SW DOLBY (MUSIC, CINEMA, MATRIX, GAME, PROLOGIC) Dolby D (5.1ch) Dolby D (2ch) Dolby D (2ch Surr) L.PCM (Audio) Dolby Digital 5.1 Pro...
Quick Guide (easy Manual) (ver.1.0) (English)
Page 21
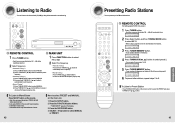
... will help to reduce noise. • This function works only with the Remote Control. 40 How to select PRESET and MANUAL on the display. 4 Press TUNING/CH( , ) button to select preset 2. • You can select from presets 1 to 30. 5 Press TUNER MEMORY button. • Tuner number will disappear and station 89.10 will blink on the main unit. 1. To Listen to Preset Station • Press TUNING MODE button of the remote control to select MANUAL or PRESET. Press the SETUP button. 2. Presetting Radio Stations You can...
... will help to reduce noise. • This function works only with the Remote Control. 40 How to select PRESET and MANUAL on the display. 4 Press TUNING/CH( , ) button to select preset 2. • You can select from presets 1 to 30. 5 Press TUNER MEMORY button. • Tuner number will disappear and station 89.10 will blink on the main unit. 1. To Listen to Preset Station • Press TUNING MODE button of the remote control to select MANUAL or PRESET. Press the SETUP button. 2. Presetting Radio Stations You can...

Quick Guide (easy Manual) (ver.1.0) (English)
Page 22
... appears on the display. Caution • Using the RESET function will turn the volume up too high when you set the time that this unless necessary. To Output Sound Again Press MUTE button again. • MUTE will disappear and sound will output. • SLEEP, Mute and the Adjust Display function can adjust the brightness of the display. Connect the headphone to the headphone jack and listen to select "YES". •...
... appears on the display. Caution • Using the RESET function will turn the volume up too high when you set the time that this unless necessary. To Output Sound Again Press MUTE button again. • MUTE will disappear and sound will output. • SLEEP, Mute and the Adjust Display function can adjust the brightness of the display. Connect the headphone to the headphone jack and listen to select "YES". •...
Quick Guide (easy Manual) (ver.1.0) (English)
Page 25
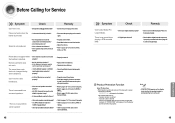
... Remedy Can't turn it on. • Isthepowercodepluggedintotheoutlet? • Connect the power plug to select LARGE, SMALL or YES. If speaker cable is shorted If there is no sound when playing a DTS encoded DVD. • Is the input signal selected properly? • Select 2 channel Dolby Digital, PCM, and Analog input signal. • Is Digital input selected? • Check whether digital external component is shorted - If speaker terminal is properly connected and refer to page 26 to select other Surround Modes. 48...
... Remedy Can't turn it on. • Isthepowercodepluggedintotheoutlet? • Connect the power plug to select LARGE, SMALL or YES. If speaker cable is shorted If there is no sound when playing a DTS encoded DVD. • Is the input signal selected properly? • Select 2 channel Dolby Digital, PCM, and Analog input signal. • Is Digital input selected? • Check whether digital external component is shorted - If speaker terminal is properly connected and refer to page 26 to select other Surround Modes. 48...
Quick Guide (easy Manual) (ver.1.0) (English)
Page 26
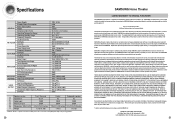
...Specifications GENERAL FM TUNER AM TUNER AMPLIFIER FREQUENCY RESPONSE VIDEO OUTPUT Power Supply Standby Power Consumption Power Consumption Weight Dimensions (W x H x D) Operating Temperature Range Operating Humidity Range Frequency Response Usable Sensitivity S/N Ratio Distortion Stereo Separation Tuner Output Level Frequency Response S/N Ratio Usable Sensitivity Distortion Rated Output Front Speaker(Left+Right) Center Speaker Surround Speaker(Left+Right) Subwoofer Input Sensitivity/Impedance S/N Ratio(Analog Input) Separation(1KHz) Analog Input Digital Input/96KHz PCM TV Format Input Level...
...Specifications GENERAL FM TUNER AM TUNER AMPLIFIER FREQUENCY RESPONSE VIDEO OUTPUT Power Supply Standby Power Consumption Power Consumption Weight Dimensions (W x H x D) Operating Temperature Range Operating Humidity Range Frequency Response Usable Sensitivity S/N Ratio Distortion Stereo Separation Tuner Output Level Frequency Response S/N Ratio Usable Sensitivity Distortion Rated Output Front Speaker(Left+Right) Center Speaker Surround Speaker(Left+Right) Subwoofer Input Sensitivity/Impedance S/N Ratio(Analog Input) Separation(1KHz) Analog Input Digital Input/96KHz PCM TV Format Input Level...


