
User Manual (ENGLISH)
Page 2
... fournies dans le système TV Guide On Screen est fabriqués sous licence de Gemstar-TV Guide International, Inc. English - 2 Disclaimer Notice Gemstar-TV Guide International Inc. Le système TV Guide On Screen. © 2006 Samsung Electronics Co., Ltd. Trademark Notice ...In the United States, TV GUIDE and other related marks are not...
... fournies dans le système TV Guide On Screen est fabriqués sous licence de Gemstar-TV Guide International, Inc. English - 2 Disclaimer Notice Gemstar-TV Guide International Inc. Le système TV Guide On Screen. © 2006 Samsung Electronics Co., Ltd. Trademark Notice ...In the United States, TV GUIDE and other related marks are not...
User Manual (ENGLISH)
Page 3
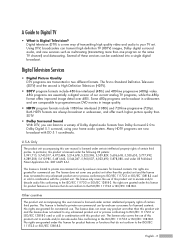
... comparable to progressive-scan DVD movies in combination with this user manual is licensed under this license for licensed contents. A Guide to Digital TV • What is High Definition Television (HDTV). • SDTV program formats include 480-line interlaced (480i) and 480-line progressive ...(480p) video. 480i programs are essentially a digital version of our current analog TV programs, while the 480p format offers improved image detail over 480i. No rights are granted for commercial use by end-user consumers for...
... comparable to progressive-scan DVD movies in combination with this user manual is licensed under this license for licensed contents. A Guide to Digital TV • What is High Definition Television (HDTV). • SDTV program formats include 480-line interlaced (480i) and 480-line progressive ...(480p) video. 480i programs are essentially a digital version of our current analog TV programs, while the 480p format offers improved image detail over 480i. No rights are granted for commercial use by end-user consumers for...

User Manual (ENGLISH)
Page 4
.... English - 4 They are also designed to www.cablelabs.com. When CableCARD is inserted into the CableCARD slot of a Digital Cable Ready TV. NOTE • This television receiver supports the copy protection system regulated by your cable provider needs to be viewable depending on the amount of... a new digital cable standard. Digital Cable Ready TVs are the products of data your local cable service provider after a proper subscription process. It should be noted that CableCARD is no...
.... English - 4 They are also designed to www.cablelabs.com. When CableCARD is inserted into the CableCARD slot of a Digital Cable Ready TV. NOTE • This television receiver supports the copy protection system regulated by your cable provider needs to be viewable depending on the amount of... a new digital cable standard. Digital Cable Ready TVs are the products of data your local cable service provider after a proper subscription process. It should be noted that CableCARD is no...
User Manual (ENGLISH)
Page 5
...DTV stations are different than 12' in common areas and are not located in height. You can provide broadcast DTV signals via a master TV antenna system to the transmission tower. Once the DTV signal level exceeds a certain threshold at the receiver, the digital video and audio data... of rental units (apartments, etc.) are used for broadcast. DTV receivers do not worry about this since the sound comes from inside your TV Guide. The Federal Communications Commission's OTARD Rule (part of the Telecommunications Act of 1996) allows residents of condominiums, townhouse, or members of ...
...DTV stations are different than 12' in common areas and are not located in height. You can provide broadcast DTV signals via a master TV antenna system to the transmission tower. Once the DTV signal level exceeds a certain threshold at the receiver, the digital video and audio data... of rental units (apartments, etc.) are used for broadcast. DTV receivers do not worry about this since the sound comes from inside your TV Guide. The Federal Communications Commission's OTARD Rule (part of the Telecommunications Act of 1996) allows residents of condominiums, townhouse, or members of ...

User Manual (ENGLISH)
Page 6
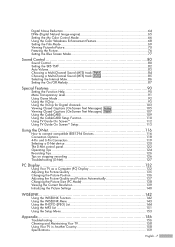
Table of Contents Your New Wide TV 10 Viewing Position ...10 List of Features...11 Accessories ...11 Front Panel Indicators 12 Front/Right Side Buttons 13 Side Panel Jacks ...13 Rear Panel Jacks ...14 Remote Control...15 Connections 18 Connecting VHF and UHF Antennas 18 Antennas with 75-ohm ...Round Leads 18 Connecting Cable TV 19 Cable without a Cable Box 19 Cable with a Cable Box that ...
Table of Contents Your New Wide TV 10 Viewing Position ...10 List of Features...11 Accessories ...11 Front Panel Indicators 12 Front/Right Side Buttons 13 Side Panel Jacks ...13 Rear Panel Jacks ...14 Remote Control...15 Connections 18 Connecting VHF and UHF Antennas 18 Antennas with 75-ohm ...Round Leads 18 Connecting Cable TV 19 Cable without a Cable Box 19 Cable with a Cable Box that ...
User Manual (ENGLISH)
Page 7
...Viewing Closed Captions (On-Screen Text Messages) Digital 107 Using the CableCARD 109 Using the CableCARD Setup Function 110 Using TV Guide On ScreenTM 112 Using TV Guide On ScreenTM Setup 113 Using the D-Net 116 How to connect compatible IEEE1394 Devices 116 Connection Options 118 4-... control panel 122 Operating Tips ...124 Recording Tips...126 Tips on stopping recording 126 Troubleshooting (D-Net 127 PC Display 132 Using Your TV as a Computer (PC) Display 132 Adjusting the Picture Quality 135 Changing the Picture Position 136 Adjusting the Picture Quality and Position ...
...Viewing Closed Captions (On-Screen Text Messages) Digital 107 Using the CableCARD 109 Using the CableCARD Setup Function 110 Using TV Guide On ScreenTM 112 Using TV Guide On ScreenTM Setup 113 Using the D-Net 116 How to connect compatible IEEE1394 Devices 116 Connection Options 118 4-... control panel 122 Operating Tips ...124 Recording Tips...126 Tips on stopping recording 126 Troubleshooting (D-Net 127 PC Display 132 Using Your TV as a Computer (PC) Display 132 Adjusting the Picture Quality 135 Changing the Picture Position 136 Adjusting the Picture Quality and Position ...

User Manual (ENGLISH)
Page 10
When installing the product, make sure to keep it away from the screen as far back from the wall (more than 10cm/4 inches) for ventilation purposes. • Poor ventilation may cause an increase in the internal temperature of the product, resulting in a shortened component life and degraded performance. Your New Wide TV Viewing Position To optimize your viewing comfort, please follow the guidelines below for an extended period of time, sit as possible. English - 10 If viewing for viewing distance.
When installing the product, make sure to keep it away from the screen as far back from the wall (more than 10cm/4 inches) for ventilation purposes. • Poor ventilation may cause an increase in the internal temperature of the product, resulting in a shortened component life and degraded performance. Your New Wide TV Viewing Position To optimize your viewing comfort, please follow the guidelines below for an extended period of time, sit as possible. English - 10 If viewing for viewing distance.

User Manual (ENGLISH)
Page 11
...dual channel speakers • A special sleep timer • Picture-in-Picture capability that lets you watch two channels at once • Widescreen TV with adjustable image size • Life-like clear images provided by DNle technology • My Color Control mode to correspond with your color preference...Weakness Enhancement Feature • Digital Input jack • Digital Audio Output (OPTICAL) jack • CableCARD slot • D-Net (IEEE1394) • TV Guide On Screen™ • Game mode • Easy-to-use on-screen menu system you can access from the front/right side panel, ...
...dual channel speakers • A special sleep timer • Picture-in-Picture capability that lets you watch two channels at once • Widescreen TV with adjustable image size • Life-like clear images provided by DNle technology • My Color Control mode to correspond with your color preference...Weakness Enhancement Feature • Digital Input jack • Digital Audio Output (OPTICAL) jack • CableCARD slot • D-Net (IEEE1394) • TV Guide On Screen™ • Game mode • Easy-to-use on-screen menu system you can access from the front/right side panel, ...
User Manual (ENGLISH)
Page 12
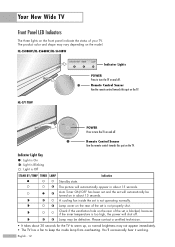
... a certified technician. • It takes about 15 seconds. Remote Control Sensor Aim the remote control towards this spot on the TV. Check if the ventilation hole on the rear of the set will shut off . You'll occasionally hear it working. Auto Timer ON/OFF has been set and the set... Panel LED Indicators The three lights on the model. Lamp may not appear immediately. • The TV has a fan to warm up, so normal brightness may be turned on the rear of your TV. English - 12 The product color and shape may vary depending on the front panel indicate the status of...
... a certified technician. • It takes about 15 seconds. Remote Control Sensor Aim the remote control towards this spot on the TV. Check if the ventilation hole on the rear of the set will shut off . You'll occasionally hear it working. Auto Timer ON/OFF has been set and the set... Panel LED Indicators The three lights on the model. Lamp may not appear immediately. • The TV has a fan to warm up, so normal brightness may be turned on the rear of your TV. English - 12 The product color and shape may vary depending on the front panel indicate the status of...
User Manual (ENGLISH)
Page 13
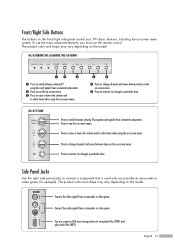
...is used only occasionally (a camcorder or video game, for example). Front/Right Side Buttons The buttons on the front/right side panel control your TV's basic features, including the on -screen menu. Connect the audio signal from a camcorder or video game. Press to activate (or change ...and signals from connected components. Side Panel Jacks Use the right side panel jacks to activate (or change channels and move between viewing TV programs and signals from connected components. ´ Press to see the on -screen menu system. To use the more advanced features,...
...is used only occasionally (a camcorder or video game, for example). Front/Right Side Buttons The buttons on the front/right side panel control your TV's basic features, including the on -screen menu. Connect the audio signal from a camcorder or video game. Press to activate (or change ...and signals from connected components. Side Panel Jacks Use the right side panel jacks to activate (or change channels and move between viewing TV programs and signals from connected components. ´ Press to see the on -screen menu system. To use the more advanced features,...

User Manual (ENGLISH)
Page 14
... IN Connect to the DVI audio output jack of flexibility for this purpose, which allow you to receive left and right audio from your TV. Ò RS232C Connection for professional linking network and service usage. Ú D-Net (IEEE1394) S400 MPEG Connect to external IEEE1394 digital products... such as digital VCRs and camcorders. Your New Wide TV Rear Panel Jacks Œ CableCARDTM Insert a CableCARD into the slot. (Refer to page 22) ´ S-VIDEO INPUT jacks Connects an S-Video signal from...
... IN Connect to the DVI audio output jack of flexibility for this purpose, which allow you to receive left and right audio from your TV. Ò RS232C Connection for professional linking network and service usage. Ú D-Net (IEEE1394) S400 MPEG Connect to external IEEE1394 digital products... such as digital VCRs and camcorders. Your New Wide TV Rear Panel Jacks Œ CableCARDTM Insert a CableCARD into the slot. (Refer to page 22) ´ S-VIDEO INPUT jacks Connects an S-Video signal from...
User Manual (ENGLISH)
Page 15
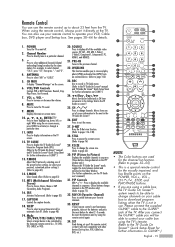
... SLEEP Press to select a preset time interval for about 23 feet from the TV. RESET If your favorite channels. 33. P.MODE Adjust the TV picture by the Samsung remote control (i.e., TV, DVD, STB, CABLE, or VCR). 20. Mode (TV/DVD/STB/CABLE/VCR) Selects a target device to page 63) 30. P....SIZE Press to change channels in the PIP window only.) When in the TV Guide On ScreenTM mode, toggles...
... SLEEP Press to select a preset time interval for about 23 feet from the TV. RESET If your favorite channels. 33. P.MODE Adjust the TV picture by the Samsung remote control (i.e., TV, DVD, STB, CABLE, or VCR). 20. Mode (TV/DVD/STB/CABLE/VCR) Selects a target device to page 63) 30. P....SIZE Press to change channels in the PIP window only.) When in the TV Guide On ScreenTM mode, toggles...

User Manual (ENGLISH)
Page 16
Your New Wide TV Installing Batteries in the Remote Control With normal use, the batteries in the remote control. NOTE • Do not mix battery types, i.e, alkaline and manganese. ...
Your New Wide TV Installing Batteries in the Remote Control With normal use, the batteries in the remote control. NOTE • Do not mix battery types, i.e, alkaline and manganese. ...

User Manual (ENGLISH)
Page 18
Antennas with 75-ohm Round Leads If your antenna looks like this: it has 75-ohm round leads. 1 Plug the antenna lead into the ANT 2 IN (AIR) on the rear panel of your TV. Connections Connecting VHF and UHF Antennas If you do not have a cable system, you will need to connect an antenna to your TV. English - 18
Antennas with 75-ohm Round Leads If your antenna looks like this: it has 75-ohm round leads. 1 Plug the antenna lead into the ANT 2 IN (AIR) on the rear panel of your TV. Connections Connecting VHF and UHF Antennas If you do not have a cable system, you will need to connect an antenna to your TV. English - 18
User Manual (ENGLISH)
Page 19
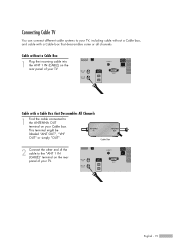
... - 19 Cable with a Cable box that Descrambles All Channels 1 Find the cable connected to the "ANT 1 IN (CABLE)" terminal on the rear panel of your TV. Connecting Cable TV You can connect different cable systems to your TV, including cable without a Cable Box 1 Plug the incoming cable into the ANT 1 IN (CABLE) on the...
... - 19 Cable with a Cable box that Descrambles All Channels 1 Find the cable connected to the "ANT 1 IN (CABLE)" terminal on the rear panel of your TV. Connecting Cable TV You can connect different cable systems to your TV, including cable without a Cable Box 1 Plug the incoming cable into the ANT 1 IN (CABLE) on the...

User Manual (ENGLISH)
Page 20
...CABLE) on the RF (A/B) switch. 5 Connect the last coaxial cable between the other OUT terminal on the splitter and the A-IN terminal on the TV. After you've made this connection you set the A/B switch to tune your Splitter. Set the A/B switch to the "B" position to view scrambled ...channels. (When you will need a two-way splitter, an RF (A/B) switch, and four coaxial cables (which you can buy from your Samsung dealer or any electronics store). 1 Find and disconnect the cable that Descrambles Some (But Not All) Channels To complete this connection, set the A/B ...
...CABLE) on the RF (A/B) switch. 5 Connect the last coaxial cable between the other OUT terminal on the splitter and the A-IN terminal on the TV. After you've made this connection you set the A/B switch to tune your Splitter. Set the A/B switch to the "B" position to view scrambled ...channels. (When you will need a two-way splitter, an RF (A/B) switch, and four coaxial cables (which you can buy from your Samsung dealer or any electronics store). 1 Find and disconnect the cable that Descrambles Some (But Not All) Channels To complete this connection, set the A/B ...
User Manual (ENGLISH)
Page 21
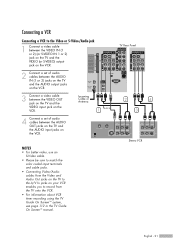
TV Rear Panel 2 4 3 Stereo VCR English - 21 Connecting a VCR Connecting a VCR to the Video or S-Video/Audio jack 1 Connect a video cable between the VIDEO IN (1 or 2) (or S-VIDEO IN 1 or 2) jack on the TV and the VIDEO (or S-VIDEO) output jack on the VCR. 2 Connect a set of audio cables ...coded input terminals and cable jacks. • Connecting Video/Audio cables from the TV onto the VCR. • For information about VCR timer recording using the TV Guide On ScreenTM system, see page 112 in the TV Guide On ScreenTM manual. NOTES • For better video, use an S-Video...
TV Rear Panel 2 4 3 Stereo VCR English - 21 Connecting a VCR Connecting a VCR to the Video or S-Video/Audio jack 1 Connect a video cable between the VIDEO IN (1 or 2) (or S-VIDEO IN 1 or 2) jack on the TV and the VIDEO (or S-VIDEO) output jack on the VCR. 2 Connect a set of audio cables ...coded input terminals and cable jacks. • Connecting Video/Audio cables from the TV onto the VCR. • For information about VCR timer recording using the TV Guide On ScreenTM system, see page 112 in the TV Guide On ScreenTM manual. NOTES • For better video, use an S-Video...

User Manual (ENGLISH)
Page 22
... channel information configuration. 2 When channel information configuration is finished, the message "Updating is Completed" is now updated. It indicates that the channel list is displayed. TV Rear Panel Incoming Cable or Antenna Please insert the card as shown. English - 22 Connections Connecting CableCARD You must obtain a CableCARD from a local cable service provider...
... channel information configuration. 2 When channel information configuration is finished, the message "Updating is Completed" is now updated. It indicates that the channel list is displayed. TV Rear Panel Incoming Cable or Antenna Please insert the card as shown. English - 22 Connections Connecting CableCARD You must obtain a CableCARD from a local cable service provider...

User Manual (ENGLISH)
Page 23
...-video cables shown here are usually found on the side or back of audio cables between the VIDEO IN (or S-VIDEO IN) jack on the TV and the VIDEO (or S-VIDEO) output jack on the Camcorder. If you need to match the color coded input terminals and cable jacks. They are... it easy to connect a Camcorder to view tapes without using only one audio cable. 1 Camcorder Output Jacks TV Rear and right side or Camcorder 2 3 NOTE • Please be sure to connect a set of two cables. 3 Connect a set of the camcorder. 2 Connect a video or S-Video ...
...-video cables shown here are usually found on the side or back of audio cables between the VIDEO IN (or S-VIDEO IN) jack on the TV and the VIDEO (or S-VIDEO) output jack on the Camcorder. If you need to match the color coded input terminals and cable jacks. They are... it easy to connect a Camcorder to view tapes without using only one audio cable. 1 Camcorder Output Jacks TV Rear and right side or Camcorder 2 3 NOTE • Please be sure to connect a set of two cables. 3 Connect a set of the camcorder. 2 Connect a video or S-Video ...

User Manual (ENGLISH)
Page 24
... 1 DVD Player Connections Connecting a DVD Player The rear panel jacks on your TV make it easy to connect a DVD player to match the color coded input terminals and cable jacks. NOTE • Please be sure to your TV. TV Rear Panel Connecting to HDMI (High Definition Multimedia Interface) ...1 Connect an HDMI cable between the COMPONENT (1 or 2) AUDIO (L, R) IN jacks on the TV and the AUDIO OUT jacks on the DVD player. Connecting to Y, ...
... 1 DVD Player Connections Connecting a DVD Player The rear panel jacks on your TV make it easy to connect a DVD player to match the color coded input terminals and cable jacks. NOTE • Please be sure to your TV. TV Rear Panel Connecting to HDMI (High Definition Multimedia Interface) ...1 Connect an HDMI cable between the COMPONENT (1 or 2) AUDIO (L, R) IN jacks on the TV and the AUDIO OUT jacks on the DVD player. Connecting to Y, ...


