
Open Source Guide (ENGLISH)
Page 1
... manual has wrong versions of the Free Software Foundation's software and to any version ever published by others will not have received copies, or rights, from you provide a warranty) and that there is believed to be distributed under this License and to control compilation and installation of any problems introduced by the Free Software Foundation. 10. com). This product uses some software programs...
... manual has wrong versions of the Free Software Foundation's software and to any version ever published by others will not have received copies, or rights, from you provide a warranty) and that there is believed to be distributed under this License and to control compilation and installation of any problems introduced by the Free Software Foundation. 10. com). This product uses some software programs...

Open Source Guide (ENGLISH)
Page 2
... terms, attach the following notices to the public, we recommend making it free software that everyone can do so by permitting redistribution under the terms of the ordinary General Public License). You can redistribute and change. 16. IN NO EVENT UNLESS REQUIRED BY APPLICABLE LAW OR AGREED TO IN...CONSEQUENTIAL DAMAGES ARISING OUT OF THE USE OR INABILITY TO USE THE LIBRARY (INCLUDING BUT NOT LIMITED TO LOSS OF DATA OR DATA BEING RENDERED INACCURATE OR LOSSES SUSTAINED BY YOU OR THIRD PARTIES OR A FAILURE OF THE LIBRARY TO OPERATE WITH ANY OTHER SOFTWARE), EVEN IF SUCH HOLDER OR OTHER...
... terms, attach the following notices to the public, we recommend making it free software that everyone can do so by permitting redistribution under the terms of the ordinary General Public License). You can redistribute and change. 16. IN NO EVENT UNLESS REQUIRED BY APPLICABLE LAW OR AGREED TO IN...CONSEQUENTIAL DAMAGES ARISING OUT OF THE USE OR INABILITY TO USE THE LIBRARY (INCLUDING BUT NOT LIMITED TO LOSS OF DATA OR DATA BEING RENDERED INACCURATE OR LOSSES SUSTAINED BY YOU OR THIRD PARTIES OR A FAILURE OF THE LIBRARY TO OPERATE WITH ANY OTHER SOFTWARE), EVEN IF SUCH HOLDER OR OTHER...
User Manual (ENGLISH)
Page 3
... unit accompanying this product unit. Digital television (DTV) is High Definition Television (HDTV). • SDTV program formats include 480-line interlaced (480i) and 480-line progressive (480p) video. 480i programs are always broadcast in widescreen, and offer much higher picture quality than SDTV. • Dolby Surround Sound With DTV, you can transmit high definition TV (HDTV) images, Dolby digital surround audio, and new services such as multicasting (transmitting more...
... unit accompanying this product unit. Digital television (DTV) is High Definition Television (HDTV). • SDTV program formats include 480-line interlaced (480i) and 480-line progressive (480p) video. 480i programs are always broadcast in widescreen, and offer much higher picture quality than SDTV. • Dolby Surround Sound With DTV, you can transmit high definition TV (HDTV) images, Dolby digital surround audio, and new services such as multicasting (transmitting more...
User Manual (ENGLISH)
Page 5
... can I hear a Clicking sound in common areas and are used for your present antenna may work fine. It is that the landlord of broadcast TV signals as long as analog TV receivers to my cable TV service? All you need to use a different method for DTV? I connect an antenna in the TV Guide On ScreenTM Setup. How difficult is decoded at the receiver, the digital video and audio data is it to...
... can I hear a Clicking sound in common areas and are used for your present antenna may work fine. It is that the landlord of broadcast TV signals as long as analog TV receivers to my cable TV service? All you need to use a different method for DTV? I connect an antenna in the TV Guide On ScreenTM Setup. How difficult is decoded at the receiver, the digital video and audio data is it to...

User Manual (ENGLISH)
Page 6
... Operation 32 Turning the TV On and Off 32 Dynamic Menus and On-Screen Displays 32 Navigating Menus by Using the Menu Map 33 Selecting a Menu Language 34 Memorizing Channels 35 Changing Channels 37 Customizing Your Remote Control 38 Remote Control Codes 42 Setting the Clock...45 Setting the On/Off Timer 47 Setting the Sleep Timer 48 Viewing an External Signal Source 49 Assigning Names to External Input Mode 50 Channel Control 52 Selecting Your Favorite Channels 52 Viewing the Channel Lists...
... Operation 32 Turning the TV On and Off 32 Dynamic Menus and On-Screen Displays 32 Navigating Menus by Using the Menu Map 33 Selecting a Menu Language 34 Memorizing Channels 35 Changing Channels 37 Customizing Your Remote Control 38 Remote Control Codes 42 Setting the Clock...45 Setting the On/Off Timer 47 Setting the Sleep Timer 48 Viewing an External Signal Source 49 Assigning Names to External Input Mode 50 Channel Control 52 Selecting Your Favorite Channels 52 Viewing the Channel Lists...
User Manual (ENGLISH)
Page 7
... the Picture 76 Setting the Blue Screen Mode 77 Sound Control 80 Sound Control ...80 Setting the SRS TSXT 82 Auto Volume...83 Choosing a Multi-Channel Sound (MTS) track Digital 84 Choosing a Multi-Channel Sound (MTS) track Analog 85 Selecting the Internal Mute 86 Setting the On/Off Melody 87 Special Features 90 Setting the Function Help 90 Menu Transparency Level 91 Using Game Mode 92 Using the V-Chip...93 Using the V-Chip for Digital channels 103 Viewing Closed Captions (On-Screen...
... the Picture 76 Setting the Blue Screen Mode 77 Sound Control 80 Sound Control ...80 Setting the SRS TSXT 82 Auto Volume...83 Choosing a Multi-Channel Sound (MTS) track Digital 84 Choosing a Multi-Channel Sound (MTS) track Analog 85 Selecting the Internal Mute 86 Setting the On/Off Melody 87 Special Features 90 Setting the Function Help 90 Menu Transparency Level 91 Using Game Mode 92 Using the V-Chip...93 Using the V-Chip for Digital channels 103 Viewing Closed Captions (On-Screen...

User Manual (ENGLISH)
Page 11
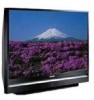
...-operate remote control • Dynamic, easy to navigate menus • Easy-to-use channel manager menu. • WISELINK enables you have all the parts shown here. Remote Control (BP59-00115A)/ AAA Batteries Warranty Card/ Owner's Instructions Registration Card/ Safety Guide Manual/ Quick Guide Manual/ Power Cord (3903-000144) G-LINKTM Cable (MD96-00036A) Cloth-Clean English - 11 If any time you choose • Adjustable picture and sound settings and the ability to memorize your favorite settings • Automatic channel...
...-operate remote control • Dynamic, easy to navigate menus • Easy-to-use channel manager menu. • WISELINK enables you have all the parts shown here. Remote Control (BP59-00115A)/ AAA Batteries Warranty Card/ Owner's Instructions Registration Card/ Safety Guide Manual/ Quick Guide Manual/ Power Cord (3903-000144) G-LINKTM Cable (MD96-00036A) Cloth-Clean English - 11 If any time you choose • Adjustable picture and sound settings and the ability to memorize your favorite settings • Automatic channel...
User Manual (ENGLISH)
Page 12
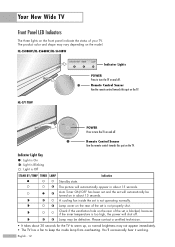
...; It takes about 30 seconds for the TV to turn the TV on the rear of your TV. Indicator Light Key : Light is On : Light is Blinking : Light is not properly shut. Auto Timer ON/OFF has been set and the set is Off STAND BY/TEMP TIMER LAMP Indication Standby state. Your New Wide TV Front Panel LED Indicators The three lights on the model. The product color and shape may vary depending on the...
...; It takes about 30 seconds for the TV to turn the TV on the rear of your TV. Indicator Light Key : Light is On : Light is Blinking : Light is not properly shut. Auto Timer ON/OFF has been set and the set is Off STAND BY/TEMP TIMER LAMP Indication Standby state. Your New Wide TV Front Panel LED Indicators The three lights on the model. The product color and shape may vary depending on the...

User Manual (ENGLISH)
Page 14
... the slot. (Refer to page 22) ´ S-VIDEO INPUT jacks Connects an S-Video signal from an S-VHS VCR or DVD player. (Refer to page 21) ˇ VIDEO/AUDIO INPUT jacks Connect video/audio signals from external sources, such as VCR or DVD players. (Refer to pages 21 and 25) ¨ VIDEO/AUDIO OUTPUT jacks Sends video/audio signals from the TV to pages 18~20) ı POWER IN Connect the supplied power cord. An optional HDMI/DVI cable will be used as a DVI connection with HDMI output.
... the slot. (Refer to page 22) ´ S-VIDEO INPUT jacks Connects an S-Video signal from an S-VHS VCR or DVD player. (Refer to page 21) ˇ VIDEO/AUDIO INPUT jacks Connect video/audio signals from external sources, such as VCR or DVD players. (Refer to pages 21 and 25) ¨ VIDEO/AUDIO OUTPUT jacks Sends video/audio signals from the TV to pages 18~20) ı POWER IN Connect the supplied power cord. An optional HDMI/DVI cable will be used as a DVI connection with HDMI output.
User Manual (ENGLISH)
Page 15
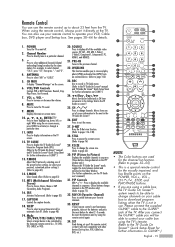
... try using the remote control, always point it will be able to change channels in the PIP window only.) When in TV Guide menu. (Refer to the TV Guide On ScreenTM manual and TV Guide On ScreenTM Quick Setup Sheet for automatic shut off . 2. Channel Number Press to directly tune to display all of the preset factory settings (or select your favorite channels. 33. For example, to page 81) 15. S.MODE Select Sound effect...
... try using the remote control, always point it will be able to change channels in the PIP window only.) When in TV Guide menu. (Refer to the TV Guide On ScreenTM manual and TV Guide On ScreenTM Quick Setup Sheet for automatic shut off . 2. Channel Number Press to directly tune to display all of the preset factory settings (or select your favorite channels. 33. For example, to page 81) 15. S.MODE Select Sound effect...

User Manual (ENGLISH)
Page 24
... 2) VIDEO (Y, PB, PR) IN jacks on the TV and the COMPONENT (Y/PB/PR or Y/CB/CR) OUT jacks on the DVD player. 2 Connect a set of audio cables between the HDMI IN 2 (or HDMI 1/DVI IN) jack on the TV and the HDMI OUT jack on your TV make it easy to connect a DVD player to match the color coded input terminals and cable jacks. English - 24 Incoming Cable or Antenna TV Rear Panel 1 DVD Player Incoming Cable or Antenna 2 1 DVD Player Connections Connecting a DVD Player The rear panel...
... 2) VIDEO (Y, PB, PR) IN jacks on the TV and the COMPONENT (Y/PB/PR or Y/CB/CR) OUT jacks on the DVD player. 2 Connect a set of audio cables between the HDMI IN 2 (or HDMI 1/DVI IN) jack on the TV and the HDMI OUT jack on your TV make it easy to connect a DVD player to match the color coded input terminals and cable jacks. English - 24 Incoming Cable or Antenna TV Rear Panel 1 DVD Player Incoming Cable or Antenna 2 1 DVD Player Connections Connecting a DVD Player The rear panel...

User Manual (ENGLISH)
Page 26
... TV and the AUDIO OUT jacks on the Set-Top Box. NOTES • Requires a Cable Converter. • To use the TV Guide On ScreenTM, you have to connect the G-LINKTM cable. • Make sure the HDMI/DVI source's power is on, or you will be sure to match the color coded input terminals and cable jacks. • Component Video separates the video into Y(Luminance (Brightness)), Pb (Blue) and Pr (Red) for enhanced video quality. TV Rear Panel...
... TV and the AUDIO OUT jacks on the Set-Top Box. NOTES • Requires a Cable Converter. • To use the TV Guide On ScreenTM, you have to connect the G-LINKTM cable. • Make sure the HDMI/DVI source's power is on, or you will be sure to match the color coded input terminals and cable jacks. • Component Video separates the video into Y(Luminance (Brightness)), Pb (Blue) and Pr (Red) for enhanced video quality. TV Rear Panel...

User Manual (ENGLISH)
Page 28
... Video Output Active Inactive When "Internal mute" is shown below. TV Rear Panel NOTES • OPTICAL: converts the electric signal into an optical light signal, and transmits it through glass fibers. • When a Digital audio system is connected to the Digital Audio 1 Out (Optical) terminal: Decrease the gain (volume) of digital audio systems on the TV. English - 28 For more information, see your audio system owner's manual. 1 If your audio system has an optical digital audio input, connect to "On", Sound...
... Video Output Active Inactive When "Internal mute" is shown below. TV Rear Panel NOTES • OPTICAL: converts the electric signal into an optical light signal, and transmits it through glass fibers. • When a Digital audio system is connected to the Digital Audio 1 Out (Optical) terminal: Decrease the gain (volume) of digital audio systems on the TV. English - 28 For more information, see your audio system owner's manual. 1 If your audio system has an optical digital audio input, connect to "On", Sound...

User Manual (ENGLISH)
Page 32
... adjustments using the TV's front/right side panel buttons. Viewing the Menus 1 Press the MENU button. Enter 2 Press the œ or √ button, then press the ENTER button to the selected source. Operation Turning the TV On and Off Press the POWER button on your TV. Access the on -screen menu system and make adjustments. There are nine menu groups: "Input", "Picture", "Sound", "Channel", "Setup", "PIP", "Listings", "Application", and "Menu Map". You can also use the ENTER buttons on the remote control. No Time...
... adjustments using the TV's front/right side panel buttons. Viewing the Menus 1 Press the MENU button. Enter 2 Press the œ or √ button, then press the ENTER button to the selected source. Operation Turning the TV On and Off Press the POWER button on your TV. Access the on -screen menu system and make adjustments. There are nine menu groups: "Input", "Picture", "Sound", "Channel", "Setup", "PIP", "Listings", "Application", and "Menu Map". You can also use the ENTER buttons on the remote control. No Time...
User Manual (ENGLISH)
Page 45
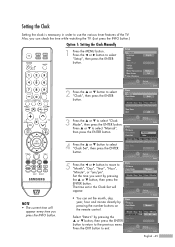
... remote control. Setup Enter Clock Return Clock Mode Clock Set Auto -- : -- -- or † to select "Clock", then press the ENTER button. or † button, then press the ENTER button. Also, you can set in order to the previous menu. or † button to select "Manual", Clock Return then press the ENTER button. Clock Mode Clock Set Setup Enter Manual Auto -- : -- -- 4 Press the ... Setup Adjust Enter English - 45 Month / Day / Year Hour / Minute Time...
... remote control. Setup Enter Clock Return Clock Mode Clock Set Auto -- : -- -- or † to select "Clock", then press the ENTER button. or † button, then press the ENTER button. Also, you can set in order to the previous menu. or † button to select "Manual", Clock Return then press the ENTER button. Clock Mode Clock Set Setup Enter Manual Auto -- : -- -- 4 Press the ... Setup Adjust Enter English - 45 Month / Day / Year Hour / Minute Time...
User Manual (ENGLISH)
Page 47
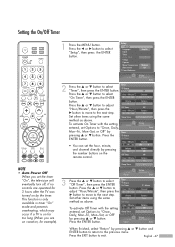
... controls are on vacation, for 3 hours after the TV was turned on for too long (When you set the hour, minute, Hour / Minute ... 12 : 00 am Sleep Timer Adjust 3 Press the ... Volume 10 Off Timer Hour / Minute 12 : 00 am † and channel directly by pressing ... Setup Return Language Clock Timer Game Mode V-Chip Caption Menu Transparency Blue Screen † Color Weakness English Off Medium Off NOTE • Auto Power Off When you are operated...
... controls are on vacation, for 3 hours after the TV was turned on for too long (When you set the hour, minute, Hour / Minute ... 12 : 00 am Sleep Timer Adjust 3 Press the ... Volume 10 Off Timer Hour / Minute 12 : 00 am † and channel directly by pressing ... Setup Return Language Clock Timer Game Mode V-Chip Caption Menu Transparency Blue Screen † Color Weakness English Off Medium Off NOTE • Auto Power Off When you are operated...

User Manual (ENGLISH)
Page 66
... the selected mode is no OSD on the screen will automatically set the My Color Control mode to the previous menu. Using the My Color Control Function in the "Detail Control" menu (see page 67) will display the My Color Control menu. or † button to suit your preference, by pressing the ... Picture Control Setting the My Color Control Mode My Color Control allows you to adjust colors according to your preferences. 1 Press the MENU button. Easy Control Red Green Blue Yellow Pink Standard...
... the selected mode is no OSD on the screen will automatically set the My Color Control mode to the previous menu. Using the My Color Control Function in the "Detail Control" menu (see page 67) will display the My Color Control menu. or † button to suit your preference, by pressing the ... Picture Control Setting the My Color Control Mode My Color Control allows you to adjust colors according to your preferences. 1 Press the MENU button. Easy Control Red Green Blue Yellow Pink Standard...

User Manual (ENGLISH)
Page 93
... for a new TV set is "0000".) The "V-Chip" menu is defined by the user). Press the EXIT button to confirm. Setup Enter 3 Press the ... How to select "Setup", then press the ENTER button. Press the number buttons to enter your new PIN to exit. Press the œ or √ button to Change Your Password 1 Press the MENU button. Using the V-Chip Access to channels and programs is controlled by a password (i.e., a 4-digit secret code that is displayed.
... for a new TV set is "0000".) The "V-Chip" menu is defined by the user). Press the EXIT button to confirm. Setup Enter 3 Press the ... How to select "Setup", then press the ENTER button. Press the number buttons to enter your new PIN to exit. Press the œ or √ button to Change Your Password 1 Press the MENU button. Using the V-Chip Access to channels and programs is controlled by a password (i.e., a 4-digit secret code that is displayed.

User Manual (ENGLISH)
Page 113
... you turn your TV on your TV on, select "Remind me again" or close the Reminder screen without selecting any time you want to select "TV Guide On ScreenTM Setup", then press the ENTER button. Using TV Guide On ScreenTM Setup 1 Press the MENU button. or † button to set up TV Guide On ScreenTM later and want the reminder screen to be displayed each time you to TV Guide On ScreenTM manual for details. Listings Return TV Guide...
... you turn your TV on your TV on, select "Remind me again" or close the Reminder screen without selecting any time you want to select "TV Guide On ScreenTM Setup", then press the ENTER button. Using TV Guide On ScreenTM Setup 1 Press the MENU button. or † button to set up TV Guide On ScreenTM later and want the reminder screen to be displayed each time you to TV Guide On ScreenTM manual for details. Listings Return TV Guide...
User Manual (ENGLISH)
Page 156
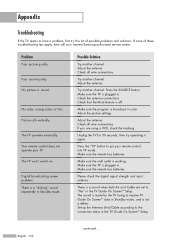
... the TV trying to receive TV Guide On ScreenTM data in . No picture or sound. Adjust the antenna. Make sure the wall outlet is off. Please check the digital signal strength and input antenna. The sound is not a defect. Check the antenna connections. Press the SOURCE button. Picture rolls vertically. The TV operates erratically. Make sure the remote has batteries. Digital broadcasting screen problem. Make sure the remote has batteries. English - 156 continued... Try another channel. Check all wire connections...
... the TV trying to receive TV Guide On ScreenTM data in . No picture or sound. Adjust the antenna. Make sure the wall outlet is off. Please check the digital signal strength and input antenna. The sound is not a defect. Check the antenna connections. Press the SOURCE button. Picture rolls vertically. The TV operates erratically. Make sure the remote has batteries. Digital broadcasting screen problem. Make sure the remote has batteries. English - 156 continued... Try another channel. Check all wire connections...


