
Open Source Guide (ENGLISH)
Page 2
To apply these terms (or, alternatively, under the terms of warranty; You can redistribute and change. It is found. and each source file to the library. How to Apply These Terms to Your New Libraries If you develop a new library, and you want it to be of the greatest possible use to where the full notice is safest to attach them to the start of each file should have at least the "copyright" line and a pointer to the public, we recommend making it free software that everyone can do so by permitting redistribution under these terms, attach the following notices to most ...
To apply these terms (or, alternatively, under the terms of warranty; You can redistribute and change. It is found. and each source file to the library. How to Apply These Terms to Your New Libraries If you develop a new library, and you want it to be of the greatest possible use to where the full notice is safest to attach them to the start of each file should have at least the "copyright" line and a pointer to the public, we recommend making it free software that everyone can do so by permitting redistribution under these terms, attach the following notices to most ...
Quick Guide (ENGLISH)
Page 1
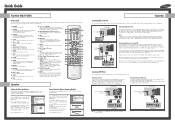
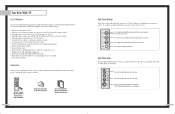
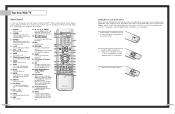
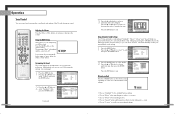
...PIP Controls SIZE; Press to display the available channels in the "Antenna" channel menu. Press to select the size of the preset factory settings (or select your DVD player's owner's manual. Press the EXIT button to resume normal video. 10. Press again to exit. SOURCE Press... type of cable system: "STD", "HRC" or "IRC". Second VCR Connecting a DVD Player The rear panel jacks on the DVD player. S.MODE Adjust the TV sound by the Samsung remote control (i.e., TV, STB, VCR, CABLE, or DVD). 12. MUTE Press to exit. MENU Displays the main on the...
...PIP Controls SIZE; Press to display the available channels in the "Antenna" channel menu. Press to select the size of the preset factory settings (or select your DVD player's owner's manual. Press the EXIT button to resume normal video. 10. Press again to exit. SOURCE Press... type of cable system: "STD", "HRC" or "IRC". Second VCR Connecting a DVD Player The rear panel jacks on the DVD player. S.MODE Adjust the TV sound by the Samsung remote control (i.e., TV, STB, VCR, CABLE, or DVD). 12. MUTE Press to exit. MENU Displays the main on the...
Quick Guide (ENGLISH)
Page 2
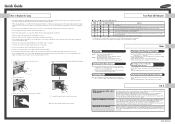
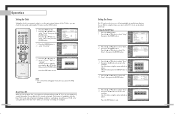
... supplied by sunlight is shone on picture quality. Notes Watching a DTV through Set-Top Box DLP : Press the SOURCE button on screen. Change channels with DLP remote control. When power is turned off your TV. All projection TV use sun screen separately to prevent the screen from interior screen by the manufacturer... use only the correct lamp replacement. If you remove the lamp, you can identify the lamp type on rear of your projection TV to handle the lamp. • Please keep the old lamp away from time to time for best projector operation. Please tighten the holding ...
... supplied by sunlight is shone on picture quality. Notes Watching a DTV through Set-Top Box DLP : Press the SOURCE button on screen. Change channels with DLP remote control. When power is turned off your TV. All projection TV use sun screen separately to prevent the screen from interior screen by the manufacturer... use only the correct lamp replacement. If you remove the lamp, you can identify the lamp type on rear of your projection TV to handle the lamp. • Please keep the old lamp away from time to time for best projector operation. Please tighten the holding ...
User Manual (ENGLISH)
Page 2
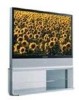
Table of Contents Your New Wide TV 6 Replacing the Lamp 6 List of Features ...8 Accessories ...8 Side Panel Buttons 9 Side Panel Jacks 9 Front Panel LED Indicators 10 Rear Panel Jacks 11 Remote Control ...12 Installing Batteries in the Remote Control 13 Connections ...16 Connecting VHF and UHF Antennas 16 ...Main Picture 59 Changing the Size of the Sub Picture 60 Changing the Location of the Sub Picture 61 Changing the Channel of the Sub Picture 62 Selecting the Sound Source 63 Setting the SRS TSXT 64 Choosing a Multi-Channel Sound (MTS) track 65 Auto Volume ...66 Enjoying ...
Table of Contents Your New Wide TV 6 Replacing the Lamp 6 List of Features ...8 Accessories ...8 Side Panel Buttons 9 Side Panel Jacks 9 Front Panel LED Indicators 10 Rear Panel Jacks 11 Remote Control ...12 Installing Batteries in the Remote Control 13 Connections ...16 Connecting VHF and UHF Antennas 16 ...Main Picture 59 Changing the Size of the Sub Picture 60 Changing the Location of the Sub Picture 61 Changing the Channel of the Sub Picture 62 Selecting the Sound Source 63 Setting the SRS TSXT 64 Choosing a Multi-Channel Sound (MTS) track 65 Auto Volume ...66 Enjoying ...
User Manual (ENGLISH)
Page 5
... control • Easy-to-use the remote control. If any time you choose • Adjustable picture and sound settings and the ability to memorize your favorite settings • Automatic channel tuning for up to 181 channels • A special filter to reduce or eliminate reception problems... from a camcorder or video game. Connect an S-video signal from connected components. Press to activate (or change channels and move between viewing TV programs and signals from a camcorder or video game. (S-Video 3 jack and Audio L/R input 3 are used only occasionally (a camcorder or video...
... control • Easy-to-use the remote control. If any time you choose • Adjustable picture and sound settings and the ability to memorize your favorite settings • Automatic channel tuning for up to 181 channels • A special filter to reduce or eliminate reception problems... from a camcorder or video game. Connect an S-video signal from connected components. Press to activate (or change channels and move between viewing TV programs and signals from a camcorder or video game. (S-Video 3 jack and Audio L/R input 3 are used only occasionally (a camcorder or video...
User Manual (ENGLISH)
Page 6
... of your PC . A cooling fan inside lamp from the TV to the video output jack on your TV. Check if the ventilation hole on the rear of the set top box when using the component video input jacks. Ø PC AUDIO INPUT jacks Connect these to the audio output jacks on your PC... panel indicate the status of your cable system. Lamp cover on rear of the set of component video input jacks on and off . Lamp may not appear immediately. • The TV has a fan to receive a signal from a DVD player or a set is blocked, because if the inner temperature is not operating normally....
... of your PC . A cooling fan inside lamp from the TV to the video output jack on your TV. Check if the ventilation hole on the rear of the set top box when using the component video input jacks. Ø PC AUDIO INPUT jacks Connect these to the audio output jacks on your PC... panel indicate the status of your cable system. Lamp cover on rear of the set of component video input jacks on and off . Lamp may not appear immediately. • The TV has a fan to receive a signal from a DVD player or a set is blocked, because if the inner temperature is not operating normally....
User Manual (ENGLISH)
Page 7
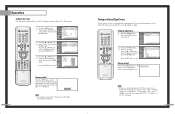
...; VCR/DVD Controls Controls VCR or DVD functions: Rewind, Stop, Play/Pause, Fast Forward. 27. POWER Turns the TV on -screen menu. 9. S.MODE Adjust the TV sound by the Samsung remote control (i.e., TV, STB, VCR, CABLE, or DVD). 12. ADD/DEL Press to add or erase channels in the remote control. ...select a preset time interval for about a year. EXIT Press to exit the menu. 17 ENTER Press to select highlight up of the available video sources (i.e., TV, Set-Top box, VCR, DVD, DTV, PC). 14. While using the on the main screen with the signal in a cool dry place. 1 Slide the ...
...; VCR/DVD Controls Controls VCR or DVD functions: Rewind, Stop, Play/Pause, Fast Forward. 27. POWER Turns the TV on -screen menu. 9. S.MODE Adjust the TV sound by the Samsung remote control (i.e., TV, STB, VCR, CABLE, or DVD). 12. ADD/DEL Press to add or erase channels in the remote control. ...select a preset time interval for about a year. EXIT Press to exit the menu. 17 ENTER Press to select highlight up of the available video sources (i.e., TV, Set-Top box, VCR, DVD, DTV, PC). 14. While using the on the main screen with the signal in a cool dry place. 1 Slide the ...

User Manual (ENGLISH)
Page 11
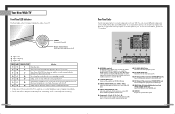
...1 Locate the A/V output jacks on the camcorder. Camcorder Output Jacks TV Side Panel Camcorder 20 Connecting a DVD Player The rear panel jacks on your TV make it easy to connect a DVD player to your TV. Connecting to Y,PB,PR 1 Connect a set of audio cables between the AUDIO IN (1 or 2) jacks on ... Camcorder The side panel jacks on your TV make it easy to connect a camcorder to your TV. TV Rear Panel Incoming Cable or Antenna 2 To enable Component video viewing, connect a set of audio cables between the VIDEO IN (or S-VIDEO IN) jack on the TV and the VIDEO OUT jack on the camcorder...
...1 Locate the A/V output jacks on the camcorder. Camcorder Output Jacks TV Side Panel Camcorder 20 Connecting a DVD Player The rear panel jacks on your TV make it easy to connect a DVD player to your TV. Connecting to Y,PB,PR 1 Connect a set of audio cables between the AUDIO IN (1 or 2) jacks on ... Camcorder The side panel jacks on your TV make it easy to connect a camcorder to your TV. TV Rear Panel Incoming Cable or Antenna 2 To enable Component video viewing, connect a set of audio cables between the VIDEO IN (or S-VIDEO IN) jack on the TV and the VIDEO OUT jack on the camcorder...

User Manual (ENGLISH)
Page 12
...) 1 Connect a HDMI cable between the DVI IN jack on the TV and the DVI OUT jack on the Set-Top Box. Incoming Cable or Antenna 22 TV Rear Panel DTV Set Top Box TV Rear Panel DTV Set Top Box Connecting to R,G,B 1 Connect a set of video cables between the COMPONENT (1 or 2) VIDEO (Y, PB, PR...) IN jacks on the TV and VIDEO (Y/PB/PR or Y/CB/CR) OUT jacks on the Set-Top Box. TV Rear Panel NOTE • ...
...) 1 Connect a HDMI cable between the DVI IN jack on the TV and the DVI OUT jack on the Set-Top Box. Incoming Cable or Antenna 22 TV Rear Panel DTV Set Top Box TV Rear Panel DTV Set Top Box Connecting to R,G,B 1 Connect a set of video cables between the COMPONENT (1 or 2) VIDEO (Y, PB, PR...) IN jacks on the TV and VIDEO (Y/PB/PR or Y/CB/CR) OUT jacks on the Set-Top Box. TV Rear Panel NOTE • ...

User Manual (ENGLISH)
Page 14
...: AAnntt..11 Air/CATV : AAirnt.2 Auto Program Add/Delete Favorite Channels Name Fine Tune ▼ More Move Enter Return 27 Input Input Source List : TV Edit Name √ √ There are five menu groups: Picture "Input", "Picture", "Sound", Sound "Channel" and "Setup". Air 12 Signal V-... different signal sources by pressing the MENU button on the remote control. The TV displays the current channel, the status of your remote control to control the settings of certain picture and sound settings and the current time. Viewing the Display Press the INFO button on the ...
...: AAnntt..11 Air/CATV : AAirnt.2 Auto Program Add/Delete Favorite Channels Name Fine Tune ▼ More Move Enter Return 27 Input Input Source List : TV Edit Name √ √ There are five menu groups: Picture "Input", "Picture", "Sound", Sound "Channel" and "Setup". Air 12 Signal V-... different signal sources by pressing the MENU button on the remote control. The TV displays the current channel, the status of your remote control to control the settings of certain picture and sound settings and the current time. Viewing the Display Press the INFO button on the ...
User Manual (ENGLISH)
Page 16
... button. NOTE • Only memorized channels can use the number buttons, you were watching. 30 Selecting Your Favorite Channels You can store your TV by using the number buttons. You can be set as TV and CATV). You will see all the channels that were either erased or not memorized. The... TV will not see channels that the TV has memorized. (The TV must have memorized at least three channels.) You will change channels. When you press ...
... button. NOTE • Only memorized channels can use the number buttons, you were watching. 30 Selecting Your Favorite Channels You can store your TV by using the number buttons. You can be set as TV and CATV). You will see all the channels that were either erased or not memorized. The... TV will not see channels that the TV has memorized. (The TV must have memorized at least three channels.) You will change channels. When you press ...

User Manual (ENGLISH)
Page 18
... √ Contrast 90 Brightness 50 Sharpness 50 Color 50 Tint 50 50 Reset Move Enter Return 34 Using Automatic Picture Settings Your TV has automatic picture settings ("Dynamic", "Standard" and "Cinema") that are preset at the factory. See next page.) Customizing the Picture 1 Press...Standard √ Contrast 90 Brightness 50 Sharpness 50 Color 50 Tint 50 50 Reset Move Enter Return 3 Press the ... Resetting the Picture Settings to the Factory Defaults You can activate either "Dynamic", "Standard" or "Cinema" by pressing the P.MODE button (or by making ...
... √ Contrast 90 Brightness 50 Sharpness 50 Color 50 Tint 50 50 Reset Move Enter Return 34 Using Automatic Picture Settings Your TV has automatic picture settings ("Dynamic", "Standard" and "Cinema") that are preset at the factory. See next page.) Customizing the Picture 1 Press...Standard √ Contrast 90 Brightness 50 Sharpness 50 Color 50 Tint 50 50 Reset Move Enter Return 3 Press the ... Resetting the Picture Settings to the Factory Defaults You can activate either "Dynamic", "Standard" or "Cinema" by pressing the P.MODE button (or by making ...
User Manual (ENGLISH)
Page 19
... button to select "Sound", then press the ENTER button. Balance 100Hz 300Hz 1KHz 3KHz 10KHz Move Adjust Return Using Automatic Sound Settings Your TV has automatic sound settings ("Standard", "Music", "Movie" and "Speech") that is displayed and the sound cuts off. or † button to exit.... or † button to increase or decrease the value of the standard sound settings. or † button to select "Equalizer", then ...
... button to select "Sound", then press the ENTER button. Balance 100Hz 300Hz 1KHz 3KHz 10KHz Move Adjust Return Using Automatic Sound Settings Your TV has automatic sound settings ("Standard", "Music", "Movie" and "Speech") that is displayed and the sound cuts off. or † button to exit.... or † button to increase or decrease the value of the standard sound settings. or † button to select "Equalizer", then ...
User Manual (ENGLISH)
Page 20
... the ... Input Picture Sound Channel Setup Press the EXIT button to select "Setup", then press the ENTER button. Before using the timers, you must set the TV's clock, as above . Press the ... Input Picture Sound Channel Setup Off Timer Hour ▲ 12 ▼ Min am/pm Activation 00 am ...step. or † button, then press the ENTER button. Absent Power Off When you set the timer "On", your TV left on for example). 38 Setting the Timers This TV can check the time while watching the TV. (Just press the INFO button.) 1 Press the MENU button. This function is necessary ...
... the ... Input Picture Sound Channel Setup Press the EXIT button to select "Setup", then press the ENTER button. Before using the timers, you must set the TV's clock, as above . Press the ... Input Picture Sound Channel Setup Off Timer Hour ▲ 12 ▼ Min am/pm Activation 00 am ...step. or † button, then press the ENTER button. Absent Power Off When you set the timer "On", your TV left on for example). 38 Setting the Timers This TV can check the time while watching the TV. (Just press the INFO button.) 1 Press the MENU button. This function is necessary ...
User Manual (ENGLISH)
Page 21
...until the appropriate time interval appears (any of jacks: "AV1", "AV2", "S-Video1", "S-Video2", "Component1", "Component2", "PC", "DVI" or "HDMI" on the TV's rear panel, and "AV3" or "S-Video3" on the AV1 remote control repeatedly to exit. Press the EXIT button to select an external signal source... to exit. Press the EXIT button to select "Sleep Timer", then press the ENTER button. Press the ... Input Picture Sound Channel Setup Time Clock Set Sleep Timer On Timer Off Timer 10 : 30 am √ 11 : 30 pm √ Channel Setup Move Enter Return 3 Press the ... ...
...until the appropriate time interval appears (any of jacks: "AV1", "AV2", "S-Video1", "S-Video2", "Component1", "Component2", "PC", "DVI" or "HDMI" on the TV's rear panel, and "AV3" or "S-Video3" on the AV1 remote control repeatedly to exit. Press the EXIT button to select an external signal source... to exit. Press the EXIT button to select "Sleep Timer", then press the ENTER button. Press the ... Input Picture Sound Channel Setup Time Clock Set Sleep Timer On Timer Off Timer 10 : 30 am √ 11 : 30 pm √ Channel Setup Move Enter Return 3 Press the ... ...

User Manual (ENGLISH)
Page 24
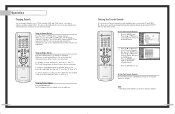
... DVD player). 6 Once your remote control is set up, press the MODE button any time you enter 3 digits of the code, even if the first digit is a "0". (If more than Samsung). Special Features Customizing Your Remote Control Your TV comes equipped with all VCRs, DVD players and ...Cable boxes. Remote Control Codes VCR Codes Setting Up Your Remote Control to operate your Samsung remote control, press the SET button. 4 Enter 3 digits of the VCR...
... DVD player). 6 Once your remote control is set up, press the MODE button any time you enter 3 digits of the code, even if the first digit is a "0". (If more than Samsung). Special Features Customizing Your Remote Control Your TV comes equipped with all VCRs, DVD players and ...Cable boxes. Remote Control Codes VCR Codes Setting Up Your Remote Control to operate your Samsung remote control, press the SET button. 4 Enter 3 digits of the VCR...

User Manual (ENGLISH)
Page 25
...Features Fine Tuning Channels The Fine Tuning function lets you manually adjust the TV's tuner if you have difficulty tuning channels. 1 Using the number buttons on the remote control, select the channel you experience noise on a certain channel, set the "LNA" to "On" or "Off" for this channel, ...Add/Delete Favorite Channels Name Fine Tune ▼ More Move Enter Return 3 Press the ... Air 12 Fine Tune 3 To store the fine tuning setting in "ANT 2 IN" mode). 49 Move Enter Return Press the EXIT button to select "Channel", then press the ENTER button. Input Picture Sound...
...Features Fine Tuning Channels The Fine Tuning function lets you manually adjust the TV's tuner if you have difficulty tuning channels. 1 Using the number buttons on the remote control, select the channel you experience noise on a certain channel, set the "LNA" to "On" or "Off" for this channel, ...Add/Delete Favorite Channels Name Fine Tune ▼ More Move Enter Return 3 Press the ... Air 12 Fine Tune 3 To store the fine tuning setting in "ANT 2 IN" mode). 49 Move Enter Return Press the EXIT button to select "Channel", then press the ENTER button. Input Picture Sound...

User Manual (ENGLISH)
Page 26
... be changed when the "PIP" is a standard TV screen size. or † button to scroll the picture. • "Zoom2": Magnifies the size of the picture on screen using the scroll function. or † button to scroll the picture. • "4:3": Sets the picture to exit. With PIP Off, it ...... Press the ... NOTES • You can also move the picture on the remote control repeatedly to select one of the picture size settings. • "Wide": Sets the picture to exit. Input Picture Sound Channel Setup Picture Mode Color Tone Size Digital NR DNIe MCC Film Mode PIP : Standard : ...
... be changed when the "PIP" is a standard TV screen size. or † button to scroll the picture. • "Zoom2": Magnifies the size of the picture on screen using the scroll function. or † button to scroll the picture. • "4:3": Sets the picture to exit. With PIP Off, it ...... Press the ... NOTES • You can also move the picture on the remote control repeatedly to select one of the picture size settings. • "Wide": Sets the picture to exit. Input Picture Sound Channel Setup Picture Mode Color Tone Size Digital NR DNIe MCC Film Mode PIP : Standard : ...

User Manual (ENGLISH)
Page 27
... : Off √ : On √ √ : Off √ √ Move Enter Return 3 Press the ... DNIeTM technology will fit every signals into your TV is weak, you more detailed image with 3D noise reduction, detail enhancement, contrast enhancement and white enhancement. or † button to select "Off", "Demo" or...Enter Return 52 DNIeTM (Digital Natural Image engine) This feature brings you can activate the Digital Noise Reduction feature to select one of the settings. • On: Switches on the DNIe mode. • Off: Switches off the DNIe mode. • Demo: The screen ...
... : Off √ : On √ √ : Off √ √ Move Enter Return 3 Press the ... DNIeTM technology will fit every signals into your TV is weak, you more detailed image with 3D noise reduction, detail enhancement, contrast enhancement and white enhancement. or † button to select "Off", "Demo" or...Enter Return 52 DNIeTM (Digital Natural Image engine) This feature brings you can activate the Digital Noise Reduction feature to select one of the settings. • On: Switches on the DNIe mode. • Off: Switches off the DNIe mode. • Demo: The screen ...

User Manual (ENGLISH)
Page 28
... Press the ... Changing the adjustment value will be reset to their preferences, by adjusting skin, sky, and grass tones using the predefined settings ("Turkish Blue", "Emerald Green", "Indian Pink", "Standard", "Custom") without affecting other colors on the screen. Using the Easy Control ... the translucent, romantic turquoise sea. • "Indian Pink": Emphasizing Warm Skin Colors. • "Standard": Standard Picture 54 Custom Settings 1 Press the MENU button. Detail Control Input Skin Tone 50 Green Grass 50 Picture Blue Sky 100 Reset Sound Channel Setup Move Enter...
... Press the ... Changing the adjustment value will be reset to their preferences, by adjusting skin, sky, and grass tones using the predefined settings ("Turkish Blue", "Emerald Green", "Indian Pink", "Standard", "Custom") without affecting other colors on the screen. Using the Easy Control ... the translucent, romantic turquoise sea. • "Indian Pink": Emphasizing Warm Skin Colors. • "Standard": Standard Picture 54 Custom Settings 1 Press the MENU button. Detail Control Input Skin Tone 50 Green Grass 50 Picture Blue Sky 100 Reset Sound Channel Setup Move Enter...


