
Open Source Guide (ENGLISH)
Page 1
... accord with the object code. 4. The Free Software Foundation may not distribute the Program at least the "copyright" line and a pointer to make sure that everyone 's free use of the Program is derived from you changed the files and the date of any portion of it , in the most effectively convey the exclusion of the operating system on , we want...
... accord with the object code. 4. The Free Software Foundation may not distribute the Program at least the "copyright" line and a pointer to make sure that everyone 's free use of the Program is derived from you changed the files and the date of any portion of it , in the most effectively convey the exclusion of the operating system on , we want...

Open Source Guide (ENGLISH)
Page 2
...free software that everyone can do so by permitting redistribution under the terms of the ordinary General Public License). and each source file to the public, we recommend making it to be of the greatest possible use... to most effectively convey the exclusion of each file should have at least the "copyright" line and a pointer to the ...USE OR INABILITY TO USE THE LIBRARY (INCLUDING BUT NOT LIMITED TO LOSS OF DATA OR DATA BEING RENDERED INACCURATE OR LOSSES SUSTAINED BY YOU OR THIRD PARTIES OR A FAILURE OF THE LIBRARY TO OPERATE WITH ANY OTHER SOFTWARE...
...free software that everyone can do so by permitting redistribution under the terms of the ordinary General Public License). and each source file to the public, we recommend making it to be of the greatest possible use... to most effectively convey the exclusion of each file should have at least the "copyright" line and a pointer to the ...USE OR INABILITY TO USE THE LIBRARY (INCLUDING BUT NOT LIMITED TO LOSS OF DATA OR DATA BEING RENDERED INACCURATE OR LOSSES SUSTAINED BY YOU OR THIRD PARTIES OR A FAILURE OF THE LIBRARY TO OPERATE WITH ANY OTHER SOFTWARE...
Quick Guide (ENGLISH)
Page 1
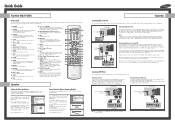
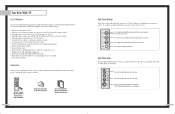
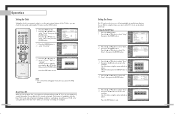
... to change channels in the "Antenna" channel menu. Operation Selecting the Video Signal Source Before your area), then use the converter box to activate (or change channels. 15. If you to VCR Audio OUT using the on your DVD player's owner's manual. While using only one channel while watching another channel, a splitter (not included) must specify the type of Component video, see your TV make it will need two coaxial cables. Press the ... From Cable TV Rear Panel Connecting a Cable Converter Box This connection allows...
... to change channels in the "Antenna" channel menu. Operation Selecting the Video Signal Source Before your area), then use the converter box to activate (or change channels. 15. If you to VCR Audio OUT using the on your DVD player's owner's manual. While using only one channel while watching another channel, a splitter (not included) must specify the type of Component video, see your TV make it will need two coaxial cables. Press the ... From Cable TV Rear Panel Connecting a Cable Converter Box This connection allows...
Quick Guide (ENGLISH)
Page 2
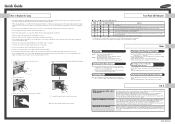
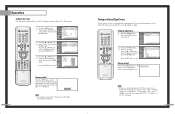
... replace the lamp with 2 screens (exterior/interior screen). The code for a long time at a enough distance. Please tighten the holding the handle and pulling it . Front Panel LED Indicators : Light is On, : Light is Blinking, : Light is the same model. Check if the ventilation hole on the DLP remote control and select "Component1" or "Component2". Viewing a DVD Home Theater DLP : Press the SOURCE button on the rear of the set is not properly shut. Change channels...
... replace the lamp with 2 screens (exterior/interior screen). The code for a long time at a enough distance. Please tighten the holding the handle and pulling it . Front Panel LED Indicators : Light is On, : Light is Blinking, : Light is the same model. Check if the ventilation hole on the DLP remote control and select "Component1" or "Component2". Viewing a DVD Home Theater DLP : Press the SOURCE button on the rear of the set is not properly shut. Change channels...
User Manual (ENGLISH)
Page 2
...-Channel Sound (MTS) track 65 Auto Volume ...66 Enjoying the Sound of External Speakers 67 Using the V-Chip (USA 68 Viewing Closed Caption Information 74 Setting the Blue Screen Mode 76 Setting The On/Off Melody 77 Using the Color Weakness Enhancement Feature 78 PC Display...80 Using Your TV as a Computer (PC) Display 80 How to Connect Your PC to the TV 80 Setting up Your PC Software (Based on Widows 98 81 Display Modes 82 Adjusting the Picture Quality...
...-Channel Sound (MTS) track 65 Auto Volume ...66 Enjoying the Sound of External Speakers 67 Using the V-Chip (USA 68 Viewing Closed Caption Information 74 Setting the Blue Screen Mode 76 Setting The On/Off Melody 77 Using the Color Weakness Enhancement Feature 78 PC Display...80 Using Your TV as a Computer (PC) Display 80 How to Connect Your PC to the TV 80 Setting up Your PC Software (Based on Widows 98 81 Display Modes 82 Adjusting the Picture Quality...
User Manual (ENGLISH)
Page 5
... on -screen menu system. Connect the audio signal from a camcorder or video game. If any time you choose • Adjustable picture and sound settings and the ability to memorize your TV, check to make sure that you must use on-screen menu system you can access from the side panel or remote control • Automatic timer to activate (or change channels and move between viewing TV programs and signals from a camcorder or video game. (S-Video 3 jack and Audio L/R input 3 are used only...
... on -screen menu system. Connect the audio signal from a camcorder or video game. If any time you choose • Adjustable picture and sound settings and the ability to memorize your TV, check to make sure that you must use on-screen menu system you can access from the side panel or remote control • Automatic timer to activate (or change channels and move between viewing TV programs and signals from a camcorder or video game. (S-Video 3 jack and Audio L/R input 3 are used only...
User Manual (ENGLISH)
Page 6
... DVI output. ˝ HDMI (High Definition Multimedia Interface) VIDEO/AUDIO INPUT jack Connect to keep the inside the set top box when using the component video input jacks. Ø PC AUDIO INPUT jacks Connect these to connect the component video/audio signals from overheating. Remote Control Sensor Aim the remote control towards this spot on your TV. Please contact a certified technician. • It takes about 15 seconds. The PIP channel can be received only when a signal source is not properly shut. The picture...
... DVI output. ˝ HDMI (High Definition Multimedia Interface) VIDEO/AUDIO INPUT jack Connect to keep the inside the set top box when using the component video input jacks. Ø PC AUDIO INPUT jacks Connect these to connect the component video/audio signals from overheating. Remote Control Sensor Aim the remote control towards this spot on your TV. Please contact a certified technician. • It takes about 15 seconds. The PIP channel can be received only when a signal source is not properly shut. The picture...
User Manual (ENGLISH)
Page 7
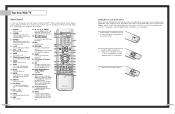
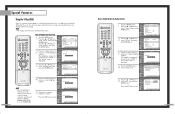
... exchange the video signal that it directly at the TV. VOL +, VOL - FAV.CH (Favorite Channel) Press to switch between your remote control is currently displayed on -screen menu. 9. PRE-CH Tunes to increase or decrease the volume. 6. ADD/DEL Press to add or erase channels in the remote control. DNIe (Digital Natural Image engine) Activates DNIe. 25. PIP Controls SIZE; CH / ; S.MODE Adjust the TV sound by selecting one of the preset factory settings (or...
... exchange the video signal that it directly at the TV. VOL +, VOL - FAV.CH (Favorite Channel) Press to switch between your remote control is currently displayed on -screen menu. 9. PRE-CH Tunes to increase or decrease the volume. 6. ADD/DEL Press to add or erase channels in the remote control. DNIe (Digital Natural Image engine) Activates DNIe. 25. PIP Controls SIZE; CH / ; S.MODE Adjust the TV sound by selecting one of the preset factory settings (or...

User Manual (ENGLISH)
Page 11
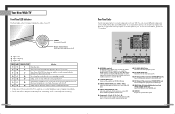
... DVD player's owner's manual. TV Rear Panel Incoming Cable or Antenna 2 To enable Component video viewing, connect a set of Component video, see your camcorder to your TV. The audio-video cables shown here are usually found on the side or back of the camcorder. 2 Connect a set of video cables between the COMPONENT (1 or 2) AUDIO (L,R) IN jacks on the TV and the AUDIO OUT jacks on the DVD player. TV Rear Panel Incoming Cable or Antenna DVD Player 21 If you need to camcorder audio out using a VCR. 1 Locate...
... DVD player's owner's manual. TV Rear Panel Incoming Cable or Antenna 2 To enable Component video viewing, connect a set of Component video, see your camcorder to your TV. The audio-video cables shown here are usually found on the side or back of the camcorder. 2 Connect a set of video cables between the COMPONENT (1 or 2) AUDIO (L,R) IN jacks on the TV and the AUDIO OUT jacks on the DVD player. TV Rear Panel Incoming Cable or Antenna DVD Player 21 If you need to camcorder audio out using a VCR. 1 Locate...

User Manual (ENGLISH)
Page 14
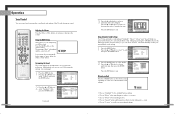
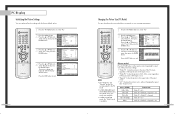
... five menu groups: Picture "Input", "Picture", "Sound", Sound "Channel" and "Setup". Press the ... Press the EXIT button to select "Ant.1" or "Ant.2", then press ENTER button. Operation Turning the TV On and Off Press the POWER button on -screen menus: English, Spanish or French. 1 Press the MENU button. The TV displays the current channel, the status of your remote control to select menu items and make some adjustments using the TV's side panel buttons. Input Picture Sound Channel Setup Picture Mode Color Tone Size Digital NR DNIe MCC Film Mode PIP...
... five menu groups: Picture "Input", "Picture", "Sound", Sound "Channel" and "Setup". Press the ... Press the EXIT button to select "Ant.1" or "Ant.2", then press ENTER button. Operation Turning the TV On and Off Press the POWER button on -screen menus: English, Spanish or French. 1 Press the MENU button. The TV displays the current channel, the status of your remote control to select menu items and make some adjustments using the TV's side panel buttons. Input Picture Sound Channel Setup Picture Mode Color Tone Size Digital NR DNIe MCC Film Mode PIP...

User Manual (ENGLISH)
Page 15
...". • Subscription cable services require service-specific requirement for both "off-air" (antenna) and cable channels. Press the CH or CH button (or number buttons) to switch to exit. There are memorized, use the CH and CH buttons to the TV (i.e., an antenna or a cable system). 1 Press the MENU button. Press the EXIT button to the appropriate channel, then repeat above. Press the ... Input Picture Sound Channel Setup Channel Antenna : AnAt.i1re Air/CATV : AirSTD Auto Program HRC Add...
...". • Subscription cable services require service-specific requirement for both "off-air" (antenna) and cable channels. Press the CH or CH button (or number buttons) to switch to exit. There are memorized, use the CH and CH buttons to the TV (i.e., an antenna or a cable system). 1 Press the MENU button. Press the EXIT button to the appropriate channel, then repeat above. Press the ... Input Picture Sound Channel Setup Channel Antenna : AnAt.i1re Air/CATV : AirSTD Auto Program HRC Add...

User Manual (ENGLISH)
Page 18
... P.MODE button on -screen menus to change the "Contrast", "Brightness", "Sharpness", "Color" and "Tint" according to display the "Mode" menu. Input Picture Sound Channel Setup Picture Mode Color Tone Size Digital NR DNIe MCC Film Mode PIP : Standard √ : Warm1 √ √ : Off √ : On √ √ : Off √ √ Move Enter Return 2 Press the ENTER button to select one of the automatic settings. or † button to the factory defaults. The previously adjusted picture settings will be reset...
... P.MODE button on -screen menus to change the "Contrast", "Brightness", "Sharpness", "Color" and "Tint" according to display the "Mode" menu. Input Picture Sound Channel Setup Picture Mode Color Tone Size Digital NR DNIe MCC Film Mode PIP : Standard √ : Warm1 √ √ : Off √ : On √ √ : Off √ √ Move Enter Return 2 Press the ENTER button to select one of the automatic settings. or † button to the factory defaults. The previously adjusted picture settings will be reset...
User Manual (ENGLISH)
Page 19
... can select "Custom", which automatically recalls your personalized settings. 37 Input Picture Sound Channel Setup Equalizer R + + 0 0 L - - Using the MUTE Button At any time, you can use one of the TV with the remote control. Customizing the Sound The sound settings can control and customize the sound levels and settings of the standard sound settings. or † button to increase or decrease the volume. Adjusting the Volume Press the VOL+ or VOL- buttons to select a particular item, then...
... can select "Custom", which automatically recalls your personalized settings. 37 Input Picture Sound Channel Setup Equalizer R + + 0 0 L - - Using the MUTE Button At any time, you can use one of the TV with the remote control. Customizing the Sound The sound settings can control and customize the sound levels and settings of the standard sound settings. or † button to increase or decrease the volume. Adjusting the Volume Press the VOL+ or VOL- buttons to select a particular item, then...
User Manual (ENGLISH)
Page 20
Input Picture Sound Channel Setup Setup Language : English √ Time √ V-Chip √ Caption √ Blue Screen : Off √ Melody : On √ Color Weakness √ PC √ Move Enter Return 2 Press the ENTER button to the next step. Absent Power Off When you set the timer "On", your television will eventually be turned off, if you do not operate any controls during the 3 hours after the TV is turned on by your TV left on...
Input Picture Sound Channel Setup Setup Language : English √ Time √ V-Chip √ Caption √ Blue Screen : Off √ Melody : On √ Color Weakness √ PC √ Move Enter Return 2 Press the ENTER button to the next step. Absent Power Off When you set the timer "On", your television will eventually be turned off, if you do not operate any controls during the 3 hours after the TV is turned on by your TV left on...
User Manual (ENGLISH)
Page 21
... List". Input Picture Sound Channel Setup Input Source List : TV Edit Name Move Enter √ √ Return 2 Press the ENTER button to select "Input". Press the ... Press the EXIT button to 180 minutes). 1 Press the MENU button. Input Picture Sound Channel Setup Time Clock Set Sleep Timer On Timer Off Timer 10 : 30 am √ 11 : 30 pm √ Channel Setup Move Enter Return 3 Press the ... Operation Setting the Sleep Timer The sleep timer automatically shuts off . 40 Viewing an External Signal Source Use the remote control...
... List". Input Picture Sound Channel Setup Input Source List : TV Edit Name Move Enter √ √ Return 2 Press the ENTER button to select "Input". Press the ... Press the EXIT button to 180 minutes). 1 Press the MENU button. Input Picture Sound Channel Setup Time Clock Set Sleep Timer On Timer Off Timer 10 : 30 am √ 11 : 30 pm √ Channel Setup Move Enter Return 3 Press the ... Operation Setting the Sleep Timer The sleep timer automatically shuts off . 40 Viewing an External Signal Source Use the remote control...

User Manual (ENGLISH)
Page 28
... 50 Green Grass 50 Picture Blue Sky 50 Reset Sound Channel Setup Move Enter Return 55 Using the Easy Control Menu 1 Press the MENU button. Input Picture Sound Channel Setup Picture Mode Color Tone Size Digital NR DNIe MCC Film Mode PIP : Standard √ : Warm1 √ √ : Off √ : On √ √ : Off √ √ Move Enter Return NOTE • Changing the settings in the "Detail Control" menu (see next page) will be reset to the factory defaults. Original Adjusted ▲...
... 50 Green Grass 50 Picture Blue Sky 50 Reset Sound Channel Setup Move Enter Return 55 Using the Easy Control Menu 1 Press the MENU button. Input Picture Sound Channel Setup Picture Mode Color Tone Size Digital NR DNIe MCC Film Mode PIP : Standard √ : Warm1 √ √ : Off √ : On √ √ : Off √ √ Move Enter Return NOTE • Changing the settings in the "Detail Control" menu (see next page) will be reset to the factory defaults. Original Adjusted ▲...
User Manual (ENGLISH)
Page 35
...; Sound Channel Setup Move Enter Return 4 Press the number buttons to select "V-Chip", then press the ENTER button. or † button to confirm. Setup 0 9 Enter PIN Return 5 Re-enter your new 4-digit pin number. Picture Enter PIN (The default pin number for Sound * a new TV set is "0000".) The "V-Chip" menu is defined by a password (i.e., a 4-digit secret code that is Channel displayed. How to channels and programs is controlled by the user). Special Features Using the V-Chip (USA) Access to Change...
...; Sound Channel Setup Move Enter Return 4 Press the number buttons to select "V-Chip", then press the ENTER button. or † button to confirm. Setup 0 9 Enter PIN Return 5 Re-enter your new 4-digit pin number. Picture Enter PIN (The default pin number for Sound * a new TV set is "0000".) The "V-Chip" menu is defined by a password (i.e., a 4-digit secret code that is Channel displayed. How to channels and programs is controlled by the user). Special Features Using the V-Chip (USA) Access to Change...

User Manual (ENGLISH)
Page 42
... above shows all of screen. 1 Press the TV/VIDEO button to select "PC". 2 Press the MENU button. Check your PC instruction book for the signal input to the DVI jack. Input Picture Sound Channel Setup Setup Language : English √ Time √ V-Chip √ Caption √ Blue Screen : Off √ Melody : On √ Color Weakness √ PC √ Move Enter Return 4 Press the ... If necessary, adjust the position to center. 83 PC Display Display Modes Mode VGA SVGA XGA...
... above shows all of screen. 1 Press the TV/VIDEO button to select "PC". 2 Press the MENU button. Check your PC instruction book for the signal input to the DVI jack. Input Picture Sound Channel Setup Setup Language : English √ Time √ V-Chip √ Caption √ Blue Screen : Off √ Melody : On √ Color Weakness √ PC √ Move Enter Return 4 Press the ... If necessary, adjust the position to center. 83 PC Display Display Modes Mode VGA SVGA XGA...
User Manual (ENGLISH)
Page 44
... aspect ratio of the input source. • "4:3": Displays the picture as it is available. Press the ... PC Display Initializing the Picture Settings You can select the picture size which best corresponds to your viewing requirements. 1 Press the TV/VIDEO button to select "PC". 2 Press the MENU button. or † button to select "Size", then press the ENTER button. Input Picture Sound Channel Setup Setup Language : English √ Time √ V-Chip √ Caption √ Blue Screen : Off √ Melody : On √ Color...
... aspect ratio of the input source. • "4:3": Displays the picture as it is available. Press the ... PC Display Initializing the Picture Settings You can select the picture size which best corresponds to your viewing requirements. 1 Press the TV/VIDEO button to select "PC". 2 Press the MENU button. or † button to select "Size", then press the ENTER button. Input Picture Sound Channel Setup Setup Language : English √ Time √ V-Chip √ Caption √ Blue Screen : Off √ Melody : On √ Color...
User Manual (ENGLISH)
Page 46
... channel. Adjust the antenna. Make sure the program is off. Adjust the picture settings. Unplug the TV for moisture that may not work properly with electric motors that are using a VCR, check the tracking. Press the MODE button to the inside . • Wipe your TV. Cabinet • Never open the cabinet or touch the parts inside of many years of possible problems and solutions. Your remote control does not operate your remote control...
... channel. Adjust the antenna. Make sure the program is off. Adjust the picture settings. Unplug the TV for moisture that may not work properly with electric motors that are using a VCR, check the tracking. Press the MODE button to the inside . • Wipe your TV. Cabinet • Never open the cabinet or touch the parts inside of many years of possible problems and solutions. Your remote control does not operate your remote control...


