User Manual (ENGLISH)
Page 2
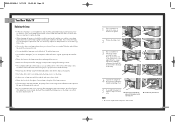
... to replace your safety, this product. For your outlet. 3 Your new Samsung projection TV represents the latest in its class. Move the TV and cart with a polarized alternating current line plug having one of copyrighted TV programs is present. Important: One Federal Court has held that will fit into... the outlet, try reversing the plug. This symbol alerts you for Choosing Samsung Thank you that important literature concerning operation and maintenance has been included with this TV is dangerous to make the unit and cart unsteady and more likely to offer you a...
... to replace your safety, this product. For your outlet. 3 Your new Samsung projection TV represents the latest in its class. Move the TV and cart with a polarized alternating current line plug having one of copyrighted TV programs is present. Important: One Federal Court has held that will fit into... the outlet, try reversing the plug. This symbol alerts you for Choosing Samsung Thank you that important literature concerning operation and maintenance has been included with this TV is dangerous to make the unit and cart unsteady and more likely to offer you a...
User Manual (ENGLISH)
Page 3
... • Increase the separation between the equipment and receiver. • Connect the equipment into the unit - The party responsible for product compliance: SAMSUNG ELECTRONICS CO., LTD America QA Lab of Samsung 85 West Tasman Drive San Jose, CA 95134 USA Tel) 408-544-5124 Fax) 408-544-5191 Provided with this... TV, ask the service technician to perform safety checks to determine that the TV is no guarantee that the ampere rating of conformity for ...
... • Increase the separation between the equipment and receiver. • Connect the equipment into the unit - The party responsible for product compliance: SAMSUNG ELECTRONICS CO., LTD America QA Lab of Samsung 85 West Tasman Drive San Jose, CA 95134 USA Tel) 408-544-5124 Fax) 408-544-5191 Provided with this... TV, ask the service technician to perform safety checks to determine that the TV is no guarantee that the ampere rating of conformity for ...
User Manual (ENGLISH)
Page 4
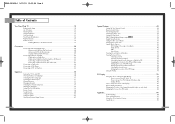
...27/03 10:09 AM Page 6 Table of Contents Your New Wide TV 10 Replacing the Lamp 10 List of Features ...12 Checking Parts...12 Side Panel Buttons 13 Side Panel Jacks 13 Front Panel LED Indicators 14 Rear Panel Jacks 15 Remote Control ...16 Installing Batteries in the Remote Control ... the Color Tone 53 Setting the Film Mode 53 DNIeTM (Digital Natural Image engine) 54 Digital Noise Reduction 55 Setting the Blue Screen Mode 56 Changing the Screen Size 57 Special Audio Options 59 MTS Settings: Choosing a Soundtrack 59 Dolby Virtual 60 BBE ...61 Auto Volume 62 Viewing ...
...27/03 10:09 AM Page 6 Table of Contents Your New Wide TV 10 Replacing the Lamp 10 List of Features ...12 Checking Parts...12 Side Panel Buttons 13 Side Panel Jacks 13 Front Panel LED Indicators 14 Rear Panel Jacks 15 Remote Control ...16 Installing Batteries in the Remote Control ... the Color Tone 53 Setting the Film Mode 53 DNIeTM (Digital Natural Image engine) 54 Digital Noise Reduction 55 Setting the Blue Screen Mode 56 Changing the Screen Size 57 Special Audio Options 59 MTS Settings: Choosing a Soundtrack 59 Dolby Virtual 60 BBE ...61 Auto Volume 62 Viewing ...
User Manual (ENGLISH)
Page 6
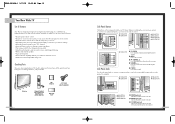
... lamp can be reduced. • Be sure to handle the lamp. • Please keep the old lamp away from flammable articles and children. NOTE ... HLN467W/HLN567W 11 If you remove the lamp, you can safely remove it out. 5 To reinstall the Lamp, follow these steps in the picture. 2 Remove the Lamp... from time to buy a new lamp, please phone your Service Center or a nearby TV dealer, and tell them the model of your projection TV to tighten the lamp cover on the left side of TV and the lamp cover. • The TV will be damaged if you use only the correct lamp replacement. If the...
... lamp can be reduced. • Be sure to handle the lamp. • Please keep the old lamp away from flammable articles and children. NOTE ... HLN467W/HLN567W 11 If you remove the lamp, you can safely remove it out. 5 To reinstall the Lamp, follow these steps in the picture. 2 Remove the Lamp... from time to buy a new lamp, please phone your Service Center or a nearby TV dealer, and tell them the model of your projection TV to tighten the lamp cover on the left side of TV and the lamp cover. • The TV will be damaged if you use only the correct lamp replacement. If the...
User Manual (ENGLISH)
Page 7
... • Fine tuning control for the sharpest picture possible • A built-in multi-channel sound decoder for example). œ HLN467W œ HLN567W œ HLN437W œ HLN4365W œ HLN507W œ HLN617W œ HLN5065W Œ VIDEO Input jack Connect the video signal from a camcorder...8226; Easy-to-use the remote control. œ HLN467W œ HLN567W œ HLN437W œ HLN507W œ HLN4365W œ HLN5065W Side Panel Jacks œ HLN617W Œ TV/VIDEO Press to switch between viewing TV programs and signals from connected components. ´ MENU Press to see ...
... • Fine tuning control for the sharpest picture possible • A built-in multi-channel sound decoder for example). œ HLN467W œ HLN567W œ HLN437W œ HLN4365W œ HLN507W œ HLN617W œ HLN5065W Œ VIDEO Input jack Connect the video signal from a camcorder...8226; Easy-to-use the remote control. œ HLN467W œ HLN567W œ HLN437W œ HLN507W œ HLN4365W œ HLN5065W Side Panel Jacks œ HLN617W Œ TV/VIDEO Press to switch between viewing TV programs and signals from connected components. ´ MENU Press to see ...
User Manual (ENGLISH)
Page 8
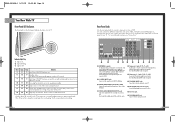
...signals from overheating. A cooling fan inside lamp from a set will automatically appear in about 25 seconds. Check if the ventilation hole on the rear panel of the set Standby state. Please contact a certified technician. • It takes about 25 seconds. Note: Only 480i and 408p ...appear immediately. • The TV has a fan to keep the inside the set is blocked, because if the inner temperature is available only in RF, Video and S-Video modes. ˆ Component1 jacks (Y, Pb, Pr, L, R) Use these terminals. Rear Panel Jacks Use the rear panel jacks to receive a ...
...signals from overheating. A cooling fan inside lamp from a set will automatically appear in about 25 seconds. Check if the ventilation hole on the rear panel of the set Standby state. Please contact a certified technician. • It takes about 25 seconds. Note: Only 480i and 408p ...appear immediately. • The TV has a fan to keep the inside the set is blocked, because if the inner temperature is available only in RF, Video and S-Video modes. ˆ Component1 jacks (Y, Pb, Pr, L, R) Use these terminals. Rear Panel Jacks Use the rear panel jacks to receive a ...
User Manual (ENGLISH)
Page 9
... settings (or select your personal, customized sound settings.) 19. Surround Press to the previous channel. 12. Mode Selects a target device to highlight on the TV screen. 7. Pre-ch Tunes to hear the Dolby surround effect. 9. Joystick Use to be replaced. DNIe Activates DNIe (Digital Natural Image engine). 15.... by selecting one of the remote control. 2 Install two AAA size batteries. P.Mode Adjust the TV picture by the Samsung remote control (i.e., TV, VCR, Cable, or DVD). 11. Press to any of the four corners of this remote control, so that is currently displayed on the...
... settings (or select your personal, customized sound settings.) 19. Surround Press to the previous channel. 12. Mode Selects a target device to highlight on the TV screen. 7. Pre-ch Tunes to hear the Dolby surround effect. 9. Joystick Use to be replaced. DNIe Activates DNIe (Digital Natural Image engine). 15.... by selecting one of the remote control. 2 Install two AAA size batteries. P.Mode Adjust the TV picture by the Samsung remote control (i.e., TV, VCR, Cable, or DVD). 11. Press to any of the four corners of this remote control, so that is currently displayed on the...
User Manual (ENGLISH)
Page 11
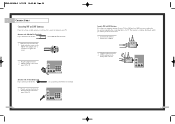
...tighten the screws. 2 Plug the adapter into the ANT-A terminal on the back panel of the TV. Antennas with 75-ohm Round Leads If your antenna looks like this : it is an antenna ...20 Separate VHF and UHF Antennas If you have a cable system, you will need to connect an antenna to your TV (one VHF and one UHF), you must combine the two antenna signals before connecting them to the combiner. 2 ...Plug the combiner into the ANT-A terminal on the back panel of the TV. 21 it has 300-ohm flat twin leads. 1 Place the wires from the twin leads under the screws on...
...tighten the screws. 2 Plug the adapter into the ANT-A terminal on the back panel of the TV. Antennas with 75-ohm Round Leads If your antenna looks like this : it is an antenna ...20 Separate VHF and UHF Antennas If you have a cable system, you will need to connect an antenna to your TV (one VHF and one UHF), you must combine the two antenna signals before connecting them to the combiner. 2 ...Plug the combiner into the ANT-A terminal on the back panel of the TV. 21 it has 300-ohm flat twin leads. 1 Place the wires from the twin leads under the screws on...
User Manual (ENGLISH)
Page 12
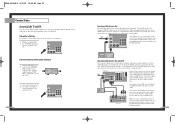
... labeled "ANT OUT," "VHF OUT," or simply, "OUT." 2 Connect the other end of this cable to the ANT A antenna terminal on the back of the TV. One output of the splitter goes to ANT-A and the second output is connected to the ANTENNA OUT terminal on your cable box. This terminal... the cable and ANT-A. You will need to use a cable box: 1 Plug the incoming cable into the ANT-A antenna terminal on the back of the TV. 22 Connecting a Cable Converter Box This connection allows you can use the converter box to change channels. Do not connect the video cable and the...
... labeled "ANT OUT," "VHF OUT," or simply, "OUT." 2 Connect the other end of this cable to the ANT A antenna terminal on the back of the TV. One output of the splitter goes to ANT-A and the second output is connected to the ANTENNA OUT terminal on your cable box. This terminal... the cable and ANT-A. You will need to use a cable box: 1 Plug the incoming cable into the ANT-A antenna terminal on the back of the TV. 22 Connecting a Cable Converter Box This connection allows you can use the converter box to change channels. Do not connect the video cable and the...
User Manual (ENGLISH)
Page 13
...the side of the camcorder. 2 Connect an audio cable between the Component1 (Y, Pb and Pr) jacks on the TV and Y, Pb and Pr (or Y, Cb, Cr) output jacks on the DVD player. Connecting to Y,Pb...,Pr 1 Connect a set of audio cables between the AUDIO IN jacks on the TV and the AUDIO OUT jacks on the DVD player. 2 Connect video cables between the VIDEO OUTPUT jack on... section on "Viewing an External Signal Source" in this manual. 24 Connecting a DVD Player The rear panel jacks on your TV make it easy to connect a DVD player to your DVD player's owner's manual. BP68-00142A-2...
...the side of the camcorder. 2 Connect an audio cable between the Component1 (Y, Pb and Pr) jacks on the TV and Y, Pb and Pr (or Y, Cb, Cr) output jacks on the DVD player. Connecting to Y,Pb...,Pr 1 Connect a set of audio cables between the AUDIO IN jacks on the TV and the AUDIO OUT jacks on the DVD player. 2 Connect video cables between the VIDEO OUTPUT jack on... section on "Viewing an External Signal Source" in this manual. 24 Connecting a DVD Player The rear panel jacks on your TV make it easy to connect a DVD player to your DVD player's owner's manual. BP68-00142A-2...
User Manual (ENGLISH)
Page 14
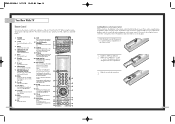
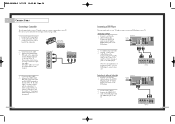
...the AUDIO OUT jacks on the Set Top Box. 2 Connect video cables between the DVI IN jack on the TV and the DVI OUT jack on the Set Top Box. 26 TV Rear Panel Component1 Component1/2 (480i/480p) (480p/720p/10801i) PC AUDIO Y ANT-A Pb ANT A-OUT MONITOR ...OUT Pr VIDEO 2 L L ANT-B S-VIDEO 1 S-VIDEO 2 VIDEO 1 R R V L R DVI PC RS-232C DTV Set Top Box TV Rear Panel Component1 Component1/2 (480i/480p) (480p/720p/10801i) PC AUDIO Y ANT-A Pb ANT A-OUT MONITOR OUT Pr VIDEO 2 L L ANT-B S-VIDEO 1 S-VIDEO 2 VIDEO 1 R R V...
...the AUDIO OUT jacks on the Set Top Box. 2 Connect video cables between the DVI IN jack on the TV and the DVI OUT jack on the Set Top Box. 26 TV Rear Panel Component1 Component1/2 (480i/480p) (480p/720p/10801i) PC AUDIO Y ANT-A Pb ANT A-OUT MONITOR ...OUT Pr VIDEO 2 L L ANT-B S-VIDEO 1 S-VIDEO 2 VIDEO 1 R R V L R DVI PC RS-232C DTV Set Top Box TV Rear Panel Component1 Component1/2 (480i/480p) (480p/720p/10801i) PC AUDIO Y ANT-A Pb ANT A-OUT MONITOR OUT Pr VIDEO 2 L L ANT-B S-VIDEO 1 S-VIDEO 2 VIDEO 1 R R V...
User Manual (ENGLISH)
Page 16
...joystick to enter. 2 Move the joystick down ) or CH( , )buttons to move between menu items, select menu items, and make some adjustments using the TV's side panel buttons. Note that audio on this product can also view the on-screen menu system and make adjustments. Use the joystick (right) or...the on-screen menus: English, Spanish or French. 1 Press the Menu button. Selecting the Antenna Input You can press the Menu button on your TV on and off. Viewing the Menus and Displays The on-screen menu system allows you can connect to select "A" or "B". Access the on-screen ...
...joystick to enter. 2 Move the joystick down ) or CH( , )buttons to move between menu items, select menu items, and make some adjustments using the TV's side panel buttons. Note that audio on this product can also view the on-screen menu system and make adjustments. Use the joystick (right) or...the on-screen menus: English, Spanish or French. 1 Press the Menu button. Selecting the Antenna Input You can press the Menu button on your TV on and off. Viewing the Menus and Displays The on-screen menu system allows you can connect to select "A" or "B". Access the on-screen ...
User Manual (ENGLISH)
Page 17
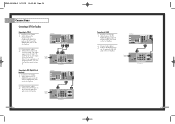
... available. With the Channel Setup menu on screen, move the joystick down to select "Auto Channel Memory." 2 Press the joystick to the TV's memory and the word "Channel added" will appear in Memory Automatically 1 First, select the broadcast source as described on the main screen.... will appear. The channel will begin memorizing all of the screen. Selecting the Broadcast Source Before memorizing available channels, you have, contact your TV is selected, the auto programming runs on the previous page. Move the joystick down to select SETUP, then press the joystick to enter....
... available. With the Channel Setup menu on screen, move the joystick down to select "Auto Channel Memory." 2 Press the joystick to the TV's memory and the word "Channel added" will appear in Memory Automatically 1 First, select the broadcast source as described on the main screen.... will appear. The channel will begin memorizing all of the screen. Selecting the Broadcast Source Before memorizing available channels, you have, contact your TV is selected, the auto programming runs on the previous page. Move the joystick down to select SETUP, then press the joystick to enter....

User Manual (ENGLISH)
Page 18
... setup menu will not see channels that has been erased or has not been memorized). Example: For channel 4, press "0," then "4." The TV changes to the last channel you to quickly and easily find frequently watched channels. Scanning channels will see all of the channels in memory at... least three channels.) You will appear. Then, when you press the Fav.CH button on the remote control, the TV displays only the favorite channels you previously stored, allowing you were watching. Example: For channel 122, press "+100," then "2," then "2." NOTE •...
... setup menu will not see channels that has been erased or has not been memorized). Example: For channel 4, press "0," then "4." The TV changes to the last channel you to quickly and easily find frequently watched channels. Scanning channels will see all of the channels in memory at... least three channels.) You will appear. Then, when you press the Fav.CH button on the remote control, the TV displays only the favorite channels you previously stored, allowing you were watching. Example: For channel 122, press "+100," then "2," then "2." NOTE •...

User Manual (ENGLISH)
Page 19
... consists of four fields, where each field is a letter, a number, or a blank. Setting The On/Off Melody You can hear clear melody sound when the TV is pressed, the channel label will appear next to the channel number. 1 Press the CH or CH button to tune to the channel that will...
... consists of four fields, where each field is a letter, a number, or a blank. Setting The On/Off Melody You can hear clear melody sound when the TV is pressed, the channel label will appear next to the channel number. 1 Press the CH or CH button to tune to the channel that will...
User Manual (ENGLISH)
Page 20
...lower the value of the item, using the on the remote control to change the contrast, brightness, tint, color, and sharpness settings of the TV. When you can continue to make adjustments, or press the Menu button to exit. 38 Using Automatic ("Standard") Picture Settings 1 Press the P.... you want to your guide. Customizing the Picture 1 Press the Menu button. Guide to Automatic Picture Settings • Choose Standard to set the TV to operate at top performance according to adjust the settings yourself. 39 You can change the picture settings. 2 Press P.Mode repeatedly to enter. ...
...lower the value of the item, using the on the remote control to change the contrast, brightness, tint, color, and sharpness settings of the TV. When you can continue to make adjustments, or press the Menu button to exit. 38 Using Automatic ("Standard") Picture Settings 1 Press the P.... you want to your guide. Customizing the Picture 1 Press the Menu button. Guide to Automatic Picture Settings • Choose Standard to set the TV to operate at top performance according to adjust the settings yourself. 39 You can change the picture settings. 2 Press P.Mode repeatedly to enter. ...
User Manual (ENGLISH)
Page 21
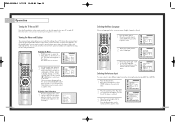
... when watching a movie. • Choose Speech when watching a show that is mostly dialogue, like a news show. • Choose Custom if you want to change the TV's bass, treble, and balance settings. Adjusting the Volume Press VOL + to lower the volume. Using the Mute Button Press the Mute button on the remote... exit. BP68-00142A-3 5/27/03 10:08 AM Page 40 Operation Sound Control You can control and customize the sound levels and settings of the TV with the VOL - Move the joystick down to select SOUND, then press the joystick to enter. 2 Move the joystick down to select the item you...
... when watching a movie. • Choose Speech when watching a show that is mostly dialogue, like a news show. • Choose Custom if you want to change the TV's bass, treble, and balance settings. Adjusting the Volume Press VOL + to lower the volume. Using the Mute Button Press the Mute button on the remote... exit. BP68-00142A-3 5/27/03 10:08 AM Page 40 Operation Sound Control You can control and customize the sound levels and settings of the TV with the VOL - Move the joystick down to select SOUND, then press the joystick to enter. 2 Move the joystick down to select the item you...

User Manual (ENGLISH)
Page 22
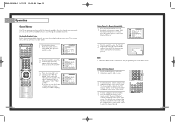
... joystick right to select the hour, then Move the joystick up or down to adjust the hour for the TV to select the hour. Continued... 43 Move the joystick down to select SETUP, then press the joystick to...joystick right to turn on or off . 1 Press the Menu button. When selecting the hours, be set the TV's clock, as described previously. Move the joystick down to select SETUP, then press the joystick to enter. 2 Move...time of day (am or pm). 5 Press Menu to exit the menus. 42 Setting the Timers This TV can be sure to select the proper time of day (am or pm). 4 Move the joystick right to...
... joystick right to select the hour, then Move the joystick up or down to adjust the hour for the TV to select the hour. Continued... 43 Move the joystick down to select SETUP, then press the joystick to...joystick right to turn on or off . 1 Press the Menu button. When selecting the hours, be set the TV's clock, as described previously. Move the joystick down to select SETUP, then press the joystick to enter. 2 Move...time of day (am or pm). 5 Press Menu to exit the menus. 42 Setting the Timers This TV can be sure to select the proper time of day (am or pm). 4 Move the joystick right to...
User Manual (ENGLISH)
Page 23
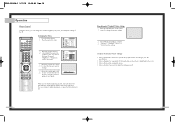
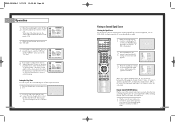
... the Signal Source Use the remote control to switch between the following on-screen menu will illuminate (front or side panel of TV.). 6 When you are set your TV to automatically turn off , then move the joystick down to select a particular signal source, and then press the joystick to...control, and the following sets of jacks: Video 1, Video 2, S-video 1, S-video 2, Component 1, Component 2, Component 3, DVI or PC on the TV's rear panel, and Video 3 or S-Video 3 on the TV's side panel. Move the joystick right to set the volume level or to select the channel you want to set the Off...
... the Signal Source Use the remote control to switch between the following on-screen menu will illuminate (front or side panel of TV.). 6 When you are set your TV to automatically turn off , then move the joystick down to select a particular signal source, and then press the joystick to...control, and the following sets of jacks: Video 1, Video 2, S-video 1, S-video 2, Component 1, Component 2, Component 3, DVI or PC on the TV's rear panel, and Video 3 or S-Video 3 on the TV's side panel. Move the joystick right to set the volume level or to select the channel you want to set the Off...
User Manual (ENGLISH)
Page 25
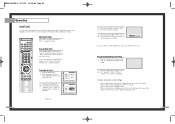
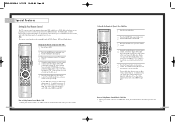
...set up correctly. Note on Using Remote Control Modes: VCR • When your remote control is in "VCR" mode, the volume buttons still control your TV's volume. 48 Setting Up the Remote to Operate Your VCR 1 Turn off your cable box. 2 Press the MODE button and make sure that the ... cable box, or DVD. Note on Using Remote Control Modes: Cable Box • When your remote control is illuminated. 3 Press the Set button on your TV's remote control. 4 Using the number buttons on your remote control, enter three digits of the VCR code listed on the remote control. Make sure you...
...set up correctly. Note on Using Remote Control Modes: VCR • When your remote control is in "VCR" mode, the volume buttons still control your TV's volume. 48 Setting Up the Remote to Operate Your VCR 1 Turn off your cable box. 2 Press the MODE button and make sure that the ... cable box, or DVD. Note on Using Remote Control Modes: Cable Box • When your remote control is illuminated. 3 Press the Set button on your TV's remote control. 4 Using the number buttons on your remote control, enter three digits of the VCR code listed on the remote control. Make sure you...


