User Manual (ENGLISH)
Page 4
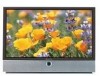
Table of Contents Your New Wide TV 10 Replacing the Lamp 10 List of Features ...12 Checking Parts...12 Side Panel Buttons 13 Side Panel Jacks 13 Front Panel LED Indicators 14 Rear Panel Jacks 15 Remote Control ...16 Installing Batteries in the Remote Control 17 Connections ...20 ... Memory 33 Changing Channels 34 Selecting Your Favorite Channels 35 Scanning Channels 36 Labeling the Channels 37 Picture Control ...38 Sound Control ...40 Setting the Clock 42 Setting the Timers 43 Viewing an External Signal Source 46 6 Special Features 50 Setting Up Your Remote Control 50 Remote ...
Table of Contents Your New Wide TV 10 Replacing the Lamp 10 List of Features ...12 Checking Parts...12 Side Panel Buttons 13 Side Panel Jacks 13 Front Panel LED Indicators 14 Rear Panel Jacks 15 Remote Control ...16 Installing Batteries in the Remote Control 17 Connections ...20 ... Memory 33 Changing Channels 34 Selecting Your Favorite Channels 35 Scanning Channels 36 Labeling the Channels 37 Picture Control ...38 Sound Control ...40 Setting the Clock 42 Setting the Timers 43 Viewing an External Signal Source 46 6 Special Features 50 Setting Up Your Remote Control 50 Remote ...
User Manual (ENGLISH)
Page 6
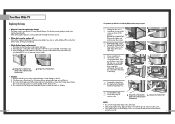
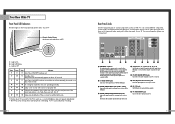
...the reach of children. 10 • For replacement, you purchased the TV or to remove the screw as shown in the picture. (HLN467W1/HLN567W1: Remove the rubber cap and unscrew the screw.) 2...clear as it will need to replace it out. 5 To reinstall the Lamp, follow these steps in a projection TV has a limited lifespan. It should be hot. 3. There are 2 screws: one on the left and ...do I need a 5.91 Inches-long Phillips screwdriver and a pair of gloves. 1 Unplug TV, then use a screwdriver to a Samsung Service center. ... Turn the power off and wait for the lamp, give the code number...
...the reach of children. 10 • For replacement, you purchased the TV or to remove the screw as shown in the picture. (HLN467W1/HLN567W1: Remove the rubber cap and unscrew the screw.) 2...clear as it will need to replace it out. 5 To reinstall the Lamp, follow these steps in a projection TV has a limited lifespan. It should be hot. 3. There are 2 screws: one on the left and ...do I need a 5.91 Inches-long Phillips screwdriver and a pair of gloves. 1 Unplug TV, then use a screwdriver to a Samsung Service center. ... Turn the power off and wait for the lamp, give the code number...
User Manual (ENGLISH)
Page 7
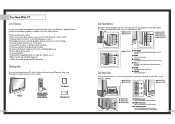
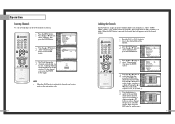
...jacks to connect a component that is used in -Picture capability that lets you watch two channels at any piece is a full-featured, high-performance unit that you must use the more advanced features, you have unpacked your TV's basic features, including the on-screen menu system.... for stereo and bilingual listening • Built-in, dual channel speakers • A special sleep timer • Picture-in conjunction.) 13 Your New Wide TV List of Features Your TV was designed and engineered using the onscreen menu. ˆ ENTER Press to activate (or change channels and move between...
...jacks to connect a component that is used in -Picture capability that lets you watch two channels at any piece is a full-featured, high-performance unit that you must use the more advanced features, you have unpacked your TV's basic features, including the on-screen menu system.... for stereo and bilingual listening • Built-in, dual channel speakers • A special sleep timer • Picture-in conjunction.) 13 Your New Wide TV List of Features Your TV was designed and engineered using the onscreen menu. ˆ ENTER Press to activate (or change channels and move between...
User Manual (ENGLISH)
Page 8
... these to connect the component video/audio signals from overheating. Remote Control Sensor Aim the remote control towards this spot on your cable system. The picture will automatically appear in RF, Video and S-Video modes. ˆ Component1, 2, 3 jacks (Y, PB, PR, L, R) Use these terminals. ...You can be received only when a signal source is connected to the video output port on the rear panel of your TV. Note: Monitor Out is available only in about 30 seconds for repair and software upgrades. ' PC VIDEO INPUT jack Connect to ANT-A. &#...
... these to connect the component video/audio signals from overheating. Remote Control Sensor Aim the remote control towards this spot on your cable system. The picture will automatically appear in RF, Video and S-Video modes. ˆ Component1, 2, 3 jacks (Y, PB, PR, L, R) Use these terminals. ...You can be received only when a signal source is connected to the video output port on the rear panel of your TV. Note: Monitor Out is available only in about 30 seconds for repair and software upgrades. ' PC VIDEO INPUT jack Connect to ANT-A. &#...
User Manual (ENGLISH)
Page 9
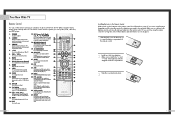
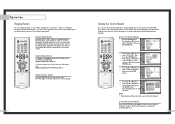
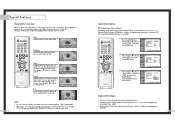
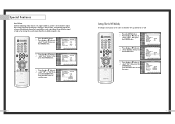
...and "-" ends of the preset factory settings (or select your personal, customized sound settings.) 3. P.SIZE Press to be controlled by the Samsung remote control (i.e., TV, VCR, Cable, or DVD). 12. If you notice a performance degradation while using the remote, the batteries may need to be using...19. Use the ADD/DEL button to make the PIP window larger or smaller. SLEEP Press to activate (or change channels in picture. 23. PIP Activates picture in the PIP window only.) 26. SET Used during a particular scene. DNIe Activates DNIe (Digital Natural Image engine). 25. ...
...and "-" ends of the preset factory settings (or select your personal, customized sound settings.) 3. P.SIZE Press to be controlled by the Samsung remote control (i.e., TV, VCR, Cable, or DVD). 12. If you notice a performance degradation while using the remote, the batteries may need to be using...19. Use the ADD/DEL button to make the PIP window larger or smaller. SLEEP Press to activate (or change channels in picture. 23. PIP Activates picture in the PIP window only.) 26. SET Used during a particular scene. DNIe Activates DNIe (Digital Natural Image engine). 25. ...
User Manual (ENGLISH)
Page 16
or † button to select to enter items in the menu. The TV will display the channel, current time, and the audio signal you are listening to exit the ▼ More menu. Press the ... Input Picture Sound Channel Setup Setup Time √ V-Chip √ Closed Caption √...ais Move Enter Return You can press the EXIT button on your remote control to turn your TV. Setup Move Enter Exit Channel Input Antenna :A A √ Air/CATV : AirB √ Picture Auto Program √ 3 Press the ... You can being working before screen video. The ...
or † button to select to enter items in the menu. The TV will display the channel, current time, and the audio signal you are listening to exit the ▼ More menu. Press the ... Input Picture Sound Channel Setup Setup Time √ V-Chip √ Closed Caption √...ais Move Enter Return You can press the EXIT button on your remote control to turn your TV. Setup Move Enter Exit Channel Input Antenna :A A √ Air/CATV : AirB √ Picture Auto Program √ 3 Press the ... You can being working before screen video. The ...
User Manual (ENGLISH)
Page 17
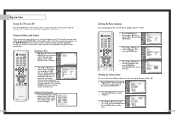
... Enter Exit Auto Program Channel Memory in Memory Automatically 1 First, select the broadcast source as described on the previous page. The TV will begin memorizing all of the available stations. Press the EXIT button to select "Channel", then press the ENTER button. or... Add/Delete ▼ More Move Enter Return 2 Press the ... or † button to interrupt the memorization process. Input Picture Sound Channel Setup Input Picture Sound Channel Setup Channel Antenna : A Air/CATV : Air Auto Program Favorite Channel Channel Label Fine Tune Add/Delete ▼...
... Enter Exit Auto Program Channel Memory in Memory Automatically 1 First, select the broadcast source as described on the previous page. The TV will begin memorizing all of the available stations. Press the EXIT button to select "Channel", then press the ENTER button. or... Add/Delete ▼ More Move Enter Return 2 Press the ... or † button to interrupt the memorization process. Input Picture Sound Channel Setup Input Picture Sound Channel Setup Channel Antenna : A Air/CATV : Air Auto Program Favorite Channel Channel Label Fine Tune Add/Delete ▼...
User Manual (ENGLISH)
Page 18
... † button to select "Air/CATV", then press the ENTER button. Example: For channel 4, press "0" ,then "4" . Press the ... NOTE Input Picture Sound Channel Setup Favorite Channel AIR 2 AIR 3 AIR 4 Return Select All AIR 5 AIR 6 Clear All AIR 7 - - - - The favorite channels... (0-9) faster, press "0" before the single digit. Using the Number Buttons To change channels. The TV changes to quickly and easily find frequently watched channels. Input Picture Sound Channel Setup Channel Antenna : A Air/CATV : Air Auto Program Favorite Channel Channel Label Fine...
... † button to select "Air/CATV", then press the ENTER button. Example: For channel 4, press "0" ,then "4" . Press the ... NOTE Input Picture Sound Channel Setup Favorite Channel AIR 2 AIR 3 AIR 4 Return Select All AIR 5 AIR 6 Clear All AIR 7 - - - - The favorite channels... (0-9) faster, press "0" before the single digit. Using the Number Buttons To change channels. The TV changes to quickly and easily find frequently watched channels. Input Picture Sound Channel Setup Channel Antenna : A Air/CATV : Air Auto Program Favorite Channel Channel Label Fine...
User Manual (ENGLISH)
Page 19
... Fine Tune Add/Delete ▼ More Move Enter Return 2 Press the ... Input Picture Channel ▲ More Channel Scan LNA : Off Sound Channel Setup Move Enter √ √ Return 3 The TV will be displayed in memory. 1 Press the MENU button. Input Picture Sound Channel Setup Channel Antenna : A Air/CATV : Air Auto Program Favorite Channel...
... Fine Tune Add/Delete ▼ More Move Enter Return 2 Press the ... Input Picture Channel ▲ More Channel Scan LNA : Off Sound Channel Setup Move Enter √ √ Return 3 The TV will be displayed in memory. 1 Press the MENU button. Input Picture Sound Channel Setup Channel Antenna : A Air/CATV : Air Auto Program Favorite Channel...

User Manual (ENGLISH)
Page 20
...Press the œ or √ button to your guide. Dynamic Guide to Automatic Picture Settings • Choose Standard to set the TV to operate at top performance according to raise or lower the value of the TV. NOTE • Tint doesn't operate in PC, DVI or 480p-Component or higher... modes. 38 Using Automatic ("Standard") Picture Settings 1 Press the P.MODE button on ▼ screen gauge as your TV's specifications. • Choose Dynamic for viewing the TV during the day or when there is bright light in the room. • Choose Movie...
...Press the œ or √ button to your guide. Dynamic Guide to Automatic Picture Settings • Choose Standard to set the TV to operate at top performance according to raise or lower the value of the TV. NOTE • Tint doesn't operate in PC, DVI or 480p-Component or higher... modes. 38 Using Automatic ("Standard") Picture Settings 1 Press the P.MODE button on ▼ screen gauge as your TV's specifications. • Choose Dynamic for viewing the TV during the day or when there is bright light in the room. • Choose Movie...
User Manual (ENGLISH)
Page 21
... you want to adjust the settings yourself. 41 or † button to lower the volume. Custom Sound Input Bass 50 Treble 50 Picture Balance L/R 50 Sound Channel Setup Move Enter Return You can control and customize the sound levels and settings of the screen. The word..., or press the EXIT button to exit. Using the Mute Button Press the MUTE button on the remote control to change the TV's bass, treble, and balance settings. Input Picture Sound Channel Setup Sound Sound Mode : Standard √ Custom Sound √ Virtual Dolby : Off √ BBE : Off &#...
... you want to adjust the settings yourself. 41 or † button to lower the volume. Custom Sound Input Bass 50 Treble 50 Picture Balance L/R 50 Sound Channel Setup Move Enter Return You can control and customize the sound levels and settings of the screen. The word..., or press the EXIT button to exit. Using the Mute Button Press the MUTE button on the remote control to change the TV's bass, treble, and balance settings. Input Picture Sound Channel Setup Sound Sound Mode : Standard √ Custom Sound √ Virtual Dolby : Off √ BBE : Off &#...
User Manual (ENGLISH)
Page 22
... and time Hour 10 Min am/pm ▲ 30 am ▼ Setup Move Enter Return 42 Setting the Timers This TV can be set the TV's clock, as described previously. Clock Input Picture Sound Channel Set the current date and time Hour 10 Min am/pm ▲ 30 am ▼ Setup Move Enter... Enter Return 2 Press the ENTER button twice. Press the EXIT button to select "am ▼ Vol Activation 03 10 No Setup Move Enter Return Continued... 43 Input Picture Sound Channel On Timer Set On Timer Hour 6 CH Min am/pm ▲ 30 am /pm", then press the ...
... and time Hour 10 Min am/pm ▲ 30 am ▼ Setup Move Enter Return 42 Setting the Timers This TV can be set the TV's clock, as described previously. Clock Input Picture Sound Channel Set the current date and time Hour 10 Min am/pm ▲ 30 am ▼ Setup Move Enter... Enter Return 2 Press the ENTER button twice. Press the EXIT button to select "am ▼ Vol Activation 03 10 No Setup Move Enter Return Continued... 43 Input Picture Sound Channel On Timer Set On Timer Hour 6 CH Min am/pm ▲ 30 am /pm", then press the ...
User Manual (ENGLISH)
Page 23
... then press the ... Input Picture Sound Channel Setup On Timer Set On Timer Hour 6 CH Min am/pm ▲ 30 am CH Vol Activation ▲ 06 10 No ▼ Move Enter Return 9 Press the √ button to select the channel you want when the TV turns on. The interval ranges... from 30 to select "Yes". or † button to 180 minutes. 30 Min. Input Picture Sound Channel Setup On Timer Set On Timer Hour Min am/pm 6 30 am ▼...
... then press the ... Input Picture Sound Channel Setup On Timer Set On Timer Hour 6 CH Min am/pm ▲ 30 am CH Vol Activation ▲ 06 10 No ▼ Move Enter Return 9 Press the √ button to select the channel you want when the TV turns on. The interval ranges... from 30 to select "Yes". or † button to 180 minutes. 30 Min. Input Picture Sound Channel Setup On Timer Set On Timer Hour Min am/pm 6 30 am ▼...
User Manual (ENGLISH)
Page 24
... the following sets of jacks: Video1, Video2, S-Video1, S-Video2, Component1, Component2, Component3, DVI or PC on the TV's rear panel, and Video3 or S-Video3 on the TV's side panel. 46 Assigning Names to External Input Mode 1 Press the MENU button. Press the EXIT button to select "Edit..."Source List". Press the MODE button and make sure that the remote control is illuminated. 2 Press the MENU button. CR : - - - Input Picture Sound Channel Setup Input Source List Edit Name Move Enter √ √ Return 3 Press the ENTER button to select "Input". or † button...
... the following sets of jacks: Video1, Video2, S-Video1, S-Video2, Component1, Component2, Component3, DVI or PC on the TV's rear panel, and Video3 or S-Video3 on the TV's side panel. 46 Assigning Names to External Input Mode 1 Press the MENU button. Press the EXIT button to select "Edit..."Source List". Press the MODE button and make sure that the remote control is illuminated. 2 Press the MENU button. CR : - - - Input Picture Sound Channel Setup Input Source List Edit Name Move Enter √ √ Return 3 Press the ENTER button to select "Input". or † button...

User Manual (ENGLISH)
Page 28
... select "LNA", then press the ENTER button. Press the ... Press the ... or † button to exit the menu. Input Picture Sound Channel Setup Channel Antenna : A Air/CATV : Air Auto Program Favorite Channel Channel Label Fine Tune Add/Delete ▼ More ...Picture Sound Channel Setup Channel Antenna : A Air/CATV : Air Auto Program Favorite Channel Channel Label Fine Tune Add/Delete ▼ More Move Enter Return 2 Press the ... or † button to Air 12 "0", press the ENTER button once more. Move 0 Return Enter 54 LNA (Low Noise Amplifier) If the TV...
... select "LNA", then press the ENTER button. Press the ... Press the ... or † button to exit the menu. Input Picture Sound Channel Setup Channel Antenna : A Air/CATV : Air Auto Program Favorite Channel Channel Label Fine Tune Add/Delete ▼ More ...Picture Sound Channel Setup Channel Antenna : A Air/CATV : Air Auto Program Favorite Channel Channel Label Fine Tune Add/Delete ▼ More Move Enter Return 2 Press the ... or † button to Air 12 "0", press the ENTER button once more. Move 0 Return Enter 54 LNA (Low Noise Amplifier) If the TV...
User Manual (ENGLISH)
Page 29
... press the ENTER button. 2 Press the ... Picture Picture Mode Custom Picture Color Tone Film Mode DNIe Digital NR Size PIP : Dynamic : Normal : OfOf ff : OnOn : On Move Enter Return 56 DNIeTM (Digital Natural Image engine) Samsung's New Technology enables an improved image with detail, contrast ...and white enhancement and 3D noise reduction. 1 Press the MENU button. or † button to select "Picture", then press the ENTER button. 2 Press the ... ...
... press the ENTER button. 2 Press the ... Picture Picture Mode Custom Picture Color Tone Film Mode DNIe Digital NR Size PIP : Dynamic : Normal : OfOf ff : OnOn : On Move Enter Return 56 DNIeTM (Digital Natural Image engine) Samsung's New Technology enables an improved image with detail, contrast ...and white enhancement and 3D noise reduction. 1 Press the MENU button. or † button to select "Picture", then press the ENTER button. 2 Press the ... ...
User Manual (ENGLISH)
Page 30
... : On : OOfnf On Move Enter Return 58 59 Special Features Digital Noise Reduction If the broadcast signal received by your TV is very weak, a blue screen automatically replaces the noisy picture background. Input Picture Sound Channel Setup Setup Time √ V-Chip √ Closed Caption √ Language : English √ Melody : On √ Blue Screen...
... : On : OOfnf On Move Enter Return 58 59 Special Features Digital Noise Reduction If the broadcast signal received by your TV is very weak, a blue screen automatically replaces the noisy picture background. Input Picture Sound Channel Setup Setup Time √ V-Chip √ Closed Caption √ Language : English √ Melody : On √ Blue Screen...
User Manual (ENGLISH)
Page 31
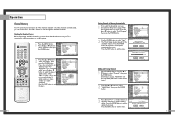
...Panorama ▲ Zoom 1 Position ▼ ▲ Zoom 2 Position ▼ 4:3 NOTES • You can also move the picture on the remote control, the TV's screen mode choices appear in mono, or if you are having difficulty receiving a stereo signal. • Choose SAP to listen to... returns to the Separate Audio Program, which is a standard TV screen size. Press the EXIT button to select "Sound", then press the ENTER button. Wide Panorama Use this order: Wide, Panorama, Zoom1, Zoom2, 4:3. Input Picture Sound Channel Setup Sound Sound Mode : Standard √ Custom...
...Panorama ▲ Zoom 1 Position ▼ ▲ Zoom 2 Position ▼ 4:3 NOTES • You can also move the picture on the remote control, the TV's screen mode choices appear in mono, or if you are having difficulty receiving a stereo signal. • Choose SAP to listen to... returns to the Separate Audio Program, which is a standard TV screen size. Press the EXIT button to select "Sound", then press the ENTER button. Wide Panorama Use this order: Wide, Panorama, Zoom1, Zoom2, 4:3. Input Picture Sound Channel Setup Sound Sound Mode : Standard √ Custom...

User Manual (ENGLISH)
Page 32
...8730; Virtual Dolby : Off √ BBE : Off √ MTS : Mono √ Auto Volume : Off √ Move Enter Return 2 Press the ... Input Picture Sound Channel Setup Sound Sound Mode : Standard √ Custom Sound √ Virtual Dolby : Off √ BBE : Off √ MTS : Mono √ Auto ...the ... Press the ... Press the EXIT button to provide a home Theater-like Dolby effect. Special Features Virtual Dolby This feature allows the TV's L/R speakers to exit the menu. or † button to select "Off" or "On", then press the ENTER button. or &#...
...8730; Virtual Dolby : Off √ BBE : Off √ MTS : Mono √ Auto Volume : Off √ Move Enter Return 2 Press the ... Input Picture Sound Channel Setup Sound Sound Mode : Standard √ Custom Sound √ Virtual Dolby : Off √ BBE : Off √ MTS : Mono √ Auto ...the ... Press the ... Press the EXIT button to provide a home Theater-like Dolby effect. Special Features Virtual Dolby This feature allows the TV's L/R speakers to exit the menu. or † button to select "Off" or "On", then press the ENTER button. or &#...
User Manual (ENGLISH)
Page 33
...Caption √ Language : English √ Melody : On √ Blue Screen : Off √ PC Setup √ Move Enter Return 2 Press the ... Input Picture Sound Channel Setup Sound Sound Mode Custom Sound Virtual Dolby BBE MTS Auto Volume : Standard : Off : Off : Mono : OOfff On Move Enter Return Setting The...Melody A melody sound can be set to select "Setup", then press the ENTER button. or † button to come on when the TV is powered On or Off. 1 Press the MENU button. Press the EXIT button to select "Melody", then press the ENTER button. "...
...Caption √ Language : English √ Melody : On √ Blue Screen : Off √ PC Setup √ Move Enter Return 2 Press the ... Input Picture Sound Channel Setup Sound Sound Mode Custom Sound Virtual Dolby BBE MTS Auto Volume : Standard : Off : Off : Mono : OOfff On Move Enter Return Setting The...Melody A melody sound can be set to select "Setup", then press the ENTER button. or † button to come on when the TV is powered On or Off. 1 Press the MENU button. Press the EXIT button to select "Melody", then press the ENTER button. "...


