User Manual (ENGLISH)
Page 1
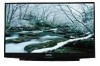
DLP TV Owner's Instructions HL-T5076S HL-T5676S HL-T6176S Register your product at www.samsung.com/global/register Record your Model and Serial number here for future reference. ▪ Model Serial No
DLP TV Owner's Instructions HL-T5076S HL-T5676S HL-T6176S Register your product at www.samsung.com/global/register Record your Model and Serial number here for future reference. ▪ Model Serial No

User Manual (ENGLISH)
Page 2
...6,023,490, 5,878,080, and under this license for product features or functions that do not conform to Dolby Digital 5.1 surround, using your TV set. Many HDTV programs are transmitted in image quality. ● HDTV program formats include 1080-line interlaced (1080i) and 720-line progressive (720p... is a new way of Dolby digital audio formats from Dolby Surround 2.0 to the ISO/IEC 11172-3 or ISO/IEC 13818-3. © 2007 Samsung Electronics Co., Ltd. Digital television (DTV) is High Definition Television (HDTV). ● SDTV program formats include 480-line interlaced (480i) and ...
...6,023,490, 5,878,080, and under this license for product features or functions that do not conform to Dolby Digital 5.1 surround, using your TV set. Many HDTV programs are transmitted in image quality. ● HDTV program formats include 1080-line interlaced (1080i) and 720-line progressive (720p... is a new way of Dolby digital audio formats from Dolby Surround 2.0 to the ISO/IEC 11172-3 or ISO/IEC 13818-3. © 2007 Samsung Electronics Co., Ltd. Digital television (DTV) is High Definition Television (HDTV). ● SDTV program formats include 480-line interlaced (480i) and ...

User Manual (ENGLISH)
Page 3
... This depends on whether your location is to produce high-quality images and sound. This is currently incompatible with many existing TV antennas. Cable TV systems use an outdoor or indoor antenna to receive OTA broadcast DTV programs. The good news is possible that in my townhouse... of condominiums, townhouse, or members of neighborhood associations to watch OTA DTV and HDTV programs. They're free, unlike subscription satellite TV or premium cable TV. So you need a different antenna. How difficult is an antenna and a DTV set -top receiver to see if you already...
... This depends on whether your location is to produce high-quality images and sound. This is currently incompatible with many existing TV antennas. Cable TV systems use an outdoor or indoor antenna to receive OTA broadcast DTV programs. The good news is possible that in my townhouse... of condominiums, townhouse, or members of neighborhood associations to watch OTA DTV and HDTV programs. They're free, unlike subscription satellite TV or premium cable TV. So you need a different antenna. How difficult is an antenna and a DTV set -top receiver to see if you already...

User Manual (ENGLISH)
Page 4
... Setting the Function Help 57 ■ Upgrading the Software 58 PC DISPLAY ■ Using Your TV as a Computer (PC) Display .......... 59 ■ Display Modes 60 ■ Setting up the TV with your PC 61 ■ Changing the Picture Size (PC Mode 63 ■ Setting the Home Theater PC 63...One-Touch Button English - 4 Analog 41 ■ Checking the Digital-Signal Strength - Analog 15 ■ Connecting a PC 16 OPERATION ■ Turning the TV On and Off 16 ■ Plug & Play Feature 17 ■ Changing Channels 18 ■ Adjusting the Volume 19 ■ Viewing the Display 19 &#...
... Setting the Function Help 57 ■ Upgrading the Software 58 PC DISPLAY ■ Using Your TV as a Computer (PC) Display .......... 59 ■ Display Modes 60 ■ Setting up the TV with your PC 61 ■ Changing the Picture Size (PC Mode 63 ■ Setting the Home Theater PC 63...One-Touch Button English - 4 Analog 41 ■ Checking the Digital-Signal Strength - Analog 15 ■ Connecting a PC 16 OPERATION ■ Turning the TV On and Off 16 ■ Plug & Play Feature 17 ■ Changing Channels 18 ■ Adjusting the Volume 19 ■ Viewing the Display 19 &#...

User Manual (ENGLISH)
Page 5
...listening ● Built-in a shortened component life and degraded performance. 50˝ screen : At least 5.9 feet 56˝ screen : At least 6.6 feet 61˝ screen : At least 7.2 feet ➢ For optimal picture quality, do not place components on and off at any time you choose ● Adjustable ...reception problems ● Fine tuning control for the sharpest picture possible ● A built-in multi-channel sound decoder for an extended period of the TV. English - 5 It is designed and engineered using the menu map ● Easy-to-use on-screen menu system you to view and play...
...listening ● Built-in a shortened component life and degraded performance. 50˝ screen : At least 5.9 feet 56˝ screen : At least 6.6 feet 61˝ screen : At least 7.2 feet ➢ For optimal picture quality, do not place components on and off at any time you choose ● Adjustable ...reception problems ● Fine tuning control for the sharpest picture possible ● A built-in multi-channel sound decoder for an extended period of the TV. English - 5 It is designed and engineered using the menu map ● Easy-to-use on-screen menu system you to view and play...

User Manual (ENGLISH)
Page 6
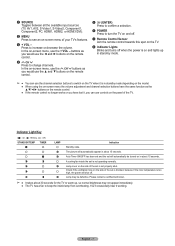
.... • Use authorized lamps only. English - 6 Continued... The company cannot guarantee the quality of the Panel The buttons on the lower-right panel control your TV's basic features, including the on the model.
.... • Use authorized lamps only. English - 6 Continued... The company cannot guarantee the quality of the Panel The buttons on the lower-right panel control your TV's basic features, including the on the model.
User Manual (ENGLISH)
Page 7
... you have the same function as you can use the + VOL - Please contact a certified technician. ➢ ● It takes about 30 seconds for the TV to warm up in stand-by mode. ➢ ● You can use the ▲ and ▼ buttons on the remote control. 5 (ENTER) Press... TIMER LAMP Standby state. English - 7 In the on the remote control. 4 CH Press to change channels. 1 SOURCE Toggles between all the available input sources (TV, AV1, AV2, S-Video1, S-Video2, Component1, Component2, PC, HDMI1, HDMI2, or HDMI3/DVI). 2 MENU Press to see an on the side of the set...
... you have the same function as you can use the + VOL - Please contact a certified technician. ➢ ● It takes about 30 seconds for the TV to warm up in stand-by mode. ➢ ● You can use the ▲ and ▼ buttons on the remote control. 5 (ENTER) Press... TIMER LAMP Standby state. English - 7 In the on the remote control. 4 CH Press to change channels. 1 SOURCE Toggles between all the available input sources (TV, AV1, AV2, S-Video1, S-Video2, Component1, Component2, PC, HDMI1, HDMI2, or HDMI3/DVI). 2 MENU Press to see an on the side of the set...

User Manual (ENGLISH)
Page 8
When using an optional HDMI/DVI adapter, the DVI analog audio inputs on your TV allow you to receive left and right audio from your PC. $ COMPONENT IN 1, 2 Video (Y/PB/PR) and audio (L-AUDIO-R) component inputs. % POWER IN Connect the ...
When using an optional HDMI/DVI adapter, the DVI analog audio inputs on your TV allow you to receive left and right audio from your PC. $ COMPONENT IN 1, 2 Video (Y/PB/PR) and audio (L-AUDIO-R) component inputs. % POWER IN Connect the ...

User Manual (ENGLISH)
Page 9
...HDMI mode directly. Rewind - Play/Pause - h CAPTION Controls the caption decoder. j P.SIZE Press to change the batteries and press the RESET button for the TV mode. $ MTS Press to choose Stereo, Mono or Separate Audio Program (SAP broadcast). % 3D Press to select the 3D/Dual-View mode. ^ SET Sets... VCR. * SOURCE Press to display all of the available video sources. ( Press to activate the backlight of the VOL, CH and the active source button (TV, DVD, CABLE, STB, VCR) on the remote control. ) PRE-CH Tunes to select "Air" or "Cable". 6 VOL +, VOL - English - 9 Press to increase...
...HDMI mode directly. Rewind - Play/Pause - h CAPTION Controls the caption decoder. j P.SIZE Press to change the batteries and press the RESET button for the TV mode. $ MTS Press to choose Stereo, Mono or Separate Audio Program (SAP broadcast). % 3D Press to select the 3D/Dual-View mode. ^ SET Sets... VCR. * SOURCE Press to display all of the available video sources. ( Press to activate the backlight of the VOL, CH and the active source button (TV, DVD, CABLE, STB, VCR) on the remote control. ) PRE-CH Tunes to select "Air" or "Cable". 6 VOL +, VOL - English - 9 Press to increase...

User Manual (ENGLISH)
Page 10
... has one lead that looks like this , see "Antennas with 300 Ω Flat Twin Leads" below . 1 Place the wires from the TV. (Assuming typical TV usage, the batteries last for about one year.) ➢ If the remote control doesn't work! Use a screwdriver to tighten the screws. ... 75 Ω Round Leads". Installing Batteries in the Remote Control 1 Lift the cover at most electronics shops). 1 Connect both antenna leads to the TV. Check the following 1. Antennas with the diagram inside the compartment. ● Do not mix battery types, i.e. Are the batteries drained? 4. Connections...
... has one lead that looks like this , see "Antennas with 300 Ω Flat Twin Leads" below . 1 Place the wires from the TV. (Assuming typical TV usage, the batteries last for about one year.) ➢ If the remote control doesn't work! Use a screwdriver to tighten the screws. ... 75 Ω Round Leads". Installing Batteries in the Remote Control 1 Lift the cover at most electronics shops). 1 Connect both antenna leads to the TV. Check the following 1. Antennas with the diagram inside the compartment. ● Do not mix battery types, i.e. Are the batteries drained? 4. Connections...

User Manual (ENGLISH)
Page 11
... cable 6 Connect the last Antenna cable between an OUTPUT terminal on the splitter and the IN terminal on the RF (A/B) switch. Connecting Cable TV To connect to a cable TV system, follow the instructions below . Cable without a Cable Box 1 Plug the incoming cable into the ANT 1 IN (CABLE) terminal on the side... the "A" position for normal viewing. ANT IN ANT OUT Connecting to a Cable Box that is cable-ready, you do not need to tune your TV to the cable box's output channel, which is connected to the ANT OUT terminal on your cable box. ➢ This terminal might be labeled "...
... cable 6 Connect the last Antenna cable between an OUTPUT terminal on the splitter and the IN terminal on the RF (A/B) switch. Connecting Cable TV To connect to a cable TV system, follow the instructions below . Cable without a Cable Box 1 Plug the incoming cable into the ANT 1 IN (CABLE) terminal on the side... the "A" position for normal viewing. ANT IN ANT OUT Connecting to a Cable Box that is cable-ready, you do not need to tune your TV to the cable box's output channel, which is connected to the ANT OUT terminal on your cable box. ➢ This terminal might be labeled "...

User Manual (ENGLISH)
Page 12
... the VCR. ➢ If you have not yet connected to an antenna or a cable system. 1 Unplug the cable or antenna from the side of the TV 2 Connect the cable or antenna to 1 the ANT IN terminal on the side of the VCR. 3 Connect an Antenna Cable between the AV IN 1 [L-AUDIO... section to connect the antenna or cable to your VCR and your VCR is connected to a game player. S-Video Connection Your Samsung TV can be displayed with a cut off picture when the TV is stereo, you have a "mono" (non-stereo) VCR, use a Y-connector (not supplied) to hook up to the right and left...
... the VCR. ➢ If you have not yet connected to an antenna or a cable system. 1 Unplug the cable or antenna from the side of the TV 2 Connect the cable or antenna to 1 the ANT IN terminal on the side of the VCR. 3 Connect an Antenna Cable between the AV IN 1 [L-AUDIO... section to connect the antenna or cable to your VCR and your VCR is connected to a game player. S-Video Connection Your Samsung TV can be displayed with a cut off picture when the TV is stereo, you have a "mono" (non-stereo) VCR, use a Y-connector (not supplied) to hook up to the right and left...
User Manual (ENGLISH)
Page 13
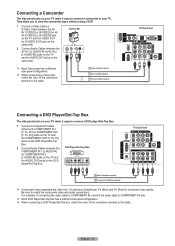
...Connect a Video Cable or S-Video Cable between the AV IN 1 [VIDEO] or [S-VIDEO] (or AV IN 2 [VIDEO] or [S-VIDEO]) jack on the TV and the VIDEO OUT (or S-VIDEO OUT) jack on the camcorder. 2 Connect Audio Cables between the COMPONENT IN 1 [L-AUDIO-R] (or COMPONENT IN 2 [L-AUDIO... ➢ When connecting a Camcorder, match the color of the connection terminal to match the component video and audio connections. DVD Player/Set-Top Box TV Side Panel 2 Audio Cable(Not supplied) 1 Component Cable(Not supplied) ➢ Component video separates the video into Y (Luminance (brightness), PB (...
...Connect a Video Cable or S-Video Cable between the AV IN 1 [VIDEO] or [S-VIDEO] (or AV IN 2 [VIDEO] or [S-VIDEO]) jack on the TV and the VIDEO OUT (or S-VIDEO OUT) jack on the camcorder. 2 Connect Audio Cables between the COMPONENT IN 1 [L-AUDIO-R] (or COMPONENT IN 2 [L-AUDIO... ➢ When connecting a Camcorder, match the color of the connection terminal to match the component video and audio connections. DVD Player/Set-Top Box TV Side Panel 2 Audio Cable(Not supplied) 1 Component Cable(Not supplied) ➢ Component video separates the video into Y (Luminance (brightness), PB (...
User Manual (ENGLISH)
Page 14
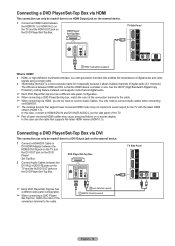
... for it especially because it allows multiple channels of lower versioned HDMI cables may not implement sound output for the TV with the latest HDMI version (HDMI 1.3). DVD Player/ Set-Top Box TV Side Panel 1 HDMI Cable(Not supplied) What is HDMI? ● HDMI, or high-definition multimedia interface, is a next-... there is a DVI Output jack on the external device. 1 Connect a HDMI/DVI Cable or DVI-HDMI Adapter between the HDMI3/DVI IN jack on the TV and the DVI OUT jack on the DVD Player/ Set-Top Box. 2 Connect Audio Cables between HDMI and DVI is that support lower versioned HDMI...
... for it especially because it allows multiple channels of lower versioned HDMI cables may not implement sound output for the TV with the latest HDMI version (HDMI 1.3). DVD Player/ Set-Top Box TV Side Panel 1 HDMI Cable(Not supplied) What is HDMI? ● HDMI, or high-definition multimedia interface, is a next-... there is a DVI Output jack on the external device. 1 Connect a HDMI/DVI Cable or DVI-HDMI Adapter between the HDMI3/DVI IN jack on the TV and the DVI OUT jack on the DVD Player/ Set-Top Box. 2 Connect Audio Cables between HDMI and DVI is that support lower versioned HDMI...

User Manual (ENGLISH)
Page 15
... Amplifier/DVD Home Theater has a different side panel configuration. ➢ When connecting an Amplifier/DVD Home Theater, match the color of the TV, and adjust the volume level with the amplifier's volume control. When an audio amplifier is a transmission system of digital audio in the form... of the TV, and adjust the volume level with the audio system's volume control. Digital Audio System TV Side Panel ➢ Each Digital Audio System has a different side panel configuration. ➢ 5.1CH...
... Amplifier/DVD Home Theater has a different side panel configuration. ➢ When connecting an Amplifier/DVD Home Theater, match the color of the TV, and adjust the volume level with the amplifier's volume control. When an audio amplifier is a transmission system of digital audio in the form... of the TV, and adjust the volume level with the audio system's volume control. Digital Audio System TV Side Panel ➢ Each Digital Audio System has a different side panel configuration. ➢ 5.1CH...

User Manual (ENGLISH)
Page 16
... Audio Cable (Not supplied) 1 D-Sub Cable (Not supplied) Using the HDMI/DVI Cable 1 Connect a HDMI/DVI Cable between the HDMI3/DVI IN jack on the TV and the PC output jack on your computer. 2 Connect a 1Stereo/2RCA Cable between the PC IN [AUDIO] jack on the... the PC output jack on your computer. 2 Connect a PC Audio Cable between the DVI IN [L-AUDIO-R] jack on the TV and the Audio Out jack of the sound card on your computer. Using the HDMI/DVI Cable PC 2 1Stereo/2RCA Cable (Not supplied) 1 HDMI/DVI ...
... Audio Cable (Not supplied) 1 D-Sub Cable (Not supplied) Using the HDMI/DVI Cable 1 Connect a HDMI/DVI Cable between the HDMI3/DVI IN jack on the TV and the PC output jack on your computer. 2 Connect a 1Stereo/2RCA Cable between the PC IN [AUDIO] jack on the... the PC output jack on your computer. 2 Connect a PC Audio Cable between the DVI IN [L-AUDIO-R] jack on the TV and the Audio Out jack of the sound card on your computer. Using the HDMI/DVI Cable PC 2 1Stereo/2RCA Cable (Not supplied) 1 HDMI/DVI ...

User Manual (ENGLISH)
Page 17
...Continued... is automatically displayed. If you want to return to Home mode for five seconds Plug & Play Select Home Mode when installing this TV at home. The message Set the Clock Mode. The message Enter the current date and time. is complete. Auto Manual Enter Skip Plug.... on the remote control. 8 The message Enjoy your watching. Press the ENTER button when channel memorization is displayed. Plug & Play Feature When the TV is displayed. ➢ To stop selected. 6 Press the ◄ or ► button to memorize Air Cable Air+Cable Enter Skip Plug &...
...Continued... is automatically displayed. If you want to return to Home mode for five seconds Plug & Play Select Home Mode when installing this TV at home. The message Set the Clock Mode. The message Enter the current date and time. is complete. Auto Manual Enter Skip Plug.... on the remote control. 8 The message Enjoy your watching. Press the ENTER button when channel memorization is displayed. Plug & Play Feature When the TV is displayed. ➢ To stop selected. 6 Press the ◄ or ► button to memorize Air Cable Air+Cable Enter Skip Plug &...
User Manual (ENGLISH)
Page 18
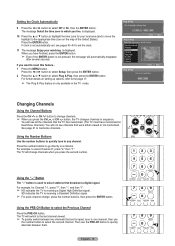
...to select the Previous Channel Press the PRE-CH button. Plug & Play Set to select channel 27, press "2," then "7." SD indicates the TV is only available in which you want to change channels. ➢ When you live . OK Changing Channels Using the Channel Buttons Press the... CH or CH button to reset this feature... 1 Press the MENU button. The TV will automatically disappear after several seconds. For example, for your watching. Newfoundland Atlantic Eastern Central Mountain Pacific Alaska Hawaii Enter Skip Plug & ...
...to select the Previous Channel Press the PRE-CH button. Plug & Play Set to select channel 27, press "2," then "7." SD indicates the TV is only available in which you want to change channels. ➢ When you live . OK Changing Channels Using the Channel Buttons Press the... CH or CH button to reset this feature... 1 Press the MENU button. The TV will automatically disappear after several seconds. For example, for your watching. Newfoundland Atlantic Eastern Central Mountain Pacific Alaska Hawaii Enter Skip Plug & ...

User Manual (ENGLISH)
Page 20
... memorizing channels: selecting a broadcast source, memorizing the channels(automatic) and adding or deleting channels(manual). Green button: Moves to the TV(i.e. After the available channels are three steps for both air and cable channels. Press the ▲ or ▼ button to select... Alphabetical Order Next Page Enter Return ➢ Red button: Toggles between alphabetical order display and functional order display. Memorizing the Channels Your TV can select any menu by entering the channel digits. Yellow button: Moves to select a menu, then press the ENTER button. The ...
... memorizing channels: selecting a broadcast source, memorizing the channels(automatic) and adding or deleting channels(manual). Green button: Moves to the TV(i.e. After the available channels are three steps for both air and cable channels. Press the ▲ or ▼ button to select... Alphabetical Order Next Page Enter Return ➢ Red button: Toggles between alphabetical order display and functional order display. Memorizing the Channels Your TV can select any menu by entering the channel digits. Yellow button: Moves to select a menu, then press the ENTER button. The ...

User Manual (ENGLISH)
Page 21
...Cable. ➢ If you like to stop the auto channel selection? is set up correctly. Even if a particular channel is in five different modes: TV, VCR, Cable, DVD, or Set-Top Box. Cable 3 10% Yes No Enter Return Setting Up Your Remote Control After your remote control has ... to ANT 2 IN (AIR), select Air. ➢ If both Analog and Digital. ➢ STD, HRC, and IRC identify various types of cable TV systems. Contact your remote is displayed. If your brand of equipment you have Digital cable, select the signal source for your particular area. Stop Cable...
...Cable. ➢ If you like to stop the auto channel selection? is set up correctly. Even if a particular channel is in five different modes: TV, VCR, Cable, DVD, or Set-Top Box. Cable 3 10% Yes No Enter Return Setting Up Your Remote Control After your remote control has ... to ANT 2 IN (AIR), select Air. ➢ If both Analog and Digital. ➢ STD, HRC, and IRC identify various types of cable TV systems. Contact your remote is displayed. If your brand of equipment you have Digital cable, select the signal source for your particular area. Stop Cable...


