Safety Guide (ENGLISH)
Page 1
... touch the inside . When removing the power cord, make any internal part of children. • Do not install the product in an unstable location such as a bookcase, or built-in the back or bottom are any unusual sounds or smells coming from the mains socket, therefore the mains plug shall be blocked or covered. - in a location safely out of the...
... touch the inside . When removing the power cord, make any internal part of children. • Do not install the product in an unstable location such as a bookcase, or built-in the back or bottom are any unusual sounds or smells coming from the mains socket, therefore the mains plug shall be blocked or covered. - in a location safely out of the...
Open Source Guide (ENGLISH)
Page 2
...change. To apply these terms (or, alternatively, under the terms of the ordinary General Public License). and each file should have at least the "copyright" line and a pointer to where the full notice is safest to attach them to the start of each source... file to most effectively convey the exclusion of the greatest possible use to the public, we recommend making it to the library... you develop a new library, and you want it free software that everyone can do so by permitting redistribution under these terms, attach the following notices ...
...change. To apply these terms (or, alternatively, under the terms of the ordinary General Public License). and each file should have at least the "copyright" line and a pointer to where the full notice is safest to attach them to the start of each source... file to most effectively convey the exclusion of the greatest possible use to the public, we recommend making it to the library... you develop a new library, and you want it free software that everyone can do so by permitting redistribution under these terms, attach the following notices ...
User Manual (ENGLISH)
Page 4
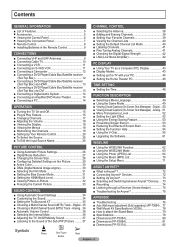
... Screen Size 28 ■ Configuring Detailed Settings on the Picture 29 ■ Active Color 30 ■ DNIe (Digital Natural Image engine 30 ■ Selecting the Film Mode 31 ■ Setting the Blue Screen Mode 31 ■ Setting the HDMI Black Level 31 ■ Viewing Picture-in the Remote Control 9 CONNECTIONS ■ Connecting VHF and UHF Antennas 9 ■ Connecting Cable TV 10 ■ Connecting a VCR 11 ■ Connecting an S-VHS VCR 11 ■ Connecting a Camcorder 12 ■ Connecting a DVD Player/Cable Box...
... Screen Size 28 ■ Configuring Detailed Settings on the Picture 29 ■ Active Color 30 ■ DNIe (Digital Natural Image engine 30 ■ Selecting the Film Mode 31 ■ Setting the Blue Screen Mode 31 ■ Setting the HDMI Black Level 31 ■ Viewing Picture-in the Remote Control 9 CONNECTIONS ■ Connecting VHF and UHF Antennas 9 ■ Connecting Cable TV 10 ■ Connecting a VCR 11 ■ Connecting an S-VHS VCR 11 ■ Connecting a Camcorder 12 ■ Connecting a DVD Player/Cable Box...
User Manual (ENGLISH)
Page 5
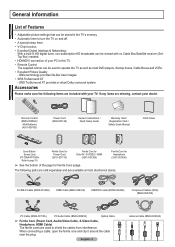
...) PC Audio Cable (BN39-00061B) Optical Cable ➢ Ferrite Core (Power Cord, Audio/Video Cable, S-Video Cable, Headphone, HDMI Cable) The ferrite cores are included with no Cable Box/Satellite receiver (SetTop Box) needed. • HDMI/DVI connection of your PC to this TV. • Remote Control The supplied remote can be viewed with your TV. SRS TruSurround XT provides a virtual Dolby surround system. The following items are used to operate the TV as well as most electronics stores. English - 5 Antenna Cable (BN39...
...) PC Audio Cable (BN39-00061B) Optical Cable ➢ Ferrite Core (Power Cord, Audio/Video Cable, S-Video Cable, Headphone, HDMI Cable) The ferrite cores are included with no Cable Box/Satellite receiver (SetTop Box) needed. • HDMI/DVI connection of your PC to this TV. • Remote Control The supplied remote can be viewed with your TV. SRS TruSurround XT provides a virtual Dolby surround system. The following items are used to operate the TV as well as most electronics stores. English - 5 Antenna Cable (BN39...
User Manual (ENGLISH)
Page 7
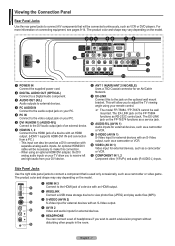
... product color and shape may vary depending on your TV allow you to adjust the TV viewing angle using an optional HDMI/DVI adapter, the DVI analog audio inputs on the model. 1 HDMI IN 3 Connect to the HDMI jack of a device with an S-Video output. 4 AV IN 2 Video and audio inputs for external devices. 5 HEADPHONE You can also be necessary to make this to the jack on the optional wall mount bracket. Viewing the Connection Panel Rear Panel Jacks Use the rear panel...
... product color and shape may vary depending on your TV allow you to adjust the TV viewing angle using an optional HDMI/DVI adapter, the DVI analog audio inputs on the model. 1 HDMI IN 3 Connect to the HDMI jack of a device with an S-Video output. 4 AV IN 2 Video and audio inputs for external devices. 5 HEADPHONE You can also be necessary to make this to the jack on the optional wall mount bracket. Viewing the Connection Panel Rear Panel Jacks Use the rear panel...

User Manual (ENGLISH)
Page 8
... channels. % SLEEP Press to select a preset time interval for automatic shut off. ^ SRS Selects SRS TruSurround XT mode. & SET Sets the remote to control your TV, VCR, Cable, DVD player, or Set-Top Box. * TV/DVD/STB/CABLE/VCR Press to operate your remote does not work, change the screen size. f UP▲/DOWN▼/LEFT◄/ RIGHT►/ENTER Use to select on the screen. 5 ANTENNA Press to operate your VCR, Cable box, DVD player, or Set-Top Box. k PIP Picture...
... channels. % SLEEP Press to select a preset time interval for automatic shut off. ^ SRS Selects SRS TruSurround XT mode. & SET Sets the remote to control your TV, VCR, Cable, DVD player, or Set-Top Box. * TV/DVD/STB/CABLE/VCR Press to operate your remote does not work, change the screen size. f UP▲/DOWN▼/LEFT◄/ RIGHT►/ENTER Use to select on the screen. 5 ANTENNA Press to operate your VCR, Cable box, DVD player, or Set-Top Box. k PIP Picture...

User Manual (ENGLISH)
Page 13
... video signals using an HDMI/DVI cable connection, you do not need to connect Audio cables when connecting via HDMI/DVI. ➢ The TV may not output sound and pictures may be displayed with abnormal color when DVD players/Cable Boxes/Satellite receivers supporting HDMI versions older than 1.3 are not 1.3 may cause annoying flicker or no sound, connect the HDMI cable to the HDMI IN 1 jack and the audio cables to connect Audio Cables. You only need to the DVI IN (HDMI1) [R-AUDIO-L] jacks on the external device. DVD Player / Cable Box/Satellite receiver (Set-Top Box) TV Rear Panel...
... video signals using an HDMI/DVI cable connection, you do not need to connect Audio cables when connecting via HDMI/DVI. ➢ The TV may not output sound and pictures may be displayed with abnormal color when DVD players/Cable Boxes/Satellite receivers supporting HDMI versions older than 1.3 are not 1.3 may cause annoying flicker or no sound, connect the HDMI cable to the HDMI IN 1 jack and the audio cables to connect Audio Cables. You only need to the DVI IN (HDMI1) [R-AUDIO-L] jacks on the external device. DVD Player / Cable Box/Satellite receiver (Set-Top Box) TV Rear Panel...

User Manual (ENGLISH)
Page 14
... sound card on the TV outputs 2 channel audio only. Amplifier/DVD Home Theater TV Rear Panel When an audio amplifier is connected to 2 RCA cable between the DIGITAL AUDIO OUT (OPTICAL) jacks on the TV and the Digital Audio Input (OPTICAL) jacks on the Digital Audio System. Using the D-Sub Cable PC TV Rear Panel 2 PC Audio Cable (Not supplied) 1 D-Sub Cable (Not supplied) Using the HDMI/DVI Cable PC TV Rear Panel 2 3.5 mm Stereo plug to the "AUDIO OUT [R-AUDIO-L]" jacks: Decrease the gain (volume) of the TV, and adjust the volume level with the Amplifier's volume control...
... sound card on the TV outputs 2 channel audio only. Amplifier/DVD Home Theater TV Rear Panel When an audio amplifier is connected to 2 RCA cable between the DIGITAL AUDIO OUT (OPTICAL) jacks on the TV and the Digital Audio Input (OPTICAL) jacks on the Digital Audio System. Using the D-Sub Cable PC TV Rear Panel 2 PC Audio Cable (Not supplied) 1 D-Sub Cable (Not supplied) Using the HDMI/DVI Cable PC TV Rear Panel 2 3.5 mm Stereo plug to the "AUDIO OUT [R-AUDIO-L]" jacks: Decrease the gain (volume) of the TV, and adjust the volume level with the Amplifier's volume control...

User Manual (ENGLISH)
Page 28
... HDMI, Component (720p/1080i/1080p) or DTV(1080i) signals are input. ➢ • Some cable boxes and satellite receivers have its own set of the image on your screen. Move Enter Return 16:9 Sets the picture to display the menu. Zoom2 The screen size when the Zoom1 screen is vertically enlarged. Your TV comes with six screen size options, each designed to work best with specific types of the picture to fit the entire screen. 4:3 Sets the picture...
... HDMI, Component (720p/1080i/1080p) or DTV(1080i) signals are input. ➢ • Some cable boxes and satellite receivers have its own set of the image on your screen. Move Enter Return 16:9 Sets the picture to display the menu. Zoom2 The screen size when the Zoom1 screen is vertically enlarged. Your TV comes with six screen size options, each designed to work best with specific types of the picture to fit the entire screen. 4:3 Sets the picture...
User Manual (ENGLISH)
Page 29
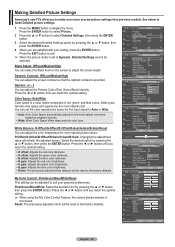
... optimal setting. ➢ When using the My Color Control Feature, the current picture remains in movement. Dynamic Contrast: Off/Low/Medium/High You can adjust the color temperature for the input signal to Auto or Wide. • Auto: Auto Color Space automatically adjusts to the factory defaults. Select your setting, press the ENTER button. Black Adjust: Off/Low/Medium/High You can adjust the Primary Color (Red, Green Blue) Intensity. My Color Control: Pink/Green/Blue/White/Reset This setting can set to...
... optimal setting. ➢ When using the My Color Control Feature, the current picture remains in movement. Dynamic Contrast: Off/Low/Medium/High You can adjust the color temperature for the input signal to Auto or Wide. • Auto: Auto Color Space automatically adjusts to the factory defaults. Select your setting, press the ENTER button. Black Adjust: Off/Low/Medium/High You can adjust the Primary Color (Red, Green Blue) Intensity. My Color Control: Pink/Green/Blue/White/Reset This setting can set to...

User Manual (ENGLISH)
Page 30
... Return T V Picture ▲ More Color Tone : Cool1 Detailed Settings Size : 16:9 Digital NR : Auto Active Color : OOnff DNIe Reset : ODnemo : On Move Enter Return English - 30 Press the EXIT button to display the menu. DVD player) connected to the HDMI or Component IN jacks.You must set the DNIe to display the menu. Using this option, the blue and green colors will be more vivid. 1 Press the MENU button to Demo, you set the Picture Mode to Movie...
... Return T V Picture ▲ More Color Tone : Cool1 Detailed Settings Size : 16:9 Digital NR : Auto Active Color : OOnff DNIe Reset : ODnemo : On Move Enter Return English - 30 Press the EXIT button to display the menu. DVD player) connected to the HDMI or Component IN jacks.You must set the DNIe to display the menu. Using this option, the blue and green colors will be more vivid. 1 Press the MENU button to Demo, you set the Picture Mode to Movie...

User Manual (ENGLISH)
Page 31
... only when an external device is no signal is being received or the signal is very weak, a blue screen automatically replaces the noisy picture background. Selecting the Film Mode Automatically senses and processes film signals from an external device, regardless of the picture while in HDMI mode. 1 Press the MENU button to display the menu. T V Setup ▲ More Screen Burn Protection ► HDMI Black Level : Normal ► Film Mode : Off ► Wall-Mount Adjustment ► PIP ► Function...
... only when an external device is no signal is being received or the signal is very weak, a blue screen automatically replaces the noisy picture background. Selecting the Film Mode Automatically senses and processes film signals from an external device, regardless of the picture while in HDMI mode. 1 Press the MENU button to display the menu. T V Setup ▲ More Screen Burn Protection ► HDMI Black Level : Normal ► Film Mode : Off ► Wall-Mount Adjustment ► PIP ► Function...

User Manual (ENGLISH)
Page 43
... control panel window appears, click on Display and a display dialog-box will apply in almost all cases. (If not, contact your videocard user guide; PC Display Using Your TV as stripes) might appear different. (and depending on Windows XP) The Windows display-settings for information about connecting your PC to enter a VIDEO mode. Also, make sure that the PC is adjusted automatically. English - 43 D-Sub Input Display Mode IBM VESA RESOLUTION...
... control panel window appears, click on Display and a display dialog-box will apply in almost all cases. (If not, contact your videocard user guide; PC Display Using Your TV as stripes) might appear different. (and depending on Windows XP) The Windows display-settings for information about connecting your PC to enter a VIDEO mode. Also, make sure that the PC is adjusted automatically. English - 43 D-Sub Input Display Mode IBM VESA RESOLUTION...

User Manual (ENGLISH)
Page 49
... display the menu. You must adjust the sound using the equalizer. • The Reset in TV mode. ➢ If the picture is poor when a game console is connected to exit. Press the EXIT button to the TV, try turning the Game Mode Off then On again. English - 49 T V Setup Plug & Play ► Language : English ► Time ► Game Mode : Off ► V-Chip ► Caption ► Menu Transparency : Medium ► ▼ More Move Enter Return T V Setup Plug & Play...
... display the menu. You must adjust the sound using the equalizer. • The Reset in TV mode. ➢ If the picture is poor when a game console is connected to exit. Press the EXIT button to the TV, try turning the Game Mode Off then On again. English - 49 T V Setup Plug & Play ► Language : English ► Time ► Game Mode : Off ► V-Chip ► Caption ► Menu Transparency : Medium ► ▼ More Move Enter Return T V Setup Plug & Play...

User Manual (ENGLISH)
Page 61
... the ENTER button. The message Scanning for USB... is displayed. 5 If the firmware on the USB is displayed. Press the ◄ or ► button to receive information about downloading upgrades and using a USB drive. T V Setup ▲ More Screen Burn Protection ► HDMI Black Level : Normal ► Film Mode : Off ► Wall-Mount Adjustment ► PIP ► Function Help : On ► SW Upgrade ► Move Enter Return T V USB SW Upgrade ► Move Enter SW Upgrade Scanning for USB... It may...
... the ENTER button. The message Scanning for USB... is displayed. 5 If the firmware on the USB is displayed. Press the ◄ or ► button to receive information about downloading upgrades and using a USB drive. T V Setup ▲ More Screen Burn Protection ► HDMI Black Level : Normal ► Film Mode : Off ► Wall-Mount Adjustment ► PIP ► Function Help : On ► SW Upgrade ► Move Enter Return T V USB SW Upgrade ► Move Enter SW Upgrade Scanning for USB... It may...

User Manual (ENGLISH)
Page 72
...+ works when the AV device supporting Anynet+ is an Anynet+ logo on the Home Theater. ➢ Connect only one Home Theater. ➢ When following the connection above, the Optical jack only outputs 2 channel audio. HDMI 1.3 Cable HDMI 1.3 Cable HDMI 1.3 Cable To connect to control all connected Samsung devices that support Anynet+ with Samsung devices that enables you can be sure your TV and the Digital Audio Input on it. To be used only with your Samsung TV's remote. Connect...
...+ works when the AV device supporting Anynet+ is an Anynet+ logo on the Home Theater. ➢ Connect only one Home Theater. ➢ When following the connection above, the Optical jack only outputs 2 channel audio. HDMI 1.3 Cable HDMI 1.3 Cable HDMI 1.3 Cable To connect to control all connected Samsung devices that support Anynet+ with Samsung devices that enables you can be sure your TV and the Digital Audio Input on it. To be used only with your Samsung TV's remote. Connect...

User Manual (ENGLISH)
Page 74
...+ function only works when the active source on the side of the Anynet+ devices connected to the recording device. If you are watching video from another device, the video from Anynet+ to the corresponding device. Press the REC button. English - 74 Example: When a DVD Recorder is connected, the play control menu of a TV program using the buttons on the TV remote control is set the Anynet+ (HDMI-CEC), auto turn off, and...
...+ function only works when the active source on the side of the Anynet+ devices connected to the recording device. If you are watching video from another device, the video from Anynet+ to the corresponding device. Press the REC button. English - 74 Example: When a DVD Recorder is connected, the play control menu of a TV program using the buttons on the TV remote control is set the Anynet+ (HDMI-CEC), auto turn off, and...

User Manual (ENGLISH)
Page 75
... the device list. ➢ The receiver will send out 5.1 channel sound to the Home theater receiver. The Anynet+ system supports Anynet+ devices only. ■ Connect only one receiver (home theater). ■ Check if the Anynet+ device power cord is properly connected. ■ Check the Anynet+ device's Video/Audio/HDMI 1.3 cable connections. ■ Check whether Anynet+ (HDMI-CEC) is set on the TV remote control to switch to TV. You cannot use the remote control when you...
... the device list. ➢ The receiver will send out 5.1 channel sound to the Home theater receiver. The Anynet+ system supports Anynet+ devices only. ■ Connect only one receiver (home theater). ■ Check if the Anynet+ device power cord is properly connected. ■ Check the Anynet+ device's Video/Audio/HDMI 1.3 cable connections. ■ Check whether Anynet+ (HDMI-CEC) is set on the TV remote control to switch to TV. You cannot use the remote control when you...
User Manual (ENGLISH)
Page 76
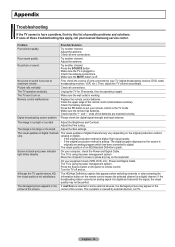
.... The TV won't turn on the screen is plugged in the TV mode. Check all wire connections. Make sure the wall outlet is not satisfactory. Check that appears when switching channels or when pressing the Information button on the panel or remote control. Screen is caused by external devices, not TV. This symptom is black and power indicator light blinks steadily. Problem Poor picture quality. Make sure the TV is originally an analog program which...
.... The TV won't turn on the screen is plugged in the TV mode. Check all wire connections. Make sure the wall outlet is not satisfactory. Check that appears when switching channels or when pressing the Information button on the panel or remote control. Screen is caused by external devices, not TV. This symptom is black and power indicator light blinks steadily. Problem Poor picture quality. Make sure the TV is originally an analog program which...
User Manual (ENGLISH)
Page 79
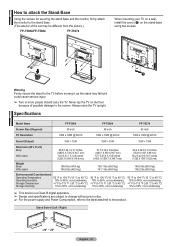
... attach the Stand-Base Using the screws for securing the stand base and the monitor, firmly attach the monitor to the product. Specifications Model Name Screen Size (Diagonal) PC Resolution FP-T5084 50 inch 1920 x 1080 @ 60 Hz FP-T5884 58 inch 1920 x 1080 @ 60 Hz FP-T6374 63 inch 1920 x 1080 @ 60 Hz Sound (Output) 15W + 15W 15W + 15W 15W + 15W Dimension (W x H x D) Body With stand Weight Body With stand 50.8 X 29.1 X 3.7 inches (1289...
... attach the Stand-Base Using the screws for securing the stand base and the monitor, firmly attach the monitor to the product. Specifications Model Name Screen Size (Diagonal) PC Resolution FP-T5084 50 inch 1920 x 1080 @ 60 Hz FP-T5884 58 inch 1920 x 1080 @ 60 Hz FP-T6374 63 inch 1920 x 1080 @ 60 Hz Sound (Output) 15W + 15W 15W + 15W 15W + 15W Dimension (W x H x D) Body With stand Weight Body With stand 50.8 X 29.1 X 3.7 inches (1289...


