User Manual (user Manual) (ver.1.0) (English)
Page 3
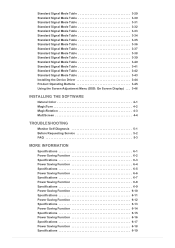
... Signal Mode Table 3-34 Standard Signal Mode Table 3-35 Standard Signal Mode Table 3-36 Standard Signal Mode Table 3-37 Standard Signal Mode Table 3-38 Standard Signal Mode Table 3-39 Installing the Device Driver 3-40 Product Operating Buttons 3-41 Using the Screen Adjustment Menu (OSD: On Screen Display) . . . 3-42 INSTALLING THE SOFTWARE Natural Color 4-1 MagicTune 4-2 MagicRotation 4-3 MultiScreen 4-4 TROUBLESHOOTING Monitor Self-Diagnosis 5-1 Before Requesting Service 5-2 FAQ 5-3 MORE INFORMATION Specifications 6-1 Power Saving Function 6-2 Specifications 6-3 Power Saving...
... Signal Mode Table 3-34 Standard Signal Mode Table 3-35 Standard Signal Mode Table 3-36 Standard Signal Mode Table 3-37 Standard Signal Mode Table 3-38 Standard Signal Mode Table 3-39 Installing the Device Driver 3-40 Product Operating Buttons 3-41 Using the Screen Adjustment Menu (OSD: On Screen Display) . . . 3-42 INSTALLING THE SOFTWARE Natural Color 4-1 MagicTune 4-2 MagicRotation 4-3 MultiScreen 4-4 TROUBLESHOOTING Monitor Self-Diagnosis 5-1 Before Requesting Service 5-2 FAQ 5-3 MORE INFORMATION Specifications 6-1 Power Saving Function 6-2 Specifications 6-3 Power Saving...
User Manual (user Manual) (ver.1.0) (English)
Page 12
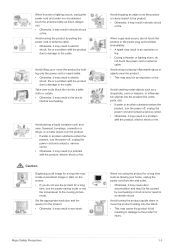
... the cable. Caution Displaying a still image for a long time may create a persistent image or stain on the screen. • If you do not touch the power cord or antenna cable. When not using or placing inflammable spray or objects near the product. • This may result in an explosion or fire. • During a thunder or lighting storm, do not use the power-saving mode or set...
... the cable. Caution Displaying a still image for a long time may create a persistent image or stain on the screen. • If you do not touch the power cord or antenna cable. When not using or placing inflammable spray or objects near the product. • This may result in an explosion or fire. • During a thunder or lighting storm, do not use the power-saving mode or set...
User Manual (user Manual) (ver.1.0) (English)
Page 17
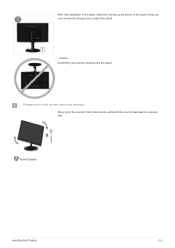
Caution Avoid lifting the product holding only the stand. Stand Stopper Installing the Product 2-2 After the installation of the assembly. Now you can remove the stopper pin to maxium first. . Disassembly is in the reverse order of the base, stand the monitor up as shown in the figure. When pivot the monitor from horizontal to vertical,tilt the monitor backward to adjust the stand. -
Caution Avoid lifting the product holding only the stand. Stand Stopper Installing the Product 2-2 After the installation of the assembly. Now you can remove the stopper pin to maxium first. . Disassembly is in the reverse order of the base, stand the monitor up as shown in the figure. When pivot the monitor from horizontal to vertical,tilt the monitor backward to adjust the stand. -

User Manual (user Manual) (ver.1.0) (English)
Page 25
... use it in public locations. Connect the Kensington lock cable. 3. Since the shape and usage of the locking device may be different depending on the model and the manufacturer, for more information, refer to the User Manual supplied with the locking device. Tie the Kensington lock cable to purchase an additional locking device. You have to a desk or heavy object. 2-6 Kensington Lock Kensington Lock A Kensington Lock...
... use it in public locations. Connect the Kensington lock cable. 3. Since the shape and usage of the locking device may be different depending on the model and the manufacturer, for more information, refer to the User Manual supplied with the locking device. Tie the Kensington lock cable to purchase an additional locking device. You have to a desk or heavy object. 2-6 Kensington Lock Kensington Lock A Kensington Lock...

User Manual (user Manual) (ver.1.0) (English)
Page 81
... the instructions displayed on the screen. 4. Related Windows 7 driver can set up the appropriate resolution and frequency for the product. Select the model of your product from Samsung Electronics website. 1. If the supplied drive file is included on "Windows Driver". 3. Insert the driver installation CD-ROM into the CD-ROM drive. 2. Using the product 3-40 Check if the appropriate resolution and screen refresh rate are displayed in the Control Panel settings. Complete the remaining installation steps...
... the instructions displayed on the screen. 4. Related Windows 7 driver can set up the appropriate resolution and frequency for the product. Select the model of your product from Samsung Electronics website. 1. If the supplied drive file is included on "Windows Driver". 3. Insert the driver installation CD-ROM into the CD-ROM drive. 2. Using the product 3-40 Check if the appropriate resolution and screen refresh rate are displayed in the Control Panel settings. Complete the remaining installation steps...

User Manual (user Manual) (ver.1.0) (English)
Page 83
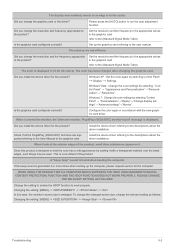
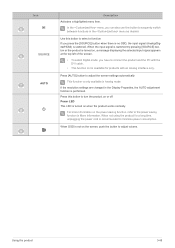
... the power cord is switched. Press [AUTO] button to adjust volume. Press this button to turn the product on or off Power LED This LED is not on , a message displaying the selected input signal appears at the top left of the screen. • To select Digital mode, you press the [SOURCE] button when there is no OSD, the input signal (Analog/Digital/HDMI) is recommended to the power saving function in Analog mode. Using the product 3-41 When OSD is turned on the power-saving...
... the power cord is switched. Press [AUTO] button to adjust volume. Press this button to turn the product on or off Power LED This LED is not on , a message displaying the selected input signal appears at the top left of the screen. • To select Digital mode, you press the [SOURCE] button when there is no OSD, the input signal (Analog/Digital/HDMI) is recommended to the power saving function in Analog mode. Using the product 3-41 When OSD is turned on the power-saving...

User Manual (user Manual) (ver.1.0) (English)
Page 85
... picture settings optimized for the best entertainment environment (movie, DVD, etc.). • Controls the picture contrast automatically so that are preset at the factory. The Monitor has four automatic picture settings (, , and ) that bright and dark pictures are dark. This also provides a sharp image. • Select this mode to mode or mode. • This menu is unavailable when is set . You can only be set when the external input is connected through HDMI/DVI...
... picture settings optimized for the best entertainment environment (movie, DVD, etc.). • Controls the picture contrast automatically so that are preset at the factory. The Monitor has four automatic picture settings (, , and ) that bright and dark pictures are dark. This also provides a sharp image. • Select this mode to mode or mode. • This menu is unavailable when is set . You can only be set when the external input is connected through HDMI/DVI...
User Manual (user Manual) (ver.1.0) (English)
Page 89
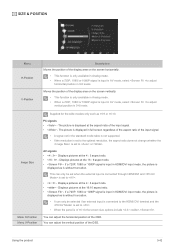
Image Size Menu H-Position Menu V-Position Supplied for the wide models only such as is without truncation. Displays pictures at the 16 : 9 aspect ratio. • - You can only be set to adjust horizontal position in 0-6 levels. If a 720P, 1080i or 1080P signal is input in HDMI/DVI input mode, the picture is displayed as is set to the optimal resolution, the aspect ratio does not change whether the is without truncation. • It can adjust the vertical position of the OSD. AV...
Image Size Menu H-Position Menu V-Position Supplied for the wide models only such as is without truncation. Displays pictures at the 16 : 9 aspect ratio. • - You can only be set to adjust horizontal position in 0-6 levels. If a 720P, 1080i or 1080P signal is input in HDMI/DVI input mode, the picture is displayed as is set to the optimal resolution, the aspect ratio does not change whether the is without truncation. • It can adjust the vertical position of the OSD. AV...
User Manual (user Manual) (ver.1.0) (English)
Page 90
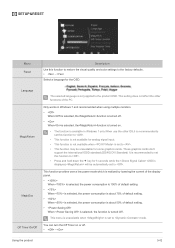
... using multiple monitors. • Whenis selected, thefunction is turned off . • - SETUP&RESET Menu Reset Description Use this function to . • Press and hold down the ▼ key for 5 seconds while the OSD is only applied to the product OSD. Only works in Windows 7 only.When use the other functions of default setting. • When is selected, the function is set to . Select a language for some graphics cards. Using...
... using multiple monitors. • Whenis selected, thefunction is turned off . • - SETUP&RESET Menu Reset Description Use this function to . • Press and hold down the ▼ key for 5 seconds while the OSD is only applied to the product OSD. Only works in Windows 7 only.When use the other functions of default setting. • When is selected, the function is set to . Select a language for some graphics cards. Using...

User Manual (user Manual) (ver.1.0) (English)
Page 93
... • Windows XP Professional • Windows Vista 32Bit • Windows 7 32Bit For MagicTune™, Windows 2000 or later is a software program that helps with monitor adjustments by the graphics card, motherboard and the networking environment. Restrictions and Problems with the mouse and the keyboard without using the operating buttons of monitor functions and easy-to the instructions displayed on the screen. • The software may not work properly...
... • Windows XP Professional • Windows Vista 32Bit • Windows 7 32Bit For MagicTune™, Windows 2000 or later is a software program that helps with monitor adjustments by the graphics card, motherboard and the networking environment. Restrictions and Problems with the mouse and the keyboard without using the operating buttons of monitor functions and easy-to the instructions displayed on the screen. • The software may not work properly...
User Manual (user Manual) (ver.1.0) (English)
Page 95
... the instructions displayed on the CD-ROM. 3. If some applications like Windows Media Player, Real Player, etc. MagicRotation does not provide support for the software installation does not appear on the main screen, find and double-click the MagicRotation setup file on the screen. • The software may be the latest driver supplied by the graphics card, motherboard and the networking environment. are changing...
... the instructions displayed on the CD-ROM. 3. If some applications like Windows Media Player, Real Player, etc. MagicRotation does not provide support for the software installation does not appear on the main screen, find and double-click the MagicRotation setup file on the screen. • The software may be the latest driver supplied by the graphics card, motherboard and the networking environment. are changing...
User Manual (user Manual) (ver.1.0) (English)
Page 99
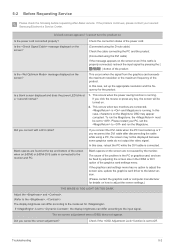
... the input signal. The color is weird / The picture is set for the product. Set up the graphics card referring to the computer. This occurs when the signal from the graphics card exceeds the maximum resolution or the maximum frequency of the power cord. If you cancel the screen adjustment? Please restart your nearest Samsung Electronics Service Center. THE IMAGE IS TOO LIGHT OR TOO DARK. Check the cable connection to the user manual...
... the input signal. The color is weird / The picture is set for the product. Set up the graphics card referring to the computer. This occurs when the signal from the graphics card exceeds the maximum resolution or the maximum frequency of the power cord. If you cancel the screen adjustment? Please restart your nearest Samsung Electronics Service Center. THE IMAGE IS TOO LIGHT OR TOO DARK. Check the cable connection to the user manual...
User Manual (user Manual) (ver.1.0) (English)
Page 100
... the user manual. To change the enlarged screen size, change the graphics card or the driver? Please press the [AUTO] button to the (Standard Signal Mode Table) The color is designed so that the color has a soft appearance by selecting " Control Panel" → "Appearance and Personalization"→"Personalization"→" Resolution". Windows XP : Set the color again by selecting "Control Panel" → "Personalization"→"Display"→"Change display settings"→"Advanced settings"→"Monitor". Check if all the Plug&Play (VESA DDC...
... the user manual. To change the enlarged screen size, change the graphics card or the driver? Please press the [AUTO] button to the (Standard Signal Mode Table) The color is designed so that the color has a soft appearance by selecting " Control Panel" → "Appearance and Personalization"→"Personalization"→" Resolution". Windows XP : Set the color again by selecting "Control Panel" → "Personalization"→"Display"→"Change display settings"→"Advanced settings"→"Monitor". Check if all the Plug&Play (VESA DDC...
User Manual (user Manual) (ver.1.0) (English)
Page 3
... Signal Mode Table 3-38 Standard Signal Mode Table 3-39 Standard Signal Mode Table 3-40 Standard Signal Mode Table 3-41 Standard Signal Mode Table 3-42 Standard Signal Mode Table 3-43 Installing the Device Driver 3-44 Product Operating Buttons 3-45 Using the Screen Adjustment Menu (OSD: On Screen Display) . . . 3-46 INSTALLING THE SOFTWARE Natural Color 4-1 MagicTune 4-2 MagicRotation 4-3 MultiScreen 4-4 TROUBLESHOOTING Monitor Self-Diagnosis 5-1 Before Requesting Service 5-2 FAQ 5-3 MORE INFORMATION Specifications 6-1 Power Saving Function 6-2 Specifications 6-3 Power Saving...
... Signal Mode Table 3-38 Standard Signal Mode Table 3-39 Standard Signal Mode Table 3-40 Standard Signal Mode Table 3-41 Standard Signal Mode Table 3-42 Standard Signal Mode Table 3-43 Installing the Device Driver 3-44 Product Operating Buttons 3-45 Using the Screen Adjustment Menu (OSD: On Screen Display) . . . 3-46 INSTALLING THE SOFTWARE Natural Color 4-1 MagicTune 4-2 MagicRotation 4-3 MultiScreen 4-4 TROUBLESHOOTING Monitor Self-Diagnosis 5-1 Before Requesting Service 5-2 FAQ 5-3 MORE INFORMATION Specifications 6-1 Power Saving Function 6-2 Specifications 6-3 Power Saving...

User Manual (user Manual) (ver.1.0) (English)
Page 92
... appropriate resolution and screen refresh rate are displayed in the Control Panel settings. For more information, refer to the instructions displayed on the screen. 4. Select the model of your product from Samsung Electronics website. 1. Using the product 3-44 Related Windows 7 driver can set up the appropriate resolution and frequency for the product. If the supplied drive file is included on "Windows Driver". 3. 3-44 Installing the Device Driver If you install the device driver, you can be downloaded...
... appropriate resolution and screen refresh rate are displayed in the Control Panel settings. For more information, refer to the instructions displayed on the screen. 4. Select the model of your product from Samsung Electronics website. 1. Using the product 3-44 Related Windows 7 driver can set up the appropriate resolution and frequency for the product. If the supplied drive file is included on "Windows Driver". 3. 3-44 Installing the Device Driver If you install the device driver, you can be downloaded...
User Manual (user Manual) (ver.1.0) (English)
Page 94
... power-saving function, refer to adjust volume. Press [AUTO] button to minimize power consumption. If the resolution settings are changed in the Display Properties, the AUTO adjustment function is only available in Analog mode. When the input signal is switched by pressing [SOURCE] button or the product is turned on, a message displaying the selected input signal appears at the top left of the screen. • To select Digital mode, you press the [SOURCE] button when there is no OSD, the input signal (Analog/Digital/HDMI...
... power-saving function, refer to adjust volume. Press [AUTO] button to minimize power consumption. If the resolution settings are changed in the Display Properties, the AUTO adjustment function is only available in Analog mode. When the input signal is switched by pressing [SOURCE] button or the product is turned on, a message displaying the selected input signal appears at the top left of the screen. • To select Digital mode, you press the [SOURCE] button when there is no OSD, the input signal (Analog/Digital/HDMI...

User Manual (user Manual) (ver.1.0) (English)
Page 96
... factory. The Monitor has four automatic picture settings (, , and ) that are bright. Provides preset picture settings optimized for various user environments such as editing a document, surfing the Internet, playing games,or movies and so on the screen • This menu is unavailable when is set to or mode. • This menu is unavailable when is set to view a sharper image than in Standard mode. • Select this mode to mode...
... factory. The Monitor has four automatic picture settings (, , and ) that are bright. Provides preset picture settings optimized for various user environments such as editing a document, surfing the Internet, playing games,or movies and so on the screen • This menu is unavailable when is set to or mode. • This menu is unavailable when is set to view a sharper image than in Standard mode. • Select this mode to mode...

User Manual (user Manual) (ver.1.0) (English)
Page 100
... input is connected through HDMI/DVI and is set to adjust horizontal position in 0-6 levels. You can adjust the horizontal position of the OSD. The picture is of 16:10,the screen size options include ,,. You can adjust the vertical position of the OSD. AV signals • - If a 720P, 1080i or 1080P signal is input in HDMI/DVI input mode, the picture is displayed as is without truncation. Using the product 3-46 Displays pictures at the 4 : 3 aspect ratio. • - Image Size Menu H-Position Menu V-Position Supplied for the wide models...
... input is connected through HDMI/DVI and is set to adjust horizontal position in 0-6 levels. You can adjust the horizontal position of the OSD. The picture is of 16:10,the screen size options include ,,. You can adjust the vertical position of the OSD. AV signals • - If a 720P, 1080i or 1080P signal is input in HDMI/DVI input mode, the picture is displayed as is without truncation. Using the product 3-46 Displays pictures at the 4 : 3 aspect ratio. • - Image Size Menu H-Position Menu V-Position Supplied for the wide models...
User Manual (user Manual) (ver.1.0) (English)
Page 110
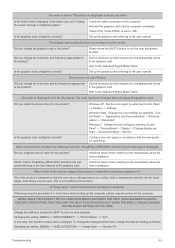
... the power cord. This occurs when the power saving function is connected to the monitor and PC. If you reconnect the DVI cable after disconnecting the cable while using the DVI cable) If the message appears on the screen are found at a 1 second interval? 1. Troubleshooting 5-2 Please restart your nearest Samsung Electronics Service Center. This occurs when the signal from the graphics card exceeds the maximum resolution or the maximum frequency...
... the power cord. This occurs when the power saving function is connected to the monitor and PC. If you reconnect the DVI cable after disconnecting the cable while using the DVI cable) If the message appears on the screen are found at a 1 second interval? 1. Troubleshooting 5-2 Please restart your nearest Samsung Electronics Service Center. This occurs when the signal from the graphics card exceeds the maximum resolution or the maximum frequency...
User Manual (user Manual) (ver.1.0) (English)
Page 111
... (Standard Signal Mode Table) Set up the graphics card referring to . This is set to the user manual. If the beep sound is displayed. Check the cable connection to the descriptions about the driver installation. Did you change the relevant setting as if viewing the screen through a cellophane paper? Windows 7 : Change the color settings by selecting Control Panel → Display → Settings. When I look at the exterior edges of -focus. Since this case, the monitor's screen size is heard...
... (Standard Signal Mode Table) Set up the graphics card referring to . This is set to the user manual. If the beep sound is displayed. Check the cable connection to the descriptions about the driver installation. Did you change the relevant setting as if viewing the screen through a cellophane paper? Windows 7 : Change the color settings by selecting Control Panel → Display → Settings. When I look at the exterior edges of -focus. Since this case, the monitor's screen size is heard...


