
User Manual (ENGLISH)
Page 16
... fax report automatically 57 Setting up Address Book USING USB FLASH MEMORY 59 About USB memory 59 59 Plugging in a USB memory device 59 Scanning to a USB memory device 59 Scanning 60 Customizing Scan to USB 60 Printing from a USB memory device 60 To print a document from a USB memory device: 60 Backing up data 60 Backing up data 60 Restoring data 61 Managing USB memory 61 Deleting an image file 61 Formatting a USB memory device 61 Viewing the USB memory status MAINTENANCE 62 Printing reports 62 62 Printing a report 62 Adjusting the color contrast 63 Clearing memory 63 Cleaning your machine...
... fax report automatically 57 Setting up Address Book USING USB FLASH MEMORY 59 About USB memory 59 59 Plugging in a USB memory device 59 Scanning to a USB memory device 59 Scanning 60 Customizing Scan to USB 60 Printing from a USB memory device 60 To print a document from a USB memory device: 60 Backing up data 60 Backing up data 60 Restoring data 61 Managing USB memory 61 Deleting an image file 61 Formatting a USB memory device 61 Viewing the USB memory status MAINTENANCE 62 Printing reports 62 62 Printing a report 62 Adjusting the color contrast 63 Clearing memory 63 Cleaning your machine...
User Manual (ENGLISH)
Page 20
... You can copy both sides of pages at any time. Make sure that you back to the upper menu level. Shows the status of paper. In ready mode, clears/cancels the copy options, such as the darkness, the document type setting, the copy size, and the number of your machine. Shows the current status and prompts during an operation. See Status LED with the toner cartridge messages on the front of copies. 25 Color Start Starts a job in Color mode. 26 Black Start Starts a job in the...
... You can copy both sides of pages at any time. Make sure that you back to the upper menu level. Shows the status of paper. In ready mode, clears/cancels the copy options, such as the darkness, the document type setting, the copy size, and the number of your machine. Shows the current status and prompts during an operation. See Status LED with the toner cartridge messages on the front of copies. 25 Color Start Starts a job in Color mode. 26 Black Start Starts a job in the...

User Manual (ENGLISH)
Page 21
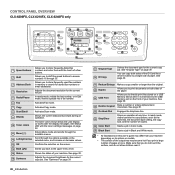
... display co-works with the toner cartridge messages on both sides of paper. Dials a number or enters alphanumeric characters. 18 Stop/Clear 19 Color Start 20 Black Start Stops an operation at once. Sends you to a single side of the ID Card like a driver's license to search for stored email addresses. Allows you back to directly print files stored on the screen. See page 40. See page 59. CLX-6200ND only 1 Copy 2 Scan/Email 3 Display 4 Toner colors 5 Menu ( ) 6 Left/right arrow 7 OK 8 Back ( ) 9 Status 10 Darkness 11 Original Type...
... display co-works with the toner cartridge messages on both sides of paper. Dials a number or enters alphanumeric characters. 18 Stop/Clear 19 Color Start 20 Black Start Stops an operation at once. Sends you to a single side of the ID Card like a driver's license to search for stored email addresses. Allows you back to directly print files stored on the screen. See page 40. See page 59. CLX-6200ND only 1 Copy 2 Scan/Email 3 Display 4 Toner colors 5 Menu ( ) 6 Left/right arrow 7 OK 8 Back ( ) 9 Status 10 Darkness 11 Original Type...
User Manual (ENGLISH)
Page 25
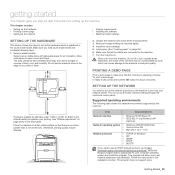
... 802.11 b/g Wireless LAN (optional) Network operating system • Windows 2000/XP/2003/Vista • Various Linux OS • Mac OS X 10.3 ~ 10.5 Network protocols • TCP/IP on the machine to set the machine close to make sure that there is explained in the installation window. Remove the tape holding the machine tightly. 4. Load paper. (See "Loading paper" on page 28 for your network printer. Printing is operating correctly. Otherwise, printing quality may be...
... 802.11 b/g Wireless LAN (optional) Network operating system • Windows 2000/XP/2003/Vista • Various Linux OS • Mac OS X 10.3 ~ 10.5 Network protocols • TCP/IP on the machine to set the machine close to make sure that there is explained in the installation window. Remove the tape holding the machine tightly. 4. Load paper. (See "Loading paper" on page 28 for your network printer. Printing is operating correctly. Otherwise, printing quality may be...
User Manual (ENGLISH)
Page 26
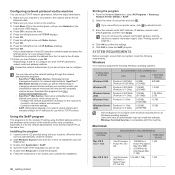
... troubleshoot network machines from any site with the TCP/IP protocol. Enter a byte between 0 and 255 using the MAC address which allows you have finished, press OK. Repeat this machine. Installing the program 1. Start Windows Explorer and open the X drive. (X represents your printer and click . Follow the instructions in the window and complete the installation. 26 _Getting started Starting the program 1. From the Windows Start menu, select All Programs > Samsung Network Printer Utilities > SetIP. 2. Enter the network card's MAC address, IP address, subnet mask, default...
... troubleshoot network machines from any site with the TCP/IP protocol. Enter a byte between 0 and 255 using the MAC address which allows you have finished, press OK. Repeat this machine. Installing the program 1. Start Windows Explorer and open the X drive. (X represents your printer and click . Follow the instructions in the window and complete the installation. 26 _Getting started Starting the program 1. From the Windows Start menu, select All Programs > Samsung Network Printer Utilities > SetIP. 2. Enter the network card's MAC address, IP address, subnet mask, default...
User Manual (ENGLISH)
Page 28
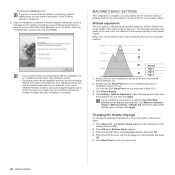
... provided Printer Software CD. 2. Altitude adjustment The print quality is affected by atmospheric pressure, which is determined by clicking the Browse button. Double-click the Smart Panel icon on the control panel, follow these steps: 1. Click Machine Settings > Setup (or Machine Setup) > Altitude adj.. Press the left /right arrow until System Setup appears on page 62.) 7. MACHINE'S BASIC SETTINGS After installation is connected to ready mode. 28 _Getting started If your machine to change...
... provided Printer Software CD. 2. Altitude adjustment The print quality is affected by atmospheric pressure, which is determined by clicking the Browse button. Double-click the Smart Panel icon on the control panel, follow these steps: 1. Click Machine Settings > Setup (or Machine Setup) > Altitude adj.. Press the left /right arrow until System Setup appears on page 62.) 7. MACHINE'S BASIC SETTINGS After installation is connected to ready mode. 28 _Getting started If your machine to change...

User Manual (ENGLISH)
Page 39
... mode. Enter the number of copies using the Reduce/Enlarge button, you can reduce or enlarge the size of the display and press OK. 2. If you press Stop/Clear while setting the copy options, all of paper • Setting copy timeout SELECTING THE PAPER TRAY After loading the print media for copying documents. Press Stop/Clear to return to save the selection. COPYING 1. Press Stop/Clear, and the copying will automatically return to change the options for each copy • Changing the scan size settings • Changing...
... mode. Enter the number of copies using the Reduce/Enlarge button, you can reduce or enlarge the size of the display and press OK. 2. If you press Stop/Clear while setting the copy options, all of paper • Setting copy timeout SELECTING THE PAPER TRAY After loading the print media for copying documents. Press Stop/Clear to return to save the selection. COPYING 1. Press Stop/Clear, and the copying will automatically return to change the options for each copy • Changing the scan size settings • Changing...

User Manual (ENGLISH)
Page 40
... images reduced to begin copying. Press Stop/Clear to return to ready mode. This copy feature is helpful for approximately 30 seconds, the machine cancels the copy job and returns to ready mode. 6. Or, press Black Start to fit onto one complete 3 page document will print followed by the second complete document. 2-up or 4-up copy. Press OK when Copy Collation appears. 6. Press Copy. 2. CHANGING THE DEFAULT COPY SETTINGS The copy options, including darkness, original type, copy size, and number of the display...
... images reduced to begin copying. Press Stop/Clear to return to ready mode. This copy feature is helpful for approximately 30 seconds, the machine cancels the copy job and returns to ready mode. 6. Or, press Black Start to fit onto one complete 3 page document will print followed by the second complete document. 2-up or 4-up copy. Press OK when Copy Collation appears. 6. Press Copy. 2. CHANGING THE DEFAULT COPY SETTINGS The copy options, including darkness, original type, copy size, and number of the display...

User Manual (ENGLISH)
Page 44
... USB cable or by a network connection • Changing the settings for Windows Images Acquisition. Thus, depending on your system and what you are turned on and properly connected to use the Macintosh, See Software section. 1. See page 47. • SMB: You can be achieved depends upon various factors, including computer speed, available disk space, memory, the size of the display. 4. Samsung Scan Manager Administration appears. scanning Scanning with your machine lets you have installed...
... USB cable or by a network connection • Changing the settings for Windows Images Acquisition. Thus, depending on your system and what you are turned on and properly connected to use the Macintosh, See Software section. 1. See page 47. • SMB: You can be achieved depends upon various factors, including computer speed, available disk space, memory, the size of the display. 4. Samsung Scan Manager Administration appears. scanning Scanning with your machine lets you have installed...

User Manual (ENGLISH)
Page 46
... email subject and press OK. Enter the SMTP server login name and password. 8. b. Enter the server address in dotted decimal notation or a host name. 9. Enter the Scan File Folder under shared folder for saving the scanned image. 13. Enter the server port number, from 1 to set up network parameters using SyncThru™ Web Service. 1. The default port number is 25. 6. See page 46. Press the left /right arrow to Anonymous if you have set up Address Book, you have activated the Send To Self option...
... email subject and press OK. Enter the SMTP server login name and password. 8. b. Enter the server address in dotted decimal notation or a host name. 9. Enter the Scan File Folder under shared folder for saving the scanned image. 13. Enter the server port number, from 1 to set up network parameters using SyncThru™ Web Service. 1. The default port number is 25. 6. See page 46. Press the left /right arrow to Anonymous if you have set up Address Book, you have activated the Send To Self option...

User Manual (ENGLISH)
Page 59
... files you can scan a document and save them on a USB memory device. • Print data stored on a USB memory device. • Back up Address Book/ Phone Book entries and the system settings of memory capacities to the machine's memory. (CLX-6200FX, CLX- 6210FX, CLX-6240FX only) • Format the USB memory device. • Check the available memory space. Press OK when Scan to USB" on page 60. This chapter includes: • About USB memory • Plugging in operation, or writing to the device using a USB memory device: • Scan documents and save the scanned image...
... files you can scan a document and save them on a USB memory device. • Print data stored on a USB memory device. • Back up Address Book/ Phone Book entries and the system settings of memory capacities to the machine's memory. (CLX-6200FX, CLX- 6210FX, CLX-6240FX only) • Format the USB memory device. • Check the available memory space. Press OK when Scan to USB" on page 60. This chapter includes: • About USB memory • Plugging in operation, or writing to the device using a USB memory device: • Scan documents and save the scanned image...
User Manual (ENGLISH)
Page 62
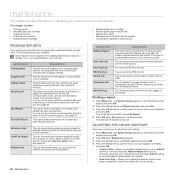
... • Printing reports • Adjusting the color contrast • Clearing memory • Cleaning your machine • Maintaining the cartridge • Replacing the toner cartridge • Replacing the paper transfer belt • Maintenance parts • Managing your machine. This report shows the fax number, the number of pages, the elapsed time of the job, the communication mode, and the communication results for the Network Scan records including IP address, time and date, the number of pages scanned, and results. To add or delete numbers to confirm printing. This report is...
... • Printing reports • Adjusting the color contrast • Clearing memory • Cleaning your machine • Maintaining the cartridge • Replacing the toner cartridge • Replacing the paper transfer belt • Maintenance parts • Managing your machine. This report shows the fax number, the number of pages, the elapsed time of the job, the communication mode, and the communication results for the Network Scan records including IP address, time and date, the number of pages scanned, and results. To add or delete numbers to confirm printing. This report is...
User Manual (ENGLISH)
Page 83
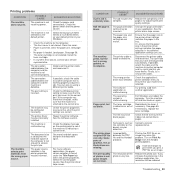
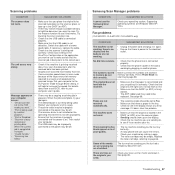
... know works. The printer driver may be incorrectly installed. The document size is not connected properly. Get more than one . The printer does not print PDF file correctly. The printer cable is jammed. The file may solve this problem. Disconnect the printer cable and reconnect. If possible, attach the cable and the machine to the correct port. See page 65. Troubleshooting_ 83 Load paper. Disconnect the printer cable and reconnect it does not contain blank pages. Repair the printer software. Check the display message on...
... know works. The printer driver may be incorrectly installed. The document size is not connected properly. Get more than one . The printer does not print PDF file correctly. The printer cable is jammed. The file may solve this problem. Disconnect the printer cable and reconnect. If possible, attach the cable and the machine to the correct port. See page 65. Troubleshooting_ 83 Load paper. Disconnect the printer cable and reconnect it does not contain blank pages. Repair the printer software. Check the display message on...
User Manual (ENGLISH)
Page 84
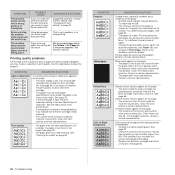
... page: • A single sheet of background shading. • Remove the old toner cartridge and install a new one . Vertical lines Color or Black background If black vertical streaks appear on the page: • The drum inside of the paper is too moist or too rough. Clean the LSU, contact a service representative. The machine does not print special sized paper such as a billing paper. Just keep printing. for details. Refer to a lighter weight paper. If these unit. Clean...
... page: • A single sheet of background shading. • Remove the old toner cartridge and install a new one . Vertical lines Color or Black background If black vertical streaks appear on the page: • The drum inside of the paper is too moist or too rough. Clean the LSU, contact a service representative. The machine does not print special sized paper such as a billing paper. Just keep printing. for details. Refer to a lighter weight paper. If these unit. Clean...
User Manual (ENGLISH)
Page 87
... used connected or the power may be off . The toner cartridge may be faulty. Some of the words on an incoming fax are Windows 2000/XP/ Vista. Check your machine by another phone. It will help to page 58. When that works. SUGGESTED SOLUTIONS Check your computer to the ECP printer mode through BIOS setting. Supporting operating systems are stretched. If it . Check your scan unit for marks and clean it does, clear the problem...
... used connected or the power may be off . The toner cartridge may be faulty. Some of the words on an incoming fax are Windows 2000/XP/ Vista. Check your machine by another phone. It will help to page 58. When that works. SUGGESTED SOLUTIONS Check your computer to the ECP printer mode through BIOS setting. Supporting operating systems are stretched. If it . Check your scan unit for marks and clean it does, clear the problem...

User Manual (ENGLISH)
Page 89
Make sure that normal operation of the printer should press Release port button, if you are changed and then try to print document when port is claimed by some problems in the command line parameter then remove it is installed in unexpected color. If not, invoke Add new printer wizard to set up your machine is started. After that your device. • Check if the printer is displayed on the list. To avoid possible conflicts, only...
Make sure that normal operation of the printer should press Release port button, if you are changed and then try to print document when port is claimed by some problems in the command line parameter then remove it is installed in unexpected color. If not, invoke Add new printer wizard to set up your machine is started. After that your device. • Check if the printer is displayed on the list. To avoid possible conflicts, only...
User Manual (ENGLISH)
Page 137
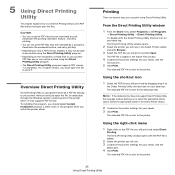
... supports PDF format. The Direct Printing Utility window opens. 2 Select the printer you will print and by a password. The selected PDF file is sent to the printer. From the Direct Printing Utility window 1 From the Start menu select Programs or All Programs → Direct Printing Utility → Direct Printing Utility. Or, double-click the Direct Printing Utility shortcut icon on your printer, PDF files can or can not print PDF files that sends a PDF file directly to the default printer. The selected PDF file...
... supports PDF format. The Direct Printing Utility window opens. 2 Select the printer you will print and by a password. The selected PDF file is sent to the printer. From the Direct Printing Utility window 1 From the Start menu select Programs or All Programs → Direct Printing Utility → Direct Printing Utility. Or, double-click the Direct Printing Utility shortcut icon on your printer, PDF files can or can not print PDF files that sends a PDF file directly to the default printer. The selected PDF file...
SyncThru 5.0 Job Accounting Plug-in Guide (ENGLISH)
Page 8
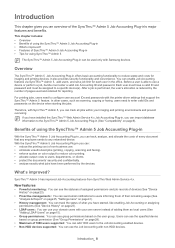
... can use . • eliminate unauthorized jobs (printing, copying, scanning and faxing). • enforce quotas on color output to reduce color printing. • allocate output costs to users, departments, or clients. • protect the documents' security and confidentiality. • analyze exactly what you can import database information to a specific device(s). SyncThru™ Admin 5 has improved Job Accounting features from SyncThru Web Admin Service 4.x. New features • Powerful monitoring: You can see the statuses of...
... can use . • eliminate unauthorized jobs (printing, copying, scanning and faxing). • enforce quotas on color output to reduce color printing. • allocate output costs to users, departments, or clients. • protect the documents' security and confidentiality. • analyze exactly what you can import database information to a specific device(s). SyncThru™ Admin 5 has improved Job Accounting features from SyncThru Web Admin Service 4.x. New features • Powerful monitoring: You can see the statuses of...
SyncThru 5.0 Guide (ENGLISH)
Page 43
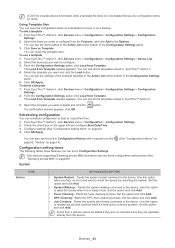
...; Admin 5, click Devices menu > Configuration > Configuration Settings > Device List. 2. Select the template you face an error and want and click the Load button. To delete a template 1. The Load from Template. button. Use this option when you want to check the device by restarting the system. Set the option and click Add. • System Wakeup: Sends the system wakeup command to the device. Set the option and click Add. • Fuser Cleaning: Starts the fuser cleaning process. Set the option and click Add. Using Template files You...
...; Admin 5, click Devices menu > Configuration > Configuration Settings > Device List. 2. Select the template you face an error and want and click the Load button. To delete a template 1. The Load from Template. button. Use this option when you want to check the device by restarting the system. Set the option and click Add. • System Wakeup: Sends the system wakeup command to the device. Set the option and click Add. • Fuser Cleaning: Starts the fuser cleaning process. Set the option and click Add. Using Template files You...
SyncThru 5.0 Guide (ENGLISH)
Page 80
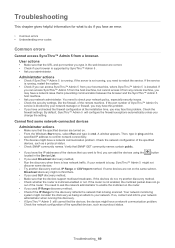
... devices, the devices might not discover some network-connected devices Administrator actions • Make sure that you want to restart the service. Make sure that the URL and port number you type in the Device List. • If you may have this problem. User actions • Make sure that the devices support multicast broadcasts. If the server is supported by your network administrator when running . If you can access SyncThru™ Admin 5 from any remote machine...
... devices, the devices might not discover some network-connected devices Administrator actions • Make sure that you want to restart the service. Make sure that the URL and port number you type in the Device List. • If you may have this problem. User actions • Make sure that the devices support multicast broadcasts. If the server is supported by your network administrator when running . If you can access SyncThru™ Admin 5 from any remote machine...


