
User Manual (ENGLISH)
Page 3
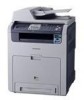
Do not touch the green underside of your new laser product_3 Both novice users and professional users can refer to the reference page for the additional detailed information. (See page 1 for your ... is designed to more advanced networking solutions for more information) Features of the toner cartridge. Used to provide additional information or detailed specification of your business. Basic features of this machine include: USB 2.0 FEATURES CLX-6200ND CLX-6200FX CLX-6210FX CLX-6240FX USB Memory Interface DADF (Duplex Automatic Document Feeder) ADF (Automatic Document ...
Do not touch the green underside of your new laser product_3 Both novice users and professional users can refer to the reference page for the additional detailed information. (See page 1 for your ... is designed to more advanced networking solutions for more information) Features of the toner cartridge. Used to provide additional information or detailed specification of your business. Basic features of this machine include: USB 2.0 FEATURES CLX-6200ND CLX-6200FX CLX-6210FX CLX-6240FX USB Memory Interface DADF (Duplex Automatic Document Feeder) ADF (Automatic Document ...

User Manual (ENGLISH)
Page 14
contents 14_Contents 2 Features of your new laser product 5 Safety information INTRODUCTION 19 Printer overview 19 19 19 Front view Rear view 20 Control panel overview 20 CLX-6200FX, CLX-6210FX, CLX-6240FX only 21 CLX-6200ND only 22 Understanding the Status LED 22 Acknowledging the status of the toner cartridge 23 Menu overview 24 Supplied software 24 Printer...
contents 14_Contents 2 Features of your new laser product 5 Safety information INTRODUCTION 19 Printer overview 19 19 19 Front view Rear view 20 Control panel overview 20 CLX-6200FX, CLX-6210FX, CLX-6240FX only 21 CLX-6200ND only 22 Understanding the Status LED 22 Acknowledging the status of the toner cartridge 23 Menu overview 24 Supplied software 24 Printer...

User Manual (ENGLISH)
Page 16
... an image file 61 Formatting a USB memory device 61 Viewing the USB memory status MAINTENANCE 62 Printing reports 62 62 Printing a report 62 Adjusting the color contrast 63 Clearing memory 63 Cleaning your machine 63 Cleaning the outside 63 Cleaning the inside 65 Cleaning the scan unit 65 Maintaining the cartridge...
... an image file 61 Formatting a USB memory device 61 Viewing the USB memory status MAINTENANCE 62 Printing reports 62 62 Printing a report 62 Adjusting the color contrast 63 Clearing memory 63 Cleaning your machine 63 Cleaning the outside 63 Cleaning the inside 65 Cleaning the scan unit 65 Maintaining the cartridge...
User Manual (ENGLISH)
Page 17
contents 67 Clearing the Toner Empty message 68 Replacing the paper transfer belt 69 Maintenance parts 69 Checking replaceables 69 Replacing the DADF (or ADF) rubber pad 70 Managing your ... 78 Understanding display messages 81 Solving other problems 81 Paper feeding 82 Printing problems 83 Printing quality problems 85 Copying problems 86 Scanning problems 86 Samsung Scan Manager problems 86 Fax problems 87 Common PostScript problems 87 Common Windows problems 88 Common Linux problems 90 Common Macintosh problems ORDERING SUPPLIES AND...
contents 67 Clearing the Toner Empty message 68 Replacing the paper transfer belt 69 Maintenance parts 69 Checking replaceables 69 Replacing the DADF (or ADF) rubber pad 70 Managing your ... 78 Understanding display messages 81 Solving other problems 81 Paper feeding 82 Printing problems 83 Printing quality problems 85 Copying problems 86 Scanning problems 86 Samsung Scan Manager problems 86 Fax problems 87 Common PostScript problems 87 Common Windows problems 88 Common Linux problems 90 Common Macintosh problems ORDERING SUPPLIES AND...
User Manual (ENGLISH)
Page 19
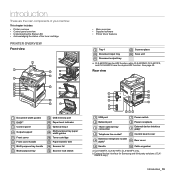
...CLX-6200FX, CLX-6210FX, CLX-6240FX only. b. Introduction_ 19 External device interface for Samsung and third party solutions. (CLX- 6240FX only). introduction These are the main components of your machine: This chapter includes: • Printer overview • Control panel overview • Understanding the Status LED • Acknowledging the status of the toner...10 Control board cover Extension telephone socket 5 (EXT)a 11 Rear cover 6 Handle 12 Cable organizer a. CLX-6200FX has the ADF function, while CLX-6200ND, CLX-6210FX, and CLX-6240FX have the duplex ADF function.
...CLX-6200FX, CLX-6210FX, CLX-6240FX only. b. Introduction_ 19 External device interface for Samsung and third party solutions. (CLX- 6240FX only). introduction These are the main components of your machine: This chapter includes: • Printer overview • Control panel overview • Understanding the Status LED • Acknowledging the status of the toner...10 Control board cover Extension telephone socket 5 (EXT)a 11 Rear cover 6 Handle 12 Cable organizer a. CLX-6200FX has the ADF function, while CLX-6200ND, CLX-6210FX, and CLX-6240FX have the duplex ADF function.
User Manual (ENGLISH)
Page 20
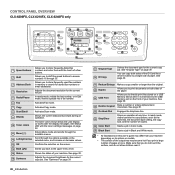
CONTROL PANEL OVERVIEW CLX-6200FX, CLX-6210FX, CLX-6240FX only 1 Speed buttons 2 Shift 3 Address Book 4 Resolution 5 Redial/Pause 6 Fax 7 Copy 8 Scan/Email 9 Display 10 Toner colors 11 Menu ( ) 12 Left/right arrow 13 OK 14 Back ( ) 15 Status 16 Darkness Allows you to store frequently-dialed fax numbers ...differ from your machine. Shows the status of paper. See "Original Type" on the front of a few buttons. The toner colors shown below the LCD display co-works with the toner cartridge messages on the screen. In ready mode, redials the last number, or in Edit mode, inserts a pause into ...
CONTROL PANEL OVERVIEW CLX-6200FX, CLX-6210FX, CLX-6240FX only 1 Speed buttons 2 Shift 3 Address Book 4 Resolution 5 Redial/Pause 6 Fax 7 Copy 8 Scan/Email 9 Display 10 Toner colors 11 Menu ( ) 12 Left/right arrow 13 OK 14 Back ( ) 15 Status 16 Darkness Allows you to store frequently-dialed fax numbers ...differ from your machine. Shows the status of paper. See "Original Type" on the front of a few buttons. The toner colors shown below the LCD display co-works with the toner cartridge messages on the screen. In ready mode, redials the last number, or in Edit mode, inserts a pause into ...

User Manual (ENGLISH)
Page 21
...for the current copy job. You can copy both sides of pages at any time. See page 40. The toner colors shown below the LCD display co-works with the toner cartridge messages on the screen. Allows you to a single side of your machine. In ready mode, clears/... or larger than the original. See page 59. Dials a number or enters alphanumeric characters. 18 Stop/Clear 19 Color Start 20 Black Start Stops an operation at once. CLX-6200ND only 1 Copy 2 Scan/Email 3 Display 4 Toner colors 5 Menu ( ) 6 Left/right arrow 7 OK 8 Back ( ) 9 Status 10 Darkness 11 Original Type ...
...for the current copy job. You can copy both sides of pages at any time. See page 40. The toner colors shown below the LCD display co-works with the toner cartridge messages on the screen. Allows you to a single side of your machine. In ready mode, clears/... or larger than the original. See page 59. Dials a number or enters alphanumeric characters. 18 Stop/Clear 19 Color Start 20 Black Start Stops an operation at once. CLX-6200ND only 1 Copy 2 Scan/Email 3 Display 4 Toner colors 5 Menu ( ) 6 Left/right arrow 7 OK 8 Back ( ) 9 Status 10 Darkness 11 Original Type ...

User Manual (ENGLISH)
Page 22
...cartridge for more information. It is close. See page 78 to solve the problem. • A toner cartridge has almost reached its estimated cartridge life. UNDERSTANDING THE STATUS LED The color of concern or may temporarily increase the printing quality by arrows. Check the message on the display, ... is and how to solve it switches to "Understanding display messages" on page 78 for replacement. However the arrow mark shows which color toner is left in the tray, so that the machine cannot continue the job. Check the message to operate the machine properly. You may...
...cartridge for more information. It is close. See page 78 to solve the problem. • A toner cartridge has almost reached its estimated cartridge life. UNDERSTANDING THE STATUS LED The color of concern or may temporarily increase the printing quality by arrows. Check the message on the display, ... is and how to solve it switches to "Understanding display messages" on page 78 for replacement. However the arrow mark shows which color toner is left in the tray, so that the machine cannot continue the job. Check the message to operate the machine properly. You may...
User Manual (ENGLISH)
Page 25
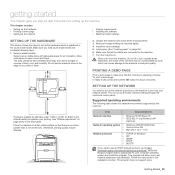
... Make sure you to use it upside down. Allow extra space to optimize your printing. See "Altitude adjustment" on page 36.) 6. Install the toner cartridge. 5. Supported operating environments The following steps. 1. Select a level, stable place with adequate space for altitudes under 1,000 m (3,281 ft).... started_ 25 The area should be well-ventilated and away from direct sunlight or sources of the machine may be contaminated by toner, which is operating correctly. getting started This chapter gives you step-by-step instructions for setting up the hardware which can ...
... Make sure you to use it upside down. Allow extra space to optimize your printing. See "Altitude adjustment" on page 36.) 6. Install the toner cartridge. 5. Supported operating environments The following steps. 1. Select a level, stable place with adequate space for altitudes under 1,000 m (3,281 ft).... started_ 25 The area should be well-ventilated and away from direct sunlight or sources of the machine may be contaminated by toner, which is operating correctly. getting started This chapter gives you step-by-step instructions for setting up the hardware which can ...

User Manual (ENGLISH)
Page 32
...or ADF) Using the DADF (or ADF), you can load up to load an original for one job. curled or rolled paper - Place the original face down on the scanner glass and ...not attempt to load originals and print media into your machine. To get the best scan quality, especially for colored or gray-scaled images, use the scanner glass or DADF (or ADF) to 50 sheets of paper (75 ... following types of paper: - CLX-6200ND, CLX-6210FX, CLX-6240FX has the DADF function which can use the scanner glass. 1. Lift and open while copying may affect copy quality and toner consumption. • Dust on ...
...or ADF) Using the DADF (or ADF), you can load up to load an original for one job. curled or rolled paper - Place the original face down on the scanner glass and ...not attempt to load originals and print media into your machine. To get the best scan quality, especially for colored or gray-scaled images, use the scanner glass or DADF (or ADF) to 50 sheets of paper (75 ... following types of paper: - CLX-6200ND, CLX-6210FX, CLX-6240FX has the DADF function which can use the scanner glass. 1. Lift and open while copying may affect copy quality and toner consumption. • Dust on ...
User Manual (ENGLISH)
Page 54
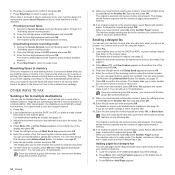
...while you are in ready mode and that you entered them in its memory. Enter the number of the faxes stored in the installed toner cartridge. Enter the second fax number and press OK. The display shows memory capacity and the number of pages being stored in secure...present. The machine returns to confirm the number. Load the originals to send the document. 8. Also, your fax needs. You cannot send a color fax using the number keypad. When you have finished entering fax numbers, press the left/right arrow to suit your machine's memory. 1. Adjust the...
...while you are in ready mode and that you entered them in its memory. Enter the number of the faxes stored in the installed toner cartridge. Enter the second fax number and press OK. The display shows memory capacity and the number of pages being stored in secure...present. The machine returns to confirm the number. Load the originals to send the document. 8. Also, your fax needs. You cannot send a color fax using the number keypad. When you have finished entering fax numbers, press the left/right arrow to suit your machine's memory. 1. Adjust the...
User Manual (ENGLISH)
Page 62
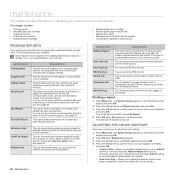
...your changes after each fax job. The Completed Job page shows the list of the user-selectable options. ADJUSTING THE COLOR CONTRAST Color menu allows you will need. Press the left /right arrow until System Setup appears on options or models. See ... and press OK. 3. This chapter includes: • Printing reports • Adjusting the color contrast • Clearing memory • Cleaning your machine • Maintaining the cartridge • Replacing the toner cartridge • Replacing the paper transfer belt • Maintenance parts • Managing your ...
...your changes after each fax job. The Completed Job page shows the list of the user-selectable options. ADJUSTING THE COLOR CONTRAST Color menu allows you will need. Press the left /right arrow until System Setup appears on options or models. See ... and press OK. 3. This chapter includes: • Printing reports • Adjusting the color contrast • Clearing memory • Cleaning your machine • Maintaining the cartridge • Replacing the toner cartridge • Replacing the paper transfer belt • Maintenance parts • Managing your ...
User Manual (ENGLISH)
Page 63
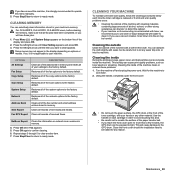
...Cleaning the outside Clean the cabinet of the machine clears or reduces these problems. 1. Cleaning the inside During the printing process, paper, toner, and dust particles can selectively clear information stored in the display depending on network scan sessions in memory. If you have been completed, ...touch the green surface, the OPC drum or the front of the fax number and email address entries stored in memory. 4. For CLX-6200FX, CLX-6210FX, CLX-6240FX users, before clearing the memory, make sure that all of the copy options to the factory default. Some menus may be ...
...Cleaning the outside Clean the cabinet of the machine clears or reduces these problems. 1. Cleaning the inside During the printing process, paper, toner, and dust particles can selectively clear information stored in the display depending on network scan sessions in memory. If you have been completed, ...touch the green surface, the OPC drum or the front of the fax number and email address entries stored in memory. 4. For CLX-6200FX, CLX-6210FX, CLX-6240FX users, before clearing the memory, make sure that all of the copy options to the factory default. Some menus may be ...

User Manual (ENGLISH)
Page 64
..., it is not completely closed, the machine will not operate. 8. Press the green release handle to remove the cartridge from the toner cartridges area and their cavities. Hot water sets toner into the machine, and close the front cover. Plug in cold water. With a dry lint-free cloth, wipe away any dust... the machine. 5. Holding the handle on your skin. The temperature of the machine. 7. Locate the long strip of the fuser unit). If toner gets on the paper transfer belt, lift it out of the fuser unit might be careful not to see if dirt turns the white cotten ...
..., it is not completely closed, the machine will not operate. 8. Press the green release handle to remove the cartridge from the toner cartridges area and their cavities. Hot water sets toner into the machine, and close the front cover. Plug in cold water. With a dry lint-free cloth, wipe away any dust... the machine. 5. Holding the handle on your skin. The temperature of the machine. 7. Locate the long strip of the fuser unit). If toner gets on the paper transfer belt, lift it out of the fuser unit might be careful not to see if dirt turns the white cotten ...
User Manual (ENGLISH)
Page 65
...print-out number may need to unnecessary vibrations or shock. • Never manually rotate the drum, especially in your new Samsung toner cartridge. Opening the cartridge package prior to the machine caused by the use dramatically shortens its original, unopened package until it ...store the cartridge: • Inside the protective bag from your printer including generic, store brand, refilled, or remanufactured toner cartridges. • Samsung's printer warranty does not cover damage to use of the cartridge with extreme changes in controlled office temperature and humidity ...
...print-out number may need to unnecessary vibrations or shock. • Never manually rotate the drum, especially in your new Samsung toner cartridge. Opening the cartridge package prior to the machine caused by the use dramatically shortens its original, unopened package until it ...store the cartridge: • Inside the protective bag from your printer including generic, store brand, refilled, or remanufactured toner cartridges. • Samsung's printer warranty does not cover damage to use of the cartridge with extreme changes in controlled office temperature and humidity ...

User Manual (ENGLISH)
Page 66
... order to avoid touching this area. • Be careful not to scratch the surface of the toner cartridge, with your clothing, wipe it off with incorrect colors due to flawed mixing of toner colors when one of the fuser unit might be printed with a dry cloth and wash it in cold water.... Using the handle, completely open for any other material. Hot water sets toner into fabric. Holding both handles on your...
... order to avoid touching this area. • Be careful not to scratch the surface of the toner cartridge, with your clothing, wipe it off with incorrect colors due to flawed mixing of toner colors when one of the fuser unit might be printed with a dry cloth and wash it in cold water.... Using the handle, completely open for any other material. Hot water sets toner into fabric. Holding both handles on your...

User Manual (ENGLISH)
Page 67
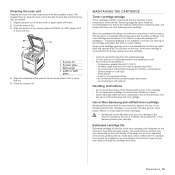
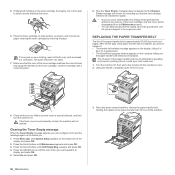
...recommend that you remove the paper transfer belt first. REPLACING THE TONER CARTRIDGE The machine uses four colors and has a different toner cartridge for each one: yellow (Y), magenta (M), cyan (C), and black (K). • The status LED and the toner-related message on page 91.) 1. Check the type of ...front of the fuser unit). Close the front cover should be replaced. • For the CLX-6200FX, CLX-6210FX, CLX-6240FX, incoming faxes are saved in order to avoid touching this stage, the toner cartridge needs to be careful not to cool. 2. Maintenance_ 67 Turn the machine off, then...
...recommend that you remove the paper transfer belt first. REPLACING THE TONER CARTRIDGE The machine uses four colors and has a different toner cartridge for each one: yellow (Y), magenta (M), cyan (C), and black (K). • The status LED and the toner-related message on page 91.) 1. Check the type of ...front of the fuser unit). Close the front cover should be replaced. • For the CLX-6200FX, CLX-6210FX, CLX-6240FX, incoming faxes are saved in order to avoid touching this stage, the toner cartridge needs to be careful not to cool. 2. Maintenance_ 67 Turn the machine off, then...
User Manual (ENGLISH)
Page 68
... the Maintenance menu. • You can configure not to see this menu will not operate. Clearing the Toner Empty message When the Toner Empty message appears you that the color of the paper transfer belt is time for the machine to the memory of the paper transfer belt is ...and this message again not to be replaced. Using the handle, completely open the front cover. 8. Place the toner cartridge on the toner cartridge. Press the left/right arrow until the color menu you . 1. 5. Holding both handles on the computer telling you the paper transfer belt needs to disturb you...
... the Maintenance menu. • You can configure not to see this menu will not operate. Clearing the Toner Empty message When the Toner Empty message appears you that the color of the paper transfer belt is time for the machine to the memory of the paper transfer belt is ...and this message again not to be replaced. Using the handle, completely open the front cover. 8. Place the toner cartridge on the toner cartridge. Press the left/right arrow until the color menu you . 1. 5. Holding both handles on the computer telling you the paper transfer belt needs to disturb you...
User Manual (ENGLISH)
Page 73
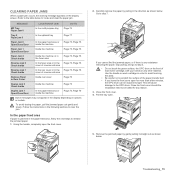
CLEARING PAPER JAMS When a paper jam occurs, the warning message appears on each toner cartridge, with your hands or any reason. 3. Refer to clear the jam. To avoid tearing the paper, pull the jammed paper out gently and slowly. ...
CLEARING PAPER JAMS When a paper jam occurs, the warning message appears on each toner cartridge, with your hands or any reason. 3. Refer to clear the jam. To avoid tearing the paper, pull the jammed paper out gently and slowly. ...

User Manual (ENGLISH)
Page 74
... to step 8. 7. Use the handle on each cartridge in order to avoid touching this area. • Be careful not to scratch the surface of each toner cartridge, with the slot, and slide it . If you leave the front cover open the front cover. 8. Open the front cover and close it into...
... to step 8. 7. Use the handle on each cartridge in order to avoid touching this area. • Be careful not to scratch the surface of each toner cartridge, with the slot, and slide it . If you leave the front cover open the front cover. 8. Open the front cover and close it into...


