Smart Hub Manual User Manual Ver.1.0 (English)
Page 3
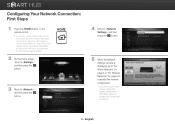
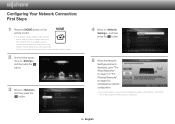
... , and then press the e button. 4 Move to , and then press the e button. English Configuring Your Network Connection: First Steps 1 Press the [HOME] button on the remote control. ※ If you configue your player and the other end to a router or modem. 2 On the Home screen, move to , and then press the...
... , and then press the e button. 4 Move to , and then press the e button. English Configuring Your Network Connection: First Steps 1 Press the [HOME] button on the remote control. ※ If you configue your player and the other end to a router or modem. 2 On the Home screen, move to , and then press the...
Smart Hub Manual User Manual Ver.1.0 (English)
Page 5
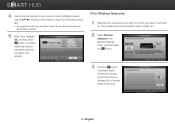
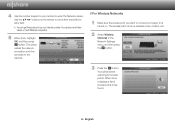
... most Windows computers. 5 When done, highlight OK, and then press e button. The access point can get these values on your remote to move from your player to is turned on the remote to enter the Network values. The player verifies the network connection and then connects to the network. ❙ For Wireless...
... most Windows computers. 5 When done, highlight OK, and then press e button. The access point can get these values on your remote to move from your player to is turned on the remote to enter the Network values. The player verifies the network connection and then connects to the network. ❙ For Wireless...
Smart Hub Manual User Manual Ver.1.0 (English)
Page 7
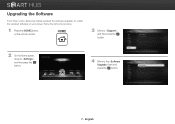
HOME 3 Move to , and then press the e button. 2 On the Home screen, move to , and then press the e button. 4 Move to time, Samsung makes updated the software available. English To install the updated software on your player, follow the instructions below. 1 Press the [HOME] button on the remote control. Upgrading the Software From time to the item and press the e button. 7 -
HOME 3 Move to , and then press the e button. 2 On the Home screen, move to , and then press the e button. 4 Move to time, Samsung makes updated the software available. English To install the updated software on your player, follow the instructions below. 1 Press the [HOME] button on the remote control. Upgrading the Software From time to the item and press the e button. 7 -
Smart Hub Manual User Manual Ver.1.0 (English)
Page 9
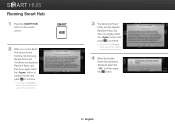
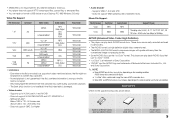
... the button, you will not be able to use the Smart Hub service. 3 The Samsung Privacy Policy window appears. Read the Terms, and then if you run the Smart Hub service for the first time..., the Samsung Service Terms and Conditions are displayed. SMART HUB 2 When you agree, select the button to receive...press the e button. 9 - Running Smart Hub 1 Press the [SMART HUB] button on the remote control. button and press e to continue. ※ If you select the button, you will not be able to continue. ...
... the button, you will not be able to use the Smart Hub service. 3 The Samsung Privacy Policy window appears. Read the Terms, and then if you run the Smart Hub service for the first time..., the Samsung Service Terms and Conditions are displayed. SMART HUB 2 When you agree, select the button to receive...press the e button. 9 - Running Smart Hub 1 Press the [SMART HUB] button on the remote control. button and press e to continue. ※ If you select the button, you will not be able to continue. ...
Smart Hub Manual User Manual Ver.1.0 (English)
Page 10
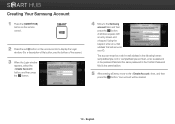
... with an entry screen and a keypad. Your account will serve as your ID. The account must be created. 10 - Creating Your Samsung Account 1 Press the [SMART HUB] button on the remote control to display the Login window. (For a description of the button, see the bottom of the screen.) 3 When the Login window....net. Using the keypad, enter an e-mail address that will be a valid e-mail address in the same fashion. 5 After entering all items, move to the Samsung account field, and then press the e button.
... with an entry screen and a keypad. Your account will serve as your ID. The account must be created. 10 - Creating Your Samsung Account 1 Press the [SMART HUB] button on the remote control to display the Login window. (For a description of the button, see the bottom of the screen.) 3 When the Login window....net. Using the keypad, enter an e-mail address that will be a valid e-mail address in the same fashion. 5 After entering all items, move to the Samsung account field, and then press the e button.
Smart Hub Manual User Manual Ver.1.0 (English)
Page 11
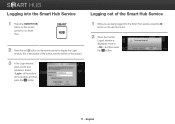
... Hub Service 1 While you are being logged into the Smart Hub Service 1 Press the [SMART HUB] button on the remote control to run Smart Hub. SMART HUB 2 Press the red a button on the remote control to display the Login window. (For a description of the button, see the bottom of the window, and... the bottom of the screen.) 3 In the Login window, enter your ID and password. Logging into the Smart Hub service, press the a button on the remote control. 2 When the Confirm Logout window is displayed, move to , and then press the e button. 11 -
... Hub Service 1 While you are being logged into the Smart Hub Service 1 Press the [SMART HUB] button on the remote control to run Smart Hub. SMART HUB 2 Press the red a button on the remote control to display the Login window. (For a description of the button, see the bottom of the window, and... the bottom of the screen.) 3 In the Login window, enter your ID and password. Logging into the Smart Hub service, press the a button on the remote control. 2 When the Confirm Logout window is displayed, move to , and then press the e button. 11 -
Smart Hub Manual User Manual Ver.1.0 (English)
Page 12
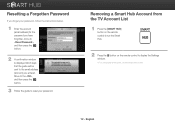
... be sent to the email address (account) you entered. Removing a Smart Hub Account from the TV Account List 1 Press the [SMART HUB] button on the remote control to run the Smart Hub. English Resetting a Forgotten Password If you forget your password. SMART HUB 2 Press the } button on the...
... be sent to the email address (account) you entered. Removing a Smart Hub Account from the TV Account List 1 Press the [SMART HUB] button on the remote control to run the Smart Hub. English Resetting a Forgotten Password If you forget your password. SMART HUB 2 Press the } button on the...
Smart Hub Manual User Manual Ver.1.0 (English)
Page 14
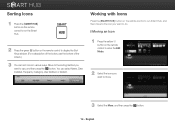
... to the sorting method you want to move to the icon you want to do. ❙ Moving an Icon 1 Press the yellow { button on the remote control to enter the Edit Mode. 2 Select the icons you want to run the Smart Hub. Working with Icons Press the [SMART HUB] button on... to run Smart Hub, and then move . 3 Select the Move, and then press the e button. 14 - Sorting Icons 1 Press the [SMART HUB] button on the remote control to display the Sort Keys window. (For a description of the button, see the bottom of the screen.) 3 You can select Name, Date Installed, Frequency...
... to the sorting method you want to move to the icon you want to do. ❙ Moving an Icon 1 Press the yellow { button on the remote control to enter the Edit Mode. 2 Select the icons you want to run the Smart Hub. Working with Icons Press the [SMART HUB] button on... to run Smart Hub, and then move . 3 Select the Move, and then press the e button. 14 - Sorting Icons 1 Press the [SMART HUB] button on the remote control to display the Sort Keys window. (For a description of the button, see the bottom of the screen.) 3 You can select Name, Date Installed, Frequency...

Smart Hub Manual User Manual Ver.1.0 (English)
Page 15
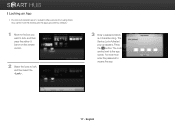
... corresponding folder icon are created. ❙ Inserting an Icon into a Folder 1 Move to the icon you want to move. 2 Press the yellow { button on the remote control to enter the Edit Mode, and then select . 2 Enter the name of the folders you can move the icon to create, and then press... the e button. English ❙ Create New Folder 1 Press the yellow { button on the remote control to enter the Edit Mode. 3 Select the icons to move to folder, and then select the . 4 A list of the folder you want , and then...
... corresponding folder icon are created. ❙ Inserting an Icon into a Folder 1 Move to the icon you want to move. 2 Press the yellow { button on the remote control to enter the Edit Mode, and then select . 2 Enter the name of the folders you can move the icon to create, and then press... the e button. English ❙ Create New Folder 1 Press the yellow { button on the remote control to enter the Edit Mode. 3 Select the icons to move to folder, and then select the . 4 A list of the folder you want , and then...

Smart Hub Manual User Manual Ver.1.0 (English)
Page 16
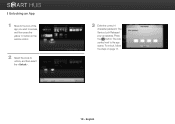
English ❙ Renaming a Folder 1 Move to the icon you want to rename, and then press the yellow { button on the remote control to enter the Edit Mode. 2 Move to the item using the arrow buttons, and then press the e button. 3 Enter the new name you want to apply to the selected folder, and then press the e button. The name of the selected folder is changed. 16 -
English ❙ Renaming a Folder 1 Move to the icon you want to rename, and then press the yellow { button on the remote control to enter the Edit Mode. 2 Move to the item using the arrow buttons, and then press the e button. 3 Enter the new name you want to apply to the selected folder, and then press the e button. The name of the selected folder is changed. 16 -
Smart Hub Manual User Manual Ver.1.0 (English)
Page 17
The Service Lock Activated pop-up appears. You now must enter the password to lock, and then select the . 3 Enter a password which is 4 characters long. ❙ Locking an App • You can lock specific apps to prevent other persons from using them. (You cannot lock the folders and the apps provided by default.) 1 Move to the icon you want to lock, and then press the yellow { button on the remote control. 2 Select the icons to access the app. 17 - The Lock symbol next to the app closes. Press the e button. English
The Service Lock Activated pop-up appears. You now must enter the password to lock, and then select the . 3 Enter a password which is 4 characters long. ❙ Locking an App • You can lock specific apps to prevent other persons from using them. (You cannot lock the folders and the apps provided by default.) 1 Move to the icon you want to lock, and then press the yellow { button on the remote control. 2 Select the icons to access the app. 17 - The Lock symbol next to the app closes. Press the e button. English
Smart Hub Manual User Manual Ver.1.0 (English)
Page 18
English The Service Lock Released pop-up appears. Press the e button. To re-lock, follow the steps on the remote control. 2 Select the icons to the app opens. ❙ Unlocking an App 1 Move to the icon of the app you want to access, and then press the yellow { button on page 17. 18 - The lock symbol next to unlock, and then select the . 3 Enter the correct 4 character password.
English The Service Lock Released pop-up appears. Press the e button. To re-lock, follow the steps on the remote control. 2 Select the icons to the app opens. ❙ Unlocking an App 1 Move to the icon of the app you want to access, and then press the yellow { button on page 17. 18 - The lock symbol next to unlock, and then select the . 3 Enter the correct 4 character password.
Smart Hub Manual User Manual Ver.1.0 (English)
Page 19
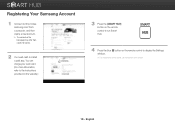
Registering Your Samsung Account 1 Connect to run Smart Hub. You can charge your cash card. (For more information, refer to the instructions provided on the website.) 3 Press the [SMART HUB] button on the remote control to display the Settings window. ※ For a description of the button, see the bottom of the ... may differ from a computer, and then create a new account. ✎ The contents of the screen. 19 - SMART HUB 4 Press the blue } button on the remote control to http://www. English samsung.com/ from country to country. 2 You need cash to install a paid app.
Registering Your Samsung Account 1 Connect to run Smart Hub. You can charge your cash card. (For more information, refer to the instructions provided on the website.) 3 Press the [SMART HUB] button on the remote control to display the Settings window. ※ For a description of the button, see the bottom of the ... may differ from a computer, and then create a new account. ✎ The contents of the screen. 19 - SMART HUB 4 Press the blue } button on the remote control to http://www. English samsung.com/ from country to country. 2 You need cash to install a paid app.

Smart Hub Manual User Manual Ver.1.0 (English)
Page 21
If you do not have an account, register an account by referring to the section in this manual that describes how to register a Samsung account. (refer to page 19~20.) 4 Move to the icon of the screen. 3 You must have a Samsung Apps account to install, and then press the e button. The App Details window showing the information on the remote control to run the Smart Hub. SMART HUB 2 Run "Samsung Apps" located at the middle left of the app you want to install a paid app. English Using Samsung Apps 1 Press the [SMART HUB] button on the selected app is displayed. 21 -
If you do not have an account, register an account by referring to the section in this manual that describes how to register a Samsung account. (refer to page 19~20.) 4 Move to the icon of the screen. 3 You must have a Samsung Apps account to install, and then press the e button. The App Details window showing the information on the remote control to run the Smart Hub. SMART HUB 2 Run "Samsung Apps" located at the middle left of the app you want to install a paid app. English Using Samsung Apps 1 Press the [SMART HUB] button on the selected app is displayed. 21 -
Allshare Guide User Manual Ver.1.0 (English)
Page 4
... the LAN port on the back of a LAN cable to , and then HUB press the s button. 5 When the Network Settings window is turned on the remote control. Configuring Your Network Connection: First Steps 1 Press the [HOME] button on . English The access point can be a wireless router, modem, etc. HOME ※※...
... the LAN port on the back of a LAN cable to , and then HUB press the s button. 5 When the Network Settings window is turned on the remote control. Configuring Your Network Connection: First Steps 1 Press the [HOME] button on . English The access point can be a wireless router, modem, etc. HOME ※※...
Allshare Guide User Manual Ver.1.0 (English)
Page 6
... a wireless router, modem, etc. 2 Select Wireless (General) in the Network Settings menu, and then press the s button. 3 Press the s button. Use the buttons on your remote to enter the Network values. Your player starts scanning for access points. English 4 Use the number keypad on the...
... a wireless router, modem, etc. 2 Select Wireless (General) in the Network Settings menu, and then press the s button. 3 Press the s button. Use the buttons on your remote to enter the Network values. Your player starts scanning for access points. English 4 Use the number keypad on the...
Allshare Guide User Manual Ver.1.0 (English)
Page 11
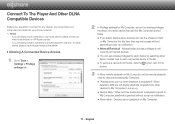
...to My Computer in the list. ●● To remove a device from the list, click the button next to the device. 3 In Allow remote playback on My Computer. 11 - If you are able to connect to any device, you must have your computer connected to your network administrator or...on My Computer the first time they request access without a pop-up . ●● Always allow : Devices cannot playback on My Computer, set the remote playback rules for My Computer, set up the sharing privileges that each connected device in a pop-up notification. ●● Never allow : When another ...
...to My Computer in the list. ●● To remove a device from the list, click the button next to the device. 3 In Allow remote playback on My Computer. 11 - If you are able to connect to any device, you must have your computer connected to your network administrator or...on My Computer the first time they request access without a pop-up . ●● Always allow : Devices cannot playback on My Computer, set the remote playback rules for My Computer, set up the sharing privileges that each connected device in a pop-up notification. ●● Never allow : When another ...
User Manual Ver.1.0 (English)
Page 3
... fallen into the same wall socket. Then, insert the disc, and try to play 4 Accessories 5 Front Panel 6 Rear Panel 6 Remote Control 6 Connections A. Using the product as when the power-supply cord or plug is may occur on a disc, clean it to ... place to qualified service personnel. If you must be reproduced or copied without the prior written permission of the wall socket. Copyright © 2012 Samsung Electronics Co.,Ltd. Contents Safety Information Warning 2 Precautions 2 Disc Storage & Management 3 Handling Cautions 3 Copyright 3 Getting Started Before using the User...
... fallen into the same wall socket. Then, insert the disc, and try to play 4 Accessories 5 Front Panel 6 Rear Panel 6 Remote Control 6 Connections A. Using the product as when the power-supply cord or plug is may occur on a disc, clean it to ... place to qualified service personnel. If you must be reproduced or copied without the prior written permission of the wall socket. Copyright © 2012 Samsung Electronics Co.,Ltd. Contents Safety Information Warning 2 Precautions 2 Disc Storage & Management 3 Handling Cautions 3 Copyright 3 Getting Started Before using the User...
User Manual Ver.1.0 (English)
Page 5
... , depending on the video resolution and frame rate condition. Does not support GMC 2 or higher Check for Remote Control (AAA Size) (BN43-00004A) User Manual (AK68-02273A) Remote Control (AK59-00146A) 5 Does not support WMA sampling rate of Sony Corporation. • "AVCHD" and the... discs may stutter during sound/video playback. -- Batteries for the supplied accessories shown below. Accessories •• Video decoder -- • SAMSUNG is not responsible for any data file damage or data loss. • Your player does not support NTFS compressed files, sparse files, or...
... , depending on the video resolution and frame rate condition. Does not support GMC 2 or higher Check for Remote Control (AAA Size) (BN43-00004A) User Manual (AK68-02273A) Remote Control (AK59-00146A) 5 Does not support WMA sampling rate of Sony Corporation. • "AVCHD" and the... discs may stutter during sound/video playback. -- Batteries for the supplied accessories shown below. Accessories •• Video decoder -- • SAMSUNG is not responsible for any data file damage or data loss. • Your player does not support NTFS compressed files, sparse files, or...
User Manual Ver.1.0 (English)
Page 6
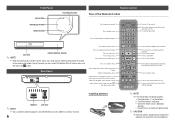
... to play the movie, you to local environmental regulations. Front Panel STOP BUTTON OPEN/CLOSE BUTTON POWER BUTTON PLAY/PAUSE BUTTON Remote Control Tour of the Remote Control Turn the player on and off . Press to enter the disc menu. Turn the TV on and off . Rear... Panel Use to eject a disc. These buttons are drained. • Check if the remote sensor is any fluorescent lighting nearby. !! Press to use Pandora. Press to search a disc backwards or forwards. Press to display the playback information...
... to play the movie, you to local environmental regulations. Front Panel STOP BUTTON OPEN/CLOSE BUTTON POWER BUTTON PLAY/PAUSE BUTTON Remote Control Tour of the Remote Control Turn the player on and off . Press to enter the disc menu. Turn the TV on and off . Rear... Panel Use to eject a disc. These buttons are drained. • Check if the remote sensor is any fluorescent lighting nearby. !! Press to use Pandora. Press to search a disc backwards or forwards. Press to display the playback information...


