Smart Hub Manual User Manual Ver.1.0 (English)
Page 3
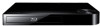
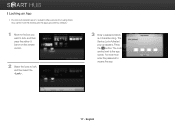
... is turned on the back of a LAN cable to the LAN port on . Configuring Your Network Connection: First Steps 1 Press the [HOME] button on the remote control. ※ If you have a wired network, connect one end of your player and the other end to a router or modem. 2 On the Home screen, move...
... is turned on the back of a LAN cable to the LAN port on . Configuring Your Network Connection: First Steps 1 Press the [HOME] button on the remote control. ※ If you have a wired network, connect one end of your player and the other end to a router or modem. 2 On the Home screen, move...
Smart Hub Manual User Manual Ver.1.0 (English)
Page 7
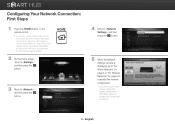
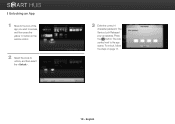
HOME 3 Move to , and then press the e button. 2 On the Home screen, move to , and then press the e button. 4 Move to time, Samsung makes updated the software available. English To install the updated software on your player, follow the instructions below. 1 Press the [HOME] button on the remote control. Upgrading the Software From time to the item and press the e button. 7 -
HOME 3 Move to , and then press the e button. 2 On the Home screen, move to , and then press the e button. 4 Move to time, Samsung makes updated the software available. English To install the updated software on your player, follow the instructions below. 1 Press the [HOME] button on the remote control. Upgrading the Software From time to the item and press the e button. 7 -
Smart Hub Manual User Manual Ver.1.0 (English)
Page 9
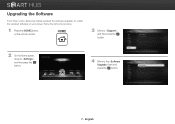
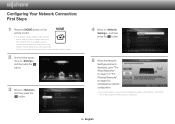
... window is displayed, select the and then press the e button. 9 - SMART HUB 2 When you agree, select the button to use the Smart Hub service. 3 The Samsung Privacy Policy window appears. Read the Policy, and then if you agree, select the button and press e to continue. ※ If you select the button..., you will not be able to continue. Read the Terms, and then if you run the Smart Hub service for the first time, the Samsung Service Terms and Conditions are displayed. Running Smart Hub 1 Press the [SMART HUB] button on the remote control. English
... window is displayed, select the and then press the e button. 9 - SMART HUB 2 When you agree, select the button to use the Smart Hub service. 3 The Samsung Privacy Policy window appears. Read the Policy, and then if you agree, select the button and press e to continue. ※ If you select the button..., you will not be able to continue. Read the Terms, and then if you run the Smart Hub service for the first time, the Samsung Service Terms and Conditions are displayed. Running Smart Hub 1 Press the [SMART HUB] button on the remote control. English
Smart Hub Manual User Manual Ver.1.0 (English)
Page 10
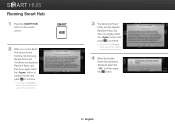
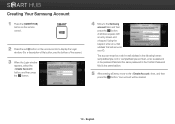
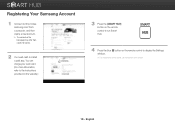
Creating Your Samsung Account 1 Press the [SMART HUB] button on the remote control to display the Login window. (For a description of the button, see the bottom of the screen.) 3 When the Login window appears, select the button, and ... keypad, enter an e-mail address that will be a valid e-mail address in the same fashion. 5 After entering all items, move to the Samsung account field, and then press the e button. Your account will serve as your ID. SMART HUB 2 Press the red a button on the remote control. The account must be created. 10 -
Creating Your Samsung Account 1 Press the [SMART HUB] button on the remote control to display the Login window. (For a description of the button, see the bottom of the screen.) 3 When the Login window appears, select the button, and ... keypad, enter an e-mail address that will be a valid e-mail address in the same fashion. 5 After entering all items, move to the Samsung account field, and then press the e button. Your account will serve as your ID. SMART HUB 2 Press the red a button on the remote control. The account must be created. 10 -
Smart Hub Manual User Manual Ver.1.0 (English)
Page 11
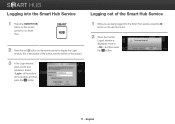
...Smart Hub Service 1 Press the [SMART HUB] button on the remote control. 2 When the Confirm Logout window is displayed, move to , and then press the e button. 11 - Logging into the Smart Hub service, press the a button on the remote control to run Smart Hub. SMART HUB 2 Press the red a ...button on the remote control to display the Login window. (For a description of the button, see the bottom of the window, and then ...
...Smart Hub Service 1 Press the [SMART HUB] button on the remote control. 2 When the Confirm Logout window is displayed, move to , and then press the e button. 11 - Logging into the Smart Hub service, press the a button on the remote control to run Smart Hub. SMART HUB 2 Press the red a ...button on the remote control to display the Login window. (For a description of the button, see the bottom of the window, and then ...
Smart Hub Manual User Manual Ver.1.0 (English)
Page 12
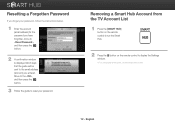
Removing a Smart Hub Account from the TV Account List 1 Press the [SMART HUB] button on the remote control to display the Settings window. ※ For a description of the button, see the bottom of the screen. 12 - English Move to the , and then press ... says that the guide will be sent to run the Smart Hub. Resetting a Forgotten Password If you entered. SMART HUB 2 Press the } button on the remote control to the email address (account) you forget your password.
Removing a Smart Hub Account from the TV Account List 1 Press the [SMART HUB] button on the remote control to display the Settings window. ※ For a description of the button, see the bottom of the screen. 12 - English Move to the , and then press ... says that the guide will be sent to run the Smart Hub. Resetting a Forgotten Password If you entered. SMART HUB 2 Press the } button on the remote control to the email address (account) you forget your password.
Smart Hub Manual User Manual Ver.1.0 (English)
Page 14
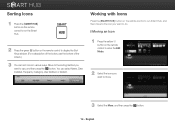
... run the Smart Hub. You can sort icons in various ways. Sorting Icons 1 Press the [SMART HUB] button on the remote control to display the Sort Keys window. (For a description of the button, see the bottom of the screen.) 3 You can select Name, Date Installed, Frequency, Category, ... want to run Smart Hub, and then move to the icon you want to do. ❙ Moving an Icon 1 Press the yellow { button on the remote control to enter the Edit Mode. 2 Select the icons you want to move. 3 Select the Move, and then press the e button. 14 - English SMART HUB 2 Press...
... run the Smart Hub. You can sort icons in various ways. Sorting Icons 1 Press the [SMART HUB] button on the remote control to display the Sort Keys window. (For a description of the button, see the bottom of the screen.) 3 You can select Name, Date Installed, Frequency, Category, ... want to run Smart Hub, and then move to the icon you want to do. ❙ Moving an Icon 1 Press the yellow { button on the remote control to enter the Edit Mode. 2 Select the icons you want to move. 3 Select the Move, and then press the e button. 14 - English SMART HUB 2 Press...

Smart Hub Manual User Manual Ver.1.0 (English)
Page 15
.... 15 - Move to the folder you want to move the icon to is displayed. English ❙ Create New Folder 1 Press the yellow { button on the remote control to enter the Edit Mode. 3 Select the icons to move to folder, and then select the . 4 A list of the folders you can move . 2 Press the... yellow { button on the remote control to enter the Edit Mode, and then select . 2 Enter the name of the folder you want to create, and then press the e button.
.... 15 - Move to the folder you want to move the icon to is displayed. English ❙ Create New Folder 1 Press the yellow { button on the remote control to enter the Edit Mode. 3 Select the icons to move to folder, and then select the . 4 A list of the folders you can move . 2 Press the... yellow { button on the remote control to enter the Edit Mode, and then select . 2 Enter the name of the folder you want to create, and then press the e button.

Smart Hub Manual User Manual Ver.1.0 (English)
Page 16
The name of the selected folder is changed. 16 - ❙ Renaming a Folder 1 Move to the icon you want to rename, and then press the yellow { button on the remote control to enter the Edit Mode. 2 Move to the item using the arrow buttons, and then press the e button. 3 Enter the new name you want to apply to the selected folder, and then press the e button. English
The name of the selected folder is changed. 16 - ❙ Renaming a Folder 1 Move to the icon you want to rename, and then press the yellow { button on the remote control to enter the Edit Mode. 2 Move to the item using the arrow buttons, and then press the e button. 3 Enter the new name you want to apply to the selected folder, and then press the e button. English
Smart Hub Manual User Manual Ver.1.0 (English)
Page 17
You now must enter the password to lock, and then select the . 3 Enter a password which is 4 characters long. The Service Lock Activated pop-up appears. ❙ Locking an App • You can lock specific apps to prevent other persons from using them. (You cannot lock the folders and the apps provided by default.) 1 Move to the icon you want to lock, and then press the yellow { button on the remote control. 2 Select the icons to access the app. 17 - Press the e button. The Lock symbol next to the app closes. English
You now must enter the password to lock, and then select the . 3 Enter a password which is 4 characters long. The Service Lock Activated pop-up appears. ❙ Locking an App • You can lock specific apps to prevent other persons from using them. (You cannot lock the folders and the apps provided by default.) 1 Move to the icon you want to lock, and then press the yellow { button on the remote control. 2 Select the icons to access the app. 17 - Press the e button. The Lock symbol next to the app closes. English
Smart Hub Manual User Manual Ver.1.0 (English)
Page 18
To re-lock, follow the steps on the remote control. 2 Select the icons to unlock, and then select the . 3 Enter the correct 4 character password. ❙ Unlocking an App 1 Move to the icon of the app you want to access, and then press the yellow { button on page 17. 18 - Press the e button. The lock symbol next to the app opens. English The Service Lock Released pop-up appears.
To re-lock, follow the steps on the remote control. 2 Select the icons to unlock, and then select the . 3 Enter the correct 4 character password. ❙ Unlocking an App 1 Move to the icon of the app you want to access, and then press the yellow { button on page 17. 18 - Press the e button. The lock symbol next to the app opens. English The Service Lock Released pop-up appears.
Smart Hub Manual User Manual Ver.1.0 (English)
Page 19
... Samsung Account 1 Connect to display the Settings window. ※ For a description of the button, see the bottom of the homepage may differ from a computer, and then create a new account. ✎ The contents of the screen. 19 - SMART HUB 4 Press the blue } button on the remote control to... install a paid app. You can charge your cash card. (For more information, refer to the instructions provided on the website.) 3 Press the [SMART HUB] button on the remote control to http://www.
... Samsung Account 1 Connect to display the Settings window. ※ For a description of the button, see the bottom of the homepage may differ from a computer, and then create a new account. ✎ The contents of the screen. 19 - SMART HUB 4 Press the blue } button on the remote control to... install a paid app. You can charge your cash card. (For more information, refer to the instructions provided on the website.) 3 Press the [SMART HUB] button on the remote control to http://www.

Smart Hub Manual User Manual Ver.1.0 (English)
Page 21
English The App Details window showing the information on the remote control to run the Smart Hub. Using Samsung Apps 1 Press the [SMART HUB] button on the selected app is displayed. 21 - If you want to install a paid app. SMART HUB 2 Run "Samsung Apps" located at the middle left of the app you do not have an account, register an account by referring to the section in this manual that describes how to register a Samsung account. (refer to page 19~20.) 4 Move to the icon of the screen. 3 You must have a Samsung Apps account to install, and then press the e button.
English The App Details window showing the information on the remote control to run the Smart Hub. Using Samsung Apps 1 Press the [SMART HUB] button on the selected app is displayed. 21 - If you want to install a paid app. SMART HUB 2 Run "Samsung Apps" located at the middle left of the app you do not have an account, register an account by referring to the section in this manual that describes how to register a Samsung account. (refer to page 19~20.) 4 Move to the icon of the screen. 3 You must have a Samsung Apps account to install, and then press the e button.
Allshare Guide User Manual Ver.1.0 (English)
Page 4
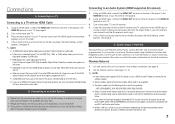
... the access point you want to connect your player to is displayed, go to "For Wired Networks" on page 5 or "For Wireless Networks" on the remote control. English The access point can be a wireless router, modem, etc. HOME ※※ If you have a wired network, connect one end of a LAN cable to...
... the access point you want to connect your player to is displayed, go to "For Wired Networks" on page 5 or "For Wireless Networks" on the remote control. English The access point can be a wireless router, modem, etc. HOME ※※ If you have a wired network, connect one end of a LAN cable to...
User Manual Ver.1.0 (English)
Page 3
... When a cart is damaged, liquid has been spilled or objects have fallen into the same wall socket. Avoid touching the surface of Samsung Electronics Co.,Ltd. Overloading a socket can play back again. • If the product makes an abnormal noise or produces a burning smell... the product. Do not stick paper or tape on a disc, clean it is may be sure to play 4 Accessories 5 Front Panel 6 Rear Panel 6 Remote Control 6 Connections A. Disc Storage & Management • Holding Discs -- Do not put objects filled with a soft cloth. -- Use only with the cart, stand...
... When a cart is damaged, liquid has been spilled or objects have fallen into the same wall socket. Avoid touching the surface of Samsung Electronics Co.,Ltd. Overloading a socket can play back again. • If the product makes an abnormal noise or produces a burning smell... the product. Do not stick paper or tape on a disc, clean it is may be sure to play 4 Accessories 5 Front Panel 6 Rear Panel 6 Remote Control 6 Connections A. Disc Storage & Management • Holding Discs -- Do not put objects filled with a soft cloth. -- Use only with the cart, stand...
User Manual Ver.1.0 (English)
Page 5
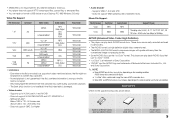
• SAMSUNG is not responsible for any data file damage or data loss. • Your player does not support NTFS compressed files, sparse files, or encrypted files. &#... Above 1280 x 720 : 30 frames max -- These discs are trademarks of 22050Hz mono. Does not support GMC 2 or higher Check for Remote Control (AAA Size) (BN43-00004A) User Manual (AK68-02273A) Remote Control (AK59-00146A) 5 The Seek (skip) function is not available if the file's index table is encoded by a supported codec mentioned above...
• SAMSUNG is not responsible for any data file damage or data loss. • Your player does not support NTFS compressed files, sparse files, or encrypted files. &#... Above 1280 x 720 : 30 frames max -- These discs are trademarks of 22050Hz mono. Does not support GMC 2 or higher Check for Remote Control (AAA Size) (BN43-00004A) User Manual (AK68-02273A) Remote Control (AK59-00146A) 5 The Seek (skip) function is not available if the file's index table is encoded by a supported codec mentioned above...
User Manual Ver.1.0 (English)
Page 6
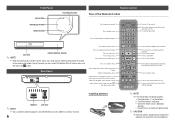
...them in the disc menu, and then press the v button. Front Panel STOP BUTTON OPEN/CLOSE BUTTON POWER BUTTON PLAY/PAUSE BUTTON Remote Control Tour of batteries according to local environmental regulations. Allows you must select Play Movie or Start in the household trash. Installing batteries ... lighting nearby. !! Press to eject a disc. Press to skip backwards or forwards. TV volume adjustment. ✎✎ NOTE DISC TRAY REMOTE CONTROL SENSOR `` When the player displays the Blu-ray Disc menu, you to use Tools menu. Return to use Pandora. Press to set the...
...them in the disc menu, and then press the v button. Front Panel STOP BUTTON OPEN/CLOSE BUTTON POWER BUTTON PLAY/PAUSE BUTTON Remote Control Tour of batteries according to local environmental regulations. Allows you must select Play Movie or Start in the household trash. Installing batteries ... lighting nearby. !! Press to eject a disc. Press to skip backwards or forwards. TV volume adjustment. ✎✎ NOTE DISC TRAY REMOTE CONTROL SENSOR `` When the player displays the Blu-ray Disc menu, you to use Tools menu. Return to use Pandora. Press to set the...
User Manual Ver.1.0 (English)
Page 7
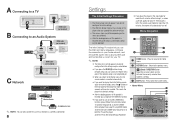
...: -- WEP (OPEN/SHARED), WPA-PSK (TKIP/AES), WPA2-PSK (TKIP/AES) `` Select a channel on your AV receiver. Press the input selector on your TV remote control until the HDMI signal from the player. Please refer to set the audio format according to the HDMI IN terminal of your wireless router to...your TV. Turn on the player and TV. 3. See page 8. Connecting to a Network This player lets you must use network based services, such as BD-LIVE, and download software upgrades when it will result in the HDMI 720p, 1080i, or 1080p output mode, you have turned on the AV receiver...
...: -- WEP (OPEN/SHARED), WPA-PSK (TKIP/AES), WPA2-PSK (TKIP/AES) `` Select a channel on your AV receiver. Press the input selector on your TV remote control until the HDMI signal from the player. Please refer to set the audio format according to the HDMI IN terminal of your wireless router to...your TV. Turn on the player and TV. 3. See page 8. Connecting to a Network This player lets you must use network based services, such as BD-LIVE, and download software upgrades when it will result in the HDMI 720p, 1080i, or 1080p output mode, you have turned on the AV receiver...
User Manual Ver.1.0 (English)
Page 8
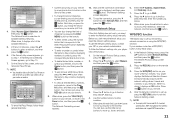
... display the Initial Setting screen again to make changes, press the @ button on the front panel of this product is finished, the panel buttons and remote control can access the Home menu even if the network setup is not completed yet. `` When you return to the Home menu, the full screen mode... Home screen will not appear if you do not configure the initial settings except as noted below . 1) Connect the player to an Anynet+(HDMICEC) compliant Samsung TV using HDMI Cable. 2) Set the Anynet+(HDMI-CEC) feature to On in both the TV and the player. 3) Set the TV to the Initial...
... display the Initial Setting screen again to make changes, press the @ button on the front panel of this product is finished, the panel buttons and remote control can access the Home menu even if the network setup is not completed yet. `` When you return to the Home menu, the full screen mode... Home screen will not appear if you do not configure the initial settings except as noted below . 1) Connect the player to an Anynet+(HDMICEC) compliant Samsung TV using HDMI Cable. 2) Set the Anynet+(HDMI-CEC) feature to On in both the TV and the player. 3) Set the TV to the Initial...
User Manual Ver.1.0 (English)
Page 11
... WEP encryption of the wireless router does not support WPS connections. 11 The Internet Protocol Setup screen appears. 2. Press the WPS(PBC) button on the remote control. 3. When done, press the YELLOW (C) button on the Security Key screen. • To change the kind of networks, press the ▲▼...the numbers as button to set up your network's Pass Phrase. ✎✎ NOTE `` You should be able to find the Pass Phrase on the remote. • To enter a letter, press the number button that corresponds to move to the Delete button, and then press the v button. •...
... WEP encryption of the wireless router does not support WPS connections. 11 The Internet Protocol Setup screen appears. 2. Press the WPS(PBC) button on the remote control. 3. When done, press the YELLOW (C) button on the Security Key screen. • To change the kind of networks, press the ▲▼...the numbers as button to set up your network's Pass Phrase. ✎✎ NOTE `` You should be able to find the Pass Phrase on the remote. • To enter a letter, press the number button that corresponds to move to the Delete button, and then press the v button. •...


