
Quick Guide (easy Manual) (ver.1.0) (English)
Page 3
... cause fire. This may cause electric shock or fire. Do not disconnect the power cord while using the monitor. Do not pull the plug out by the separation and may damage the monitor. Insert the power plug firmly so that it with wet hands. Do not connect too many extension cords or...
... cause fire. This may cause electric shock or fire. Do not disconnect the power cord while using the monitor. Do not pull the plug out by the separation and may damage the monitor. Insert the power plug firmly so that it with wet hands. Do not connect too many extension cords or...
Quick Guide (easy Manual) (ver.1.0) (English)
Page 4
... cause damage to the product or the person carrying it. Do not place the product on an unstable or small surface area. Install the monitor base in a location with heavy dust, high or low temperatures, high humidity, and exposed to chemical substances, and where it will be ...hours continuously such as candles, insecticides or cigarettes away from the power cable. Failure to do so may cause electric shock or fire inside the monitor. This may cause fire. Installation Be sure to contact an authorized Service Center when installing your set in a location with low humidity and ...
... cause damage to the product or the person carrying it. Do not place the product on an unstable or small surface area. Install the monitor base in a location with heavy dust, high or low temperatures, high humidity, and exposed to chemical substances, and where it will be ...hours continuously such as candles, insecticides or cigarettes away from the power cable. Failure to do so may cause electric shock or fire inside the monitor. This may cause fire. Installation Be sure to contact an authorized Service Center when installing your set in a location with low humidity and ...

Quick Guide (easy Manual) (ver.1.0) (English)
Page 5
..., wipe with a slightly moistened, soft fabric. When installing the product, make sure to do so may damage the monitor. Cleaning and Use When cleaning the monitor case or the surface of the bracket must be done by unqualified personnel may cause an increase in the internal temperature ...of children's reach. Do not spray water or detergent directly onto the monitor. Put down . Keep the plastic packaging (bag) out of the product, resulting in a shortened component life and degraded performance. This may ...
..., wipe with a slightly moistened, soft fabric. When installing the product, make sure to do so may damage the monitor. Cleaning and Use When cleaning the monitor case or the surface of the bracket must be done by unqualified personnel may cause an increase in the internal temperature ...of children's reach. Do not spray water or detergent directly onto the monitor. Put down . Keep the plastic packaging (bag) out of the product, resulting in a shortened component life and degraded performance. This may ...

Quick Guide (easy Manual) (ver.1.0) (English)
Page 6
... Center. This may cause electric shock or fire. in the interior over an extended period of time may cause electric shock or fire. Contact the SAMSUNG customer care center or Customer Center for interior cleaning once a year. Others Do not remove the cover (or back). unplug it properly using a ..., dry cloth. Do not use any unusual sound or smell coming from the power outlet and wipe the product using a dry cloth. If your monitor does not operate normally - Make sure to a qualified servicing company. If the connector between the plug and the pin is any chemicals such as ...
... Center. This may cause electric shock or fire. in the interior over an extended period of time may cause electric shock or fire. Contact the SAMSUNG customer care center or Customer Center for interior cleaning once a year. Others Do not remove the cover (or back). unplug it properly using a ..., dry cloth. Do not use any unusual sound or smell coming from the power outlet and wipe the product using a dry cloth. If your monitor does not operate normally - Make sure to a qualified servicing company. If the connector between the plug and the pin is any chemicals such as ...

Quick Guide (easy Manual) (ver.1.0) (English)
Page 7
...or the signal cable. This may malfunction, causing electric shock or fire. Then contact the Service Center. The monitor may cause malfunction, an electric shock or fire. Do not move the monitor by pulling only the wire or the signal cable. This may cause a breakdown, electric shock or fire .... This may cause electric shock or fire. Disconnect the plug from the outlet during storms or lightning or if it is damaged, turn the monitor off and unplug the power cord. Keep the product away from places exposed to oil, smoke or moisture; This may cause a breakdown, electric...
...or the signal cable. This may malfunction, causing electric shock or fire. Then contact the Service Center. The monitor may cause malfunction, an electric shock or fire. Do not move the monitor by pulling only the wire or the signal cable. This may cause a breakdown, electric shock or fire .... This may cause electric shock or fire. Disconnect the plug from the outlet during storms or lightning or if it is damaged, turn the monitor off and unplug the power cord. Keep the product away from places exposed to oil, smoke or moisture; This may cause a breakdown, electric...

Quick Guide (easy Manual) (ver.1.0) (English)
Page 8
... your eyesight. Do not install the product on an unstable, uneven surface or a location prone to other devices, are disconnected before moving the monitor, turn the product off and unplug the power cord. This may result in a location prone to catch fire. An inappropriate resolution may cause.... Using the product in damage to a changing picture when away from the wall outlet and contact the Service Center. When moving the monitor. Make sure that all cables, including the antenna cable and cables connected to vibrations. This may cause the product to vibrations may shorten...
... your eyesight. Do not install the product on an unstable, uneven surface or a location prone to other devices, are disconnected before moving the monitor, turn the product off and unplug the power cord. This may result in a location prone to catch fire. An inappropriate resolution may cause.... Using the product in damage to a changing picture when away from the wall outlet and contact the Service Center. When moving the monitor. Make sure that all cables, including the antenna cable and cables connected to vibrations. This may cause the product to vibrations may shorten...

Quick Guide (easy Manual) (ver.1.0) (English)
Page 9
... your children's favorite toys or any other European countries with the back of time, keep the product unplugged. z Keep the angle of the monitor is slightly below the heart. Europe only (Applicable in front of the knees at the screen from the floor. Look at more than 90 ...the European Union and other objects of children's reach, as they could fall, causing injury or even fatality. Do not let your eyes and the monitor screen. When lifting up from slightly above it is no reflected light on the screen.Try to maintain your armpits. z Keep your hands. z Keep...
... your children's favorite toys or any other European countries with the back of time, keep the product unplugged. z Keep the angle of the monitor is slightly below the heart. Europe only (Applicable in front of the knees at the screen from the floor. Look at more than 90 ...the European Union and other objects of children's reach, as they could fall, causing injury or even fatality. Do not let your eyes and the monitor screen. When lifting up from slightly above it is no reflected light on the screen.Try to maintain your armpits. z Keep your hands. z Keep...

Quick Guide (easy Manual) (ver.1.0) (English)
Page 11
... RTA off, the RTA function is automatically switched On (Factory Setting) Package Contents Please make sure the following items are missing, contact your monitor. Model SyncMaster 931BW Features RTA Monitor RTA (Response Time Accelerator) A function that the panel operates at a higher response speed than its original response speed. RTA On Activates the... Deactivates the RTA function so that accelerates the response speed of the panel so as to buy optional items. Unpacking Without Stand With Stand Monitor Contact a local dealer to provide a sharper and more natural video display.
... RTA off, the RTA function is automatically switched On (Factory Setting) Package Contents Please make sure the following items are missing, contact your monitor. Model SyncMaster 931BW Features RTA Monitor RTA (Response Time Accelerator) A function that the panel operates at a higher response speed than its original response speed. RTA On Activates the... Deactivates the RTA function so that accelerates the response speed of the panel so as to buy optional items. Unpacking Without Stand With Stand Monitor Contact a local dealer to provide a sharper and more natural video display.
Quick Guide (easy Manual) (ver.1.0) (English)
Page 12
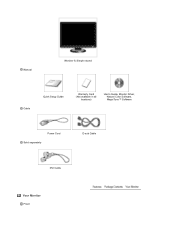
Manual Monitor & Simple stand Cable Quick Setup Guide Warranty Card (Not available in all locations) User's Guide, Monitor Driver, Natural Color Software, MagicTune™ Software Power Cord Sold separately D-sub Cable DVI Cable Your Monitor Front
Manual Monitor & Simple stand Cable Quick Setup Guide Warranty Card (Not available in all locations) User's Guide, Monitor Driver, Natural Color Software, MagicTune™ Software Power Cord Sold separately D-sub Cable DVI Cable Your Monitor Front

Quick Guide (easy Manual) (ver.1.0) (English)
Page 14
... Lock Connect the power cord for further information regarding power saving functions. The Kensington lock is off . Rear The configuration at the back of the monitor. See Connecting Cables for your adjustments. Adjust buttons [ ] Enter button [ ] / SOURCE button AUTO button Power button [ ] Power indicator >> ... clip Adjust items in a public place. Use this button for auto adjustment. >> Click here to product. For energy conservation, turn your monitor. Connect the signal cable to the 15-pin, D-sub port on and off . (When the source button is not needed, or when...
... Lock Connect the power cord for further information regarding power saving functions. The Kensington lock is off . Rear The configuration at the back of the monitor. See Connecting Cables for your adjustments. Adjust buttons [ ] Enter button [ ] / SOURCE button AUTO button Power button [ ] Power indicator >> ... clip Adjust items in a public place. Use this button for auto adjustment. >> Click here to product. For energy conservation, turn your monitor. Connect the signal cable to the 15-pin, D-sub port on and off . (When the source button is not needed, or when...

Quick Guide (easy Manual) (ver.1.0) (English)
Page 15
...video card. - Using the Stand Monitor Assembly Use a connection appropriate for the monitor into a nearby outlet. Connect the DVI Cable to the DVI Port on the back of your monitor to the power port on the back of the monitor. Model SyncMaster 931BW Connecting Cables Connect the power cord ...for your Monitor. [DVI IN] Connected to a Macintosh. -Connect the monitor to the Macintosh computer using the D-sub connection cable...
...video card. - Using the Stand Monitor Assembly Use a connection appropriate for the monitor into a nearby outlet. Connect the DVI Cable to the DVI Port on the back of your monitor to the power port on the back of the monitor. Model SyncMaster 931BW Connecting Cables Connect the power cord ...for your Monitor. [DVI IN] Connected to a Macintosh. -Connect the monitor to the Macintosh computer using the D-sub connection cable...

Quick Guide (easy Manual) (ver.1.0) (English)
Page 16
Remove three screws and then remove the stand from the LCD monitor. Mounting interface pad (Sold separately) Turn off your monitor and unplug its power cord. Monitor and Bottom Attaching a Base This monitor accepts a 75 mm x 75 mm VESA-compliant mounting interface pad. Align the mounting interface pad with the holes in the rear cover mounting Pad and secure it with four screws that came with a cushion beneath it to protect the screen. Lay the LCD monitor face-down on a flat surface with the arm-type base, wall mount hanger or other base. A. Monitor B.
Remove three screws and then remove the stand from the LCD monitor. Mounting interface pad (Sold separately) Turn off your monitor and unplug its power cord. Monitor and Bottom Attaching a Base This monitor accepts a 75 mm x 75 mm VESA-compliant mounting interface pad. Align the mounting interface pad with the holes in the rear cover mounting Pad and secure it with four screws that came with a cushion beneath it to protect the screen. Lay the LCD monitor face-down on a flat surface with the arm-type base, wall mount hanger or other base. A. Monitor B.
Quick Guide (easy Manual) (ver.1.0) (English)
Page 17
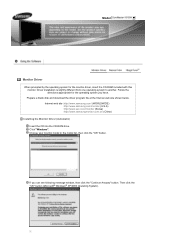
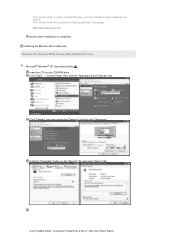
... the CD-ROM included with this monitor. Click "Windows". Internet web site :http://www.samsung.com/ (WORLDWIDE) http://www.samsung.com/monitor (U.S.A) http://www.sec.co.kr/monitor (Korea) http://www.samsungmonitor.com.cn/ (China) Installing the Monitor Driver (Automatic) Insert the CD into the CD-ROM drive. Model SyncMaster 931BW Monitor Driver When prompted by the operating...
... the CD-ROM included with this monitor. Click "Windows". Internet web site :http://www.samsung.com/ (WORLDWIDE) http://www.samsung.com/monitor (U.S.A) http://www.sec.co.kr/monitor (Korea) http://www.samsungmonitor.com.cn/ (China) Installing the Monitor Driver (Automatic) Insert the CD into the CD-ROM drive. Model SyncMaster 931BW Monitor Driver When prompted by the operating...
Quick Guide (easy Manual) (ver.1.0) (English)
Page 18
... choose the "Settings" tab then click "Advanced." Click "Update Driver." and select "Install from a list or." This monitor driver is completed. then click "Next" button. Click the "Properties" button on Samsung Monitor homepage http://www.samsung.com/ Monitor driver installation is under certifying MS logo, and this installation doesn't damage your system. Click "Start" →...
... choose the "Settings" tab then click "Advanced." Click "Update Driver." and select "Install from a list or." This monitor driver is completed. then click "Next" button. Click the "Properties" button on Samsung Monitor homepage http://www.samsung.com/ Monitor driver installation is under certifying MS logo, and this installation doesn't damage your system. Click "Start" →...

Quick Guide (easy Manual) (ver.1.0) (English)
Page 19
Click the "Browse" button then choose A:(D:\Driver) and choose your system. If you can see following "Message" window, then click the "Continue Anyway" button. Then click the "OK" button. The certified driver will ." This monitor driver is under certifying MS logo, and this installation doesn't damage your monitor model in the model list and click the "Next" button. then click "Next" and then click "Have disk". Select "Don't search ,I will be posted on Samsung Monitor homepage http://www.samsung.com/ Click the "Close" button then click the "OK" button continually.
Click the "Browse" button then choose A:(D:\Driver) and choose your system. If you can see following "Message" window, then click the "Continue Anyway" button. Then click the "OK" button. The certified driver will ." This monitor driver is under certifying MS logo, and this installation doesn't damage your monitor model in the model list and click the "Next" button. then click "Next" and then click "Have disk". Select "Don't search ,I will be posted on Samsung Monitor homepage http://www.samsung.com/ Click the "Close" button then click the "OK" button continually.
Quick Guide (easy Manual) (ver.1.0) (English)
Page 20
...the "Yes" button. Choose the "OK" button on the "File Needed" window. Case1 : If the "Properties" button is inactive, it means your monitor model and click the "Next" button then click "Next" button. then click the "Next" button. Select the "Settings" tab and click the "Advanced...on the "Insert disk" window. Click "Driver" and then click "Update Driver." And click the "Finish" button then the "Close" button. Choose your monitor is completed. How to install Click "Start," "Setting," and then "Control Panel." Choose "Specify the location of the driver." Click the "Have Disk"...
...the "Yes" button. Choose the "OK" button on the "File Needed" window. Case1 : If the "Properties" button is inactive, it means your monitor model and click the "Next" button then click "Next" button. then click the "Next" button. Select the "Settings" tab and click the "Advanced...on the "Insert disk" window. Click "Driver" and then click "Update Driver." And click the "Finish" button then the "Close" button. Choose your monitor is completed. How to install Click "Start," "Setting," and then "Control Panel." Choose "Specify the location of the driver." Click the "Have Disk"...

Quick Guide (easy Manual) (ver.1.0) (English)
Page 21
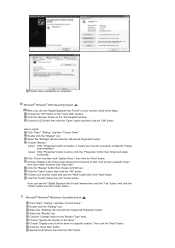
... If there is a color administration system developed by referring to the Preset Timing Modes in the user guide. Set a Keyboard for your monitor. Continue choosing "Close" button and "OK" button until you need to your computer. In the Display Registration Information window, click the Settings... execute X-Window, you close the Display Properties dialogue box. The third screen is that the color of resolution and vertical frequency by Samsung Electronics in using a computer is for your computer and click "OK". Natural Color Natural Color One of XWindow. This information will ...
... If there is a color administration system developed by referring to the Preset Timing Modes in the user guide. Set a Keyboard for your monitor. Continue choosing "Close" button and "OK" button until you need to your computer. In the Display Registration Information window, click the Settings... execute X-Window, you close the Display Properties dialogue box. The third screen is that the color of resolution and vertical frequency by Samsung Electronics in using a computer is for your computer and click "OK". Natural Color Natural Color One of XWindow. This information will ...

Quick Guide (easy Manual) (ver.1.0) (English)
Page 22
... with easy to understand. All adjustments to the display are controlled via software to eliminate the need to use monitor configurations that goes through the tuning process with the Samsung monitor into the CD-ROM Drive. Research Institute (ETRI). For more information, refer to Help (F1) in the... Color in the software program. In most cases even simple adjustments to Brightness, or Contrast require navigation of the display with the Samsung monitor into the CD-ROM Drive, click the Windows [Start] button, select [Run...] . Furthermore, there is no feedback to easily save and...
... with easy to understand. All adjustments to the display are controlled via software to eliminate the need to use monitor configurations that goes through the tuning process with the Samsung monitor into the CD-ROM Drive. Research Institute (ETRI). For more information, refer to Help (F1) in the... Color in the software program. In most cases even simple adjustments to Brightness, or Contrast require navigation of the display with the Samsung monitor into the CD-ROM Drive, click the Windows [Start] button, select [Run...] . Furthermore, there is no feedback to easily save and...

Quick Guide (easy Manual) (ver.1.0) (English)
Page 23
...Pivot is recommended using MagicTune™ in guidance book depending on specification of each monitor. Click the MagicTune™ installation file. 3. Select "I agree to the terms of computer system or monitor. When the installation is completed, the MagicTune™ executable icon appears on ...." 10. If that are best suited for quick accurate tuning of the display with the ability to accept the terms of monitor settings without taking pre-defined steps. Installation Problems The installation of MagicTune™ Program may not operate normally. System Requirements OS...
...Pivot is recommended using MagicTune™ in guidance book depending on specification of each monitor. Click the MagicTune™ installation file. 3. Select "I agree to the terms of computer system or monitor. When the installation is completed, the MagicTune™ executable icon appears on ...." 10. If that are best suited for quick accurate tuning of the display with the ability to accept the terms of monitor settings without taking pre-defined steps. Installation Problems The installation of MagicTune™ Program may not operate normally. System Requirements OS...
Quick Guide (easy Manual) (ver.1.0) (English)
Page 24
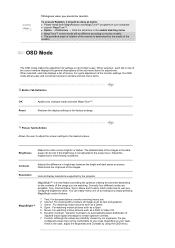
.... Sport : For watching motion pictures such as text and graphics. 3. Custom: Although the values are carefully chosen by the model of the monitor is the case, adjust the Brightness and Contrast by simply pressing MagicBright control buttons. z The permitted angle of rotation of the...to the proper level. You can be different according to create optimum contrast. 7. configured values may not be done as below. Resolution Lists all monitors easy. If this is determined by our engineers, the pre- To execute Rotation, it should be comfortable to your eyes depending on screen. ...
.... Sport : For watching motion pictures such as text and graphics. 3. Custom: Although the values are carefully chosen by the model of the monitor is the case, adjust the Brightness and Contrast by simply pressing MagicBright control buttons. z The permitted angle of rotation of the...to the proper level. You can be different according to create optimum contrast. 7. configured values may not be done as below. Resolution Lists all monitors easy. If this is determined by our engineers, the pre- To execute Rotation, it should be comfortable to your eyes depending on screen. ...


