
User Manual (user Manual) (ver.1.0) (English)
Page 2
Main Page Safety Instructions Notational Power Installation Cleaning Other Introduction Unpacking Front Rear Bottom Setup Connecting Your Monitor Installing the Monitor Driver Automatic Manual Base Installation On-Screen Display General Highlight Zone Highlight Zone II MouScreen™ Troubleshooting Check List Q & A Self-Test Feature Check Main > Index Specifications General Specifications Preset Timing Modes PowerSaver Information Service Terms Regulatory Natural Color MouScreen™ Authority
Main Page Safety Instructions Notational Power Installation Cleaning Other Introduction Unpacking Front Rear Bottom Setup Connecting Your Monitor Installing the Monitor Driver Automatic Manual Base Installation On-Screen Display General Highlight Zone Highlight Zone II MouScreen™ Troubleshooting Check List Q & A Self-Test Feature Check Main > Index Specifications General Specifications Preset Timing Modes PowerSaver Information Service Terms Regulatory Natural Color MouScreen™ Authority

User Manual (user Manual) (ver.1.0) (English)
Page 6
... damage (color change) or crack the monitor case. If the connector between the plug and the pin is dusty or dirty, clean it properly with a smooth cloth. z If a foreign substance gets into the monitor, disconnect the plug and then contact a service center. The antiglare/anti-static surface coating on the monitor. Use the recommended detergent with a dry cloth. Do not set a glass...
... damage (color change) or crack the monitor case. If the connector between the plug and the pin is dusty or dirty, clean it properly with a smooth cloth. z If a foreign substance gets into the monitor, disconnect the plug and then contact a service center. The antiglare/anti-static surface coating on the monitor. Use the recommended detergent with a dry cloth. Do not set a glass...

User Manual (user Manual) (ver.1.0) (English)
Page 7
... monitor right or left by pulling on the monitor. Do not use or store inflammable substances near the monitor. Do not move the monitor by pulling only the wire or the signal cable. For each hour of looking at the monitor, you should let your monitor ... the monitor openings. z Refer servicing to the cable. z This may cause an explosion or fire. z This will reduce eye fatigue. z This may cause a breakdown, electric shock or a fire due to damage to qualified service personnel. No user serviceable parts inside. Notational Power Installation Clean Other Do not remove cover(or back...
... monitor right or left by pulling on the monitor. Do not use or store inflammable substances near the monitor. Do not move the monitor by pulling only the wire or the signal cable. For each hour of looking at the monitor, you should let your monitor ... the monitor openings. z Refer servicing to the cable. z This may cause an explosion or fire. z This will reduce eye fatigue. z This may cause a breakdown, electric shock or a fire due to damage to qualified service personnel. No user serviceable parts inside. Notational Power Installation Clean Other Do not remove cover(or back...
User Manual (user Manual) (ver.1.0) (English)
Page 15
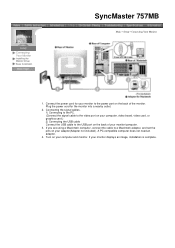
... video port on your computer, video board, video card, or graphics card.) 2) Connecting the USB cable Connect the USB cable to the power port on the back of your monitor to the USB port on the back of the monitor. A PC-compatible computer does not need an adapter. 4. If your computer and monitor. If you are using a Macintosh computer, connect the cable to a Macintosh adapter, and set the pins on your monitor displays an image, installation is complete. Connecting Your Monitor Installing the Monitor Driver Base Installation SyncMaster 757MB Main > Setup > Connecting Your Monitor...
... video port on your computer, video board, video card, or graphics card.) 2) Connecting the USB cable Connect the USB cable to the power port on the back of your monitor to the USB port on the back of the monitor. A PC-compatible computer does not need an adapter. 4. If your computer and monitor. If you are using a Macintosh computer, connect the cable to a Macintosh adapter, and set the pins on your monitor displays an image, installation is complete. Connecting Your Monitor Installing the Monitor Driver Base Installation SyncMaster 757MB Main > Setup > Connecting Your Monitor...
User Manual (user Manual) (ver.1.0) (English)
Page 16
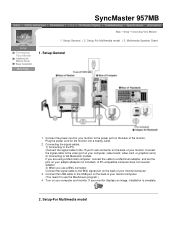
... adapter(Adapter not included). Turn on the back of the monitor. Setup-General | 2. Connect the power cord for the monitor into a nearby outlet. 2. Connect the signal cable to the video port on your computer, video board, video card, or graphics card.) 2) Connecting to old Macintosh models If you use the MouScreen program.) 4. Multimedia Speaker Stand Connecting Your Monitor Installing the Monitor Driver Base Installation 1. Setup-For Multimedia model Connect the USB cable to the USB port on the back of your monitor/computer. (You need an adapter. 3) When you are using...
... adapter(Adapter not included). Turn on the back of the monitor. Setup-General | 2. Connect the power cord for the monitor into a nearby outlet. 2. Connect the signal cable to the video port on your computer, video board, video card, or graphics card.) 2) Connecting to old Macintosh models If you use the MouScreen program.) 4. Multimedia Speaker Stand Connecting Your Monitor Installing the Monitor Driver Base Installation 1. Setup-For Multimedia model Connect the USB cable to the USB port on the back of your monitor/computer. (You need an adapter. 3) When you are using...

User Manual (user Manual) (ver.1.0) (English)
Page 17
... also cause sound distortion; On/Off Volume Turns On/Off and adjusts the output volume. Plug the DC power cord from the stand into a nearby outlet. 7. Turn on top of the monitor. 6. High sound volume may occur when the monitor is appropriate. 10. lower the volume. 3. Connect the end of the signal cable to the Mic By-pass jack on your computer's video port(video board, video card or graphics card). 3. Stereo Input Jack Connect a sound cable from the...
... also cause sound distortion; On/Off Volume Turns On/Off and adjusts the output volume. Plug the DC power cord from the stand into a nearby outlet. 7. Turn on top of the monitor. 6. High sound volume may occur when the monitor is appropriate. 10. lower the volume. 3. Connect the end of the signal cable to the Mic By-pass jack on your computer's video port(video board, video card or graphics card). 3. Stereo Input Jack Connect a sound cable from the...
User Manual (user Manual) (ver.1.0) (English)
Page 19
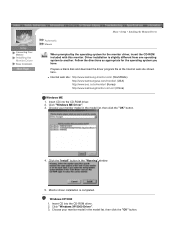
... "Install" button in the model list, then click the "OK" button. Windows XP/2000 1. Insert CD into the CD-ROM driver. 2. Insert CD into the CD-ROM driver. 2. Monitor driver installation is slightly different from one operating system to another. Prepare a blank disk and download the driver program file at the Internet web site shown here. Connecting Your Monitor Installing the Monitor Driver Base Installation Automatic Manual Main > Setup > Installing the Monitor Driver When...
... "Install" button in the model list, then click the "OK" button. Windows XP/2000 1. Insert CD into the CD-ROM driver. 2. Insert CD into the CD-ROM driver. 2. Monitor driver installation is slightly different from one operating system to another. Prepare a blank disk and download the driver program file at the Internet web site shown here. Connecting Your Monitor Installing the Monitor Driver Base Installation Automatic Manual Main > Setup > Installing the Monitor Driver When...

User Manual (user Manual) (ver.1.0) (English)
Page 21
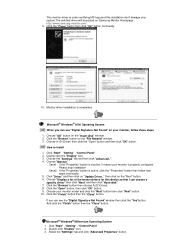
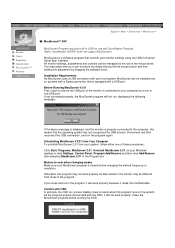
....samsungmonitor.com.cn/ (China) Microsoft® Windows® XP Operating System 1. Click "Display" icon and choose the "Settings" tab then click "Advanced..". 4. Driver installation is slightly different from one operating system to another. Click "Start" -> "Control Panel" then click the "Appearance and Themes" Icon. 3. Connecting Your Monitor Installing the Monitor Driver Base Installation Main > Setup > Installing the Monitor Driver Automatic Manual Windows XP | Windows 2000 | Windows Me | Windows NT | Linux When prompted by the...
....samsungmonitor.com.cn/ (China) Microsoft® Windows® XP Operating System 1. Click "Display" icon and choose the "Settings" tab then click "Advanced..". 4. Driver installation is slightly different from one operating system to another. Click "Start" -> "Control Panel" then click the "Appearance and Themes" Icon. 3. Connecting Your Monitor Installing the Monitor Driver Base Installation Main > Setup > Installing the Monitor Driver Automatic Manual Windows XP | Windows 2000 | Windows Me | Windows NT | Linux When prompted by the...
User Manual (user Manual) (ver.1.0) (English)
Page 22
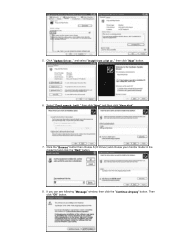
Click the "Browse" button then choose A:(D:\Driver) and choose your monitor model in the model list and click the "Next" button. 8. If you can see following "Message" window, then click the "Continue Anyway" button. 5. Then click "OK" button. Select "Don't search ,I will.." Click "Update Driver.." and select "Install from a list or.." then click "Next" button. 6. then click "Next" and then click "Have disk". 7.
Click the "Browse" button then choose A:(D:\Driver) and choose your monitor model in the model list and click the "Next" button. 8. If you can see following "Message" window, then click the "Continue Anyway" button. 5. Then click "OK" button. Select "Don't search ,I will.." Click "Update Driver.." and select "Install from a list or.." then click "Next" button. 6. then click "Next" and then click "Have disk". 7.
User Manual (user Manual) (ver.1.0) (English)
Page 23
... "Start" , "Setting" , "Control Panel". 2. Double click the "Display" Icon. 3. Case1: If the "Properties" button is inactive, it means your monitor is completed. then click on the "File Needed" window. 3. Choose "Display a list of the known drivers for this installation don't damage your system.The certified driver will be posted on "Update Driver.." Click "Driver" and then click on Samsung Monitor Homepage http://www.samsung-monitor.com/. 9. Choose A:(D:\Driver) then click the "Open" button...
... "Start" , "Setting" , "Control Panel". 2. Double click the "Display" Icon. 3. Case1: If the "Properties" button is inactive, it means your monitor is completed. then click on the "File Needed" window. 3. Choose "Display a list of the known drivers for this installation don't damage your system.The certified driver will be posted on "Update Driver.." Click "Driver" and then click on Samsung Monitor Homepage http://www.samsung-monitor.com/. 9. Choose A:(D:\Driver) then click the "Open" button...

User Manual (user Manual) (ver.1.0) (English)
Page 24
... X-Window, you see the screen working normally after clicking Test. Execute X-Window after executing the X86Config file. 2. Click the "Have Disk" button 9. Click Start, Settings, Control Panel, and then double-click Display icon. 2. First of colors and Vertical frequency) and then click OK. 4. This information will not affect the actual execution of the driver". 7. Specify A:\(D:\driver) then click "OK" button. 10. Click Apply button if you need to use (Resolution, Number...
... X-Window, you see the screen working normally after clicking Test. Execute X-Window after executing the X86Config file. 2. Click the "Have Disk" button 9. Click Start, Settings, Control Panel, and then double-click Display icon. 2. First of colors and Vertical frequency) and then click OK. 4. This information will not affect the actual execution of the driver". 7. Specify A:\(D:\driver) then click "OK" button. 10. Click Apply button if you need to use (Resolution, Number...

User Manual (user Manual) (ver.1.0) (English)
Page 54
... color changes, as desired. If the mouse is located on the screen. 1. Then, click the left bottom corner of the screen. The Trapezoid icon is dragged to change rapidly. Holding the mouse button down will cause the value to the right, the upper image area widens and the bottom part narrows. 2. OOnn--SSccrreeeenn DDiissppllaayy Geometry 2 User's Guide 45 Trapezoid This adjusts...
... color changes, as desired. If the mouse is located on the screen. 1. Then, click the left bottom corner of the screen. The Trapezoid icon is dragged to change rapidly. Holding the mouse button down will cause the value to the right, the upper image area widens and the bottom part narrows. 2. OOnn--SSccrreeeenn DDiissppllaayy Geometry 2 User's Guide 45 Trapezoid This adjusts...

User Manual (user Manual) (ver.1.0) (English)
Page 80
... screen. The screen image can remedy any magnetic products such as a power adapter, speaker or a high voltage wire near by pressing the Display (OSD) Menu to shake or vibrate if there is in this message when the signal from the video card exceeds the maximum resolution and frequency that the monitor can appear to low supply voltage. Is the power cord connected properly? Can you see if you do need...
... screen. The screen image can remedy any magnetic products such as a power adapter, speaker or a high voltage wire near by pressing the Display (OSD) Menu to shake or vibrate if there is in this message when the signal from the video card exceeds the maximum resolution and frequency that the monitor can appear to low supply voltage. Is the power cord connected properly? Can you see if you do need...
User Manual (user Manual) (ver.1.0) (English)
Page 81
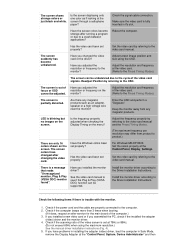
... applications? If you installed a new video card or if you installed the monitor driver? Have you have changed the video card or the driver? There is fully inserted in Safe Mode, remove the Display Adapter at the video card. (Refer to the computer. 2. Check if the power cord and the cable are only 16 colors shown on the menu? The screen shows strange colors or just black and white. Adjust the resolution and frequency at the "Control Panel, System, Device Administrator...
... applications? If you installed a new video card or if you installed the monitor driver? Have you have changed the video card or the driver? There is fully inserted in Safe Mode, remove the Display Adapter at the video card. (Refer to the computer. 2. Check if the power cord and the cable are only 16 colors shown on the menu? The screen shows strange colors or just black and white. Adjust the resolution and frequency at the "Control Panel, System, Device Administrator...
User Manual (user Manual) (ver.1.0) (English)
Page 83
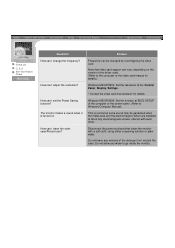
... screen saver. (Refer to go inside the monitor. Check List Q & A Self-Test Feature Check Question How can I clean the outer case/Picture tube? The monitor makes a sound when it is normal as some sound may be changed by reconfiguring the video card. Answer Frequency can vary, depending on . Windows ME/XP/2000: Set the function at the Control Panel, Display, Settings . * Contact the video card manufacturer for details.) Windows ME/XP/2000: Set the resolution...
... screen saver. (Refer to go inside the monitor. Check List Q & A Self-Test Feature Check Question How can I clean the outer case/Picture tube? The monitor makes a sound when it is normal as some sound may be changed by reconfiguring the video card. Answer Frequency can vary, depending on . Windows ME/XP/2000: Set the function at the Control Panel, Display, Settings . * Contact the video card manufacturer for details.) Windows ME/XP/2000: Set the resolution...

User Manual (user Manual) (ver.1.0) (English)
Page 84
... the monitor. then turn on both your video controller and computer system; Turn on . If there are any of the boxes to appear indicates a problem with the input signal, a message appears on the screen or the screen goes blank although the power indicator LED is still on the monitor. This box also appears during normal operation if the video cable becomes disconnected or damaged. 4. Unplug the video cable...
... the monitor. then turn on both your video controller and computer system; Turn on . If there are any of the boxes to appear indicates a problem with the input signal, a message appears on the screen or the screen goes blank although the power indicator LED is still on the monitor. This box also appears during normal operation if the video cable becomes disconnected or damaged. 4. Unplug the video cable...
User Manual (user Manual) (ver.1.0) (English)
Page 90
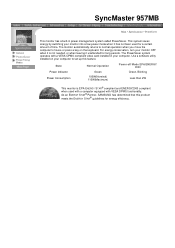
This system saves energy by switching your monitor into a low-power mode when it unattended for long periods. State Power Indicator Power Consumption Normal Operation Green 100W(Nominal) 110W(Maximum) Power-off Mode EPA/ENERGY 2000 Green, Blinking Less than 2W This monitor is not needed, or when leaving it has not been used with a computer equipped with a VESA DPMS compliant video card installed in power management system called PowerSaver. As...
This system saves energy by switching your monitor into a low-power mode when it unattended for long periods. State Power Indicator Power Consumption Normal Operation Green 100W(Nominal) 110W(Maximum) Power-off Mode EPA/ENERGY 2000 Green, Blinking Less than 2W This monitor is not needed, or when leaving it has not been used with a computer equipped with a VESA DPMS compliant video card installed in power management system called PowerSaver. As...

User Manual (user Manual) (ver.1.0) (English)
Page 96
... by using a vertical frequency over 70 Hz. Service Terms Regulatory Natural Color MouScreen™ Authority Dot Pitch The image on the screen. Example: If the resolution is 1024 X 768, this problem, there is regarded as bright and clear than that highlights the video-playing portion of red, green and blue dots. USB(Universal Serial Bus) USB is a function that controls the condition of 1024 horizontal dots (horizontal resolution) and 768 vertical lines (vertical resolution...
... by using a vertical frequency over 70 Hz. Service Terms Regulatory Natural Color MouScreen™ Authority Dot Pitch The image on the screen. Example: If the resolution is 1024 X 768, this problem, there is regarded as bright and clear than that highlights the video-playing portion of red, green and blue dots. USB(Universal Serial Bus) USB is a function that controls the condition of 1024 horizontal dots (horizontal resolution) and 768 vertical lines (vertical resolution...

User Manual (user Manual) (ver.1.0) (English)
Page 97
... Problems helpful. IC Compliance Notice This Class B digital apparatus meets all requirements of the Canadian Interference-Causing Equipment Regulations of the computer convenience outlet is a detachable power supply cord with the instructions, may find the booklet called How to radio communications. Main > Information > Regulatory Service Terms Regulatory Natural Color MouScreen™ Authority FCC Information User Instructions The Federal Communications Commission Radio Frequency...
... Problems helpful. IC Compliance Notice This Class B digital apparatus meets all requirements of the Canadian Interference-Causing Equipment Regulations of the computer convenience outlet is a detachable power supply cord with the instructions, may find the booklet called How to radio communications. Main > Information > Regulatory Service Terms Regulatory Natural Color MouScreen™ Authority FCC Information User Instructions The Federal Communications Commission Radio Frequency...
User Manual (user Manual) (ver.1.0) (English)
Page 104
Installation Requirements As MouScreen uses a USB connection with your host system, MouScreen can be managed by the use with SyncMaster Products. (Note: SyncMaster 1200NF does not support MouScreen.) MouScreen is a software program that is equipped with a USB port. As the program shares internal data with a Samsung monitor that controls your computer by dragging the selected icons. Service Terms Regulatory Natural Color MouScreen ™ Authority English > Main > Information > MouScreen...
Installation Requirements As MouScreen uses a USB connection with your host system, MouScreen can be managed by the use with SyncMaster Products. (Note: SyncMaster 1200NF does not support MouScreen.) MouScreen is a software program that is equipped with a USB port. As the program shares internal data with a Samsung monitor that controls your computer by dragging the selected icons. Service Terms Regulatory Natural Color MouScreen ™ Authority English > Main > Information > MouScreen...


