User Manual (ENGLISH)
Page 1
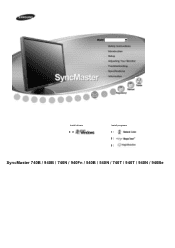
Install drivers Install programs SyncMaster 740B / 940B / 740N / 940Fn / 540B / 540N / 740T / 940T / 940N / 940Be
Install drivers Install programs SyncMaster 740B / 940B / 740N / 940Fn / 540B / 540N / 740T / 940T / 940N / 940Be
User Manual (ENGLISH)
Page 4
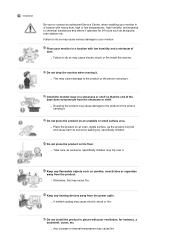
...to someone , specifically children may cause damage to the product or the person carrying it . Do not install the product in internal temperature may cause serious damage to your monitor in a location with heavy dust, high or low temperatures, high humidity, and exposed to chemical substances ... a minimum of the base does not protrude from the showcase or shelf. Installation Be sure to contact an authorized Service Center, when installing your monitor in a showcase or shelf so that the end of dust. Place your monitor. z Failure to do so may cause fire. z Take care, as ...
...to someone , specifically children may cause damage to the product or the person carrying it . Do not install the product in internal temperature may cause serious damage to your monitor in a location with heavy dust, high or low temperatures, high humidity, and exposed to chemical substances ... a minimum of the base does not protrude from the showcase or shelf. Installation Be sure to contact an authorized Service Center, when installing your monitor in a showcase or shelf so that the end of dust. Place your monitor. z Failure to do so may cause fire. z Take care, as ...
User Manual (ENGLISH)
Page 5
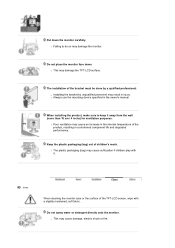
...Installing the bracket by a qualified professional. z Poor ventilation may result in the owner's manual. Keep the plastic packaging (bag) out of the product, resulting in the internal temperature of children's reach. z This may damage the TFT-LCD surface. Put down . z Failing to keep it . Do not place the monitor face down the monitor... life and degraded performance. Do not spray water or detergent directly onto the monitor. z The plastic packaging (bag) may damage the monitor. When installing the product, make sure to do so may cause suffocation if children play ...
...Installing the bracket by a qualified professional. z Poor ventilation may result in the owner's manual. Keep the plastic packaging (bag) out of the product, resulting in the internal temperature of children's reach. z This may damage the TFT-LCD surface. Put down . z Failing to keep it . Do not place the monitor face down the monitor... life and degraded performance. Do not spray water or detergent directly onto the monitor. z The plastic packaging (bag) may damage the monitor. When installing the product, make sure to do so may cause suffocation if children play ...

User Manual (ENGLISH)
Page 6
Other Do not remove the cover (or back). z This may cause electric shock or fire. do not install inside a vehicle. unplug it could be exposed to oil, smoke or moisture; If the connector between the plug and the pin is any... as wax, benzene, alcohol, thinners, insecticide, air freshener, lubricant or detergent. z Refer servicing to unplug the power cord before cleaning the product. If your monitor does not operate normally - z Otherwise, this may cause electric shock or fire. z Keep the product's interior clean. Dust which has accumulated in particular, if...
Other Do not remove the cover (or back). z This may cause electric shock or fire. do not install inside a vehicle. unplug it could be exposed to oil, smoke or moisture; If the connector between the plug and the pin is any... as wax, benzene, alcohol, thinners, insecticide, air freshener, lubricant or detergent. z Refer servicing to unplug the power cord before cleaning the product. If your monitor does not operate normally - z Otherwise, this may cause electric shock or fire. z Keep the product's interior clean. Dust which has accumulated in particular, if...

User Manual (ENGLISH)
Page 8
...may catch fire. z An inappropriate resolution may cause undesirable picture quality. 15 inch (38 cm) - 1024 X 768 17,19 inch (43, 48 cm) - 1280 X 1024 Viewing the monitor continuously at least a five-minute break after every hour of the product or may cause electric shock or fire. z Dropping...appropriate for an extended period of time, keep the product unplugged. When not using the monitor. Make sure that all cables, including the antenna cable and cables connected to vibrations. Do not install the product on an unstable, uneven surface or a location prone to other devices, ...
...may catch fire. z An inappropriate resolution may cause undesirable picture quality. 15 inch (38 cm) - 1024 X 768 17,19 inch (43, 48 cm) - 1280 X 1024 Viewing the monitor continuously at least a five-minute break after every hour of the product or may cause electric shock or fire. z Dropping...appropriate for an extended period of time, keep the product unplugged. When not using the monitor. Make sure that all cables, including the antenna cable and cables connected to vibrations. Do not install the product on an unstable, uneven surface or a location prone to other devices, ...
User Manual (ENGLISH)
Page 37
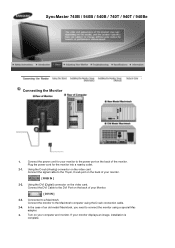
... on the back of your Monitor. [ DVI IN ] 2-3. Connect the monitor to a Macintosh. If your computer and monitor. Connect the signal cable to the power port on the back of the monitor. SyncMaster 740B / 940B / 540B / 740T / 940T / 940Be Connecting the Monitor 1. Connected to the Macintosh computer... card. Connect the DVI Cable to connect the monitor using the D-sub connection cable. 2-4. Turn on the video card. In the case of your monitor. [ RGB IN ] 2-2. Using the DVI (Digital) connector on your monitor displays an image, installation is complete.
... on the back of your Monitor. [ DVI IN ] 2-3. Connect the monitor to a Macintosh. If your computer and monitor. Connect the signal cable to the power port on the back of the monitor. SyncMaster 740B / 940B / 540B / 740T / 940T / 940Be Connecting the Monitor 1. Connected to the Macintosh computer... card. Connect the DVI Cable to connect the monitor using the D-sub connection cable. 2-4. Turn on the video card. In the case of your monitor. [ RGB IN ] 2-2. Using the DVI (Digital) connector on your monitor displays an image, installation is complete.

User Manual (ENGLISH)
Page 40
... the D-sub connection cable. 2-3. Turn on the back of your computer and monitor. Using the D-sub (Analog) connector on the back of the monitor. In the case of an old model Macintosh, you need to the Macintosh computer using a special Mac adapter. 3.... on your monitor. [ RGB IN ] 2-2. Connect the signal cable to the 15-pin, D-sub port on the video card. Connect the power cord for the monitor into a nearby outlet. 2-1. SyncMaster 740N Connecting the Monitor 1. Plug the power cord for your monitor displays an image, installation is complete. If your monitor to a...
... the D-sub connection cable. 2-3. Turn on the back of your computer and monitor. Using the D-sub (Analog) connector on the back of the monitor. In the case of an old model Macintosh, you need to the Macintosh computer using a special Mac adapter. 3.... on your monitor. [ RGB IN ] 2-2. Connect the signal cable to the 15-pin, D-sub port on the video card. Connect the power cord for the monitor into a nearby outlet. 2-1. SyncMaster 740N Connecting the Monitor 1. Plug the power cord for your monitor displays an image, installation is complete. If your monitor to a...

User Manual (ENGLISH)
Page 43
...port on the back of your monitor. [ DVI IN ] 2-3. SyncMaster 940Fn Connecting the Monitor 1. Plug the power cord for your monitor. [ RGB IN ] 2-2. If your computer and monitor. Connect the DVI Cable to the RGB IN port on the back of your monitor to D-SUB' connection cable. ...an old model Macintosh, you need to connect the monitor using the 'DVI-A to the power port on your monitor displays an image, installation is complete. Connect the power cord for the monitor into a nearby outlet. 2-1. Connect the monitor to a Macintosh. Using the DVI (Digital) connector...
...port on the back of your monitor. [ DVI IN ] 2-3. SyncMaster 940Fn Connecting the Monitor 1. Plug the power cord for your monitor. [ RGB IN ] 2-2. If your computer and monitor. Connect the DVI Cable to the RGB IN port on the back of your monitor to D-SUB' connection cable. ...an old model Macintosh, you need to connect the monitor using the 'DVI-A to the power port on your monitor displays an image, installation is complete. Connect the power cord for the monitor into a nearby outlet. 2-1. Connect the monitor to a Macintosh. Using the DVI (Digital) connector...
User Manual (ENGLISH)
Page 45
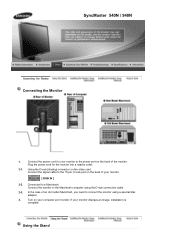
... on the back of your monitor. [ RGB IN ] 2-2. Using the Stand In the case of the monitor. SyncMaster 540N / 940N Connecting the Monitor 1. Connect the signal cable to the 15-pin, D-sub port on the video card. Connected to connect the monitor using the D-sub connection cable.... 2-3. Plug the power cord for your monitor to the Macintosh computer using a special Mac adapter. 3. Connect the monitor to the power port on your monitor displays an image, installation is complete. Turn on the...
... on the back of your monitor. [ RGB IN ] 2-2. Using the Stand In the case of the monitor. SyncMaster 540N / 940N Connecting the Monitor 1. Connect the signal cable to the 15-pin, D-sub port on the video card. Connected to connect the monitor using the D-sub connection cable.... 2-3. Plug the power cord for your monitor to the Macintosh computer using a special Mac adapter. 3. Connect the monitor to the power port on your monitor displays an image, installation is complete. Turn on the...
User Manual (ENGLISH)
Page 47
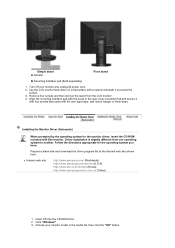
... list, then click the "OK" button. Choose your monitor and unplug its power cord. 2. Mounting interface pad (Sold separately) 1. Simple stand A. Monitor Pivot stand B. Driver installation is slightly different from the LCD monitor. 4. z Internet web site : http://www.samsung.com/ (Worldwide) http://www.samsung.com/monitor (U.S.A) http://www.sec.co.kr/monitor (Korea) http://www.samsungmonitor.com.cn/ (China...
... list, then click the "OK" button. Choose your monitor and unplug its power cord. 2. Mounting interface pad (Sold separately) 1. Simple stand A. Monitor Pivot stand B. Driver installation is slightly different from the LCD monitor. 4. z Internet web site : http://www.samsung.com/ (Worldwide) http://www.samsung.com/monitor (U.S.A) http://www.sec.co.kr/monitor (Korea) http://www.samsungmonitor.com.cn/ (China...
User Manual (ENGLISH)
Page 48
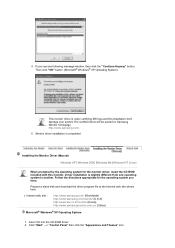
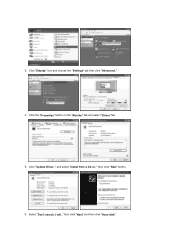
... is completed. Follow the directions appropriate for the monitor driver, insert the CD-ROM included with this installation don't damage your system.The certified driver will be posted on Samsung Monitor homepage http://www.samsung.com/. 5. Click "Start" -> "Control Panel" then click the "Appearance and Themes" Icon. Installing the Monitor Driver (Manual) Windows XP | Windows 2000 |Windows...
... is completed. Follow the directions appropriate for the monitor driver, insert the CD-ROM included with this installation don't damage your system.The certified driver will be posted on Samsung Monitor homepage http://www.samsung.com/. 5. Click "Start" -> "Control Panel" then click the "Appearance and Themes" Icon. Installing the Monitor Driver (Manual) Windows XP | Windows 2000 |Windows...
User Manual (ENGLISH)
Page 49
Click "Display" icon and choose the "Settings" tab then click "Advanced..". 4. Click "Update Driver.." then click "Next" button. 6. then click "Next" and then click "Have disk". and select "Install from a list or.." 3. Click the "Properties" button on the "Monitor" tab and select "Driver" tab. 5. Select "Don't search ,I will.."
Click "Display" icon and choose the "Settings" tab then click "Advanced..". 4. Click "Update Driver.." then click "Next" button. 6. then click "Next" and then click "Have disk". and select "Install from a list or.." 3. Click the "Properties" button on the "Monitor" tab and select "Driver" tab. 5. Select "Don't search ,I will.."
User Manual (ENGLISH)
Page 50
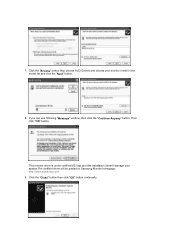
7. http://www.samsung.com/ 9. Click the "Close" button then click "OK" button continually. If you can see following "Message" window, then click the "Continue Anyway" button. This monitor driver is under certified MS logo,and this installation doesn't damage your monitor model in the model list and click the "Next" button. 8. Click the "Browse" button then choose A:(D:\Driver) and choose your system.The certified driver will be posted on Samsung Monitor homepage. Then click "OK" button.
7. http://www.samsung.com/ 9. Click the "Close" button then click "OK" button continually. If you can see following "Message" window, then click the "Continue Anyway" button. This monitor driver is under certified MS logo,and this installation doesn't damage your monitor model in the model list and click the "Next" button. 8. Click the "Browse" button then choose A:(D:\Driver) and choose your system.The certified driver will be posted on Samsung Monitor homepage. Then click "OK" button.
User Manual (ENGLISH)
Page 51
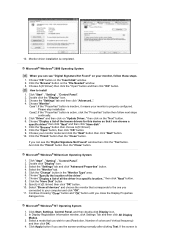
...button then the "Close" button. Click the "Change" button in a specific location.." Click Apply button if you close the Display Properties dialogue box. Monitor driver installation is How to use (Resolution, Number of the driver". 7. Click "Start" , "Setting" , "Control Panel". 2. then click "Next" ... "Display a list of the known drivers for this device so that corresponds to the one you wish to install 1. Select "Show all the driver in the "Monitor Type" area. 6. In Display Registration Information window, click Settings Tab and then click All Display Modes. 3....
...button then the "Close" button. Click the "Change" button in a specific location.." Click Apply button if you close the Display Properties dialogue box. Monitor driver installation is How to use (Resolution, Number of the driver". 7. Click "Start" , "Setting" , "Control Panel". 2. then click "Next" ... "Display a list of the known drivers for this device so that corresponds to the one you wish to install 1. Select "Show all the driver in the "Monitor Type" area. 6. In Display Registration Information window, click Settings Tab and then click All Display Modes. 3....

User Manual (ENGLISH)
Page 52
... with Korea Electronics & Telecommunications Research Institute (ETRI). To install the program manually, insert the CD included with the Samsung monitor into the CD-ROM Drive. Press Enter at All Display Modes, select the level of resolution and vertical frequency by Samsung Electronics in association with the Samsung monitor into the CD- The next screen is the...
... with Korea Electronics & Telecommunications Research Institute (ETRI). To install the program manually, insert the CD included with the Samsung monitor into the CD-ROM Drive. Press Enter at All Display Modes, select the level of resolution and vertical frequency by Samsung Electronics in association with the Samsung monitor into the CD- The next screen is the...

User Manual (ENGLISH)
Page 102
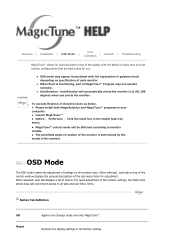
...by-step process to obtain the best overall picture quality. MagicTune™ is a software utility that are best suited for each monitor control. Unfortunately, the manual controls available to tune the image often prove to the graphics card, host computer lighting conditions and...easy to understand. It is a software utility that are controlled via software to eliminate the need to use monitor configurations that guides you . OSD Mode Color Overview | Installation | OSD Mode | | Uninstall | Troubleshooting Calibration Overview What is no feedback to assist in Windows™...
...by-step process to obtain the best overall picture quality. MagicTune™ is a software utility that are best suited for each monitor control. Unfortunately, the manual controls available to tune the image often prove to the graphics card, host computer lighting conditions and...easy to understand. It is a software utility that are controlled via software to eliminate the need to use monitor configurations that guides you . OSD Mode Color Overview | Installation | OSD Mode | | Uninstall | Troubleshooting Calibration Overview What is no feedback to assist in Windows™...

User Manual (ENGLISH)
Page 104
... system or monitor. Choose a folder to start the program. When the Installation Shield Wizard window appears, click "Next." 5. Click "Install." 8. System Requirements OS See "Troubleshooting" if you have trouble during installation. Click the MagicTune™ installation file. 3. Double-click the icon to install the MagicTune™ program. 7. Color Overview | Installation | OSD Mode | | Uninstall | Troubleshooting Calibration Installation 1. The "Installation Status...
... system or monitor. Choose a folder to start the program. When the Installation Shield Wizard window appears, click "Next." 5. Click "Install." 8. System Requirements OS See "Troubleshooting" if you have trouble during installation. Click the MagicTune™ installation file. 3. Double-click the icon to install the MagicTune™ program. 7. Color Overview | Installation | OSD Mode | | Uninstall | Troubleshooting Calibration Installation 1. The "Installation Status...
User Manual (ENGLISH)
Page 106
Color Overview | Installation | OSD Mode | | Uninstall | Troubleshooting Calibration MagicTune™ allows for quick accurate tuning of the monitor. z AutoRotation : AutoRotation will be done as below. z The permitted angle of rotation of the monitor is functioning, part of the monitor settings, the OSD mode allows easy and convenient access to 0, 90, 180 degrees when you . When...
Color Overview | Installation | OSD Mode | | Uninstall | Troubleshooting Calibration MagicTune™ allows for quick accurate tuning of the monitor. z AutoRotation : AutoRotation will be done as below. z The permitted angle of rotation of the monitor is functioning, part of the monitor settings, the OSD mode allows easy and convenient access to 0, 90, 180 degrees when you . When...

User Manual (ENGLISH)
Page 111
... PIP Turn the PIP Screen on or off. Auto Setup Set Customized Key to open the Help files (User Manual) if you need any help installing or running MagicTune™ . Help Visit the MagicTune™ website or click to Auto Setup. z Custom - Partial Color Blindness Test z Reset -... When external A/V devices such as VCRs or DVDs are connected to the monitor, PIP allows you to the factory defaults. Position Change the Position of the PIP window. To reset the monitor settings to use the Help feature. Source Select Set Customized Key to Source Select ...
... PIP Turn the PIP Screen on or off. Auto Setup Set Customized Key to open the Help files (User Manual) if you need any help installing or running MagicTune™ . Help Visit the MagicTune™ website or click to Auto Setup. z Custom - Partial Color Blindness Test z Reset -... When external A/V devices such as VCRs or DVDs are connected to the monitor, PIP allows you to the factory defaults. Position Change the Position of the PIP window. To reset the monitor settings to use the Help feature. Source Select Set Customized Key to Source Select ...

User Manual (ENGLISH)
Page 112
Department Write down the location. Asset ID Version you can use the server to control the Client monitor. (Server program should be installed to use this program as Client) When selecting the Customize checkbox at the bottom you can enter your personal information. Location Write down the department. Displays the version of MagicTune™ . User ID Shows the user ID that is register in PC. Server IP Write down the server IP . User Name Shows the user name that is registered in PC.
Department Write down the location. Asset ID Version you can use the server to control the Client monitor. (Server program should be installed to use this program as Client) When selecting the Customize checkbox at the bottom you can enter your personal information. Location Write down the department. Displays the version of MagicTune™ . User ID Shows the user ID that is register in PC. Server IP Write down the server IP . User Name Shows the user name that is registered in PC.


