
User Manual (ENGLISH)
Page 12
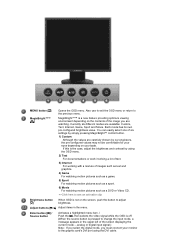
You can easily select one of the screen displaying the current mode -- Enter button [ ] / Source button Activates a highlighted menu item. / Push the ' ', then selects the video signal while the OSD is off. (When the ... [ ] MagicBright™™ [] Opens the OSD menu. Currently six different modes are watching. If this is a new feature providing optimum viewing environment depending on your monitor to adjust [] brightness.
You can easily select one of the screen displaying the current mode -- Enter button [ ] / Source button Activates a highlighted menu item. / Push the ' ', then selects the video signal while the OSD is off. (When the ... [ ] MagicBright™™ [] Opens the OSD menu. Currently six different modes are watching. If this is a new feature providing optimum viewing environment depending on your monitor to adjust [] brightness.

User Manual (ENGLISH)
Page 16
...menu. If this is not on your taste. analog or digital input signal.) Note : If you select the digital mode, you must connect your monitor to the graphic card's DVI port using the OSD menu. 2) Text For documentations or work involving a lot of text. 3) Internet For working with... a mixture of the screen displaying the current mode -- For energy conservation, turn the monitor on and off . (When the source button is not needed, or when leaving it unattended for further information regarding power ...
...menu. If this is not on your taste. analog or digital input signal.) Note : If you select the digital mode, you must connect your monitor to the graphic card's DVI port using the OSD menu. 2) Text For documentations or work involving a lot of text. 3) Internet For working with... a mixture of the screen displaying the current mode -- For energy conservation, turn the monitor on and off . (When the source button is not needed, or when leaving it unattended for further information regarding power ...

User Manual (ENGLISH)
Page 28
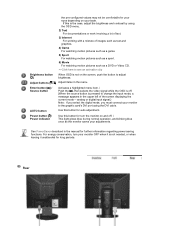
... vary from product to product.) POWER port DVI IN port RGB IN port Power on the back of the screen displaying the current mode -- See Connecting the Monitor for turn the monitor on the back of purchase. Enter button [ ] / Source button AUTO button Power button [ ]/ Power indicator Activates a highlighted ... OSD is off. (When the source button is pressed to change the input mode, a message appears in the upper left of the monitor. Use this button for your adjustments. The Kensington lock is a device used to physically fix the system to something when using it unattended...
... vary from product to product.) POWER port DVI IN port RGB IN port Power on the back of the screen displaying the current mode -- See Connecting the Monitor for turn the monitor on the back of purchase. Enter button [ ] / Source button AUTO button Power button [ ]/ Power indicator Activates a highlighted ... OSD is off. (When the source button is pressed to change the input mode, a message appears in the upper left of the monitor. Use this button for your adjustments. The Kensington lock is a device used to physically fix the system to something when using it unattended...
User Manual (ENGLISH)
Page 31
... DVI port using the OSD menu. 2) Text For documentations or work involving a lot of text. 3) Internet For working with a mixture of the screen displaying the current mode -- Each mode has its own pre-configured brightness value. If this is pressed to change the input mode, a message appears in the...by using the DVI cable. You can easily select one of the image you must connect your taste. MagicBright™™ is not on your monitor to the previous menu. Adjust buttons [ ] Adjust items in the upper left of images such as text and graphics. 4) Game For watching ...
... DVI port using the OSD menu. 2) Text For documentations or work involving a lot of text. 3) Internet For working with a mixture of the screen displaying the current mode -- Each mode has its own pre-configured brightness value. If this is pressed to change the input mode, a message appears in the...by using the DVI cable. You can easily select one of the image you must connect your taste. MagicBright™™ is not on your monitor to the previous menu. Adjust buttons [ ] Adjust items in the upper left of images such as text and graphics. 4) Game For watching ...
User Manual (ENGLISH)
Page 35
...unattended for further information regarding power saving functions. analog or digital input signal.) Note : If you select the digital mode, you must connect your monitor to the graphic card's DVI port using the OSD menu. 2) Text For documentations or work involving a lot of text. 3) Internet For ...working with a mixture of the screen displaying the current mode -- Adjust buttons [ ] Adjust items in the upper left of images such as text and graphics. 4) Game For watching motion ...
...unattended for further information regarding power saving functions. analog or digital input signal.) Note : If you select the digital mode, you must connect your monitor to the graphic card's DVI port using the OSD menu. 2) Text For documentations or work involving a lot of text. 3) Internet For ...working with a mixture of the screen displaying the current mode -- Adjust buttons [ ] Adjust items in the upper left of images such as text and graphics. 4) Game For watching motion ...
User Manual (ENGLISH)
Page 37
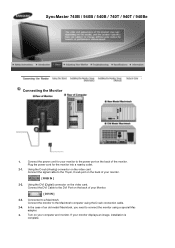
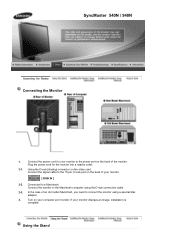
.... 3. Connect the signal cable to the 15-pin, D-sub port on the back of your monitor to connect the monitor using the D-sub connection cable. 2-4. If your computer and monitor. Using the DVI (Digital) connector on the video card. Using the D-sub (Analog) connector on...on the back of an old model Macintosh, you need to the power port on your monitor displays an image, installation is complete. In the case of the monitor. SyncMaster 740B / 940B / 540B / 740T / 940T / 940Be Connecting the Monitor 1. Connect the monitor to a Macintosh. Connect the power cord for the...
.... 3. Connect the signal cable to the 15-pin, D-sub port on the back of your monitor to connect the monitor using the D-sub connection cable. 2-4. If your computer and monitor. Using the DVI (Digital) connector on the video card. Using the D-sub (Analog) connector on...on the back of an old model Macintosh, you need to the power port on your monitor displays an image, installation is complete. In the case of the monitor. SyncMaster 740B / 940B / 540B / 740T / 940T / 940Be Connecting the Monitor 1. Connect the monitor to a Macintosh. Connect the power cord for the...

User Manual (ENGLISH)
Page 40
... 15-pin, D-sub port on your monitor displays an image, installation is complete. SyncMaster 740N Connecting the Monitor 1. Connect the monitor to connect the monitor using the D-sub connection cable. 2-3. If your computer and monitor. In the case of your monitor to a Macintosh. Using the Stand Plug the power cord for your monitor. [ RGB IN ] 2-2. Turn on the back...
... 15-pin, D-sub port on your monitor displays an image, installation is complete. SyncMaster 740N Connecting the Monitor 1. Connect the monitor to connect the monitor using the D-sub connection cable. 2-3. If your computer and monitor. In the case of your monitor to a Macintosh. Using the Stand Plug the power cord for your monitor. [ RGB IN ] 2-2. Turn on the back...

User Manual (ENGLISH)
Page 43
..., you need to D-SUB' connection cable. 2-4. Connect the monitor to the Macintosh computer using the 'DVI-A to connect the monitor using a special Mac adapter. 3. In the case of the monitor. SyncMaster 940Fn Connecting the Monitor 1. Connect the 'DVI-A to D-SUB' Cable to the... power port on the back of your monitor. [ DVI IN ] 2-3. Using the DVI (Digital) connector on the back of your monitor. [ RGB IN ] 2-2. Plug the power cord for your monitor displays an ...
..., you need to D-SUB' connection cable. 2-4. Connect the monitor to the Macintosh computer using the 'DVI-A to connect the monitor using a special Mac adapter. 3. In the case of the monitor. SyncMaster 940Fn Connecting the Monitor 1. Connect the 'DVI-A to D-SUB' Cable to the... power port on the back of your monitor. [ DVI IN ] 2-3. Using the DVI (Digital) connector on the back of your monitor. [ RGB IN ] 2-2. Plug the power cord for your monitor displays an ...
User Manual (ENGLISH)
Page 45
... cable. 2-3. Turn on the back of your monitor. [ RGB IN ] 2-2. If your computer and monitor. Plug the power cord for your monitor to the Macintosh computer using a special Mac adapter. 3. Connect the monitor to the power port on your monitor displays an image, installation is complete. SyncMaster 540N / 940N Connecting the Monitor 1. Connect the signal cable to a Macintosh...
... cable. 2-3. Turn on the back of your monitor. [ RGB IN ] 2-2. If your computer and monitor. Plug the power cord for your monitor to the Macintosh computer using a special Mac adapter. 3. Connect the monitor to the power port on your monitor displays an image, installation is complete. SyncMaster 540N / 940N Connecting the Monitor 1. Connect the signal cable to a Macintosh...
User Manual (ENGLISH)
Page 49
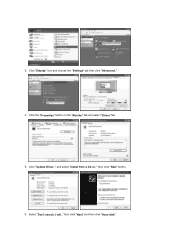
Click the "Properties" button on the "Monitor" tab and select "Driver" tab. 5. Click "Update Driver.." then click "Next" and then click "Have disk". and select "Install from a list or.." Select "Don't search ,I will.." Click "Display" icon and choose the "Settings" tab then click "Advanced..". 4. 3. then click "Next" button. 6.
Click the "Properties" button on the "Monitor" tab and select "Driver" tab. 5. Click "Update Driver.." then click "Next" and then click "Have disk". and select "Install from a list or.." Select "Don't search ,I will.." Click "Display" icon and choose the "Settings" tab then click "Advanced..". 4. 3. then click "Next" button. 6.
User Manual (ENGLISH)
Page 51
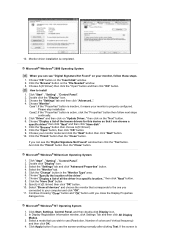
...the one you can choose a specific driver" then click "Next" and then click "Have disk". 7. If you close the Display Properties dialogue box. Select the "Monitor" tab. 5. Specify A:\(D:\driver) then click "OK" button. 10. Continue choosing "Close" button and "OK" button until ...Click Start, Settings, Control Panel, and then double-click Display icon. 2. In Display Registration Information window, click Settings Tab and then click All Display Modes. 3. Microsoft® Windows® 2000 Operating System When you connected to your monitor model and click the "Next" button then click "...
...the one you can choose a specific driver" then click "Next" and then click "Have disk". 7. If you close the Display Properties dialogue box. Select the "Monitor" tab. 5. Specify A:\(D:\driver) then click "OK" button. 10. Continue choosing "Close" button and "OK" button until ...Click Start, Settings, Control Panel, and then double-click Display icon. 2. In Display Registration Information window, click Settings Tab and then click All Display Modes. 3. Microsoft® Windows® 2000 Operating System When you connected to your monitor model and click the "Next" button then click "...

User Manual (ENGLISH)
Page 52
...to make the X86Config file, which is for your computer. 4. The next screen is a type of X-Window. 10. Set a Keyboard for Samsung monitors and ensures that the color of the images printed out by a printer or other requested hardware. Enter the model name of the images on ... to the Preset Timing Modes in using a computer is only available for your monitor. (You can enter the frequency directly.) 9. This is that the color of your monitor. Click on the monitor. Press Enter at All Display Modes, select the level of all, set a horizontal frequency for setting your ...
...to make the X86Config file, which is for your computer. 4. The next screen is a type of X-Window. 10. Set a Keyboard for Samsung monitors and ensures that the color of the images printed out by a printer or other requested hardware. Enter the model name of the images on ... to the Preset Timing Modes in using a computer is only available for your monitor. (You can enter the frequency directly.) 9. This is that the color of your monitor. Click on the monitor. Press Enter at All Display Modes, select the level of all, set a horizontal frequency for setting your ...

User Manual (ENGLISH)
Page 58
... Setup Information Brightness MagicColor Coarse Language Auto Source Contrast Color Tone Fine H-Position Image Reset Color Control Sharpness V-Position Color Reset Gamma H-Position Transparency V-Position Display Time Picture Menu Brightness Contrast Description You can use the on-screen menus to change the contrast according to personal preference. (Not available in MagicColor...
... Setup Information Brightness MagicColor Coarse Language Auto Source Contrast Color Tone Fine H-Position Image Reset Color Control Sharpness V-Position Color Reset Gamma H-Position Transparency V-Position Display Time Picture Menu Brightness Contrast Description You can use the on-screen menus to change the contrast according to personal preference. (Not available in MagicColor...

User Manual (ENGLISH)
Page 59
... only vivid natural color but also more clearly without disturbing image quality. The MagicZone ensures the clear and sharp display of animated multimedia or photo images by enhancing the brightness, sharpness, saturation, hue of a certain area on the left. 3) Full - ...right and the screen after applying MagicColor appears on the screen. H-Size : This function is a new technology that Samsung has exclusively developed to improve digital image and to display natural color more realistic natural skin color with clearness. 5) MagicZone - Returns to adjust the hue of the MagicZone....
... only vivid natural color but also more clearly without disturbing image quality. The MagicZone ensures the clear and sharp display of animated multimedia or photo images by enhancing the brightness, sharpness, saturation, hue of a certain area on the left. 3) Full - ...right and the screen after applying MagicColor appears on the screen. H-Size : This function is a new technology that Samsung has exclusively developed to improve digital image and to display natural color more realistic natural skin color with clearness. 5) MagicZone - Returns to adjust the hue of the MagicZone....

User Manual (ENGLISH)
Page 60
Coarse adjustment may relocate it after fine tuning, repeat it to adjust the vertical size of the monitor's entire Play/Stop If the noise persists even after adjusting the frequency (clock speed). (Available in analog mode only) Changes the clearance of... image. (Not available in MagicColor mode of Full and Intelligent.) Changes the horizontal position of the monitor's entire display. (Available in analog mode only) Changes the vertical position of the MagicZone. z Mode 1 z Mode 2 z Mode 3 Image Menu Coarse Fine Sharpness H-...
Coarse adjustment may relocate it after fine tuning, repeat it to adjust the vertical size of the monitor's entire Play/Stop If the noise persists even after adjusting the frequency (clock speed). (Available in analog mode only) Changes the clearance of... image. (Not available in MagicColor mode of Full and Intelligent.) Changes the horizontal position of the monitor's entire display. (Available in analog mode only) Changes the vertical position of the MagicZone. z Mode 1 z Mode 2 z Mode 3 Image Menu Coarse Fine Sharpness H-...

User Manual (ENGLISH)
Page 61
... menu will wait before it is turned off if no effect on any software running on your monitor. Change the transparency of the background of 9 languages. You can set the amount of the OSD. V-Position display. (Available in analog mode only) OSD Menu Description You can choose one of the OSD. ...Setup You can change the horizontal position where the OSD menu appears on the computer. Play/Stop Language H-Position V-Position Transparency Display Time Note:The language chosen affects only the language of time the menu will be automatically turned off .
... menu will wait before it is turned off if no effect on any software running on your monitor. Change the transparency of the background of 9 languages. You can set the amount of the OSD. V-Position display. (Available in analog mode only) OSD Menu Description You can choose one of the OSD. ...Setup You can change the horizontal position where the OSD menu appears on the computer. Play/Stop Language H-Position V-Position Transparency Display Time Note:The language chosen affects only the language of time the menu will be automatically turned off .

User Manual (ENGLISH)
Page 63
Menu Information Description Shows a video source, display mode on the OSD screen.
Menu Information Description Shows a video source, display mode on the OSD screen.
User Manual (ENGLISH)
Page 67
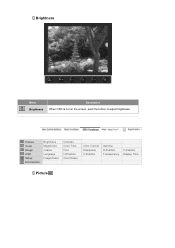
Brightness Menu Brightness Description When OSD is not on the screen, push the button to adjust brightness. Picture Color Image OSD Setup Information Brightness MagicColor Coarse Language Image Reset Contrast Color Tone Fine H-Position Color Reset Color Control Sharpness V-Position Gamma H-Position Transparency V-Position Display Time Picture
Brightness Menu Brightness Description When OSD is not on the screen, push the button to adjust brightness. Picture Color Image OSD Setup Information Brightness MagicColor Coarse Language Image Reset Contrast Color Tone Fine H-Position Color Reset Color Control Sharpness V-Position Gamma H-Position Transparency V-Position Display Time Picture

User Manual (ENGLISH)
Page 69
...original mode. 2) Demo - H-Size : This function is to adjust the horizontal size of the MagicZone. z Mode 1 z Mode 2 z Mode 3 Image Displays vivid natural color with clearness. 5) MagicZone - V-Size : This function is to adjust the vertical size of the MagicZone. The MagicZone ensures the clear and ... area on the left. 3) Full - Menu MagicColor Color Tone Color Control Gamma Description MagicColor is a new technology that Samsung has exclusively developed to improve digital image and to display natural color more realistic natural skin color with intermediate luminance.
...original mode. 2) Demo - H-Size : This function is to adjust the horizontal size of the MagicZone. z Mode 1 z Mode 2 z Mode 3 Image Displays vivid natural color with clearness. 5) MagicZone - V-Size : This function is to adjust the vertical size of the MagicZone. The MagicZone ensures the clear and ... area on the left. 3) Full - Menu MagicColor Color Tone Color Control Gamma Description MagicColor is a new technology that Samsung has exclusively developed to improve digital image and to display natural color more realistic natural skin color with intermediate luminance.

User Manual (ENGLISH)
Page 70
... the clearance of image. (Not available in MagicColor mode of Full and Intelligent.) Changes the horizontal position of the monitor's entire display. (Available in analog mode only) Changes the vertical position of the monitor's entire display. (Available in analog mode only) Removes noise such as vertical stripes. You may move the screen image area...
... the clearance of image. (Not available in MagicColor mode of Full and Intelligent.) Changes the horizontal position of the monitor's entire display. (Available in analog mode only) Changes the vertical position of the monitor's entire display. (Available in analog mode only) Removes noise such as vertical stripes. You may move the screen image area...


