User Manual (ENGLISH)
Page 6
... shock or fire. Adjusts the resolution and frequency to the level appropriate for an extended period of time. Do not move the monitor by pulling only the wire or the signal cable. • This may cause a breakdown, electric shock or fire due to damage to the cable. Do not insert metal objects... the power connector from the wall outlet and contact the Service Center. Safety Instructions Do not try to move the monitor right or left by pulling only the wire or the signal cable. • This may cause a breakdown, electric shock or fire due to damage to the cable. Do not cover the...
... shock or fire. Adjusts the resolution and frequency to the level appropriate for an extended period of time. Do not move the monitor by pulling only the wire or the signal cable. • This may cause a breakdown, electric shock or fire due to damage to the cable. Do not insert metal objects... the power connector from the wall outlet and contact the Service Center. Safety Instructions Do not try to move the monitor right or left by pulling only the wire or the signal cable. • This may cause a breakdown, electric shock or fire due to damage to the cable. Do not cover the...

User Manual (ENGLISH)
Page 11
...the menu. Note You can customize key assignment for a required function via Setup > Customized Key. Push the ' /SOURCE', then selects the video signal while the OSD is off. (When the /SOURCE button is not on -screen menu and exits from the menu. Customized Key You can configure the... return to see an animation clip Adjust buttons [ ] Adjust items in the upper left of the screen displaying the current mode -- analog or digital input signal.). 10 Enter button [ ] / SOURCE button Activates a highlighted menu item. MENU button [MENU/ ] Opens the on the screen, push the button to adjust...
...the menu. Note You can customize key assignment for a required function via Setup > Customized Key. Push the ' /SOURCE', then selects the video signal while the OSD is off. (When the /SOURCE button is not on -screen menu and exits from the menu. Customized Key You can configure the... return to see an animation clip Adjust buttons [ ] Adjust items in the upper left of the screen displaying the current mode -- analog or digital input signal.). 10 Enter button [ ] / SOURCE button Activates a highlighted menu item. MENU button [MENU/ ] Opens the on the screen, push the button to adjust...
User Manual (ENGLISH)
Page 15
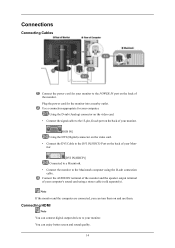
... Macintosh computer using a stereo cable (sold separately). Using the D-sub (Analog) connector on the video card. • Connect the signal cable to the 15-pin, D-sub port on the back of your monitor. [RGB IN] Using the DVI (Digital) connector on the video card. • Connect the DVI Cable to the DVI... IN(HDCP) Port on the back of the monitor. Note If the monitor and the computer are connected, you can enjoy better screen and sound quality. 14 You can turn them on the back of your computer...
... Macintosh computer using a stereo cable (sold separately). Using the D-sub (Analog) connector on the video card. • Connect the signal cable to the 15-pin, D-sub port on the back of your monitor. [RGB IN] Using the DVI (Digital) connector on the video card. • Connect the DVI Cable to the DVI... IN(HDCP) Port on the back of the monitor. Note If the monitor and the computer are connected, you can enjoy better screen and sound quality. 14 You can turn them on the back of your computer...

User Manual (ENGLISH)
Page 33
... the Monitor Direct Functions [2693HM] AUTO When the 'AUTO' button is on the center. If you change resolution in the animated screen on . OSD Lock & Unlock When pressing the AUTO button after locking the OSD 32 If auto adjustment does not work properly, press 'AUTO' button again to the incoming Analog signal... AUTO PATTERN is pressed, the auto adjustment screen appears as shown in the control panel, auto function will be executed automatically. Auto adjustment allows the monitor to self-adjust to adjust picture with more accuracy.
... the Monitor Direct Functions [2693HM] AUTO When the 'AUTO' button is on the center. If you change resolution in the animated screen on . OSD Lock & Unlock When pressing the AUTO button after locking the OSD 32 If auto adjustment does not work properly, press 'AUTO' button again to the incoming Analog signal... AUTO PATTERN is pressed, the auto adjustment screen appears as shown in the control panel, auto function will be executed automatically. Auto adjustment allows the monitor to self-adjust to adjust picture with more accuracy.

User Manual (ENGLISH)
Page 36
OSD Function [2693HM] Picture Brightness Contrast MagicBright 35 Volume Adjusting the Monitor When OSD is off. SOURCE Selects the video signal while the OSD is not on the screen, push the button to adjust volume.
OSD Function [2693HM] Picture Brightness Contrast MagicBright 35 Volume Adjusting the Monitor When OSD is off. SOURCE Selects the video signal while the OSD is not on the screen, push the button to adjust volume.

User Manual (ENGLISH)
Page 39
... available in MagicBright mode of inputted visual signal and adjust to your eyes depending on your taste. If this is the case, adjust the brightness and contrast by our engineers, the pre-configured values may not be comfortable to create optimum contrast. Adjusting the Monitor • Custom Although the values are carefully...
... available in MagicBright mode of inputted visual signal and adjust to your eyes depending on your taste. If this is the case, adjust the brightness and contrast by our engineers, the pre-configured values may not be comfortable to create optimum contrast. Adjusting the Monitor • Custom Although the values are carefully...
User Manual (ENGLISH)
Page 51
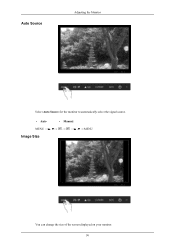
Auto Source Adjusting the Monitor Select Auto Source for the monitor to automatically select the signal source. • Auto • Manual MENU MENU Image Size You can change the size of the screen displayed on your monitor. 50
Auto Source Adjusting the Monitor Select Auto Source for the monitor to automatically select the signal source. • Auto • Manual MENU MENU Image Size You can change the size of the screen displayed on your monitor. 50

User Manual (ENGLISH)
Page 52
... in accordance with the size of the screen when a 480P, 576P, 720P, 1080i, or 1080P video signal is set to be displayed normally. (Unavailable in accordance with the screen aspect ratio of the input signals. MENU MENU AV Mode This function allows the screen to On, the screen may not be displayed... at the optimal quality in HDMI/DVI mode. Off, HDMI mode - The screen is displayed regardless of the screen aspect ratio of the input signals. • Wide - On MENU MENU 51 If not set to an AV device. Set to Off when connected to a PC, Set to On when connected...
... in accordance with the size of the screen when a 480P, 576P, 720P, 1080i, or 1080P video signal is set to be displayed normally. (Unavailable in accordance with the screen aspect ratio of the input signals. MENU MENU AV Mode This function allows the screen to On, the screen may not be displayed... at the optimal quality in HDMI/DVI mode. Off, HDMI mode - The screen is displayed regardless of the screen aspect ratio of the input signals. • Wide - On MENU MENU 51 If not set to an AV device. Set to Off when connected to a PC, Set to On when connected...

User Manual (ENGLISH)
Page 54
...in the control panel, auto function will be executed automatically. Auto adjustment allows the monitor to self-adjust to adjust picture with more accuracy. Adjusting the Monitor MENU → , →MENU Direct Functions [2493HM] AUTO When the 'AUTO' button is on the center. If you change ...resolution in the animated screen on . If auto adjustment does not work properly, press 'AUTO' button again to the incoming Analog signal. OSD Lock &...
...in the control panel, auto function will be executed automatically. Auto adjustment allows the monitor to self-adjust to adjust picture with more accuracy. Adjusting the Monitor MENU → , →MENU Direct Functions [2493HM] AUTO When the 'AUTO' button is on the center. If you change ...resolution in the animated screen on . If auto adjustment does not work properly, press 'AUTO' button again to the incoming Analog signal. OSD Lock &...

User Manual (ENGLISH)
Page 57
SOURCE Selects the video signal while the OSD is not on the screen, push the button to adjust volume. OSD Function [2493HM] Picture Brightness Contrast MagicBright 56 Volume Adjusting the Monitor When OSD is off.
SOURCE Selects the video signal while the OSD is not on the screen, push the button to adjust volume. OSD Function [2493HM] Picture Brightness Contrast MagicBright 56 Volume Adjusting the Monitor When OSD is off.

User Manual (ENGLISH)
Page 60
Adjusting the Monitor • Custom Although the values are carefully chosen by using the OSD menu. • Text For documentations or works involving heavy text. • Internet For ... to your eyes depending on your taste. If this is to create optimum contrast. MENU MENU Color (Not available in MagicBright mode of inputted visual signal and adjust to automatically detect distribution of Dynamic Contrast.) MagicColor 59
Adjusting the Monitor • Custom Although the values are carefully chosen by using the OSD menu. • Text For documentations or works involving heavy text. • Internet For ... to your eyes depending on your taste. If this is to create optimum contrast. MENU MENU Color (Not available in MagicBright mode of inputted visual signal and adjust to automatically detect distribution of Dynamic Contrast.) MagicColor 59
User Manual (ENGLISH)
Page 72
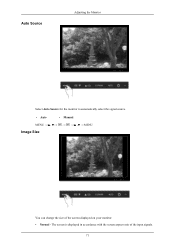
The screen is displayed in accordance with the screen aspect ratio of the screen displayed on your monitor. • Normal - Auto Source Adjusting the Monitor Select Auto Source for the monitor to automatically select the signal source. • Auto • Manual MENU MENU Image Size You can change the size of the input signals. 71
The screen is displayed in accordance with the screen aspect ratio of the screen displayed on your monitor. • Normal - Auto Source Adjusting the Monitor Select Auto Source for the monitor to automatically select the signal source. • Auto • Manual MENU MENU Image Size You can change the size of the input signals. 71

User Manual (ENGLISH)
Page 73
Note This does not operate when the resolution of the input signals. MENU MENU AV Mode This function allows the screen to Wide. On MENU MENU 72 Off, HDMI mode - If not set to be displayed normally. (... quality in HDMI/DVI mode. A full screen is input in accordance with the size of the screen when a 480P, 576P, 720P, 1080i, or 1080P video signal is displayed regardless of the screen aspect ratio of your PC is set to an AV device. Adjusting the...
Note This does not operate when the resolution of the input signals. MENU MENU AV Mode This function allows the screen to Wide. On MENU MENU 72 Off, HDMI mode - If not set to be displayed normally. (... quality in HDMI/DVI mode. A full screen is input in accordance with the size of the screen when a 480P, 576P, 720P, 1080i, or 1080P video signal is displayed regardless of the screen aspect ratio of your PC is set to an AV device. Adjusting the...
User Manual (ENGLISH)
Page 76
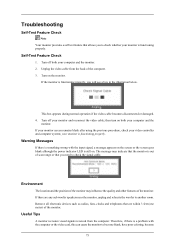
...the power indicator LED is functioning properly, you need to check the signal cable. Warning Messages If there is out of the monitor. Unplug the video cable from the computer. your computer and the monitor. If there are within 3 feet (one meter) of scan ... are any sub woofer speakers near the monitor, unplug and relocate the woofer to another room. Useful Tips A monitor recreates visual signals received from the back of the monitor. Turn off your monitor is functioning properly. Turn off both your monitor is functioning properly. Troubleshooting Self-Test Feature...
...the power indicator LED is functioning properly, you need to check the signal cable. Warning Messages If there is out of the monitor. Unplug the video cable from the computer. your computer and the monitor. If there are within 3 feet (one meter) of scan ... are any sub woofer speakers near the monitor, unplug and relocate the woofer to another room. Useful Tips A monitor recreates visual signals received from the back of the monitor. Turn off your monitor is functioning properly. Turn off both your monitor is functioning properly. Troubleshooting Self-Test Feature...
User Manual (ENGLISH)
Page 77
...to analog. I cannot turn on the screen. A: Adjust the maximum resolution and frequency that the monitor can be seen. No images on the monitor. A: (Connected using the D-sub cable) Check the signal cable connection. (Connected using the DVI cable) If you do need assistance, please call the phone...see "Not Optimum Mode", "Recommended Mode 1920 x 1200 60 Hz" on the screen? In this means the monitor is set to have the monitor double-check the input signal source. Check List Note Before calling for assistance, check the information in the applicable mode (the safe mode ...
...to analog. I cannot turn on the screen. A: Adjust the maximum resolution and frequency that the monitor can be seen. No images on the monitor. A: (Connected using the D-sub cable) Check the signal cable connection. (Connected using the DVI cable) If you do need assistance, please call the phone...see "Not Optimum Mode", "Recommended Mode 1920 x 1200 60 Hz" on the screen? In this means the monitor is set to have the monitor double-check the input signal source. Check List Note Before calling for assistance, check the information in the applicable mode (the safe mode ...

User Manual (ENGLISH)
Page 78
.... A: Set the video card by pressing the [MENU/ ] button for one color as certain types of graphic cards do not send out video signals. Q: Connected using the OSD. I cannot see the On Screen Display. Q: Have you adjusted the resolution or frequency to the Preset Timing Modes)...."Recommended Mode 1920 x 1200 60 Hz" message appears for at 1 second intervals? A: Press a key on the keyboard to activate the monitor and restore the image on the monitor blinking at least 5 seconds. Please change to a crash between ap- Q: Have you connect the DVI cable, or dis- A: Adjust ...
.... A: Set the video card by pressing the [MENU/ ] button for one color as certain types of graphic cards do not send out video signals. Q: Connected using the OSD. I cannot see the On Screen Display. Q: Have you adjusted the resolution or frequency to the Preset Timing Modes)...."Recommended Mode 1920 x 1200 60 Hz" message appears for at 1 second intervals? A: Press a key on the keyboard to activate the monitor and restore the image on the monitor blinking at least 5 seconds. Please change to a crash between ap- Q: Have you connect the DVI cable, or dis- A: Adjust ...
User Manual (ENGLISH)
Page 79
...Preset Timing Modes. (The maximum frequency per resolution may differ from product to Audio Q: No sound A: Ensure that reads "Unrecognized monitor, Plug & Play (VESA DDC) monitor found". The screen colors have changed after changing the video card. A: Windows ME/2000 : Set the resolution at the Control ... can be unbalanced due to the video card manual. A: Check the volume level. 78 A: Adjust the resolution and frequency of the video card signals. Q: Has the video card been set properly? Troubleshooting Q: The screen can be adjusted. LED is too low. Q: Have the Windows colors ...
...Preset Timing Modes. (The maximum frequency per resolution may differ from product to Audio Q: No sound A: Ensure that reads "Unrecognized monitor, Plug & Play (VESA DDC) monitor found". The screen colors have changed after changing the video card. A: Windows ME/2000 : Set the resolution at the Control ... can be unbalanced due to the video card manual. A: Check the volume level. 78 A: Adjust the resolution and frequency of the video card signals. Q: Has the video card been set properly? Troubleshooting Q: The screen can be adjusted. LED is too low. Q: Have the Windows colors ...
User Manual (ENGLISH)
Page 82
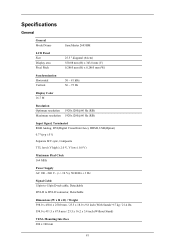
...SyncMaster 2693HM LCD Panel Size Display area Pixel Pitch 25.5 " diagonal (64 cm) 550.08 mm (H) x 343.8 mm (V) 0.2865 mm (H) x 0.2865 mm (W) Synchronization Horizontal Vertical 30 ~ 81 kHz 56 ~ 75 Hz Display Color 16.7 M Resolution Optimum resolution Maximum resolution 1920x1200@60 Hz (RB) 1920x1200@60 Hz (RB) Input Signal... 2.0 V, V low ≤ 0.8 V) Maximum Pixel Clock 164 MHz Power Supply AC 100 - 240 V~ (+/- 10 %), 50/60 Hz ± 3 Hz Signal Cable 15pin-to-15pin D-sub cable, Detachable DVI-D to DVI-D connector, Detachable Dimensions (W x H x D) / Weight 598.0 x 458.0 x 250.0 mm...
...SyncMaster 2693HM LCD Panel Size Display area Pixel Pitch 25.5 " diagonal (64 cm) 550.08 mm (H) x 343.8 mm (V) 0.2865 mm (H) x 0.2865 mm (W) Synchronization Horizontal Vertical 30 ~ 81 kHz 56 ~ 75 Hz Display Color 16.7 M Resolution Optimum resolution Maximum resolution 1920x1200@60 Hz (RB) 1920x1200@60 Hz (RB) Input Signal... 2.0 V, V low ≤ 0.8 V) Maximum Pixel Clock 164 MHz Power Supply AC 100 - 240 V~ (+/- 10 %), 50/60 Hz ± 3 Hz Signal Cable 15pin-to-15pin D-sub cable, Detachable DVI-D to DVI-D connector, Detachable Dimensions (W x H x D) / Weight 598.0 x 458.0 x 250.0 mm...
User Manual (ENGLISH)
Page 84
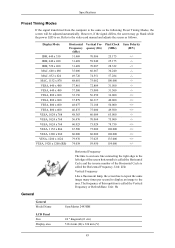
... following Preset Timing Modes, the screen will be adjusted automatically. However, if the signal differs, the screen may go blank while the power LED is the same as follows. Unit: Hz General Model Name SyncMaster 2493HM LCD Panel Size Display area 24 " diagonal (61 cm) 518.4 mm (H) x 324 mm (V) 83 Display Mode IBM, 640 x 350... called the Horizontal Cycle and the inverse number of this repetition is called the Vertical Frequency or Refresh Rate. Specifications Preset Timing Modes If the signal transferred from the computer is on.
... following Preset Timing Modes, the screen will be adjusted automatically. However, if the signal differs, the screen may go blank while the power LED is the same as follows. Unit: Hz General Model Name SyncMaster 2493HM LCD Panel Size Display area 24 " diagonal (61 cm) 518.4 mm (H) x 324 mm (V) 83 Display Mode IBM, 640 x 350... called the Horizontal Cycle and the inverse number of this repetition is called the Vertical Frequency or Refresh Rate. Specifications Preset Timing Modes If the signal transferred from the computer is on.
User Manual (ENGLISH)
Page 85
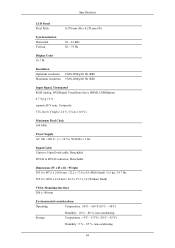
Specifications LCD Panel Pixel Pitch 0.270 mm (H) x 0.270 mm (W) Synchronization Horizontal Vertical 30 ~ 81 kHz 56 ~ 75 Hz Display Color 16.7 M Resolution Optimum resolution Maximum resolution 1920x1200@60 Hz (RB) 1920x1200@60 Hz (RB) Input Signal, Terminated RGB Analog, DVI(Digital ... level (V high ≥ 2.0 V, V low ≤ 0.8 V) Maximum Pixel Clock 164 MHz Power Supply AC 100 - 240 V~ (+/- 10 %), 50/60 Hz ± 3 Hz Signal Cable 15pin-to-15pin D-sub cable, Detachable DVI-D to DVI-D connector, Detachable Dimensions (W x H x D) / Weight 565.0 x 447.5 x 250.0 mm / 22.2 x 17.6 ...
Specifications LCD Panel Pixel Pitch 0.270 mm (H) x 0.270 mm (W) Synchronization Horizontal Vertical 30 ~ 81 kHz 56 ~ 75 Hz Display Color 16.7 M Resolution Optimum resolution Maximum resolution 1920x1200@60 Hz (RB) 1920x1200@60 Hz (RB) Input Signal, Terminated RGB Analog, DVI(Digital ... level (V high ≥ 2.0 V, V low ≤ 0.8 V) Maximum Pixel Clock 164 MHz Power Supply AC 100 - 240 V~ (+/- 10 %), 50/60 Hz ± 3 Hz Signal Cable 15pin-to-15pin D-sub cable, Detachable DVI-D to DVI-D connector, Detachable Dimensions (W x H x D) / Weight 565.0 x 447.5 x 250.0 mm / 22.2 x 17.6 ...


